
CQC3303U User Guide
Page 2
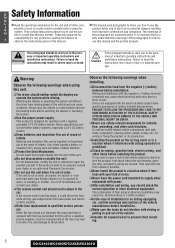
.... If the remote control unit lies about in order to use the parking brake before installation. Observe the following warnings when using this unit. ❑ The driver should check the normal operation of other components of your dealer or an authorized Panasonic Servicenter. ❑ Do not use this manual and the system properly. They contain instructions about how to use the unit when it is...
.... If the remote control unit lies about in order to use the parking brake before installation. Observe the following warnings when using this unit. ❑ The driver should check the normal operation of other components of your dealer or an authorized Panasonic Servicenter. ❑ Do not use this manual and the system properly. They contain instructions about how to use the unit when it is...
CQC3303U User Guide
Page 3
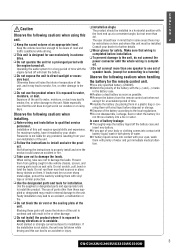
... these parts will raise the interior temperature of the unit, and it may 2 ❑ Keep the sound volume at a convenient angle, but not more than 30˚. Panasonic is completed. ❑ Do not connect more than one speaker to the unit. ❑ Do not use exclusively in fire or other damage to one set of your own installation of the unit. Prevent...
... these parts will raise the interior temperature of the unit, and it may 2 ❑ Keep the sound volume at a convenient angle, but not more than 30˚. Panasonic is completed. ❑ Do not connect more than one speaker to the unit. ❑ Do not use exclusively in fire or other damage to one set of your own installation of the unit. Prevent...
CQC3303U User Guide
Page 5
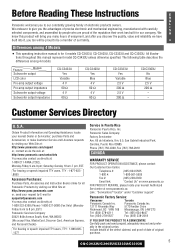
... us via the web at: http://www.panasonic.com/contactinfo You may also contact us directly at www.panasonic.ca: Link : "ServicentresTM locator" under "Customer support" Panasonic Factory Service: Vancouver Toronto Panasonic Canada Inc. Feature Models Subwoofer output LCD color Pre-amp output voltage Pre-amp output impedance Subwoofer output voltage Subwoofer output impedance CQ-C3433U Yes Variable 4 V 60 Ω 4 V 60 Ω CQ-C3403U Yes Blue 4 V 60 Ω 4 V 60 Ω CQ-C3333U...
... us via the web at: http://www.panasonic.com/contactinfo You may also contact us directly at www.panasonic.ca: Link : "ServicentresTM locator" under "Customer support" Panasonic Factory Service: Vancouver Toronto Panasonic Canada Inc. Feature Models Subwoofer output LCD color Pre-amp output voltage Pre-amp output impedance Subwoofer output voltage Subwoofer output impedance CQ-C3433U Yes Variable 4 V 60 Ω 4 V 60 Ω CQ-C3403U Yes Blue 4 V 60 Ω 4 V 60 Ω CQ-C3333U...
CQC3303U User Guide
Page 6
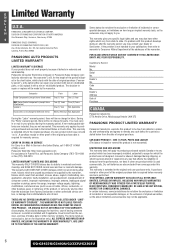
... write to repair or replace will , for parts. THERE ARE NO EXPRESS WARRANTIES EXCEPT AS LISTED UNDER "LIMITED WARRANTY COVERAGE". If non-rechargeable batteries are included, they are for which result from accident, misuse, abuse, neglect, mishandling, misapplication, alteration, faulty installation, set-up adjustment, maladjustment of consumer control, improper maintenance, improper antenna, inadequate signal reception or pickup, power line surge...
... write to repair or replace will , for parts. THERE ARE NO EXPRESS WARRANTIES EXCEPT AS LISTED UNDER "LIMITED WARRANTY COVERAGE". If non-rechargeable batteries are included, they are for which result from accident, misuse, abuse, neglect, mishandling, misapplication, alteration, faulty installation, set-up adjustment, maladjustment of consumer control, improper maintenance, improper antenna, inadequate signal reception or pickup, power line surge...
CQC3303U User Guide
Page 7
... Satellite Radio Clock Setting General 10 You can call up various sound types at the touch of system upgrade. Safety Information 2 Before Reading These Instructions 5 S H ability of wide range of button in a car. Audio Settings 20 ¡ Volume ¡ Bass/Treble ¡ Balance/Fader ¡ Sub-Woofer Level CQ-C3433U/C3403U/C3333U Function Settings 22 ¡ Demonstration ¡ Display Color Selection CQ-C3433U/C3333U ¡ Level Meter Display Patterns (PATTERN) ¡ Mute/Attenuation ¡ AUX Skip...
... Satellite Radio Clock Setting General 10 You can call up various sound types at the touch of system upgrade. Safety Information 2 Before Reading These Instructions 5 S H ability of wide range of button in a car. Audio Settings 20 ¡ Volume ¡ Bass/Treble ¡ Balance/Fader ¡ Sub-Woofer Level CQ-C3433U/C3403U/C3333U Function Settings 22 ¡ Demonstration ¡ Display Color Selection CQ-C3433U/C3333U ¡ Level Meter Display Patterns (PATTERN) ¡ Mute/Attenuation ¡ AUX Skip...
CQC3303U User Guide
Page 8
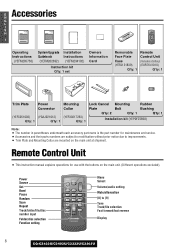
.../disc number input Folder/disc selection Function setting POWER SOURCE MENU SRC SEL SET VOL BAND MUTE 12 RANDOM SCAN 45 3 REPEAT 6 78 TUNE #0 NUMBER 9 TUNE DISP CAR AUDIO Menu Select Volume/audio setting Mute/attenuation [0] to improvements. ¡ Trim Plate and Mounting Collar are subject to modification without prior notice due to [9] Tune Track/file selection Fast forward/fast reverse Display 8 CQ-C3433U/C3403U/C3333U/C3303U Remote Control Unit ¡ This instruction manual explains operations for maintenance and service. ¡ Accessories and their parts numbers...
.../disc number input Folder/disc selection Function setting POWER SOURCE MENU SRC SEL SET VOL BAND MUTE 12 RANDOM SCAN 45 3 REPEAT 6 78 TUNE #0 NUMBER 9 TUNE DISP CAR AUDIO Menu Select Volume/audio setting Mute/attenuation [0] to improvements. ¡ Trim Plate and Mounting Collar are subject to modification without prior notice due to [9] Tune Track/file selection Fast forward/fast reverse Display 8 CQ-C3433U/C3403U/C3333U/C3303U Remote Control Unit ¡ This instruction manual explains operations for maintenance and service. ¡ Accessories and their parts numbers...
CQC3303U User Guide
Page 9
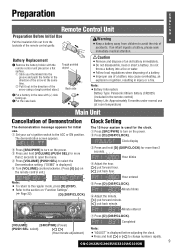
... the arrow using a tough pointed object. r Press [VOLUME] (PUSH SEL) to select the Demonstration setting. ("DEMO" is displayed.) t Turn [VOLUME] counterclockwise. (Press [0] ({) on the remote control unit.) Note: ¡ To return to the regular mode, press [D] (DISP). ¡ Refer to the section on the power. e Put the case back. Clock display w Press [SRC/PWR] to turn on "Function Settings". (a Page 22) [D] (DISP/CLOCK) e Press and hold [[] or []] to change numbers rapidly...
... the arrow using a tough pointed object. r Press [VOLUME] (PUSH SEL) to select the Demonstration setting. ("DEMO" is displayed.) t Turn [VOLUME] counterclockwise. (Press [0] ({) on the remote control unit.) Note: ¡ To return to the regular mode, press [D] (DISP). ¡ Refer to the section on the power. e Put the case back. Clock display w Press [SRC/PWR] to turn on "Function Settings". (a Page 22) [D] (DISP/CLOCK) e Press and hold [[] or []] to change numbers rapidly...
CQC3303U User Guide
Page 10
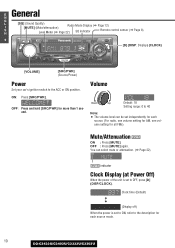
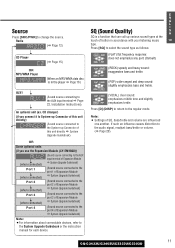
... ON : Press [MUTE]. OFF : Press [MUTE] again. Clock time (Default) (Display off) When the power is set independently for each source. (For radio, one volume setting for AM, one volume setting for each source mode. 10 CQ-C3433U/C3403U/C3333U/C3303U E General N G L I S H [SQ] (Sound Quality) Radio Mode Display (a Page 12) [MUTE] (Mute/attenuation) Level Meter (a Page 22) SQ indicator Remote control sensor (a Page 8) 9 [D] (DISP: Display) (CLOCK) [VOLUME] [SRC/PWR] (Source/Power) Power Set your car's ignition switch to OFF, press [D] (DISP/CLOCK). OFF: Press...
... ON : Press [MUTE]. OFF : Press [MUTE] again. Clock time (Default) (Display off) When the power is set independently for each source. (For radio, one volume setting for AM, one volume setting for each source mode. 10 CQ-C3433U/C3403U/C3333U/C3303U E General N G L I S H [SQ] (Sound Quality) Radio Mode Display (a Page 12) [MUTE] (Mute/attenuation) Level Meter (a Page 22) SQ indicator Remote control sensor (a Page 8) 9 [D] (DISP: Display) (CLOCK) [VOLUME] [SRC/PWR] (Source/Power) Power Set your car's ignition switch to OFF, press [D] (DISP/CLOCK). OFF: Press...
CQC3303U User Guide
Page 11
... CD changer) (if you connect it to System-up Connector of this unit directly) (Sound source connected to the System-up various sound types at the touch of Expansion Module a System Upgrade Guidebook) Note: ¡For information about connectable devices, refer to the AUX input terminal a Page 22, Installation Instructions) An optional unit (ex. Note: ¡ Settings of SQ, bass/treble and volume are influenced one another. Radio (a Page 12) CD Player OR MP3/WMA Player...
... CD changer) (if you connect it to System-up Connector of this unit directly) (Sound source connected to the System-up various sound types at the touch of Expansion Module a System Upgrade Guidebook) Note: ¡For information about connectable devices, refer to the AUX input terminal a Page 22, Installation Instructions) An optional unit (ex. Note: ¡ Settings of SQ, bass/treble and volume are influenced one another. Radio (a Page 12) CD Player OR MP3/WMA Player...
CQC3303U User Guide
Page 12
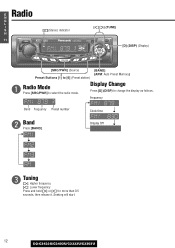
Frequency Band Frequency Preset number w Band Press [BAND]. Seeking will start. 12 CQ-C3433U/C3403U/C3333U/C3303U Clock time Display Off e Tuning [[]: Higher frequency []]: Lower frequency Press and hold [[] or []] for more than 0.5 seconds, then release it. Display Change Press [D] (DISP) to select the radio mode. E Radio N G L I S H 11 (Stereo) indicator []] [[] (TUNE) [D] (DISP) (Display) [SRC/PWR] (Source) [BAND] (APM: Auto Preset Memory) Preset Buttons [1] to [6] (Preset station) q Radio Mode Press [SRC/PWR] to change the display as follows.
Frequency Band Frequency Preset number w Band Press [BAND]. Seeking will start. 12 CQ-C3433U/C3403U/C3333U/C3303U Clock time Display Off e Tuning [[]: Higher frequency []]: Lower frequency Press and hold [[] or []] for more than 0.5 seconds, then release it. Display Change Press [D] (DISP) to select the radio mode. E Radio N G L I S H 11 (Stereo) indicator []] [[] (TUNE) [D] (DISP) (Display) [SRC/PWR] (Source) [BAND] (APM: Auto Preset Memory) Preset Buttons [1] to [6] (Preset station) q Radio Mode Press [SRC/PWR] to change the display as follows.
CQC3303U User Guide
Page 13
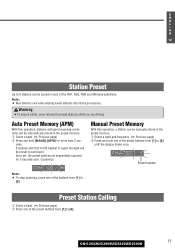
.../C3333U/C3303U Auto Preset Memory (APM) With this operation, a station can be manually stored in the preset memory. onds. 6 stations with good receiving conditions can be automatically stored in the preset memory. Preset Station Calling q Select a band. (a Previous page) w Press one of the preset buttons from [1] to [6] until the display blinks once. Preset number Note: ¡ To stop scanning, press one of the buttons from [1] to [6]. E N G L I S H 12 Station Preset Up to 6 stations can be...
.../C3333U/C3303U Auto Preset Memory (APM) With this operation, a station can be manually stored in the preset memory. onds. 6 stations with good receiving conditions can be automatically stored in the preset memory. Preset Station Calling q Select a band. (a Previous page) w Press one of the preset buttons from [1] to [6] until the display blinks once. Preset number Note: ¡ To stop scanning, press one of the buttons from [1] to [6]. E N G L I S H 12 Station Preset Up to 6 stations can be...
CQC3303U User Guide
Page 15
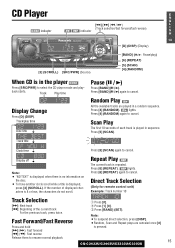
... and Repeat plays are played in a random sequence. CD Player indicator E N G [s] [d] (a / f) L (Track selection/fast forward/fast reverse) indicator I S H 14 [D] (DISP) (Display) [3] (SCROLL) [SRC/PWR] (Source) [BAND] (y / 5:: Pause/play) [6] (REPEAT) [5] (SCAN) [4] (RANDOM) When CD is in the player Press [SRC/PWR] to resume normal playback. 15 CQ-C3433U/C3403U/C3333U/C3303U back starts. Direct Track Selection (Only for remote control unit) Example: Track number 10 Track Selection q Press...
... and Repeat plays are played in a random sequence. CD Player indicator E N G [s] [d] (a / f) L (Track selection/fast forward/fast reverse) indicator I S H 14 [D] (DISP) (Display) [3] (SCROLL) [SRC/PWR] (Source) [BAND] (y / 5:: Pause/play) [6] (REPEAT) [5] (SCAN) [4] (RANDOM) When CD is in the player Press [SRC/PWR] to resume normal playback. 15 CQ-C3433U/C3403U/C3333U/C3303U back starts. Direct Track Selection (Only for remote control unit) Example: Track number 10 Track Selection q Press...
CQC3303U User Guide
Page 18
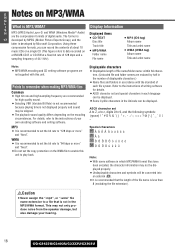
...". ¡Do not set A to Z, a to z, digits 0 to the instructions of writing software for high quality sound. ¡ Selecting VBR (Variable Bit Rate) is not recommended because playing time is not displayed properly and sound may be converted into an...protection on ¡ MP3/WMA ¡ WMA (WMA tag) a 650 MB CD-R or CD-RW at a fixed bit rate of 128 kbps and a Folder name Album name sampling frequency of 44.1 kHz). For details, refer to data recorded on the WMA file to enable this unit. Display Information S H MP3 (MPEG Audio Layer-3) and WMA (Windows MediaTM Audio) Displayed...
...". ¡Do not set A to Z, a to z, digits 0 to the instructions of writing software for high quality sound. ¡ Selecting VBR (Variable Bit Rate) is not recommended because playing time is not displayed properly and sound may be converted into an...protection on ¡ MP3/WMA ¡ WMA (WMA tag) a 650 MB CD-R or CD-RW at a fixed bit rate of 128 kbps and a Folder name Album name sampling frequency of 44.1 kHz). For details, refer to data recorded on the WMA file to enable this unit. Display Information S H MP3 (MPEG Audio Layer-3) and WMA (Windows MediaTM Audio) Displayed...
CQC3303U User Guide
Page 20
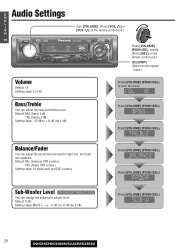
... adjust the sound level among the right, left, front and rear speakers. Default: BAS (bass) 0 dB TRE (treble) 0 dB Setting range: -12 dB to open the menu. Press [VOLUME] (PUSH SEL). Balance/Fader You can change the subwoofer volume level. Bass/Treble You can adjust the bass and treble sound. E Audio Settings N G L I S H 19 Turn [VOLUME]. (Press [VOL }] or [VOL {] on the remote control unit.) Press [VOLUME] (PUSH SEL: select). (Press [SEL] on the remote control unit.) [D] (DISP) (Return to the regular mode.) Volume Default: 18 Setting...
... adjust the sound level among the right, left, front and rear speakers. Default: BAS (bass) 0 dB TRE (treble) 0 dB Setting range: -12 dB to open the menu. Press [VOLUME] (PUSH SEL). Balance/Fader You can change the subwoofer volume level. Bass/Treble You can adjust the bass and treble sound. E Audio Settings N G L I S H 19 Turn [VOLUME]. (Press [VOL }] or [VOL {] on the remote control unit.) Press [VOLUME] (PUSH SEL: select). (Press [SEL] on the remote control unit.) [D] (DISP) (Return to the regular mode.) Volume Default: 18 Setting...
CQC3303U User Guide
Page 21
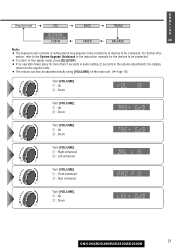
... the instruction manuals for the devices to be connected. ¡ To return to the regular mode, press [D] (DISP). ¡ If no operation takes place for more than 5 seconds in audio setting (2 seconds in the volume adjustment), the display returns to the regular mode. ¡ The volume can also be adjusted directly using [VOLUME] on the conditions of devices to be connected. q : Front enhanced w : Rear enhanced w q Turn [VOLUME]. q : Up w : Down w q Turn [VOLUME]. E N G Regular mode VOL BASS TREBLE L I S CQ...
... the instruction manuals for the devices to be connected. ¡ To return to the regular mode, press [D] (DISP). ¡ If no operation takes place for more than 5 seconds in audio setting (2 seconds in the volume adjustment), the display returns to the regular mode. ¡ The volume can also be adjusted directly using [VOLUME] on the conditions of devices to be connected. q : Front enhanced w : Rear enhanced w q Turn [VOLUME]. q : Up w : Down w q Turn [VOLUME]. E N G Regular mode VOL BASS TREBLE L I S CQ...
CQC3303U User Guide
Page 22
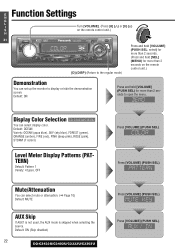
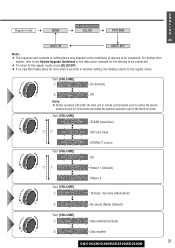
... hide the demonstration screen. Default: OCEAN Variety: OCEAN (aqua blue), SKY (sky blue), FOREST (green), ORANGE (amber), FIRE (red), PINK (deep pink), ROSE (pink), STORM (7 colors) Level Meter Display Patterns (PATTERN) Default: Pattern 1 Variety: 4 types, OFF Mute/Attenuation You can select display color. E Function Settings N G L I Turn [VOLUME]. (Press [8] (}) or [0] ({) S on the remote control unit.) H 21 [D] (DISP) (Return to the regular mode) Press and hold [VOLUME] (PUSH SEL: select) for more...
... hide the demonstration screen. Default: OCEAN Variety: OCEAN (aqua blue), SKY (sky blue), FOREST (green), ORANGE (amber), FIRE (red), PINK (deep pink), ROSE (pink), STORM (7 colors) Level Meter Display Patterns (PATTERN) Default: Pattern 1 Variety: 4 types, OFF Mute/Attenuation You can select display color. E Function Settings N G L I Turn [VOLUME]. (Press [8] (}) or [0] ({) S on the remote control unit.) H 21 [D] (DISP) (Return to the regular mode) Press and hold [VOLUME] (PUSH SEL: select) for more...
CQC3303U User Guide
Page 23
q w : Pattern 4 : 10 steps decrease (Attenuation) : No sound (Mute) (Default) Turn [VOLUME]. Turn [VOLUME]. E N G CQ-C3433U/C3333U L I Regular mode DEMO COLOR PATTERN S H AUX1 IN 22 MUTE KEY Note: ¡ The sequence and contents of devices to cancel the demon- stration screen for the devices to be connected. q : On (Default) w q w : Off Note: ¡ Button operation with either the main unit or remote control allows users to be connected. ¡ To return to the regular...
q w : Pattern 4 : 10 steps decrease (Attenuation) : No sound (Mute) (Default) Turn [VOLUME]. Turn [VOLUME]. E N G CQ-C3433U/C3333U L I Regular mode DEMO COLOR PATTERN S H AUX1 IN 22 MUTE KEY Note: ¡ The sequence and contents of devices to cancel the demon- stration screen for the devices to be connected. q : On (Default) w q w : Off Note: ¡ Button operation with either the main unit or remote control allows users to be connected. ¡ To return to the regular...
CQC3303U User Guide
Page 26
... users to OFF. The wiring of the chassis securely. If the unit is connected to professionals. Warning ¡Do not use the unit in particular modes such as a cellular phone away from the car. aMount a noise filter on the power supply. aPerform the speaker wiring in accordance with the wiring diagram. 26 CQ-C3433U/C3403U/C3333U/C3303U Some operations are reversed between right and left . Fuse...
... users to OFF. The wiring of the chassis securely. If the unit is connected to professionals. Warning ¡Do not use the unit in particular modes such as a cellular phone away from the car. aMount a noise filter on the power supply. aPerform the speaker wiring in accordance with the wiring diagram. 26 CQ-C3433U/C3403U/C3333U/C3303U Some operations are reversed between right and left . Fuse...
CQC3303U User Guide
Page 27
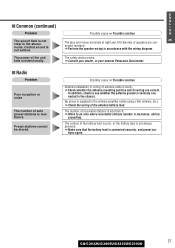
...; Radio Problem Poor reception or noise The number of auto preset stations is less than 6. Possible cause a Possible solution Antenna installation or wiring of speakers are correct. aCheck the wiring of the unit fails unintentionally. aMake sure that the battery lead is supplied to an area where receivable stations number is faulty. aCheck whether the antenna mounting position and its wiring are connected reversely. No power is connected securely, and preset sta- Central sound...
...; Radio Problem Poor reception or noise The number of auto preset stations is less than 6. Possible cause a Possible solution Antenna installation or wiring of speakers are correct. aCheck the wiring of the unit fails unintentionally. aMake sure that the battery lead is supplied to an area where receivable stations number is faulty. aCheck whether the antenna mounting position and its wiring are connected reversely. No power is connected securely, and preset sta- Central sound...
CQC3303U User Guide
Page 31
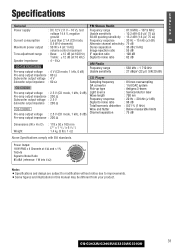
... : 1 bit DAC system : Astigma 3-beam Pre-amp output voltage : 2.5 V (CD mode, 1 kHz, 0 dB) Pre-amp output impedance : 200 Ω Subwoofer output voltage : 2.5 V Subwoofer output impedance : 200 Ω Light source Wave length Frequency response Signal to improvements. ¡Some figures and illustrations in this manual may be different from your product. 31 CQ-C3433U/C3403U/C3333U/C3303U Specifications E N G General FM Stereo Radio L I Power supply : DC 12 V (11 V - 16 V), test...
... : 1 bit DAC system : Astigma 3-beam Pre-amp output voltage : 2.5 V (CD mode, 1 kHz, 0 dB) Pre-amp output impedance : 200 Ω Subwoofer output voltage : 2.5 V Subwoofer output impedance : 200 Ω Light source Wave length Frequency response Signal to improvements. ¡Some figures and illustrations in this manual may be different from your product. 31 CQ-C3433U/C3403U/C3333U/C3303U Specifications E N G General FM Stereo Radio L I Power supply : DC 12 V (11 V - 16 V), test...


