

CQ5301U User Guide
Page 1
MUTE R Heavy Duty CD player/Weather Band Receiver CQ-5301U Operating Instructions • Please read these instructions carefully before using this product and keep this manual for future reference.
MUTE R Heavy Duty CD player/Weather Band Receiver CQ-5301U Operating Instructions • Please read these instructions carefully before using this product and keep this manual for future reference.
CQ5301U User Guide
Page 2
... wiring or fixing the product or its accessories. ❑ Installing the product on the air bag cover or in and out of the vehicle. 2 CQ-5301U Caution This pictograph intends to alert you need to open the hole from outside if possible. ❑ Never install the product in a location where it... yourself. Always stop the vehicle in a safe location and use the product safely and to observe the instructions given in this unit or an authorized Panasonic Servicenter. ❑ Do not use the system in car washes or on the floor while driving, get wet in a safe and effective manner....
... wiring or fixing the product or its accessories. ❑ Installing the product on the air bag cover or in and out of the vehicle. 2 CQ-5301U Caution This pictograph intends to alert you need to open the hole from outside if possible. ❑ Never install the product in a location where it... yourself. Always stop the vehicle in a safe location and use the product safely and to observe the instructions given in this unit or an authorized Panasonic Servicenter. ❑ Do not use the system in car washes or on the floor while driving, get wet in a safe and effective manner....

CQ5301U User Guide
Page 3
... drain the battery. ❑ Refer fuse replacement to the unit. Observe the following applies only in automobiles. ❑ Do not operate the unit for installation. Panasonic is unstable. THIS PRODUCT UTILIZES A CLASS I LASER. REFER SERVICING TO QUALIFIED PERSONNEL. Operating the audio system for this device. Do not run them near heat... period of the unit. ❑ Follow the instruction to be installed. CAUTION! DO NOT OPEN COVERS AND DO NOT REPAIR YOURSELF. Operating Instructions 1 2. Warranty Card...1 3 CQ-5301U
... drain the battery. ❑ Refer fuse replacement to the unit. Observe the following applies only in automobiles. ❑ Do not operate the unit for installation. Panasonic is unstable. THIS PRODUCT UTILIZES A CLASS I LASER. REFER SERVICING TO QUALIFIED PERSONNEL. Operating the audio system for this device. Do not run them near heat... period of the unit. ❑ Follow the instruction to be installed. CAUTION! DO NOT OPEN COVERS AND DO NOT REPAIR YOURSELF. Operating Instructions 1 2. Warranty Card...1 3 CQ-5301U
CQ5301U User Guide
Page 4
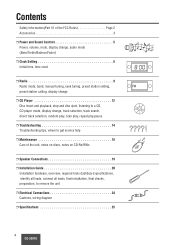
...Setting 8 Initial time, time reset ❒ Radio 9 Radio mode, band, manual tuning, seek tuning, preset station setting, FM preset station calling, display change ❒ CD Player 12 Disc insert and playback, stop and disc eject, listening to a CD, CD player mode, display change, track selection, ... 14 Troubleshooting tips, where to get service help ❒ Maintenance 18 Care of the unit, notes on discs, notes on CD-Rs/RWs ❒ Speaker Connections 19 ❒ Installation Guide 20 Installation hardware, overview, required tools dashboard specifications, identify all leads...
...Setting 8 Initial time, time reset ❒ Radio 9 Radio mode, band, manual tuning, seek tuning, preset station setting, FM preset station calling, display change ❒ CD Player 12 Disc insert and playback, stop and disc eject, listening to a CD, CD player mode, display change, track selection, ... 14 Troubleshooting tips, where to get service help ❒ Maintenance 18 Care of the unit, notes on discs, notes on CD-Rs/RWs ❒ Speaker Connections 19 ❒ Installation Guide 20 Installation hardware, overview, required tools dashboard specifications, identify all leads...

CQ5301U User Guide
Page 5
Power on: Press [MODE](POWER). ACC ON MUTE Mute Press [MUTE] to decrease volume. Volume Turn the knob clockwise to increase volume, and counterclockwise to mute the sound completely. Power and Sound Controls Power Turn the key in the ignition until the accessory indicator lights. Press [MUTE] again to 40) (default:18) Up Down 5 CQ-5301U Power off: Hold down [MODE](POWER) for more than 1 second. Volume level (0 to cancel.
Power on: Press [MODE](POWER). ACC ON MUTE Mute Press [MUTE] to decrease volume. Volume Turn the knob clockwise to increase volume, and counterclockwise to mute the sound completely. Power and Sound Controls Power Turn the key in the ignition until the accessory indicator lights. Press [MUTE] again to 40) (default:18) Up Down 5 CQ-5301U Power off: Hold down [MODE](POWER) for more than 1 second. Volume level (0 to cancel.
CQ5301U User Guide
Page 6
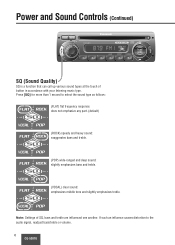
...: Settings of button in accordance with your listening music type. Press [SQ] for more than 1 second to the audio signal, readjust bass/treble or volume. 6 CQ-5301U
...: Settings of button in accordance with your listening music type. Press [SQ] for more than 1 second to the audio signal, readjust bass/treble or volume. 6 CQ-5301U
CQ5301U User Guide
Page 7
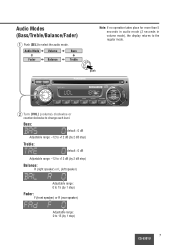
... step) Treble: default : 0 dB Adjustable range: -12 to +12 dB (by 2 dB step) Balance: R (right speaker) or L (left speaker) Adjustable range: 0 to 15 (by 1 step) 7 CQ-5301U Audio Modes (Bass/Treble/Balance/Fader) q Push [SEL] to the regular mode. Note: If no operation takes place for more than 5 seconds in audio mode...
... step) Treble: default : 0 dB Adjustable range: -12 to +12 dB (by 2 dB step) Balance: R (right speaker) or L (left speaker) Adjustable range: 0 to 15 (by 1 step) 7 CQ-5301U Audio Modes (Bass/Treble/Balance/Fader) q Push [SEL] to the regular mode. Note: If no operation takes place for more than 5 seconds in audio mode...
CQ5301U User Guide
Page 8
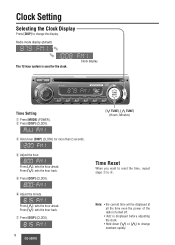
... (CLOCK). [{ TUNE], [} TUNE] (Hours, Minutes) e Hold down [{] or [}] to r. u Press [DISP] (CLOCK). 8 CQ-5301U Note: • the current time will be displayed at all the time even the power of the radio is turned off. • "Adj" is used for more than 2 seconds. r Adjust the hour. Time Reset When... you want to reset the time, repeat steps q to change the display. Press [}]: sets the hour ahead. Radio mode display (default) The 12-hour system is displayed before adjusting the clock. • Hold down [DISP] (CLOCK) for the clock. Clock ...
... (CLOCK). [{ TUNE], [} TUNE] (Hours, Minutes) e Hold down [{] or [}] to r. u Press [DISP] (CLOCK). 8 CQ-5301U Note: • the current time will be displayed at all the time even the power of the radio is turned off. • "Adj" is used for more than 2 seconds. r Adjust the hour. Time Reset When... you want to reset the time, repeat steps q to change the display. Press [}]: sets the hour ahead. Radio mode display (default) The 12-hour system is displayed before adjusting the clock. • Hold down [DISP] (CLOCK) for the clock. Clock ...
CQ5301U User Guide
Page 9
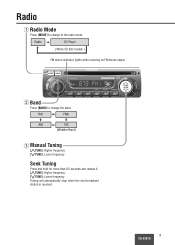
FM1 FM2 AM 162 (Weather Band) e Manual Tuning [}TUNE]: Higher frequency [{TUNE]: Lower frequency Seek Tuning Press and hold for more than 0.5 seconds and release it. [}TUNE]: Higher frequency [{TUNE]: Lower frequency Tuning will automatically stop when the next broadcast station is received. 9 CQ-5301U Radio a CD Player c ( When CD disc loaded ) FM stereo indicator, lights while receiving an FM stereo signal. Radio q Radio Mode Press [MODE] to change to change the band. MUTE w Band Press [BAND] to the radio mode.
FM1 FM2 AM 162 (Weather Band) e Manual Tuning [}TUNE]: Higher frequency [{TUNE]: Lower frequency Seek Tuning Press and hold for more than 0.5 seconds and release it. [}TUNE]: Higher frequency [{TUNE]: Lower frequency Tuning will automatically stop when the next broadcast station is received. 9 CQ-5301U Radio a CD Player c ( When CD disc loaded ) FM stereo indicator, lights while receiving an FM stereo signal. Radio q Radio Mode Press [MODE] to change to change the band. MUTE w Band Press [BAND] to the radio mode.
CQ5301U User Guide
Page 10
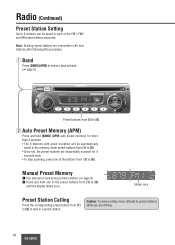
...to find a station. (➡ page 9) w Press and hold [BAND] (APM: auto preset memory) for 5 seconds each of the FM1, FM2 and AM preset station memories...Band Press [BAND](APM) to select a desired band. (➡ page 9) MUTE Preset buttons from [1] to [6] w Auto Preset Memory (APM) Press and hold one of the preset buttons from [1] to [6] until the display blinks once. ...be saved in each . • To stop scanning, press one of the buttons from [1] to [6] . Radio (Continued) Preset Station Setting Up to 6 stations can be automatically saved in the memory under preset buttons from ...
...to find a station. (➡ page 9) w Press and hold [BAND] (APM: auto preset memory) for 5 seconds each of the FM1, FM2 and AM preset station memories...Band Press [BAND](APM) to select a desired band. (➡ page 9) MUTE Preset buttons from [1] to [6] w Auto Preset Memory (APM) Press and hold one of the preset buttons from [1] to [6] until the display blinks once. ...be saved in each . • To stop scanning, press one of the buttons from [1] to [6] . Radio (Continued) Preset Station Setting Up to 6 stations can be automatically saved in the memory under preset buttons from ...

CQ5301U User Guide
Page 11
Weather Band Stations National Weather Radio Broadcasts from over 380 Iocations throughout the U.S. on one of the following frequencies. 1. 162.550 MHz 2. 162.400 MHz 3. 162.475 MHz 4. 162.425 MHz 5. ... commercial Operations within the area. Tune to weather band to monitor the preset station. If you have a question concerning NOAA Weather Radio, please contact your nearest National Weather Service Office. 11 CQ-5301U CH7 is selected by pressing [}] or [{]. WB Weather Band Frequency (channel) Number Note: The weather band (CH1-6) has been preset...
Weather Band Stations National Weather Radio Broadcasts from over 380 Iocations throughout the U.S. on one of the following frequencies. 1. 162.550 MHz 2. 162.400 MHz 3. 162.475 MHz 4. 162.425 MHz 5. ... commercial Operations within the area. Tune to weather band to monitor the preset station. If you have a question concerning NOAA Weather Radio, please contact your nearest National Weather Service Office. 11 CQ-5301U CH7 is selected by pressing [}] or [{]. WB Weather Band Frequency (channel) Number Note: The weather band (CH1-6) has been preset...

CQ5301U User Guide
Page 12
... the same as an ordinary music CD is loaded, this player recognizes it as an ordinary music CD.) "LOAd" will be displayed. CD Player Disc Insert and Playback Disc insert Playback will start automatically when a disc is loading. Radio CD player ( When CD disc loaded ) u (eject) Label Side MUTE 12 CQ-5301U Stop and Disc Eject Press [u] (eject...
... the same as an ordinary music CD is loaded, this player recognizes it as an ordinary music CD.) "LOAd" will be displayed. CD Player Disc Insert and Playback Disc insert Playback will start automatically when a disc is loading. Radio CD player ( When CD disc loaded ) u (eject) Label Side MUTE 12 CQ-5301U Stop and Disc Eject Press [u] (eject...
CQ5301U User Guide
Page 13
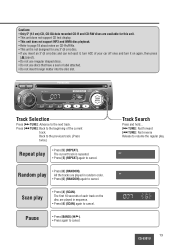
... track on the disc are played in random order. • Press [6] (RANDOM) again to cancel. Cautions: • Only 5" (12 cm) CD, CD-DA data recorded CD-R and CD-RW discs are available for any 3" (8 cm) disc. • If you insert an 3" (8 cm) disc and can not eject it, turn...MUTE Track Selection Press [d TUNE]: Advance to page 18 about notes on CD-Rs/RWs. • This unit is repeated. • Press [5] (REPEAT) again to cancel. Press [s TUNE]: Back to the previous track. (Press twice.) Repeat play . 13 CQ-5301U Back to the beginning of the current track. Pause • Press ...
... track on the disc are played in random order. • Press [6] (RANDOM) again to cancel. Cautions: • Only 5" (12 cm) CD, CD-DA data recorded CD-R and CD-RW discs are available for any 3" (8 cm) disc. • If you insert an 3" (8 cm) disc and can not eject it, turn...MUTE Track Selection Press [d TUNE]: Advance to page 18 about notes on CD-Rs/RWs. • This unit is repeated. • Press [5] (REPEAT) again to cancel. Press [s TUNE]: Back to the previous track. (Press twice.) Repeat play . 13 CQ-5301U Back to the beginning of the current track. Pause • Press ...
CQ5301U User Guide
Page 14
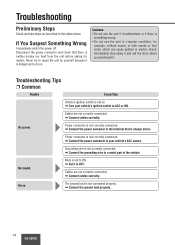
... the power connector to a metal part of the vehicle. Mute is dangerous to ON. Cables are not correctly connected. a Connect the ground lead properly. 14 CQ-5301U Never try to OFF. No power. a Set it . Immediately stop using it and call the store where you purchased it to repair the unit by...
... the power connector to a metal part of the vehicle. Mute is dangerous to ON. Cables are not correctly connected. a Connect the ground lead properly. 14 CQ-5301U Never try to OFF. No power. a Set it . Immediately stop using it and call the store where you purchased it to repair the unit by...

CQ5301U User Guide
Page 15
...is not extended enough. The radio antenna is too far, or signals are too weak. Sound skips, bad sound quality. (e.g. A disc that has data other stations of higher signal level. Refer to instructions for the concerned devices for details. 15 CQ-5301U a Connect the battery cable.../Step Disc is not correctly connected. a Clean disc, referring to the section on "Notes on Discs". ❐ Radio Trouble Much noise in combination of writing software, a CD recorder (CD-R/RW drive) and a disc which are incompatible one another . Preset station is made , or disc is dirty. ...
...is not extended enough. The radio antenna is too far, or signals are too weak. Sound skips, bad sound quality. (e.g. A disc that has data other stations of higher signal level. Refer to instructions for the concerned devices for details. 15 CQ-5301U a Connect the battery cable.../Step Disc is not correctly connected. a Clean disc, referring to the section on "Notes on Discs". ❐ Radio Trouble Much noise in combination of writing software, a CD recorder (CD-R/RW drive) and a disc which are incompatible one another . Preset station is made , or disc is dirty. ...

CQ5301U User Guide
Page 16
.... Time is not ejected. a Connect the cables correctly. a Connect the speaker wires to vibration. Disc is counted but no sound comes out. Troubleshooting (Continued) ❐ CD (Continued) Trouble Sound skips due to the correct ones. 16 CQ-5301U Left and right sounds are not correctly connected.
.... Time is not ejected. a Connect the cables correctly. a Connect the speaker wires to vibration. Disc is counted but no sound comes out. Troubleshooting (Continued) ❐ CD (Continued) Trouble Sound skips due to the correct ones. 16 CQ-5301U Left and right sounds are not correctly connected.
CQ5301U User Guide
Page 17
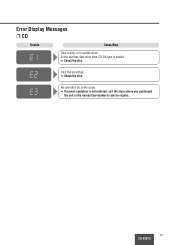
Error Display Messages ❐ CD Trouble Cause/Step Disc is dirty, or is loaded. ➡ Check the disc. A disc that has data other than CD-DA type is upside down. No operation by some cause. ➡ If normal operation is not restored, call the store where you purchased the unit or the nearest Servicenter to ask for repairs. 17 CQ-5301U Disc has scratches. ➡ Check the disc.
Error Display Messages ❐ CD Trouble Cause/Step Disc is dirty, or is loaded. ➡ Check the disc. A disc that has data other than CD-DA type is upside down. No operation by some cause. ➡ If normal operation is not restored, call the store where you purchased the unit or the nearest Servicenter to ask for repairs. 17 CQ-5301U Disc has scratches. ➡ Check the disc.

CQ5301U User Guide
Page 18
... closed. • This player cannot play back a CD-R/RW that was made by the combination of writing software, a CD recorder (CD-R/RW drive) and a disc if they may have trouble playing back some CD-R/RW discs recorded on CD recorders (CD-R/RW drives), either due to observe the instructions of ..., soft cloth to your discs. Leaving them inside a vehicle for handling it. 18 CQ-5301U Label side Do not use solvents such as benzine, thinner as they are less resistant to wipe. Care of CD-R/RW disc for extended periods may damage them and make playback impossible. • The...
... closed. • This player cannot play back a CD-R/RW that was made by the combination of writing software, a CD recorder (CD-R/RW drive) and a disc if they may have trouble playing back some CD-R/RW discs recorded on CD recorders (CD-R/RW drives), either due to observe the instructions of ..., soft cloth to your discs. Leaving them inside a vehicle for handling it. 18 CQ-5301U Label side Do not use solvents such as benzine, thinner as they are less resistant to wipe. Care of CD-R/RW disc for extended periods may damage them and make playback impossible. • The...
CQ5301U User Guide
Page 19
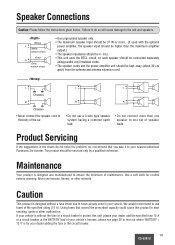
... at the BATTERY lead of the car. L + - + - We would recommend to the body of your nearest authorized Panasonic Servicenter. Product Servicing If the suggestions in your dealer adding the fuse or the circuit breaker. 19 CQ-5301U L + - + - + - Use a soft cloth for your vehicle. Chassis • Never connect the speaker cord to use a 3-wire...
... at the BATTERY lead of the car. L + - + - We would recommend to the body of your nearest authorized Panasonic Servicenter. Product Servicing If the suggestions in your dealer adding the fuse or the circuit breaker. 19 CQ-5301U L + - + - + - Use a soft cloth for your vehicle. Chassis • Never connect the speaker cord to use a 3-wire...

CQ5301U User Guide
Page 20
...attempting installation of potential dangers involved in a vehicle by a professional. Caution: This unit operates with a 12 V DC negative ground auto battery system only. Do not attempt to install this product yourself, your nearest professional installer. Before you through the remaining steps: ...for the items which are packed with your vehicle dealer or manufacturer to install this out promptly. • Panasonic Servicenter List for Service Directory 20 CQ-5301U ...Keep for future reference in case the product needs servicing. • Installation Hardware...Needed for in the ...
...attempting installation of potential dangers involved in a vehicle by a professional. Caution: This unit operates with a 12 V DC negative ground auto battery system only. Do not attempt to install this product yourself, your nearest professional installer. Before you through the remaining steps: ...for the items which are packed with your vehicle dealer or manufacturer to install this out promptly. • Panasonic Servicenter List for Service Directory 20 CQ-5301U ...Keep for future reference in case the product needs servicing. • Installation Hardware...Needed for in the ...


