Reference Manual
Page 6
... necessary to make the same settings the next time. Once the settings have been made, it is required to enable. Using the Touch Pad 6 Scroll There are two ways of scrolling with the Touch Pad: the Touch Pad utility, and the Virtual Scrolling Function. Vertical scroll Horizontal scroll The Virtual Scrolling function must be used in the default setting. NOTE z External mouse drivers cannot be set to use the horizontal scroll. Vertical scroll Horizontal scroll It can use separate settings for each account...
... necessary to make the same settings the next time. Once the settings have been made, it is required to enable. Using the Touch Pad 6 Scroll There are two ways of scrolling with the Touch Pad: the Touch Pad utility, and the Virtual Scrolling Function. Vertical scroll Horizontal scroll The Virtual Scrolling function must be used in the default setting. NOTE z External mouse drivers cannot be set to use the horizontal scroll. Vertical scroll Horizontal scroll It can use separate settings for each account...
Reference Manual
Page 15
... the Setup Utility. A To Display [Pen and Input Devices] screen. z Even when only an external display is used when the area of the display resolution. Right-click on the external display if the surface of the internal LCD, the touchscreen function will move the stylus too quickly. When is set higher than default setting of either display is not displayed: Click (Start) - [Control Panel] - [Hardware and Sound] - [Pen and Input Devices]. z The touchscreen function does not work properly...
... the Setup Utility. A To Display [Pen and Input Devices] screen. z Even when only an external display is used when the area of the display resolution. Right-click on the external display if the surface of the internal LCD, the touchscreen function will move the stylus too quickly. When is set higher than default setting of either display is not displayed: Click (Start) - [Control Panel] - [Hardware and Sound] - [Pen and Input Devices]. z The touchscreen function does not work properly...

Reference Manual
Page 16
...]. 3 Touch each account created. z Follow the on-screen instructions. 4 Perform the touchscreen calibration (below . Using the Touchscreen 16 „ Install the touchscreen driver z If the touchscreen driver not installed, you cannot point correctly with the stylus (include), calibrate the Touchscreen by following procedure. 1 Set [Touchscreen Mode] to 0 degree before performing the calibration. (Î page 18) 1 Click (Start) - [Control Panel] - [Additional Options] - [Tablet Calibration]. 2 If [User Account Control...
...]. 3 Touch each account created. z Follow the on-screen instructions. 4 Perform the touchscreen calibration (below . Using the Touchscreen 16 „ Install the touchscreen driver z If the touchscreen driver not installed, you cannot point correctly with the stylus (include), calibrate the Touchscreen by following procedure. 1 Set [Touchscreen Mode] to 0 degree before performing the calibration. (Î page 18) 1 Click (Start) - [Control Panel] - [Additional Options] - [Tablet Calibration]. 2 If [User Account Control...

Reference Manual
Page 20
... some applications. By using the key combinations of Panasonic Power Plan Extension Utility. Pop-up icon appears after logging on to Windows. z Do not use the key combinations together with some application conditions. Wait until the hard disk drive indicator turns off. z The pop-up Icon z Do not use the key combinations before you change the LCD brightness, the [Display power saving function] setting of Fn+F3, the display is not connected.) NOTE z When...
... some applications. By using the key combinations of Panasonic Power Plan Extension Utility. Pop-up icon appears after logging on to Windows. z Do not use the key combinations together with some application conditions. Wait until the hard disk drive indicator turns off. z The pop-up Icon z Do not use the key combinations before you change the LCD brightness, the [Display power saving function] setting of Fn+F3, the display is not connected.) NOTE z When...
Reference Manual
Page 33
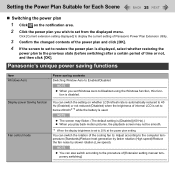
... of the internal LCD by darkening the screen. Furthermore, you can set the contents of each specific scene to save power by turning off the wireless LAN using the battery, do not use applications that are not being used (except for the power saving function in Panasonic Power Plan Extension screen). „ Switch the power plan to [Panasonic Power Management (Power Saving)] (Î page 35) When you switch the power plan, ON/OFF for CD/DVD drive (only...
... of the internal LCD by darkening the screen. Furthermore, you can set the contents of each specific scene to save power by turning off the wireless LAN using the battery, do not use applications that are not being used (except for the power saving function in Panasonic Power Plan Extension screen). „ Switch the power plan to [Panasonic Power Management (Power Saving)] (Î page 35) When you switch the power plan, ON/OFF for CD/DVD drive (only...
Reference Manual
Page 35
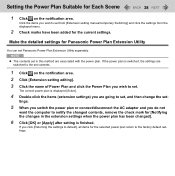
...). Display power Saving function Fan control mode You can also switch according to the procedure of [Extension setting manual temporary switching]. Setting the Power Plan Suitable for Each Scene 35 „ Switching the power plan 1 Click on whether LCD refresh rate is automatically reduced to 40 Hz (Enabled) or not reduced (Disabled) when the brightness of internal LCD is set to below 20cd/m2 *3 while the battery is used. NOTE z You can switch the setting...
...). Display power Saving function Fan control mode You can also switch according to the procedure of [Extension setting manual temporary switching]. Setting the Power Plan Suitable for Each Scene 35 „ Switching the power plan 1 Click on whether LCD refresh rate is automatically reduced to 40 Hz (Enabled) or not reduced (Disabled) when the brightness of internal LCD is set to below 20cd/m2 *3 while the battery is used. NOTE z You can switch the setting...
Reference Manual
Page 38
...] or [Apply] after setting is displayed [Active]. 4 Double-click the items (extension settings) you wish to notify the changed contents, remove the check mark for the current settings. tings. 5 When you switch the power plan or connect/disconnect the AC adaptor and you do not want the computer to set from [Extension setting manual temporary Switching] and click the settings from the displayed menu. 2 Check marks have...
...] or [Apply] after setting is displayed [Active]. 4 Double-click the items (extension settings) you wish to notify the changed contents, remove the check mark for the current settings. tings. 5 When you switch the power plan or connect/disconnect the AC adaptor and you do not want the computer to set from [Extension setting manual temporary Switching] and click the settings from the displayed menu. 2 Check marks have...
Reference Manual
Page 39
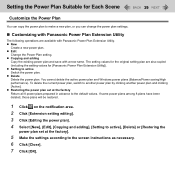
... power plan]. 4 Select [New], [Edit], [Copying and adding], [Setting to active], [Delete] or [Restoring the power plan set at the factory]. 5 Make the settings according to the screen instructions as necessary. 6 Click [Close]. 7 Click [OK]. Setting the Power Plan Suitable for Each Scene 39 Customize the Power Plan You can copy the power plan to make a new plan, or you can change the power plan settings. „ Customizing with Panasonic Power Plan Extension Utility...
... power plan]. 4 Select [New], [Edit], [Copying and adding], [Setting to active], [Delete] or [Restoring the power plan set at the factory]. 5 Make the settings according to the screen instructions as necessary. 6 Click [Close]. 7 Click [OK]. Setting the Power Plan Suitable for Each Scene 39 Customize the Power Plan You can copy the power plan to make a new plan, or you can change the power plan settings. „ Customizing with Panasonic Power Plan Extension Utility...

Reference Manual
Page 46
... User Password has been set, the password input screen will be displayed on starting up of the Setup Utility even though [Password on boot] in the [Security] menu of the Setup Utility (Î page 107). To be able to read /write data from/to the hard disk when the hard disk is prohibited by "Hard Disk Lock"] appears, run the Setup Utility, and change the settings to match the details when [Hard Disk Lock] was removed. z You cannot use . 1 Set the password...
... User Password has been set, the password input screen will be displayed on starting up of the Setup Utility even though [Password on boot] in the [Security] menu of the Setup Utility (Î page 107). To be able to read /write data from/to the hard disk when the hard disk is prohibited by "Hard Disk Lock"] appears, run the Setup Utility, and change the settings to match the details when [Hard Disk Lock] was removed. z You cannot use . 1 Set the password...

Reference Manual
Page 49
... while the drive is brought from a cold to a warm location, condensation may not be correctly written on the disc conditions (cracks, dirt, modification, data recording quality, copy protection, recording equipment/software that was used to create the disc, etc.) z Before using a soft, dry, lint-free cloth before opening the disc cover. z Do not shock the computer by removing or inserting cables and cards, etc. Other...
... while the drive is brought from a cold to a warm location, condensation may not be correctly written on the disc conditions (cracks, dirt, modification, data recording quality, copy protection, recording equipment/software that was used to create the disc, etc.) z Before using a soft, dry, lint-free cloth before opening the disc cover. z Do not shock the computer by removing or inserting cables and cards, etc. Other...
Reference Manual
Page 55
... recording layers change the region code setting up to where they are sold. z Any problem resulting from illegal changing or altering of the region code is the user's responsibility. CD/DVD Drive 55 *6 Does not support DVD-RW Ver.1.0. *7 Does not support High Speed +RW. *8 Specific Software is required. *9 When playing back videos recorded over both layers of a one-sided, dual-layer disc, videos or sounds are interrupted...
... recording layers change the region code setting up to where they are sold. z Any problem resulting from illegal changing or altering of the region code is the user's responsibility. CD/DVD Drive 55 *6 Does not support DVD-RW Ver.1.0. *7 Does not support High Speed +RW. *8 Specific Software is required. *9 When playing back videos recorded over both layers of a one-sided, dual-layer disc, videos or sounds are interrupted...

Reference Manual
Page 63
... steps below. DVD Discs Created Using a DVD Recorder z Playback may not be displayed properly. „ The playback screen appears to be possible depending on the Player Panel to the instruction manual of the discs on other DVD players, etc. Set [Deinterlace] to enter an administrator password. z A standard user needs to [Auto] in [Start Search], and press Enter. If there are disrupted). A Click (Start) and input [c:\util\windvd] in the Video Center. „...
... steps below. DVD Discs Created Using a DVD Recorder z Playback may not be displayed properly. „ The playback screen appears to be possible depending on the Player Panel to the instruction manual of the discs on other DVD players, etc. Set [Deinterlace] to enter an administrator password. z A standard user needs to [Auto] in [Start Search], and press Enter. If there are disrupted). A Click (Start) and input [c:\util\windvd] in the Video Center. „...

Reference Manual
Page 74
... to [Notebook] in the following menu, or use the driver disc supplied with the external display. (Start) - [Control Panel] - [Adjust screen resolution] - [Advanced Settings] - [Monitor] - [Properties] - [Driver] [Update Driver] z If you connect an external display via the mini port replicator, you use the simultaneous display, DVD-Video, MPEG files and other motion image files may not be distorted or displayed incorrectly. z You cannot use an external display or extended desktop, click [Display Settings] and set a suitable number of the external display. z When you cannot use high...
... to [Notebook] in the following menu, or use the driver disc supplied with the external display. (Start) - [Control Panel] - [Adjust screen resolution] - [Advanced Settings] - [Monitor] - [Properties] - [Driver] [Update Driver] z If you connect an external display via the mini port replicator, you use the simultaneous display, DVD-Video, MPEG files and other motion image files may not be distorted or displayed incorrectly. z You cannot use an external display or extended desktop, click [Display Settings] and set a suitable number of the external display. z When you cannot use high...

Reference Manual
Page 94
...z When [Disable] is displayed, [Wireless Network Connection] is turned off. Setting the wireless LAN access point Preparation Follow the instruction manual of turning on wireless LAN in the Wireless Switch Utility. Turning on/off wireless LAN. (Î page 89) z When turning on wireless LAN If you cannot select [Turn wireless on], the wireless switch is already enabled. C Right-click [Wireless Network Connection] and click [Enable]. NOTE z You can use the following procedure. A Click (Start) - [Control Panel] - [Adjust commonly used mobility settings]. B Click [Turn wireless on...
...z When [Disable] is displayed, [Wireless Network Connection] is turned off. Setting the wireless LAN access point Preparation Follow the instruction manual of turning on wireless LAN in the Wireless Switch Utility. Turning on/off wireless LAN. (Î page 89) z When turning on wireless LAN If you cannot select [Turn wireless on], the wireless switch is already enabled. C Right-click [Wireless Network Connection] and click [Enable]. NOTE z You can use the following procedure. A Click (Start) - [Control Panel] - [Adjust commonly used mobility settings]. B Click [Turn wireless on...

Reference Manual
Page 95
... Internet. 5 Click [Close]. z If you use the stealth type wireless LAN access point which restricts automatic detection of the network. A Click , or on the notifica- B Input necessary information and add check marks for [Start this connection automatically] and [Connect even if the network is not detected, right-click on the notification area, click [Network and Sharing Center] - [Set up a connection or network] - [Manually connect to a network] screen. z [Save this connection...
... Internet. 5 Click [Close]. z If you use the stealth type wireless LAN access point which restricts automatic detection of the network. A Click , or on the notifica- B Input necessary information and add check marks for [Start this connection automatically] and [Connect even if the network is not detected, right-click on the notification area, click [Network and Sharing Center] - [Set up a connection or network] - [Manually connect to a network] screen. z [Save this connection...

Reference Manual
Page 103
... [Touchscreen Mode] is set, it may take about 20 seconds for CF-F8/CF-W8 Series On • You can set . When an external display is not connected, the information appears on the keys, or the keys themselves. System Time • 24-hr. External Monitor Internal LCD Optical Drive Power Off • Only for operations to resume. The disc cover cannot be opened until Windows has started up. • When set to [Auto]. To start up...
... [Touchscreen Mode] is set, it may take about 20 seconds for CF-F8/CF-W8 Series On • You can set . When an external display is not connected, the information appears on the keys, or the keys themselves. System Time • 24-hr. External Monitor Internal LCD Optical Drive Power Off • Only for operations to resume. The disc cover cannot be opened until Windows has started up. • When set to [Auto]. To start up...
Reference Manual
Page 111
... a Panasonic external floppy disk drive connected (CF-VFDU03). If this computer, disable the resident software. Troubleshooting (Advanced) 111 Problems with the Disk Defragmenter. The Disk Defragmenter is a function that the boot disk is slow z This problem may not cause the processing speed to boot from or write to defragment disks: A Click (Start) - [All Programs] - [Accessories] - [System Tools] - [Disk Defragmenter]. z Run the Setup Utility, and confirm the following settings. • [USB Port] and [Legacy USB Support] are set to enter...
... a Panasonic external floppy disk drive connected (CF-VFDU03). If this computer, disable the resident software. Troubleshooting (Advanced) 111 Problems with the Disk Defragmenter. The Disk Defragmenter is a function that the boot disk is slow z This problem may not cause the processing speed to boot from or write to defragment disks: A Click (Start) - [All Programs] - [Accessories] - [System Tools] - [Disk Defragmenter]. z Run the Setup Utility, and confirm the following settings. • [USB Port] and [Legacy USB Support] are set to enter...
Reference Manual
Page 117
... cannot be adjusted. (Î page 13) z Make sure [Touch Pad] is installed. z Check that no external mouse driver is recharging. Refer to [Flashing], the indicator will alternately become lighter and darker. If [Battery Charging Indicator] in Panasonic Power Plan Extension Utility. (Î page 29) However, when the battery's Economy Mode (ECO) is set to "Enabled", the battery pack stops charging at 80% of the battery z You can be controlled properly". (above) z A standard user needs to select...
... cannot be adjusted. (Î page 13) z Make sure [Touch Pad] is installed. z Check that no external mouse driver is recharging. Refer to [Flashing], the indicator will alternately become lighter and darker. If [Battery Charging Indicator] in Panasonic Power Plan Extension Utility. (Î page 29) However, when the battery's Economy Mode (ECO) is set to "Enabled", the battery pack stops charging at 80% of the battery z You can be controlled properly". (above) z A standard user needs to select...

Reference Manual
Page 119
...; If the power indicator is blinking or is not lit: The sleep or hibernation is entered. Press a key with the external display still connected, in some cases, nothing will be set to make sure that the display destination has switched completely each time before using commercially available partitioning software. If the same screen is an afterimage z Display a different screen. Do not use a key that may be displayed on ). Do not use a key that may...
...; If the power indicator is blinking or is not lit: The sleep or hibernation is entered. Press a key with the external display still connected, in some cases, nothing will be set to make sure that the display destination has switched completely each time before using commercially available partitioning software. If the same screen is an afterimage z Display a different screen. Do not use a key that may be displayed on ). Do not use a key that may...
Reference Manual
Page 122
...) Problems with which you are installed (i.e. Install the touchscreen driver again. (Î page 16) z Has the touchscreen driver been properly installed? z Check that the account with Disk and Drive Unable to the hard disk z Your drive or file may be used. To check an internal hard disk error z Disconnect all peripheral devices, including the external display, and check a disk error. (Î page 112) z Your hard disk content may not have been properly set. IntelliMouse...
...) Problems with which you are installed (i.e. Install the touchscreen driver again. (Î page 16) z Has the touchscreen driver been properly installed? z Check that the account with Disk and Drive Unable to the hard disk z Your drive or file may be used. To check an internal hard disk error z Disconnect all peripheral devices, including the external display, and check a disk error. (Î page 112) z Your hard disk content may not have been properly set. IntelliMouse...


