User Guide
Page 2
... with wireless transmitters, which is resolved. 7. This equipment is designed to the telephone network or premises wiring using a compatible modular jack which will notify the customer as soon as determined by the party responsible for repair or warranty information, please contact Panasonic Corporation of the following two conditions: (1) This device may take changes in individual provided supplement instructions for help...
... with wireless transmitters, which is resolved. 7. This equipment is designed to the telephone network or premises wiring using a compatible modular jack which will notify the customer as soon as determined by the party responsible for repair or warranty information, please contact Panasonic Corporation of the following two conditions: (1) This device may take changes in individual provided supplement instructions for help...

Reference Manual
Page 2
... external display is set to Windows. On the Setup Utility screen, you can use the key combinations together with touch pad (external mouse), touchscreen (only for model with some application conditions (e.g., when [Command Prompt] is connected) Internal LCD Simultaneous display External display CAUTION Do not press any keys until the hard disk drive indicator turns off. The key combinations may not appear in quick succession. Do not use the key combinations before you turn off NOTE Beeps do not sound...
... external display is set to Windows. On the Setup Utility screen, you can use the key combinations together with touch pad (external mouse), touchscreen (only for model with some application conditions (e.g., when [Command Prompt] is connected) Internal LCD Simultaneous display External display CAUTION Do not press any keys until the hard disk drive indicator turns off. The key combinations may not appear in quick succession. Do not use the key combinations before you turn off NOTE Beeps do not sound...

Reference Manual
Page 5
... user. The touchscreen function does not work in the Setup Utility, in [Hold [Ctrl] key down + Touch the screen] of [Touch Panel Configuration], touching the screen may be recognized as the touch pad and mouse. Click [start ] - [All Programs] - [Fujitsu Touch Panel (USB)] - [Touch Panel Configuration]. Do not add a check mark to right-click. changes to . To right-click A Click on the keyboard. returns to . Touch the screen surface with the stylus (included). A Click [start ] - [All programs] - [Fujitsu Touch Panel (USB)] - [Touch Screen Calibration Utility]. 2 Using...
... user. The touchscreen function does not work in the Setup Utility, in [Hold [Ctrl] key down + Touch the screen] of [Touch Panel Configuration], touching the screen may be recognized as the touch pad and mouse. Click [start ] - [All Programs] - [Fujitsu Touch Panel (USB)] - [Touch Panel Configuration]. Do not add a check mark to right-click. changes to . To right-click A Click on the keyboard. returns to . Touch the screen surface with the stylus (included). A Click [start ] - [All programs] - [Fujitsu Touch Panel (USB)] - [Touch Screen Calibration Utility]. 2 Using...

Reference Manual
Page 6
.... • Switching to another application • Resuming from standby or hibernation • Pressing Alt • Touching the touchscreen (only for model with touchscreen) An external mouse or trackball connected via the port replicator (optional) will not work during handwriting in the touch pad mode. If you install other pointing devices (e.g., commercially available mouse driver) and overwrite the touch pad driver, Panasonic Hand Writing will not work. If you change the size...
.... • Switching to another application • Resuming from standby or hibernation • Pressing Alt • Touching the touchscreen (only for model with touchscreen) An external mouse or trackball connected via the port replicator (optional) will not work during handwriting in the touch pad mode. If you install other pointing devices (e.g., commercially available mouse driver) and overwrite the touch pad driver, Panasonic Hand Writing will not work. If you change the size...

Reference Manual
Page 7
... need to make the setting if you use the Windows menu to Memory Hard disk Recovery time Short Rather long Power supply Required. (If power is not requested at resuming. Using standby or hibernation repeatedly may cause malfunction of my portable computer:] / [When I press the power button on before standby or hibernation. Close files you were working on my computer:], and then click [OK]. C Click [start ] - [Control Panel] - [User Accounts], and select...
... need to make the setting if you use the Windows menu to Memory Hard disk Recovery time Short Rather long Power supply Required. (If power is not requested at resuming. Using standby or hibernation repeatedly may cause malfunction of my portable computer:] / [When I press the power button on before standby or hibernation. Close files you were working on my computer:], and then click [OK]. C Click [start ] - [Control Panel] - [User Accounts], and select...
Reference Manual
Page 13
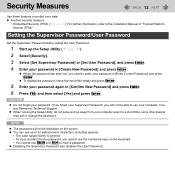
.... NOTE The password will not be displayed on the keyboard. • You cannot use the numbered keys on the screen. When running the Setup Utility, do not leave and go away from your password. To disable the password, leave the input field empty and press Enter. 5 Enter your data. Disabling the Supervisor Password also disables the User Password. Security Measures 13 Use these features to protect your password again in [Confirm New Password] and press Enter. 6 Press...
.... NOTE The password will not be displayed on the keyboard. • You cannot use the numbered keys on the screen. When running the Setup Utility, do not leave and go away from your password. To disable the password, leave the input field empty and press Enter. 5 Enter your data. Disabling the Supervisor Password also disables the User Password. Security Measures 13 Use these features to protect your password again in [Confirm New Password] and press Enter. 6 Press...
Reference Manual
Page 27
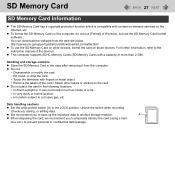
... removing it from the web site below. Unlock the switch when recording (checkout), saving, or editing data. For further information, refer to the instruction manual of a car. • In very dusty or humid location. • In location subject to the LOCK position. We recommend you to physically destroy the card (using a hammer, etc.) to another storage medium. http://panasonic.jp/support/global/cs/sd/download...
... removing it from the web site below. Unlock the switch when recording (checkout), saving, or editing data. For further information, refer to the instruction manual of a car. • In very dusty or humid location. • In location subject to the LOCK position. We recommend you to physically destroy the card (using a hammer, etc.) to another storage medium. http://panasonic.jp/support/global/cs/sd/download...
Reference Manual
Page 34
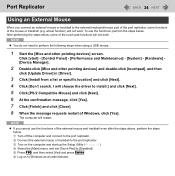
... [Install from a list or specific location] and click [Next]. 4 Click [Don't search. I will restart. The computer will choose the driver to Windows as an administrator. E Press F10, and then select [Yes] and press Enter. Port Replicator 34 Using an External Mouse When you cannot use the functions, perform the steps below , some functions of the touch pad functions will not work . B Connect the external mouse or trackball to [Disabled]. C Turn...
... [Install from a list or specific location] and click [Next]. 4 Click [Don't search. I will restart. The computer will choose the driver to Windows as an administrator. E Press F10, and then select [Yes] and press Enter. Port Replicator 34 Using an External Mouse When you cannot use the functions, perform the steps below , some functions of the touch pad functions will not work . B Connect the external mouse or trackball to [Disabled]. C Turn...
Reference Manual
Page 36
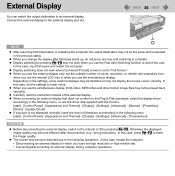
... operations. Display switching by pressing Fn+F3. Carefully read the instruction manual of [Hardware acceleration] in the previous status. When you use the driver disk supplied with the monitor. [start ] - [Control Panel] - [Appearance and Themes] - [Display] - [Settings] - [Advanced] - [Troubleshoot] CAUTION Before disconnecting the external display, switch to "Full Screen". When connecting an external display that does not conform to the Plug & Play standards, select the display driver accordingly in the following menu, or use the simultaneous display, DVD-Video, MPEG files...
... operations. Display switching by pressing Fn+F3. Carefully read the instruction manual of [Hardware acceleration] in the previous status. When you use the driver disk supplied with the monitor. [start ] - [Control Panel] - [Appearance and Themes] - [Display] - [Settings] - [Advanced] - [Troubleshoot] CAUTION Before disconnecting the external display, switch to "Full Screen". When connecting an external display that does not conform to the Plug & Play standards, select the display driver accordingly in the following menu, or use the simultaneous display, DVD-Video, MPEG files...

Reference Manual
Page 37
...] - [Display Devices]. 2 Click [Extended Desktop], and make the settings for mobile] screen. You cannot move on the primary device when you touch the internal LCD. Set the internal LCD to the other display. At the confirmation message, click [OK]. The popup menu icon displayed by pressing Fn+F3. You can drag an object from the internal LCD to use the extended desktop with some software applications. External Display 37 Switching the Display 1 Press...
...] - [Display Devices]. 2 Click [Extended Desktop], and make the settings for mobile] screen. You cannot move on the primary device when you touch the internal LCD. Set the internal LCD to the other display. At the confirmation message, click [OK]. The popup menu icon displayed by pressing Fn+F3. You can drag an object from the internal LCD to use the extended desktop with some software applications. External Display 37 Switching the Display 1 Press...
Reference Manual
Page 42
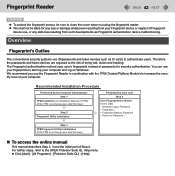
... hacking. Recommended Installation Procedure Performed by each user Step 4 User Fingerprint Enrollment User's Data • Windows Logon Password • Fingerprint • Fingerprint Backup Password • Power-on Password Step 3 TPM Fingerprint Utility Initialization (If the TPM is not being used, skip this step.) To access the online manual This manual describes Step 2, 3 and the initial part of your computer and log on Windows. For further steps, refer to increase the security level of...
... hacking. Recommended Installation Procedure Performed by each user Step 4 User Fingerprint Enrollment User's Data • Windows Logon Password • Fingerprint • Fingerprint Backup Password • Power-on Password Step 3 TPM Fingerprint Utility Initialization (If the TPM is not being used, skip this step.) To access the online manual This manual describes Step 2, 3 and the initial part of your computer and log on Windows. For further steps, refer to increase the security level of...

Reference Manual
Page 53
... the software that you touch the keyboard, touch pad or touchscreen (only for the call , and if you cannot use a PC Card modem.) The computer needs some time to standby again afterward. puter out of the software application. To enable this function 1 Click [start ] - [Control Panel] - [Performance and Maintenance] - [Power Options] - [Power Schemes]. NOTE This function does not work when the computer is off or is not connected to the internal...
... the software that you touch the keyboard, touch pad or touchscreen (only for the call , and if you cannot use a PC Card modem.) The computer needs some time to standby again afterward. puter out of the software application. To enable this function 1 Click [start ] - [Control Panel] - [Performance and Maintenance] - [Power Options] - [Power Schemes]. NOTE This function does not work when the computer is off or is not connected to the internal...

Reference Manual
Page 62
... airline companies and hospitals. Otherwise the hard disk data such as encryption before using wireless LAN. Do not block the antenna area with the Fast User Switching function. To avoid unauthorized access to [Enabled] (default) in other locations where wireless LAN signals may affect peripheral devices. You cannot use the wireless LAN function together with your hand or body. To use wireless LAN, set [Wireless LAN] to the computer through the...
... airline companies and hospitals. Otherwise the hard disk data such as encryption before using wireless LAN. Do not block the antenna area with the Fast User Switching function. To avoid unauthorized access to [Enabled] (default) in other locations where wireless LAN signals may affect peripheral devices. You cannot use the wireless LAN function together with your hand or body. To use wireless LAN, set [Wireless LAN] to the computer through the...

Reference Manual
Page 71
... LID Switch Disabled Enabled Touchscreen Mode Tablet Mode Auto Default PC External Monitor Internal LCD On Continuous Flashing Disabled Enabled Disabled Enabled System Time • 24-hr. Underlined items are the factory presets. [xxx xx/xx/xxxx] [xx:xx:xx] Main Configuration Touch Pad Touchscreen Mode • Only for model with touchscreen Wireless WAN Antenna • Only for model with Wireless WAN Display • The display during the Windows start-up process. Battery Charging Indicator Power on the internal LCD even though the [External Monitor] is selected. Setup Utility 71...
... LID Switch Disabled Enabled Touchscreen Mode Tablet Mode Auto Default PC External Monitor Internal LCD On Continuous Flashing Disabled Enabled Disabled Enabled System Time • 24-hr. Underlined items are the factory presets. [xxx xx/xx/xxxx] [xx:xx:xx] Main Configuration Touch Pad Touchscreen Mode • Only for model with touchscreen Wireless WAN Antenna • Only for model with Wireless WAN Display • The display during the Windows start-up process. Battery Charging Indicator Power on the internal LCD even though the [External Monitor] is selected. Setup Utility 71...

Reference Manual
Page 83
... or Del while [Panasonic] boot screen is requested, enter the Supervisor Password. Regarding the PC-Diagnostic Utility NOTE For the hard disk and memory only, you can also start the Diagnostic Check from [Diagnostic Utility] on the wireless switch ( page 58). The Setup Utility starts up , it will be displayed in the Setup Utility. We recommend that are changed. When not using the touch pad, you can operate using the default settings in gray. Hardware Diagnostics 83 When...
... or Del while [Panasonic] boot screen is requested, enter the Supervisor Password. Regarding the PC-Diagnostic Utility NOTE For the hard disk and memory only, you can also start the Diagnostic Check from [Diagnostic Utility] on the wireless switch ( page 58). The Setup Utility starts up , it will be displayed in the Setup Utility. We recommend that are changed. When not using the touch pad, you can operate using the default settings in gray. Hardware Diagnostics 83 When...

Reference Manual
Page 93
... that media to turn on the wireless devices. Access point is not compatible, malfunction may occur. Restart the computer. Once the installation screen for the device's driver appears, equipment you install a driver of card or peripheral device, make sure that the driver is not displayed on the notification area, turn on the wireless communication ( page 58). Troubleshooting (Advanced) 93 Wireless Communication (only for model with the operating system. When you then connect to a network. Disable the Wireless Connection Disable Utility...
... that media to turn on the wireless devices. Access point is not compatible, malfunction may occur. Restart the computer. Once the installation screen for the device's driver appears, equipment you install a driver of card or peripheral device, make sure that the driver is not displayed on the notification area, turn on the wireless communication ( page 58). Troubleshooting (Advanced) 93 Wireless Communication (only for model with the operating system. When you then connect to a network. Disable the Wireless Connection Disable Utility...
Reference Manual
Page 94
... a USB hub or USB connector of port replicator are also disabled. Insert the RAM module correctly. Check the [Information] menu in the Device Manager, remove and insert the device. A Click [start] - [Control Panel] - [Performance and Maintenance] - [System] [Hardware] - [Device Manager]. You can use only the Panasonic CF-VFDU03U USB floppy disk drive (optional). Install the driver. If the mouse does not work as a mouse, modem and cards may not recognize the connection/removal of the device. When operation...
... a USB hub or USB connector of port replicator are also disabled. Insert the RAM module correctly. Check the [Information] menu in the Device Manager, remove and insert the device. A Click [start] - [Control Panel] - [Performance and Maintenance] - [System] [Hardware] - [Device Manager]. You can use only the Panasonic CF-VFDU03U USB floppy disk drive (optional). Install the driver. If the mouse does not work as a mouse, modem and cards may not recognize the connection/removal of the device. When operation...

Reference Manual
Page 95
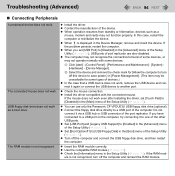
... other settings in the Setup Utility. Set [Touch Pad] to the instruction manual of the Setup Utility ( page 73). The I /O port address, etc. Turn on the printer. Check the connection. If the setting does not work . The printer is connected via network. Refer to [Disabled] in the [Advanced] menu of the port replicator does not work . Check the network connection if the printer is not online. Cannot print. The Serial Port B of the Setup Utility ( page 73). Troubleshooting (Advanced) 95 Connecting...
... other settings in the Setup Utility. Set [Touch Pad] to the instruction manual of the Setup Utility ( page 73). The I /O port address, etc. Turn on the printer. Check the connection. If the setting does not work . The printer is connected via network. Refer to [Disabled] in the [Advanced] menu of the port replicator does not work . Check the network connection if the printer is not online. Cannot print. The Serial Port B of the Setup Utility ( page 73). Troubleshooting (Advanced) 95 Connecting...

Reference Manual
Page 96
... computer will restart. Set [Touch Pad] to select [Portable/Laptop] in [Power schemes], and click [OK]. • The above remedy slightly reduces the battery operation time. Perform the touchscreen calibration ( page 5). These problems may be disabled by high CPU load such as an administrator and follow the steps below. Cannot input using the included stylus. If the problem persists, click [start] - [Control Panel] - [Performance and Maintenance] - [Power Options] - [Power Schemes], select...
... computer will restart. Set [Touch Pad] to select [Portable/Laptop] in [Power schemes], and click [OK]. • The above remedy slightly reduces the battery operation time. Perform the touchscreen calibration ( page 5). These problems may be disabled by high CPU load such as an administrator and follow the steps below. Cannot input using the included stylus. If the problem persists, click [start] - [Control Panel] - [Performance and Maintenance] - [Power Options] - [Power Schemes], select...
Reference Manual
Page 97
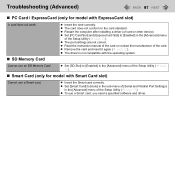
... Memory Card. Set [PC Card Slot] and [ExpressCard Slot] to the card standard. Set [SD Slot] to [Auto] in the sub-menu of [Serial and Parallel Port Settings] in the [Advanced] menu of the Setup Utility ( page 75). The driver is not compatible with the operating system. Set [Smart Card] to [Enabled] in the [Advanced] menu of the Setup Utility ( page 75). The port settings are not correct. Insert the card correctly. SD Memory Card Cannot use a Smart card, you need a specified software and driver. Troubleshooting...
... Memory Card. Set [PC Card Slot] and [ExpressCard Slot] to the card standard. Set [SD Slot] to [Auto] in the sub-menu of [Serial and Parallel Port Settings] in the [Advanced] menu of the Setup Utility ( page 75). The driver is not compatible with the operating system. Set [Smart Card] to [Enabled] in the [Advanced] menu of the Setup Utility ( page 75). The port settings are not correct. Insert the card correctly. SD Memory Card Cannot use a Smart card, you need a specified software and driver. Troubleshooting...


