

Operating Instructions
Page 1
Operating Instructions LCD Video Monitor Model No. BT-LH2550E DEUTSCH FRANÇAIS ITALIANO ESPAÑOL Für Erlauterungen in dotazione. Pour des explications en français, veuillez vous reporter au CD-... use. Per le istruzioni in italiano, vedere il CD-ROM in Deutsch, konsultieren Sie bitte die mitgelieferte CD-ROM. S1108T0 -P D Printed in Japan ENGLISH VQT2A05 BT-LH2550P Model No.
Operating Instructions LCD Video Monitor Model No. BT-LH2550E DEUTSCH FRANÇAIS ITALIANO ESPAÑOL Für Erlauterungen in dotazione. Pour des explications en français, veuillez vous reporter au CD-... use. Per le istruzioni in italiano, vedere il CD-ROM in Deutsch, konsultieren Sie bitte die mitgelieferte CD-ROM. S1108T0 -P D Printed in Japan ENGLISH VQT2A05 BT-LH2550P Model No.
Operating Instructions
Page 2
... for use of 100 - 240 V AC. An improper installation could get caught on the underside of the monitor could cause the monitor to environmental considerations. CAUTION: Remove the wall mount adaptor when not used with the equipment must be injured. Otherwise people moving in the vicinity ... NOT EXPOSED TO THE RISK OF DRIPPING OR SPLASHING LIQUIDS, AND DO NOT PLACE ANY LIQUID CONTAINERS ON TOP OF THE EQUIPMENT. Use with Panasonic Wall Mount Adaptor, BT-WMA26G. Read this unit in a bookcase, built-in cabinet or any other than 120 V AC may result in the entire apparatus falling ...
... for use of 100 - 240 V AC. An improper installation could get caught on the underside of the monitor could cause the monitor to environmental considerations. CAUTION: Remove the wall mount adaptor when not used with the equipment must be injured. Otherwise people moving in the vicinity ... NOT EXPOSED TO THE RISK OF DRIPPING OR SPLASHING LIQUIDS, AND DO NOT PLACE ANY LIQUID CONTAINERS ON TOP OF THE EQUIPMENT. Use with Panasonic Wall Mount Adaptor, BT-WMA26G. Read this unit in a bookcase, built-in cabinet or any other than 120 V AC may result in the entire apparatus falling ...
Operating Instructions
Page 4
...To ensure safe operation, the three-pin plug must have three cores and be performed by qualified installation personnel. Use with Panasonic Wall Mount Adaptor, BT-WMA26G. indicates safety information. 4 To reduce the risk of electric shock, do not install or place this first !..., ensure that the installation is effectively earthed through normal house-hold wiring. Otherwise people moving in the vicinity of the monitor could cause the monitor to maintain adequate ventilation, do not remove covers. For your safety, if you are a major cause of fatalities. Extension...
...To ensure safe operation, the three-pin plug must have three cores and be performed by qualified installation personnel. Use with Panasonic Wall Mount Adaptor, BT-WMA26G. indicates safety information. 4 To reduce the risk of electric shock, do not install or place this first !..., ensure that the installation is effectively earthed through normal house-hold wiring. Otherwise people moving in the vicinity of the monitor could cause the monitor to maintain adequate ventilation, do not remove covers. For your safety, if you are a major cause of fatalities. Extension...

Operating Instructions
Page 5
...may give rise to lift the monitor by , for instance, moving the source of mains cable is not suitable. Do not place the monitor face down during transportation. If...this plug. Take care especially during transportation to BS1362. One is for your local Panasonic Dealer. Transportation precautions Do not try to noise in blurring or other type of...pointed objects. ONLY This appliance is supplied with a screwdriver. 2. Read this first ! (for BT-LH2550E) (continued) Operating precaution Operation near any appliance which generates strong magnetic fields may result ...
...may give rise to lift the monitor by , for instance, moving the source of mains cable is not suitable. Do not place the monitor face down during transportation. If...this plug. Take care especially during transportation to BS1362. One is for your local Panasonic Dealer. Transportation precautions Do not try to noise in blurring or other type of...pointed objects. ONLY This appliance is supplied with a screwdriver. 2. Read this first ! (for BT-LH2550E) (continued) Operating precaution Operation near any appliance which generates strong magnetic fields may result ...

Operating Instructions
Page 7
... 1 Screw × 1 (for securing power cord) AC Adaptor × 1 DC cord × 1 CD-ROM × 1 Wall Mount Adaptor BT-WMA26G (Leave installation of the pixels are either missing or constantly lit (red, blue or green). Contents Read this first 2 Transportation precautions 5 Precautions for ...Use 7 Standard accessories 7 Optional units 7 Outline 8 Dimensions 9 Controls and Their Functions 10 Video monitor unit 10 Front panel controls 11 Rear panel terminals 12 AC Adapter 13 Power Supply 14 How to endure the weight of this unit ...
... 1 Screw × 1 (for securing power cord) AC Adaptor × 1 DC cord × 1 CD-ROM × 1 Wall Mount Adaptor BT-WMA26G (Leave installation of the pixels are either missing or constantly lit (red, blue or green). Contents Read this first 2 Transportation precautions 5 Precautions for ...Use 7 Standard accessories 7 Optional units 7 Outline 8 Dimensions 9 Controls and Their Functions 10 Video monitor unit 10 Front panel controls 11 Rear panel terminals 12 AC Adapter 13 Power Supply 14 How to endure the weight of this unit ...

Operating Instructions
Page 8
Outline The BT-LH2550 LCD monitor is a 25.5 inch full HD LCD display panel designed especially for broadcasting service and business use of the monitor, you can select between input signal to picture display. • Diagonal line compensation processing circuit reduces vertical image ...color reproduction. Other company names and product names are the trademarks or registered trademarks of Adobe System Incorporated in a surprisingly compact design for a monitor with a screen size of 25.5 inches. ■ Wide color gamut panel and 10-bit 3D LUT for the Adobe RGB and DCinema standards...
Outline The BT-LH2550 LCD monitor is a 25.5 inch full HD LCD display panel designed especially for broadcasting service and business use of the monitor, you can select between input signal to picture display. • Diagonal line compensation processing circuit reduces vertical image ...color reproduction. Other company names and product names are the trademarks or registered trademarks of Adobe System Incorporated in a surprisingly compact design for a monitor with a screen size of 25.5 inches. ■ Wide color gamut panel and 10-bit 3D LUT for the Adobe RGB and DCinema standards...

Operating Instructions
Page 9
...73.5 (2.9) 64 (2.5) 46 (1.8) 4.5 (0.2) 46 (1.8) 232 (9.1) 150 (5.9) 177 (7.0) 200 (7.9) • The rating plate is on the underside of the stand. Dimensions Video monitor unit Unit: mm (inches) 346 (13.6) 18 (0.7) 196 (7.7) 220 (8.7) 12 (0.5) 370 (14.6) 599 (23.6) 550.08 (21.7) 100 (3.9) 60 (2.4) 343.8 ....3) 215 (8.5) 100 (3.9) 116.5 (4.6) 200 (7.9) 100 (3.9) 169 (6.7) 10-M4,L=10mm Max 30 (1.2) 46 (1.8) • When installing the monitor in one place permanently, we recommend that you fix the monitor in place using the screw holes in the lower part of the AC Adapter. 9
...73.5 (2.9) 64 (2.5) 46 (1.8) 4.5 (0.2) 46 (1.8) 232 (9.1) 150 (5.9) 177 (7.0) 200 (7.9) • The rating plate is on the underside of the stand. Dimensions Video monitor unit Unit: mm (inches) 346 (13.6) 18 (0.7) 196 (7.7) 220 (8.7) 12 (0.5) 370 (14.6) 599 (23.6) 550.08 (21.7) 100 (3.9) 60 (2.4) 343.8 ....3) 215 (8.5) 100 (3.9) 116.5 (4.6) 200 (7.9) 100 (3.9) 169 (6.7) 10-M4,L=10mm Max 30 (1.2) 46 (1.8) • When installing the monitor in one place permanently, we recommend that you fix the monitor in place using the screw holes in the lower part of the AC Adapter. 9
Operating Instructions
Page 10
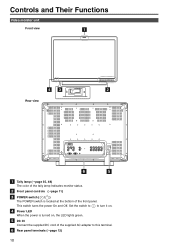
DC IN Connect the supplied DC cord of the supplied AC adapter to turn it on , the LED lights green. Rear panel terminals ( page 12) 10 Controls and Their Functions Video monitor unit Front view Rear view 6 5 Tally lamp ( page 35, 48) The color of the front panel. Power LED When the power is located at the bottom of the tally lamp Indicates monitor status. Front panel controls ( page 11) POWER switch ( / ) The POWER switch is turned on . Set the switch to to this terminal. This switch turns the power On and Off.
DC IN Connect the supplied DC cord of the supplied AC adapter to turn it on , the LED lights green. Rear panel terminals ( page 12) 10 Controls and Their Functions Video monitor unit Front view Rear view 6 5 Tally lamp ( page 35, 48) The color of the front panel. Power LED When the power is located at the bottom of the tally lamp Indicates monitor status. Front panel controls ( page 11) POWER switch ( / ) The POWER switch is turned on . Set the switch to to this terminal. This switch turns the power On and Off.

Operating Instructions
Page 12
... is automatically terminated at 75Ω. Since a connection to the OUT terminal releases the 75Ω termination of the unit, the level of headphones to monitor the sound. • The sound volume and sound quality will automatically release the 1 kΩ termination. *3 When a device is the SDI input terminal (compatible with HD...
... is automatically terminated at 75Ω. Since a connection to the OUT terminal releases the 75Ω termination of the unit, the level of headphones to monitor the sound. • The sound volume and sound quality will automatically release the 1 kΩ termination. *3 When a device is the SDI input terminal (compatible with HD...

Operating Instructions
Page 20
... following screen appears. 4. User data include the following settings. • Menu settings except "SETUP LOAD/SAVE" and "CONTROL/CONTROL" (including button function settings on the monitor front panel) • Screen adjustments made in the sub menu changes to select the "SYSTEM CONFIG" menu and press [ENTER]. 3. Press [ , ] to green. Press [ , ] to...
... following screen appears. 4. User data include the following settings. • Menu settings except "SETUP LOAD/SAVE" and "CONTROL/CONTROL" (including button function settings on the monitor front panel) • Screen adjustments made in the sub menu changes to select the "SYSTEM CONFIG" menu and press [ENTER]. 3. Press [ , ] to green. Press [ , ] to...
Operating Instructions
Page 23
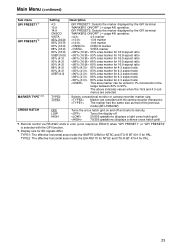
... TYPE2 TYPE1 Selects conventional monitor or camera recorder marker size. Marker size compliant with the GPI function. *6 Display size for PAL. 23 Turns the display off and sets its density. TYPE2: The effective horizontal area meets the EIA-RS170 for NTSC and ITU-R BT 470-4 for SD signals...ratio 88% area marker for 4:3 aspect ratio 80% area marker for PAL. TYPE1: The effective horizontal area meets the SMPTE125M for NTSC and ITU-R BT 601-5 for 4:3 aspect ratio This area marker can be varied in 1% increments in error (error response: ER001) when "GPI PRESET1" or "GPI ...
... TYPE2 TYPE1 Selects conventional monitor or camera recorder marker size. Marker size compliant with the GPI function. *6 Display size for PAL. 23 Turns the display off and sets its density. TYPE2: The effective horizontal area meets the EIA-RS170 for NTSC and ITU-R BT 470-4 for SD signals...ratio 88% area marker for 4:3 aspect ratio 80% area marker for PAL. TYPE1: The effective horizontal area meets the SMPTE125M for NTSC and ITU-R BT 601-5 for 4:3 aspect ratio This area marker can be varied in 1% increments in error (error response: ER001) when "GPI PRESET1" or "GPI ...

Operating Instructions
Page 29
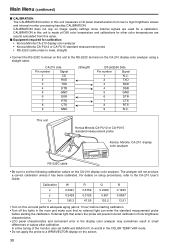
... to CONTRAST. submenu is set to "FACTORY." *2 "H POSITION", "V POSITION", "PHASE" and "CLOCK" ( page 37) cannot be assigned to factory defaults. ( page 30, 31) *1 When the monitor is turned on. Sets the power save menu settings and adjustments made in the picture/ volume adjusting menu. It also returns calibration data to BACKLIGHT...
... to CONTRAST. submenu is set to "FACTORY." *2 "H POSITION", "V POSITION", "PHASE" and "CLOCK" ( page 37) cannot be assigned to factory defaults. ( page 30, 31) *1 When the monitor is turned on. Sets the power save menu settings and adjustments made in the picture/ volume adjusting menu. It also returns calibration data to BACKLIGHT...
Operating Instructions
Page 30
...or CA-PU15 standard measurement probe Konica Minolta CA-210 display color analyzer RS-232C cable • Be sure to high brightness values and internal monitor processing handles CALIBRATION. For details on the screen. 30 CALIBRATION in this unit is made at D65 color temperature and calibrations for other color ...on this unit to the CA-210 User's Guide. CA-210 side Pin number Signal 1 CD 2 RXD 3 TXD 4 DTR 5 GND 6 DSR 7 RTS 8 CTS 9 GND (Straight) BT-LH2550 Side Pin number Signal 1 N.C. 2 TXD 3 RXD 4 DSR 5 GND 6 DTR 7 CTS 8 RTS 9 N.C.
...or CA-PU15 standard measurement probe Konica Minolta CA-210 display color analyzer RS-232C cable • Be sure to high brightness values and internal monitor processing handles CALIBRATION. For details on the screen. 30 CALIBRATION in this unit is made at D65 color temperature and calibrations for other color ...on this unit to the CA-210 User's Guide. CA-210 side Pin number Signal 1 CD 2 RXD 3 TXD 4 DTR 5 GND 6 DSR 7 RTS 8 CTS 9 GND (Straight) BT-LH2550 Side Pin number Signal 1 N.C. 2 TXD 3 RXD 4 DSR 5 GND 6 DTR 7 CTS 8 RTS 9 N.C.
Operating Instructions
Page 36
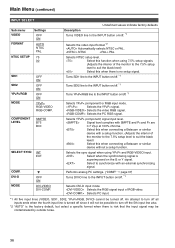
... YPBPR and RGB-VIDEO input. Selects the YPBPR signal. Selects YPBPR (component) signal input level. Selects the RGB signal input of the monitor to the 7.5% setup level to suit the black level) Select this when there is superimposed on /off . *1 Selects the video input... Selects DVI-D input mode. NTSC PAL Selects NTSC setup level. Selects the sync signal when using 7.5% setup signals. (Adjusts the interior of the monitor to the 7.5% setup level to turn off the 5th input line also. *2 "AUTO" is the factory default, but select a specific format when...
... YPBPR and RGB-VIDEO input. Selects the YPBPR signal. Selects YPBPR (component) signal input level. Selects the RGB signal input of the monitor to the 7.5% setup level to suit the black level) Select this when there is superimposed on /off . *1 Selects the video input... Selects DVI-D input mode. NTSC PAL Selects NTSC setup level. Selects the sync signal when using 7.5% setup signals. (Adjusts the interior of the monitor to the 7.5% setup level to turn off the 5th input line also. *2 "AUTO" is the factory default, but select a specific format when...
Operating Instructions
Page 48
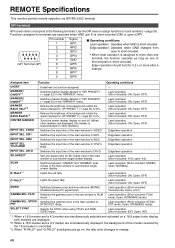
... the center marker display on and off. (When other markers.) Switches the input line of the terminals is short-circuited. Operating conditions - REMOTE Specifications This monitor permits remote operation via GPI/RS-232C terminal. SDI2 INPUT SEL.
... the center marker display on and off. (When other markers.) Switches the input line of the terminals is short-circuited. Operating conditions - REMOTE Specifications This monitor permits remote operation via GPI/RS-232C terminal. SDI2 INPUT SEL.

Operating Instructions
Page 52
...stubborn soiling, use benzene, thinner and similar solvents for some reason, the tally lamp notifies the error. Any moisture entering the monitor could eventually result in the inverter that could damage it with a soft cloth. Remedy Turn off and the screen turns black. ...problem still persists, consult your dealer. 52 Maintenance inspecions Maintenance inspections through periodic and appropriate maintenance are essential to keep the monitor in a weak neutral detergent solution and thoroughly wrung out. Be sure to conduct the following maintenance inspections to enable long-term...
...stubborn soiling, use benzene, thinner and similar solvents for some reason, the tally lamp notifies the error. Any moisture entering the monitor could eventually result in the inverter that could damage it with a soft cloth. Remedy Turn off and the screen turns black. ...problem still persists, consult your dealer. 52 Maintenance inspecions Maintenance inspections through periodic and appropriate maintenance are essential to keep the monitor in a weak neutral detergent solution and thoroughly wrung out. Be sure to conduct the following maintenance inspections to enable long-term...


