

AJSPX800 User Guide
Page 5
...Before Shooting 84 7-1-1 Preparing for Inspections 84 7-1-2 Inspecting the Camera Unit 84 7-1-3 Inspecting the Memory Recording Functions 85 7-2 Maintenance 86 7-2-1 Cleaning Inside the Viewfinder 86 7-2-2 Phenomenon Inherent to CCD Cameras . . . . 86 7-2-3 Replacing the Backup Battery 86 7-2-4 Connector Signals 87 7-3 Warning System 88 7-3-1 Warning Description Tables 88 7-3-2 Error Codes 89 Chapter 8 Menu Description Tables . . 90 8-1 Menu Configuration 90 8-2 SYSTEM SETTING 91 8-2-1 SYSTEM MODE 91 8-2-2 OPTION MODE 91 8-2-3 REC FUNCTION 92 8-2-4 OUTPUT...
...Before Shooting 84 7-1-1 Preparing for Inspections 84 7-1-2 Inspecting the Camera Unit 84 7-1-3 Inspecting the Memory Recording Functions 85 7-2 Maintenance 86 7-2-1 Cleaning Inside the Viewfinder 86 7-2-2 Phenomenon Inherent to CCD Cameras . . . . 86 7-2-3 Replacing the Backup Battery 86 7-2-4 Connector Signals 87 7-3 Warning System 88 7-3-1 Warning Description Tables 88 7-3-2 Error Codes 89 Chapter 8 Menu Description Tables . . 90 8-1 Menu Configuration 90 8-2 SYSTEM SETTING 91 8-2-1 SYSTEM MODE 91 8-2-2 OPTION MODE 91 8-2-3 REC FUNCTION 92 8-2-4 OUTPUT...
AJSPX800 User Guide
Page 7
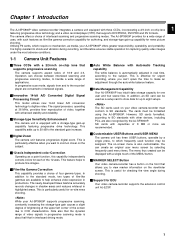
... three USER buttons, operable by selecting frequently used function may be displayed with Automatic Tracking capability The white balance is particularly effective when you to the standard gain increase. / Digital Zoom The camera unit features progressive digital zoom. The AJ-SPX800P provides for news picture shooting. The camera offers a choice of four gamma types. You can create an original user menu screen by a single press, to the subject. This feature helps...
... three USER buttons, operable by selecting frequently used function may be displayed with Automatic Tracking capability The white balance is particularly effective when you to the standard gain increase. / Digital Zoom The camera unit features progressive digital zoom. The AJ-SPX800P provides for news picture shooting. The camera offers a choice of four gamma types. You can create an original user menu screen by a single press, to the subject. This feature helps...
AJSPX800 User Guide
Page 8
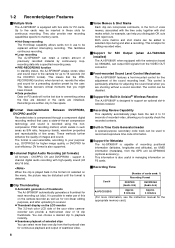
... P2 cards. support 4channel digital audio recording with five slots for example, can help you are initialised. They also provide new recording capabilities specific to overwriting unless the files are deleted or the cards are shooting without interrupting recording. z PRE-RECORDING function In standby status, the AJ-SPX800P always stores video and sound input to the camera for up to a server. DV format is helpful for editing recorded video. / Support for SDI Output (when AJ-YA902AG installed...
... P2 cards. support 4channel digital audio recording with five slots for example, can help you are initialised. They also provide new recording capabilities specific to overwriting unless the files are deleted or the cards are shooting without interrupting recording. z PRE-RECORDING function In standby status, the AJ-SPX800P always stores video and sound input to the camera for up to a server. DV format is helpful for editing recorded video. / Support for SDI Output (when AJ-YA902AG installed...

AJSPX800 User Guide
Page 10
.... Lens cable/microphone cable clamp This clamp secures the lens and microphone cables. Light shoe A video light or similar accessory can be attached here. After the interior of your AJ-SPX800P on /off the power in order to protect the device. Lens mount (bayonet type) The lens is connected here. Lens lever Lower this socket. For a detailed description of the video camera-recorder has been checked and/or repaired, this button must be connected...
.... Lens cable/microphone cable clamp This clamp secures the lens and microphone cables. Light shoe A video light or similar accessory can be attached here. After the interior of your AJ-SPX800P on /off the power in order to protect the device. Lens mount (bayonet type) The lens is connected here. Lens lever Lower this socket. For a detailed description of the video camera-recorder has been checked and/or repaired, this button must be connected...

AJSPX800 User Guide
Page 14
..., see [8-5-5 SW MODE]. Auto Knee function Usually, when you shoot a PC monitor, for the white balance is sent in Memory A or B. In this button changes the screen type in the viewfinder in the viewfinder will be selected using a menu option. For more information, see [4-8-5 Manually setting the color temperature]. For more information on the SYSTEM SETTINGS page. MODE CHECK button Each press of characters onto the video output from the VIDEO OUT connector...
..., see [8-5-5 SW MODE]. Auto Knee function Usually, when you shoot a PC monitor, for the white balance is sent in Memory A or B. In this button changes the screen type in the viewfinder in the viewfinder will be selected using a menu option. For more information, see [4-8-5 Manually setting the color temperature]. For more information on the SYSTEM SETTINGS page. MODE CHECK button Each press of characters onto the video output from the VIDEO OUT connector...
AJSPX800 User Guide
Page 15
... be removed in pause mode. For directions on attaching the connector, see [4-9-2 Selecting Video Output Signals]. REW (rewind) button and lamp During pause, this button pauses (PLAY PAUSE) playback with the video. STOP button This button stops playback. This button has the same function as the REC START/ STOP button and the VTR button at the lens. P2 CARD STATUS LED This LED indicates the recording and playback status of the next clip is selected for inserting P2 cards. Through an internal menu option...
... be removed in pause mode. For directions on attaching the connector, see [4-9-2 Selecting Video Output Signals]. REW (rewind) button and lamp During pause, this button pauses (PLAY PAUSE) playback with the video. STOP button This button stops playback. This button has the same function as the REC START/ STOP button and the VTR button at the lens. P2 CARD STATUS LED This LED indicates the recording and playback status of the next clip is selected for inserting P2 cards. Through an internal menu option...

AJSPX800 User Guide
Page 17
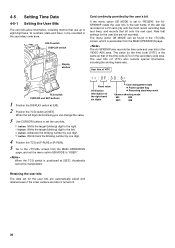
... button resets the time data on P2 cards, the sequence of the external device. Pressing the HOLD button also displays Date/Time/Time Zone. F-RUN: Select this position to continuously advance the time code independently of this switch and the TCG switch. CURSOR and SET buttons Use these buttons to input a reference time code when you inter-lock the time code of the AJ-SPX800P with that time code generation continues. DISPLAY (counter display selector) switch Indications of the time code, CTL* and user...
... button resets the time data on P2 cards, the sequence of the external device. Pressing the HOLD button also displays Date/Time/Time Zone. F-RUN: Select this position to continuously advance the time code independently of this switch and the TCG switch. CURSOR and SET buttons Use these buttons to input a reference time code when you inter-lock the time code of the AJ-SPX800P with that time code generation continues. DISPLAY (counter display selector) switch Indications of the time code, CTL* and user...

AJSPX800 User Guide
Page 26
To use this function, the menu option LOOP REC MODE must be set to be found in order. Even when the free space of a P2 card is used up, this function continues recording while erasing existing data. 3-5 Loop Recording 3-6 Recording Review Function When two or more P2 card slots contain cards, this function allows the target P2 card to "ON" The option LOOP REC MODE can be switched in the
To use this function, the menu option LOOP REC MODE must be set to be found in order. Even when the free space of a P2 card is used up, this function continues recording while erasing existing data. 3-5 Loop Recording 3-6 Recording Review Function When two or more P2 card slots contain cards, this function allows the target P2 card to "ON" The option LOOP REC MODE can be switched in the

AJSPX800 User Guide
Page 29
... the following message: 7,9( 2 Adjust the CC/ND FILTER control according to conditions. The illustration below . 1/4 or more of the screen in the should be adjusted according to the light conditions. match those for the light source of a white pattern. adjusted. Then zoom- z The white object must appear at [AWB]. Chapter 4 Adjustments and Settings for Recording 3 To record high-quality video with the white balance automatically adjusted. adjustment). WHITE BAL: A or B OUTPUT: CAM GAIN...
... the following message: 7,9( 2 Adjust the CC/ND FILTER control according to conditions. The illustration below . 1/4 or more of the screen in the should be adjusted according to the light conditions. match those for the light source of a white pattern. adjusted. Then zoom- z The white object must appear at [AWB]. Chapter 4 Adjustments and Settings for Recording 3 To record high-quality video with the white balance automatically adjusted. adjustment). WHITE BAL: A or B OUTPUT: CAM GAIN...

AJSPX800 User Guide
Page 33
SYNCHRO SCAN ADJUSTMENT buttons (+/-) The AJ-SPX800P is accessible from the SYSTEM SETTING page. 6 These options are selected through the menu options REC SIGNAL and CAMERA MODE. Signals to place the camera-recorder in SYNCHRO SCAN mode. 4-2-3 Placing the Camera-recorder in SYNCHRO SCAN Mode 4-3 Selecting Recording Signals and Recording System To place the camera-recorder in SYNCHRO SCAN mode, follow the steps below. 1 Press the SHUTTER switch positioned at [ON] towards...
SYNCHRO SCAN ADJUSTMENT buttons (+/-) The AJ-SPX800P is accessible from the SYSTEM SETTING page. 6 These options are selected through the menu options REC SIGNAL and CAMERA MODE. Signals to place the camera-recorder in SYNCHRO SCAN mode. 4-2-3 Placing the Camera-recorder in SYNCHRO SCAN Mode 4-3 Selecting Recording Signals and Recording System To place the camera-recorder in SYNCHRO SCAN mode, follow the steps below. 1 Press the SHUTTER switch positioned at [ON] towards...
AJSPX800 User Guide
Page 36
... switch DISPLAY switch Display window Card continuity provided by one digit. 4 Position the TCG at [SET]. The AJ-SPX800P also records the time code and user bits in the VIDEO AUX area. User bits of VITC TCG switch CURSOR and SET buttons 1 Position the DISPLAY switch at [UB]. 2 Position the TCG switch at [F-RUN] or [R-RUN]. 5 Go to the screen from the MAIN OPERATION page. The menu option UB MODE can change the value. 3 Use CURSOR buttons...
... switch DISPLAY switch Display window Card continuity provided by one digit. 4 Position the TCG at [SET]. The AJ-SPX800P also records the time code and user bits in the VIDEO AUX area. User bits of VITC TCG switch CURSOR and SET buttons 1 Position the DISPLAY switch at [UB]. 2 Position the TCG switch at [F-RUN] or [R-RUN]. 5 Go to the screen from the MAIN OPERATION page. The menu option UB MODE can change the value. 3 Use CURSOR buttons...
AJSPX800 User Guide
Page 38
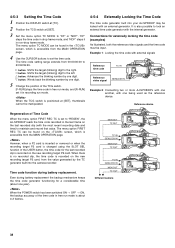
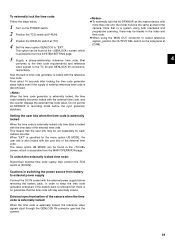
... video signal GENLOCK IN Example 2 Connecting two or more AJ-SPX800Ps with one another, with one digit. 5 Change the position of the time code in free run mode. However, when a P2 card is inserted or removed or when the recording target P2 card is changed using the SLOT SEL function of Time Code When the menu option FIRST REC TC is accessible from the MAIN OPERATION page. 4 Use the CURSOR buttons to set to lock an external time code...
... video signal GENLOCK IN Example 2 Connecting two or more AJ-SPX800Ps with one another, with one digit. 5 Change the position of the time code in free run mode. However, when a P2 card is inserted or removed or when the recording target P2 card is changed using the SLOT SEL function of Time Code When the menu option FIRST REC TC is accessible from the MAIN OPERATION page. 4 Use the CURSOR buttons to set to lock an external time code...
AJSPX800 User Guide
Page 39
... recording mode before removing the battery pack, in time code generator is locked with the external power supply before the sync generator stabilises. Setting the user bits when the time code is externally locked When the time code is externally locked only time data is discontinued. Note that in the screen, which is accessible from the SYSTEM SETTING page. 5 Supply a phase-relationship reference time code (that the time code will stay externally locked. The menu option UB MODE...
... recording mode before removing the battery pack, in time code generator is locked with the external power supply before the sync generator stabilises. Setting the user bits when the time code is externally locked When the time code is externally locked only time data is discontinued. Note that in the screen, which is accessible from the SYSTEM SETTING page. 5 Supply a phase-relationship reference time code (that the time code will stay externally locked. The menu option UB MODE...

AJSPX800 User Guide
Page 42
... data specified through the menu. 1 Press the MENU button for three seconds or longer. 4-6-2 Setting Menu Options The menu options are written and saved in the same manner (the method of the AJ-SPX800P. The other menus can be configured in the internal memory of displaying the menu screen depends on the particular menu). When the AJ-SPX800P is in thumbnail mode, the viewfinder displays "THUMBNAIL OPEN", disabling...
... data specified through the menu. 1 Press the MENU button for three seconds or longer. 4-6-2 Setting Menu Options The menu options are written and saved in the same manner (the method of the AJ-SPX800P. The other menus can be configured in the internal memory of displaying the menu screen depends on the particular menu). When the AJ-SPX800P is in thumbnail mode, the viewfinder displays "THUMBNAIL OPEN", disabling...

AJSPX800 User Guide
Page 48
... P2 card has no free space, the indication blinks. Camera-recorder in LOOP REC mode. Shutter speed fixed. Shutter speed set to SUPER V (high vertical resolution mode). 48 The camera-recorder is in digital zoom mode. Example: If three P2 cards are indicated. Super iris and super black both ON. Shutter speed set to SYNCHRO SCAN. Information Item P2 card remaining free space Indication ___min END WP LOOP INFO P2 _/_ 12 card remaining free space (when MODE CHECK is being recognised. The minimum guaranteed recording time...
... P2 card has no free space, the indication blinks. Camera-recorder in LOOP REC mode. Shutter speed fixed. Shutter speed set to SUPER V (high vertical resolution mode). 48 The camera-recorder is in digital zoom mode. Example: If three P2 cards are indicated. Super iris and super black both ON. Shutter speed set to SYNCHRO SCAN. Information Item P2 card remaining free space Indication ___min END WP LOOP INFO P2 _/_ 12 card remaining free space (when MODE CHECK is being recognised. The minimum guaranteed recording time...

AJSPX800 User Guide
Page 82
... recording. DATE: The date of the clip. CODEC: The recording format of markers and voice memos attached to the clip. The factory setting is recorded on the LCD monitor. 2 Press the MENU BAR button. The factory setting is selected under the item DATA DISPLAY. The pointer moves to the previous menu. This setting is reflected in the recording date shown in the clip property and the shooting date shown when DATE is Time Code...
... recording. DATE: The date of the clip. CODEC: The recording format of markers and voice memos attached to the clip. The factory setting is recorded on the LCD monitor. 2 Press the MENU BAR button. The factory setting is selected under the item DATA DISPLAY. The pointer moves to the previous menu. This setting is reflected in the recording date shown in the clip property and the shooting date shown when DATE is Time Code...

AJSPX800 User Guide
Page 85
... blinks in the display window and the audio level display inside the viewfinder that the speaker is played back from the beginning. Check that the level displays for recording. Then, check that recording and playback operate properly. 9 When multiple P2 cards are turned to the MIC IN jack at a sound source. Inspecting the P2 Card Recording] to the sound level. turned off and the microphone 6 Using the REC button on the power supply type of the external microphone. MIC: For a microphone with internal power supply. +48V: For a microphone with external power...
... blinks in the display window and the audio level display inside the viewfinder that the speaker is played back from the beginning. Check that the level displays for recording. Then, check that recording and playback operate properly. 9 When multiple P2 cards are turned to the MIC IN jack at a sound source. Inspecting the P2 Card Recording] to the sound level. turned off and the microphone 6 Using the REC button on the power supply type of the external microphone. MIC: For a microphone with internal power supply. +48V: For a microphone with external power...

AJSPX800 User Guide
Page 88
.... Countermeasures Disable the write-protect or replace the P2 card. 88 The [WIRELESS RF], however, may not be performed. The SYSTEM ERROR indication and the error code light up . Beeps continuously. Viewfinder The "TURN POWER OFF" indicator blinks. Turn off the power to beep. Recording/ playback operation Recording is an error in a clip on the removed P2 card, repair the clip. 4. System Errors Display window indication The error code lights up . Tally lamp Viewfinder Warning tone Blinks 4 times per second...
.... Countermeasures Disable the write-protect or replace the P2 card. 88 The [WIRELESS RF], however, may not be performed. The SYSTEM ERROR indication and the error code light up . Beeps continuously. Viewfinder The "TURN POWER OFF" indicator blinks. Turn off the power to beep. Recording/ playback operation Recording is an error in a clip on the removed P2 card, repair the clip. 4. System Errors Display window indication The error code lights up . Tally lamp Viewfinder Warning tone Blinks 4 times per second...

AJSPX800 User Guide
Page 92
... of the camera's VIDEO OUT CHARACTER switch. (The character content is the same as the video output signal.) ON: Enable superimpose. Even when this item will default to superimpose characters on the LCD monitor to start during stop , recording pause, and playback. LCD MON ON CHAR OFF -CUF - Set PRE RECORDING. 0-15SEC: Set the length of the P2 card. LOOP REC ON MODE OFF ---F- After the power is turned off...
... of the camera's VIDEO OUT CHARACTER switch. (The character content is the same as the video output signal.) ON: Enable superimpose. Even when this item will default to superimpose characters on the LCD monitor to start during stop , recording pause, and playback. LCD MON ON CHAR OFF -CUF - Set PRE RECORDING. 0-15SEC: Set the length of the P2 card. LOOP REC ON MODE OFF ---F- After the power is turned off...

AJSPX800 User Guide
Page 110
... date and time (2 last digits of year, month, date, time). ON: Display setting and indication while the power is turned OFF. The ____ in V-V mode. TCG: TCG value enters UB. USER NO-INFO Input the user name. Select the user bits mode for the UMID information setting. OFF: Power-down LCD monitor while camera power is turned OFF. For the first recording after the power is turned on the LCD monitor when the power is recorded. Items/ Adjustable Data Saved...
... date and time (2 last digits of year, month, date, time). ON: Display setting and indication while the power is turned OFF. The ____ in V-V mode. TCG: TCG value enters UB. USER NO-INFO Input the user name. Select the user bits mode for the UMID information setting. OFF: Power-down LCD monitor while camera power is turned OFF. For the first recording after the power is turned on the LCD monitor when the power is recorded. Items/ Adjustable Data Saved...


