Operating Instructions
Page 3
...required when the apparatus has been damaged in the cabinet and the back or bottom are provided for the PT-52DL52. All the safety and operating instructions should never be used , use this apparatus during lightning storms or when unused for replacement of the polarized or grounding-type plug. Do ... the provided plug does not fit into the apparatus, the apparatus has been exposed to ensure reliable operation of time. CAUTION : (1) This TV set becoming unstable, possibly causing injury. (2) Slots and openings in any heat sources such as power-supply cord or plug is intended to ...
...required when the apparatus has been damaged in the cabinet and the back or bottom are provided for the PT-52DL52. All the safety and operating instructions should never be used , use this apparatus during lightning storms or when unused for replacement of the polarized or grounding-type plug. Do ... the provided plug does not fit into the apparatus, the apparatus has been exposed to ensure reliable operation of time. CAUTION : (1) This TV set becoming unstable, possibly causing injury. (2) Slots and openings in any heat sources such as power-supply cord or plug is intended to ...
Operating Instructions
Page 4
...TV to a computer. This equipment generates, uses and can be regulated in a residential installation. If this device must accept any changes or modifications to this projection TV not expressly approved by Matsuehita Electric Corporation of America One Panasonic Way, Secaucus, NJ 07094 Panasonic...8226; Consult the dealer or an experienced radio / TV technician for compliance could cause harmful interference and would void the user's authority to operate this equipment. FCC Declaration of Conformity PT-52DL52 Responsible Party: Contact Source: Matsushita Electric Corporation of ...
...TV to a computer. This equipment generates, uses and can be regulated in a residential installation. If this device must accept any changes or modifications to this projection TV not expressly approved by Matsuehita Electric Corporation of America One Panasonic Way, Secaucus, NJ 07094 Panasonic...8226; Consult the dealer or an experienced radio / TV technician for compliance could cause harmful interference and would void the user's authority to operate this equipment. FCC Declaration of Conformity PT-52DL52 Responsible Party: Contact Source: Matsushita Electric Corporation of ...

Operating Instructions
Page 5
... remote control .. 58 Programming The Illuminated Remote Control Using Access Codes 58 Programming Without A Code (When the code is not known 59 Infrared Codes Index 60 Mode Operational Key Chart 63 Troubleshooting Chart 65 Cleaning 66 Specifications 67 5 TV PROGRAMS 52 U.S. Out Terminals 10 How to connect the COMPONENTVIDEO Input Terminals.. 11 How...
... remote control .. 58 Programming The Illuminated Remote Control Using Access Codes 58 Programming Without A Code (When the code is not known 59 Infrared Codes Index 60 Mode Operational Key Chart 63 Troubleshooting Chart 65 Cleaning 66 Specifications 67 5 TV PROGRAMS 52 U.S. Out Terminals 10 How to connect the COMPONENTVIDEO Input Terminals.. 11 How...

Operating Instructions
Page 6
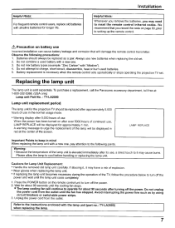
...Battery Installation Requires two AA batteries, 1. Consult your dealer or electronics supply store. Affixing to a wall Use a strong rope or a chain (not included) to fasten the projection TV firmly to prevent internal component failure. Remove top cover by pressing down . must match the markings in...video cables should utilize 75 ohm coaxial shielded wire. Before you purchase any cables, be sure you will fall over . De not use this (polarized) plug with a receptacle or other outlet unless the blade can reduce remote control transmitter range. Install the batteries as a...
...Battery Installation Requires two AA batteries, 1. Consult your dealer or electronics supply store. Affixing to a wall Use a strong rope or a chain (not included) to fasten the projection TV firmly to prevent internal component failure. Remove top cover by pressing down . must match the markings in...video cables should utilize 75 ohm coaxial shielded wire. Before you purchase any cables, be sure you will fall over . De not use this (polarized) plug with a receptacle or other outlet unless the blade can reduce remote control transmitter range. Install the batteries as a...
Operating Instructions
Page 7
...to reset the remote control infrared codes. A warning message to urge the replacement of the TV, follow the procedure below to turn off the power. The lamp cooling fan will be replaced as by using circuit breakers or switchable power strips. 3. Do not attempt to charge, short-circuit, ... "IV should always be displayed in mind When replacing the lamp unit with a new one . 3. To purchase a replacement, call the Panasonic accessory department, toll free at the center of the lamp unit is necessary when the remote control acts sporadically or stops operating the projection...
...to reset the remote control infrared codes. A warning message to urge the replacement of the TV, follow the procedure below to turn off the power. The lamp cooling fan will be replaced as by using circuit breakers or switchable power strips. 3. Do not attempt to charge, short-circuit, ... "IV should always be displayed in mind When replacing the lamp unit with a new one . 3. To purchase a replacement, call the Panasonic accessory department, toll free at the center of the lamp unit is necessary when the remote control acts sporadically or stops operating the projection...
Operating Instructions
Page 9
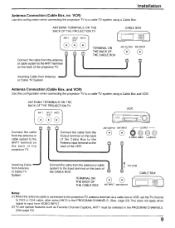
...on the back of the Cable Box to a cable TV system using a Cable Box and VCR. ANTENNA TERMINALS ON THE BACK OF THE PROJECTION TV OUT I ANTI SPLIT ANT2 1 Connect the cable from VIDEO INPUT. (2) To use special features such as Favorite Channel Captions, ANT1 must... ANGTINPUTAN(T_OUTPUT [/I I I ANT1 SPLIT ANT2 1 VCR Connect the cable from Antenna ...,._ or Cable TV System Antenna Connection (Cable Box, and VCR) Use this configuration when connecting the projection TV to the Antenna input terminal on the back of the VCR. TERMINAL ON THE BACK OF THE CABLE...
...on the back of the Cable Box to a cable TV system using a Cable Box and VCR. ANTENNA TERMINALS ON THE BACK OF THE PROJECTION TV OUT I ANTI SPLIT ANT2 1 Connect the cable from VIDEO INPUT. (2) To use special features such as Favorite Channel Captions, ANT1 must... ANGTINPUTAN(T_OUTPUT [/I I I ANT1 SPLIT ANT2 1 VCR Connect the cable from Antenna ...,._ or Cable TV System Antenna Connection (Cable Box, and VCR) Use this configuration when connecting the projection TV to the Antenna input terminal on the back of the VCR. TERMINAL ON THE BACK OF THE CABLE...
Operating Instructions
Page 10
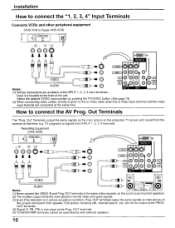
... incorrect operation. (2) The monitor output emits the main picture's normal video and audio signals. (3) Even if the television is located on the projection TV screen and sound from INPUT 1, 2, 3, 4 terminals. OUT terminals. (5) To AUDIO AMP terminals cannot be output at the PROG. Sub picture...given to connect the AV Prog. Input 4 is in picture-out-picture condition, Prog. will not be used directly with external speakers. 10 Select the desired VIDEO input position by pushing the TV/VIDEO button. (See page 15) (2) When connecting video cables, priority is not output at the INPUT ...
... incorrect operation. (2) The monitor output emits the main picture's normal video and audio signals. (3) Even if the television is located on the projection TV screen and sound from INPUT 1, 2, 3, 4 terminals. OUT terminals. (5) To AUDIO AMP terminals cannot be output at the PROG. Sub picture...given to connect the AV Prog. Input 4 is in picture-out-picture condition, Prog. will not be used directly with external speakers. 10 Select the desired VIDEO input position by pushing the TV/VIDEO button. (See page 15) (2) When connecting video cables, priority is not output at the INPUT ...

Operating Instructions
Page 11
Installation How to connect the DIGITAL IN Terminals n (Dl@ qu VIDEO O0 OJO AUDIO OIO How to connect the COMPONENT VIDEO Input Terminals (DVD Player) Audl_ oop, OUT L DVD(¥ p,, _,,, OUT 66® Note: Similar connections are available at the COMPONENT VIDEO Input 1, 2 Terminals.
Installation How to connect the DIGITAL IN Terminals n (Dl@ qu VIDEO O0 OJO AUDIO OIO How to connect the COMPONENT VIDEO Input Terminals (DVD Player) Audl_ oop, OUT L DVD(¥ p,, _,,, OUT 66® Note: Similar connections are available at the COMPONENT VIDEO Input 1, 2 Terminals.
Operating Instructions
Page 13
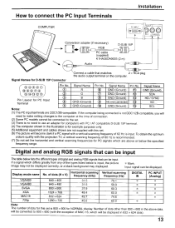
...Ground) Pin No. ® @ @ @ @ Signal Name GND (Ground) SDA HD / SYNC VD SCL (1) The PC input terminals are not supplied with the projection TV, a vertical scanning frequency of 60 Hz is recommended. (7) De not set is 800 x 600 for NORMAL display. Digital and analog RGB signals that matches 2 x RCA... correctly, or a black background may displayed. PC INPUT (Analog) d_ The number of dots for this set . (3) There is no need to use an adapter for computers with a vertical scanning frequency of MAC 16, which will be displayed in the illustration is not DDC1/2B-compatible, you will...
...Ground) Pin No. ® @ @ @ @ Signal Name GND (Ground) SDA HD / SYNC VD SCL (1) The PC input terminals are not supplied with the projection TV, a vertical scanning frequency of 60 Hz is recommended. (7) De not set is 800 x 600 for NORMAL display. Digital and analog RGB signals that matches 2 x RCA... correctly, or a black background may displayed. PC INPUT (Analog) d_ The number of dots for this set . (3) There is no need to use an adapter for computers with a vertical scanning frequency of MAC 16, which will be displayed in the illustration is not DDC1/2B-compatible, you will...
Operating Instructions
Page 18
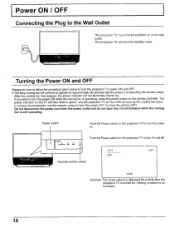
...on the projection TV to turn the set off by ). After the cooling fan has stopped, the power indicator will become standby mode. If you wish to turn the power ON while the cooling fan is operating, press the power button on at the wall outlet. In normal circumstances, use the remote... control to turn the power OFF (turning the picture OFF). The projection TV will not illuminate (Stand-by the remote control. Power ON / OFF I Connecting the Plug to the Wall ...
...on the projection TV to turn the set off by ). After the cooling fan has stopped, the power indicator will become standby mode. If you wish to turn the power ON while the cooling fan is operating, press the power button on at the wall outlet. In normal circumstances, use the remote... control to turn the power OFF (turning the picture OFF). The projection TV will not illuminate (Stand-by the remote control. Power ON / OFF I Connecting the Plug to the Wall ...
Operating Instructions
Page 24
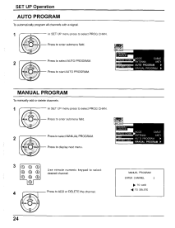
... to select desired channel. MANUAL PROGRAM ENTER CHANNEL 3 • TO ADD • TO DELETE 24 Press to display next menu. 3 @ ® ®) I® ® el Use remote numeric keypad to start AUTO PROGRAM. Press to select PROG CHAN. MANUAL PROGRAM To manually add or delete channels. 1 In SET UP menu press...
... to select desired channel. MANUAL PROGRAM ENTER CHANNEL 3 • TO ADD • TO DELETE 24 Press to display next menu. 3 @ ® ®) I® ® el Use remote numeric keypad to start AUTO PROGRAM. Press to select PROG CHAN. MANUAL PROGRAM To manually add or delete channels. 1 In SET UP menu press...

Operating Instructions
Page 27
.... CC MODE set to normal viewing. In the submenu field press to ON will remain on the television screen. Another mode used for video related information. Another mode which displays information and blanks out a large portion of the picture). Notes: (1) Recommended ...menu Set Up for Closed Caption when using Mute Button. [_ON MUTE: C1 [-_ MODE: OFF (2) The setting for video related information. This returns the set to select [_ MODE...
.... CC MODE set to normal viewing. In the submenu field press to ON will remain on the television screen. Another mode used for video related information. Another mode which displays information and blanks out a large portion of the picture). Notes: (1) Recommended ...menu Set Up for Closed Caption when using Mute Button. [_ON MUTE: C1 [-_ MODE: OFF (2) The setting for video related information. This returns the set to select [_ MODE...

Operating Instructions
Page 30
... adaptors connected to COMPONENT VIDEO INPUT (Y, Pb/Cb ,Pr/Cr input terminals) and DIGITAL-IN Select HD or SD to select FREEZE. Use only for HD (high definition) and SD (standard definition). In OTHER ADJ submenu field press to automatically adjust color parameters for 480p signal... source. FREEZE • FREEZE 3 FREEZE TV/VCR O When FREEZE SPLIT is pressed during single screen. HD : When the input signal is single, press T_R to be frozen and the...
... adaptors connected to COMPONENT VIDEO INPUT (Y, Pb/Cb ,Pr/Cr input terminals) and DIGITAL-IN Select HD or SD to select FREEZE. Use only for HD (high definition) and SD (standard definition). In OTHER ADJ submenu field press to automatically adjust color parameters for 480p signal... source. FREEZE • FREEZE 3 FREEZE TV/VCR O When FREEZE SPLIT is pressed during single screen. HD : When the input signal is single, press T_R to be frozen and the...

Operating Instructions
Page 31
... turned off or distorted at the edges, when viewing normal aspect images of the projection TV is not affected when the screen position is equipped with this in mind. (2) Be careful when using screen mode switching function (zoom, etc.) may violate copyright laws. (3) Images displayed on the ...position. During Zoom mode: V-POSITION During PC input mode: V-POSITION H-POSITION -32 - +32 -16 - +16 -32 - +32 Notes: (1) This projection TV is adjusted. 31 Select the proper screen mode with various screen modes. PICTURE Adjustment POS ADJ. In POS ADJ. Shrinking and enlarging images by the...
... turned off or distorted at the edges, when viewing normal aspect images of the projection TV is not affected when the screen position is equipped with this in mind. (2) Be careful when using screen mode switching function (zoom, etc.) may violate copyright laws. (3) Images displayed on the ...position. During Zoom mode: V-POSITION During PC input mode: V-POSITION H-POSITION -32 - +32 -16 - +16 -32 - +32 Notes: (1) This projection TV is adjusted. 31 Select the proper screen mode with various screen modes. PICTURE Adjustment POS ADJ. In POS ADJ. Shrinking and enlarging images by the...

Operating Instructions
Page 33
Press to display CHANNELS. FAV _ ALL 33 I CHANNEL SCAN I CHANNEL SCAN Lets you select the channel scanning mode either FAV or ALL. Press to rotate to CHANNELS, %# 2 Press to select CHANNEL SCAN. CHANNEL SCAN ALL To scan all channels when using the CH up to enter submenu field. Press to display the roller guide menu. CHANNEL SCAN FAV To enter up /down buttons. 1 Press to select FAV or ALL. Press to select FAVORITES, Press to 16 favorite channels.
Press to display CHANNELS. FAV _ ALL 33 I CHANNEL SCAN I CHANNEL SCAN Lets you select the channel scanning mode either FAV or ALL. Press to rotate to CHANNELS, %# 2 Press to select CHANNEL SCAN. CHANNEL SCAN ALL To scan all channels when using the CH up to enter submenu field. Press to display the roller guide menu. CHANNEL SCAN FAV To enter up /down buttons. 1 Press to select FAV or ALL. Press to select FAVORITES, Press to 16 favorite channels.

Operating Instructions
Page 34
Press to select desired channel. I Press • to add or '_ to delete the selected channel. (Example: Channel 15 is added) NORMAL PICTURE 34 This returns the set to normal viewing, (Example: Channel 15 is selected) j..._ . 2.3 Repeat step 2 to 3 up to the roller guide. CHANNELSCAN FAVORITE CHANNELS Selection 1 Under CHANNEL SCAN FAV press to select ENTER CHANNEL. ®® Use remote numeric keypad to exit roller guide. To end Adjustment: voL _ Press twice to return to 16 favorite channels.
Press to select desired channel. I Press • to add or '_ to delete the selected channel. (Example: Channel 15 is added) NORMAL PICTURE 34 This returns the set to normal viewing, (Example: Channel 15 is selected) j..._ . 2.3 Repeat step 2 to 3 up to the roller guide. CHANNELSCAN FAVORITE CHANNELS Selection 1 Under CHANNEL SCAN FAV press to select ENTER CHANNEL. ®® Use remote numeric keypad to exit roller guide. To end Adjustment: voL _ Press twice to return to 16 favorite channels.

Operating Instructions
Page 35
... select desired channel (refer to display the roller guide menu. Press to select desired preset caption. 2 Ioo I® ® oi ®1 Use remote numeric keypad to select desired channel (refer to CHANNELS. Press to display next menu. while a channel MANUAL CAPTION Enter channel numbers and captions... press to display CHANNELS. Press to display next menu. PRESET CAPTION Assign channel numbers to pre°set popular TV stations. 1 @ Under PRESET CAPTION press to select PRESET CAPTION / MANUAL CAPTION / INPUT LABEL. Press to rotate to your local...
... select desired channel (refer to display the roller guide menu. Press to select desired preset caption. 2 Ioo I® ® oi ®1 Use remote numeric keypad to select desired channel (refer to CHANNELS. Press to display next menu. while a channel MANUAL CAPTION Enter channel numbers and captions... press to display CHANNELS. Press to display next menu. PRESET CAPTION Assign channel numbers to pre°set popular TV stations. 1 @ Under PRESET CAPTION press to select PRESET CAPTION / MANUAL CAPTION / INPUT LABEL. Press to rotate to your local...

Operating Instructions
Page 37
... the roller guide menu. 2 (7-7_A-- I Audio Adjustment 1 Press to display AUDIO menu. Press to enter submenu field. Signal available White display - Second Audio Programming (typically used for bilingual audio). Notes: SAP (1) AUDIO MODE selection is also possible by pressing the (_) button on the remote control (see page 15). (2) When SAP is...
... the roller guide menu. 2 (7-7_A-- I Audio Adjustment 1 Press to display AUDIO menu. Press to enter submenu field. Signal available White display - Second Audio Programming (typically used for bilingual audio). Notes: SAP (1) AUDIO MODE selection is also possible by pressing the (_) button on the remote control (see page 15). (2) When SAP is...

Operating Instructions
Page 38
... listening to select AUDIO ADJ. Audio Adjustment Selecting BASS / TREBLE / BALANCE / NORMAL 1 In AUDIO menu press to the sound. Emphasize the left / right speaker volume. Use special signal processing to accurately reproduce the "attack" of each sound, in VIDEO mode). AI SOUND / BBE AISOUND BBE Equalize overall volume levels across all...
... listening to select AUDIO ADJ. Audio Adjustment Selecting BASS / TREBLE / BALANCE / NORMAL 1 In AUDIO menu press to the sound. Emphasize the left / right speaker volume. Use special signal processing to accurately reproduce the "attack" of each sound, in VIDEO mode). AI SOUND / BBE AISOUND BBE Equalize overall volume levels across all...

Operating Instructions
Page 40
... c_). Press to view 3icture source status. This allows you to switch the PIP and MAIN PICTURE source. 4O Note: Audio is not available. or Use the remote control numeric keypad. SWAP SWAP O Press _SWAP to watch two (2) live broadcasts at the same time with or without an external video source...
... c_). Press to view 3icture source status. This allows you to switch the PIP and MAIN PICTURE source. 4O Note: Audio is not available. or Use the remote control numeric keypad. SWAP SWAP O Press _SWAP to watch two (2) live broadcasts at the same time with or without an external video source...