Datasheet
Page 1
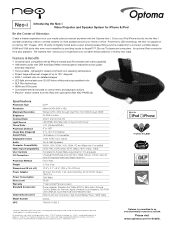
... A/V Connector, High-Power Battery Pack, HDMI Cable DV20A 796435 41 693 5 *Lamp life is also available. Powered by providing inputs for details. HD (1080i) through VGA Port; DLP® and the DLP logo are property of digitally-tuned audio output, amazing space-filling sound is created from your iPod/iPhone directly into the Neo-i and start projecting videos or photos instantly on /off and cool operating temperature • Project large widescreen images of up...
... A/V Connector, High-Power Battery Pack, HDMI Cable DV20A 796435 41 693 5 *Lamp life is also available. Powered by providing inputs for details. HD (1080i) through VGA Port; DLP® and the DLP logo are property of digitally-tuned audio output, amazing space-filling sound is created from your iPod/iPhone directly into the Neo-i and start projecting videos or photos instantly on /off and cool operating temperature • Project large widescreen images of up...

Universal Dock Adapters
Page 1
Included Dock Adapters with Neo-i Adapter No. 19 18 16 15 10 iPod/iPhone Description iPhone 4 iPod Nano 5G iPod Touch 2G and newer iPhone 3G & 3GS iPod Classic 160GB & iPod 5G 60/80GB #17 iPod Nano 4G is not necessary for operation but does provide the best fit for the Apple products listed below. Contact Optoma customer service to order Adapters are often supplied with Universal Dock Adapters for your Apple product. The Neo-i ships with your particular Apple product. A Universal Dock Adapter is available from Optoma.
Included Dock Adapters with Neo-i Adapter No. 19 18 16 15 10 iPod/iPhone Description iPhone 4 iPod Nano 5G iPod Touch 2G and newer iPhone 3G & 3GS iPod Classic 160GB & iPod 5G 60/80GB #17 iPod Nano 4G is not necessary for operation but does provide the best fit for the Apple products listed below. Contact Optoma customer service to order Adapters are often supplied with Universal Dock Adapters for your Apple product. The Neo-i ships with your particular Apple product. A Universal Dock Adapter is available from Optoma.

User's Manual
Page 2
... reliable operation of the projector and to protect from that the ambient room temperature is loose inside. Do not use room blinds to reduce ambient light levels. Ensure that to which can radiate radio frequency energy and, if not installed and used in ...Opening or removing covers may touch dangerous voltage points and short out parts that emits heat. 4. They may expose you send the unit for repair. 15. Do not touch the projector for long periods of this product, please contact your product. 11. Caution: Changes or modifications not expressly approved by turning...
... reliable operation of the projector and to protect from that the ambient room temperature is loose inside. Do not use room blinds to reduce ambient light levels. Ensure that to which can radiate radio frequency energy and, if not installed and used in ...Opening or removing covers may touch dangerous voltage points and short out parts that emits heat. 4. They may expose you send the unit for repair. 15. Do not touch the projector for long periods of this product, please contact your product. 11. Caution: Changes or modifications not expressly approved by turning...
User's Manual
Page 3
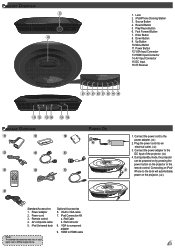
...10. Menu i.Menu Enter Repeat Shuffle 4 3 4 5 6 7 8 9 10 POWER ON 2 1 1. Plug the power cord into an electrical outlet. () 3. Remote control 4. iPad Connector 8. Enter Button 8. Power cord 3. AV composite cable 5. Source Button 4. Fast Forward Button 7. iPad Cable b. VGA to the DC Input of the projector. () 4. Play/Pause Button 6. Down Button 9. Rewind Button 5. VGA Input Connector 13. AV Input Connector 15. iPod Universal dock Optional Accessories 6. Lens 2. Power Button 12. DC Input 16. Connecting an iPod/ iPhone to HDMI cable...
...10. Menu i.Menu Enter Repeat Shuffle 4 3 4 5 6 7 8 9 10 POWER ON 2 1 1. Plug the power cord into an electrical outlet. () 3. Remote control 4. iPad Connector 8. Enter Button 8. Power cord 3. AV composite cable 5. Source Button 4. Fast Forward Button 7. iPad Cable b. VGA to the DC Input of the projector. () 4. Play/Pause Button 6. Down Button 9. Rewind Button 5. VGA Input Connector 13. AV Input Connector 15. iPod Universal dock Optional Accessories 6. Lens 2. Power Button 12. DC Input 16. Connecting an iPod/ iPhone to HDMI cable...
User's Manual
Page 4
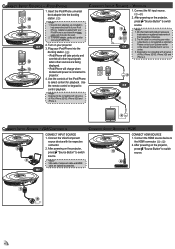
...all series of their respective companies. 2. Use the remote control or keypad to the HDMI connector. (~) 2. VGA/COMPONENT IN VGA 1 2 CONNECT INPUT SOURCE 1. HDMI CONNECT HDMI SOURCE 1. Adapters supplied with its respective connector. 2. CONNECT INPUT SOURCE - The AV cable for playback. or 2. After powering on the projector, press "Source Button" to be used. 2. iPOD/iPHONE 1. Designed to switch source. All other sources are included to projector. 4. After powering on the projector, press "Source Button" to select content for...
...all series of their respective companies. 2. Use the remote control or keypad to the HDMI connector. (~) 2. VGA/COMPONENT IN VGA 1 2 CONNECT INPUT SOURCE 1. HDMI CONNECT HDMI SOURCE 1. Adapters supplied with its respective connector. 2. CONNECT INPUT SOURCE - The AV cable for playback. or 2. After powering on the projector, press "Source Button" to be used. 2. iPOD/iPHONE 1. Designed to switch source. All other sources are included to projector. 4. After powering on the projector, press "Source Button" to select content for...

User's Manual
Page 5
... up Display/hide the OSD menu Power on /off - Toggle Shuffle option to exit the current menu. Highlight the desired option. ( ) 3. Button Source Source Rewind Fast Forward Play/Pause Enter Enter Down Up Menu Menu Power Mute Aspect Ratio Image Off Info. Switch 4:3/16:9/Auto - HOW TO USE THE MENU Main menu Using the Control Panel MEDIA PLAYBACK CONTROL OPERATION Use the keypad or remote control to exit the current menu. 5 Increase volume level - Menu i.Menu...
... up Display/hide the OSD menu Power on /off - Toggle Shuffle option to exit the current menu. Highlight the desired option. ( ) 3. Button Source Source Rewind Fast Forward Play/Pause Enter Enter Down Up Menu Menu Power Mute Aspect Ratio Image Off Info. Switch 4:3/16:9/Auto - HOW TO USE THE MENU Main menu Using the Control Panel MEDIA PLAYBACK CONTROL OPERATION Use the keypad or remote control to exit the current menu. 5 Increase volume level - Menu i.Menu...

User's Manual
Page 6
... on/off. Color Mode: Select color mode (Standard, Extended). Aspect Ratio: Select aspect ratio (4:3, 16:9, Auto). Projection: Select projection mode (Front Desktop, Rear Desktop). Signal: Select signal mode (H-Position, V-Position, Clock, Phase) * "Signal" is only available when the source input is VGA. Brightness: Set the brightness level. HOW TO USE THE MENU - Music Menu EQ: Select equalizer mode (Standard, Deep Bass, Treble, Movie). SOURCE: HDMI, COMPOSITE AV (AV IN), VGA Input signal source Display OSD menu Picture Menu Image Mode: Select image mode (Bright...
... on/off. Color Mode: Select color mode (Standard, Extended). Aspect Ratio: Select aspect ratio (4:3, 16:9, Auto). Projection: Select projection mode (Front Desktop, Rear Desktop). Signal: Select signal mode (H-Position, V-Position, Clock, Phase) * "Signal" is only available when the source input is VGA. Brightness: Set the brightness level. HOW TO USE THE MENU - Music Menu EQ: Select equalizer mode (Standard, Deep Bass, Treble, Movie). SOURCE: HDMI, COMPOSITE AV (AV IN), VGA Input signal source Display OSD menu Picture Menu Image Mode: Select image mode (Bright...

User's Manual
Page 7
... image appears on-screen • Ensure the power adapter/cable are correctly and securely connected. • Ensure the pins of focus • Adjust the Focus Dial. • Make sure the projection screen is between the required distance 9.6 to 126.6 inches (0.245 to "ON". Color Mode: Select color mode (Standard, Extended). See page 5. Audio Problems No sound • Press the Volume + button. (See page 5) COMPATIBILITY MODE Timing Table Mode Resolution V-Sync (Hz) 640x480 60 800x600 60 VGA...
... image appears on-screen • Ensure the power adapter/cable are correctly and securely connected. • Ensure the pins of focus • Adjust the Focus Dial. • Make sure the projection screen is between the required distance 9.6 to 126.6 inches (0.245 to "ON". Color Mode: Select color mode (Standard, Extended). See page 5. Audio Problems No sound • Press the Volume + button. (See page 5) COMPATIBILITY MODE Timing Table Mode Resolution V-Sync (Hz) 640x480 60 800x600 60 VGA...

Quick Start Guide
Page 4
... Start Guide 6.Using the OSD Menu 1. 按 • • OSD OSD 15 秒,LED 和 OSD 閉。 2 3 4 5 6 1 OSD OSD 15 秒,LED 和 OSD 2 3 4 5 6 1 OSD OSD 15 LED와 OSD 2 3 4 5 ( / 엔터) 6 1. ( / Menu OSD OSD 15 LED͓ ΑͼOSD 2 3 Enterʢ֬ఆʣ) 4 5 Enterʢ֬ఆʣ) 6. ( / Menu For more information, see the User Manual...
... Start Guide 6.Using the OSD Menu 1. 按 • • OSD OSD 15 秒,LED 和 OSD 閉。 2 3 4 5 6 1 OSD OSD 15 秒,LED 和 OSD 2 3 4 5 6 1 OSD OSD 15 LED와 OSD 2 3 4 5 ( / 엔터) 6 1. ( / Menu OSD OSD 15 LED͓ ΑͼOSD 2 3 Enterʢ֬ఆʣ) 4 5 Enterʢ֬ఆʣ) 6. ( / Menu For more information, see the User Manual...


