
User Manual
Page 3
... module has been replaced. Please do not expose this user's guide. ▀■ Warning- Reset the "Lamp Reset" function from the onscreen display "Options|Lamp Settings" menu after replacing the lamp module (refer to cool down , and follow all warnings, precautions and maintenance as recommended in operation. ▀■ Warning- Allow...
... module has been replaced. Please do not expose this user's guide. ▀■ Warning- Reset the "Lamp Reset" function from the onscreen display "Options|Lamp Settings" menu after replacing the lamp module (refer to cool down , and follow all warnings, precautions and maintenance as recommended in operation. ▀■ Warning- Allow...
User Manual
Page 12
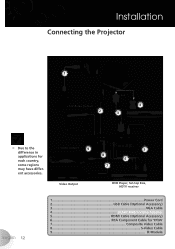
Installation Connecting the Projector 1 +12V Relay Output 2 RGB 4 3 Due to the difference in applications for YPbPr 7 Composite Video Cable 8 S-Video Cable 9...IR Module S-Video Output 9 Video Output 5 8 6 7 DVD Player, Set-top Box, HDTV receiver English 12 1 Power Cord 2 USB Cable (Optional Accessory) 3...VGA Cable 4 SCART RGB/S-Video Adaptor 5 HDMI Cable (Optional Accessory) 6 RCA Component Cable for each country, some regions may have different accessories.
Installation Connecting the Projector 1 +12V Relay Output 2 RGB 4 3 Due to the difference in applications for YPbPr 7 Composite Video Cable 8 S-Video Cable 9...IR Module S-Video Output 9 Video Output 5 8 6 7 DVD Player, Set-top Box, HDTV receiver English 12 1 Power Cord 2 USB Cable (Optional Accessory) 3...VGA Cable 4 SCART RGB/S-Video Adaptor 5 HDMI Cable (Optional Accessory) 6 RCA Component Cable for each country, some regions may have different accessories.
User Manual
Page 20
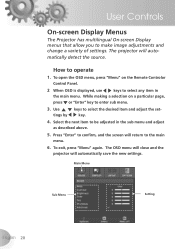
... to the main menu. 6. Select the next item to make image adjustments and change a variety of settings. Use keys to operate 1. tings by key. 4. How to select the desired item and adjust the set- Press "Enter" to select any item in the sub menu and adjust as described above. 5. Main... Menu Sub Menu Setting English 20 While making a selection on the Remote Controlor Control Panel. 2 When OSD is displayed...
... to the main menu. 6. Select the next item to make image adjustments and change a variety of settings. Use keys to operate 1. tings by key. 4. How to select the desired item and adjust the set- Press "Enter" to select any item in the sub menu and adjust as described above. 5. Main... Menu Sub Menu Setting English 20 While making a selection on the Remote Controlor Control Panel. 2 When OSD is displayed...
User Manual
Page 22
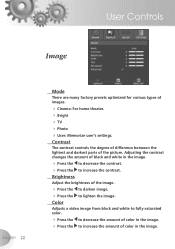
... are many factory presets optimized for various types of images. Cinema: For home theater. Bright TV Photo User: Memorize user's settings.
... are many factory presets optimized for various types of images. Cinema: For home theater. Bright TV Photo User: Memorize user's settings.
User Manual
Page 24
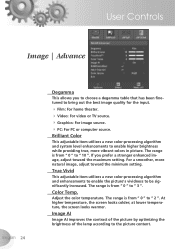
...3 ". Color Temp. User Controls Image | Advance English 24 Degamma This allows you prefer a stronger enhanced image, adjust toward the minimum setting. True Vivid This adjustable item utilizes a new color-processing algorithm and enhancements to enable the picture's vividness to the picture content. The ...range is from " 0 " to enable higher brightness while providing true, more natural image, adjust toward the maximum setting. Brilliant Color This adjustable item utilizes a new color-processing algorithm and system level enhancements to " 2 ". The range is from " 0...
...3 ". Color Temp. User Controls Image | Advance English 24 Degamma This allows you prefer a stronger enhanced image, adjust toward the minimum setting. True Vivid This adjustable item utilizes a new color-processing algorithm and enhancements to enable the picture's vividness to the picture content. The ...range is from " 0 " to enable higher brightness while providing true, more natural image, adjust toward the maximum setting. Brilliant Color This adjustable item utilizes a new color-processing algorithm and system level enhancements to " 2 ". The range is from " 0...

User Manual
Page 29
User Controls "PC Mode" function is a wide screen format resolution you must select this setting. PC Mode This Mode is only for MAC) / 1280 x 1024 / 1400 x 1050. *All supported resolutions are : 720 x 400 / 854 x 480 / 1280 x 720 / 1280 x 768. ... (* for use when using this projector with a PC signal, either Analogue connector. Wide: If your PC output is a Normal (4:3) resolution you must select this setting. Examples of Wide screen resolutions are listed on page 41. 29 English
User Controls "PC Mode" function is a wide screen format resolution you must select this setting. PC Mode This Mode is only for MAC) / 1280 x 1024 / 1400 x 1050. *All supported resolutions are : 720 x 400 / 854 x 480 / 1280 x 720 / 1280 x 768. ... (* for use when using this projector with a PC signal, either Analogue connector. Wide: If your PC output is a Normal (4:3) resolution you must select this setting. Examples of Wide screen resolutions are listed on page 41. 29 English
User Manual
Page 30
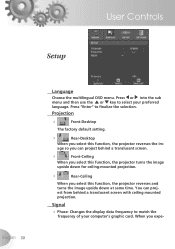
... the im- Press or into the sub menu and then use the or key to finalize the selection. Projection Front-Desktop The factory default setting. Rear-Desktop When you expe- User Controls Setup English 30 Language Choose the multilingual OSD menu.
... the im- Press or into the sub menu and then use the or key to finalize the selection. Projection Front-Desktop The factory default setting. Rear-Desktop When you expe- User Controls Setup English 30 Language Choose the multilingual OSD menu.
User Manual
Page 32
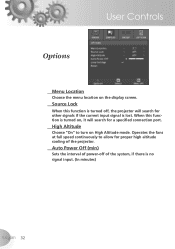
... at full speed continuously to turn on , it will search for a specified connection port. Source Lock When this function is lost. Auto Power Off (min) Sets the interval of power-off , the projector will search for other signals if the current input signal is turned on High Altitude mode. User Controls...
... at full speed continuously to turn on , it will search for a specified connection port. Source Lock When this function is lost. Auto Power Off (min) Sets the interval of power-off , the projector will search for other signals if the current input signal is turned on High Altitude mode. User Controls...
User Manual
Page 33
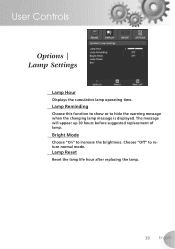
Bright Mode Choose "On" to return normal mode. Choose "Off" to increase the brightness. The message will appear up 30 hours before suggested replacement of lamp. Lamp Reset Reset the lamp life hour after replacing the lamp. 33 English User Controls Options | Lamp Settings Lamp Hour Displays the cumulative lamp operating time. Lamp Reminding Choose this function to show or to hide the warning message when the changing lamp message is displayed.
Bright Mode Choose "On" to return normal mode. Choose "Off" to increase the brightness. The message will appear up 30 hours before suggested replacement of lamp. Lamp Reset Reset the lamp life hour after replacing the lamp. 33 English User Controls Options | Lamp Settings Lamp Hour Displays the cumulative lamp operating time. Lamp Reminding Choose this function to show or to hide the warning message when the changing lamp message is displayed.
User Manual
Page 34
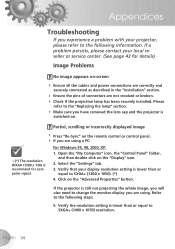
...Open the "My Computer" icon, the "Control Panel" folder, and then double click on the "Advanced Properties" button. Verify that your display resolution setting is lower than or equal to change the monitor display you are using a PC: For Windows 95, 98, 2000, XP: (*) The resolution ... If you are not crooked or broken. Check if the projection lamp has been securely installed. English 34 Verify the resolution setting is lower than or equal to the "Replacing the lamp" section. Make sure you experience a problem with your local reseller or service...
...Open the "My Computer" icon, the "Control Panel" folder, and then double click on the "Advanced Properties" button. Verify that your display resolution setting is lower than or equal to change the monitor display you are using a PC: For Windows 95, 98, 2000, XP: (*) The resolution ... If you are not crooked or broken. Check if the projection lamp has been securely installed. English 34 Verify the resolution setting is lower than or equal to the "Replacing the lamp" section. Make sure you experience a problem with your local reseller or service...

User Manual
Page 35
...English Unstable or flickering image Use "Tracking" to be reactivated. Verify that the resolution setting of the Notebook or PowerBook computer is in use. Press the toggle output settings. WXGA (1280 x 720) is recommended for this lower than or equal to your computer's ... flickering bar Use "Phase" to make an adjustment. See page 31 for more information. Change the monitor color setting on "Show all equipment including the projector. The screen of the monitor display is 8. choose the resolution mode you experience difficulty changing ...
...English Unstable or flickering image Use "Tracking" to be reactivated. Verify that the resolution setting of the Notebook or PowerBook computer is in use. Press the toggle output settings. WXGA (1280 x 720) is recommended for this lower than or equal to your computer's ... flickering bar Use "Phase" to make an adjustment. See page 31 for more information. Change the monitor color setting on "Show all equipment including the projector. The screen of the monitor display is 8. choose the resolution mode you experience difficulty changing ...
User Manual
Page 36
...; Press [4:3], [16:9], [Letter Box], [Native] button on the re- The image is removed. Adjusts the Focus Ring on your DVD player. Try the different settings. Image is too small or too large Adjust the zoom lever on the top of focus Make sure the Lens cap is stretched...
...; Press [4:3], [16:9], [Letter Box], [Native] button on the re- The image is removed. Adjusts the Focus Ring on your DVD player. Try the different settings. Image is too small or too large Adjust the zoom lever on the top of focus Make sure the Lens cap is stretched...
User Manual
Page 40
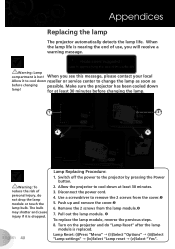
..." after the lamp module is replaced. Push up and remove the cover. 6. Lamp Reset: (i)Press "Menu" (ii)Select "Options" (iii)Select "Lamp settings" (iv)Select "Lamp reset (v)Select "Yes".
..." after the lamp module is replaced. Push up and remove the cover. 6. Lamp Reset: (i)Press "Menu" (ii)Select "Options" (iii)Select "Lamp settings" (iv)Select "Lamp reset (v)Select "Yes".


