
User's Manual
Page 1
... ...26 SYSTEM ...30 SETUP ...34 Appendices 38 Troubleshooting 38 Image Problems 38 Other Problems 39 Projector Status Indication 40 Remote Control Problems 41 Replacing the Lamp 42 Compatibility Modes 44 Ceiling Mount Installation 46 Optoma Global Offices 47 Regulation & Safety notices 49 1
... ...26 SYSTEM ...30 SETUP ...34 Appendices 38 Troubleshooting 38 Image Problems 38 Other Problems 39 Projector Status Indication 40 Remote Control Problems 41 Replacing the Lamp 42 Compatibility Modes 44 Ceiling Mount Installation 46 Optoma Global Offices 47 Regulation & Safety notices 49 1
User's Manual
Page 3
...of its life, the projector will show on . Please be sure to cool down . Allow 90 seconds for the projector to change the lamp as soon as this may hurt your local reseller or service center to rain or moisture. ▀■ Warning- Please do not expose ...this user's guide. ▀■ Warning- Please contact your eyes. ▀■ Warning- To replace the lamp, follow all warnings, precautions and maintenance as described on pages 42-43. ▀■ Warning- Do not use lens cap when projector is on the...
...of its life, the projector will show on . Please be sure to cool down . Allow 90 seconds for the projector to change the lamp as soon as this may hurt your local reseller or service center to rain or moisture. ▀■ Warning- Please do not expose ...this user's guide. ▀■ Warning- Please contact your eyes. ▀■ Warning- To replace the lamp, follow all warnings, precautions and maintenance as described on pages 42-43. ▀■ Warning- Do not use lens cap when projector is on the...

User's Manual
Page 5
Keep your back to the beam as much as possible. ▀■ When projector is used in a classroom, adequately supervise students when they are asked to point out something on the screen. ▀■ In order to minimize the lamp power, use room blinds to reduce ambient light levels. 5 English sage otice Eye Safety Warnings ▀■ Avoid staring/facing directly into the projector beam at all times.
Keep your back to the beam as much as possible. ▀■ When projector is used in a classroom, adequately supervise students when they are asked to point out something on the screen. ▀■ In order to minimize the lamp power, use room blinds to reduce ambient light levels. 5 English sage otice Eye Safety Warnings ▀■ Avoid staring/facing directly into the projector beam at all times.
User's Manual
Page 6
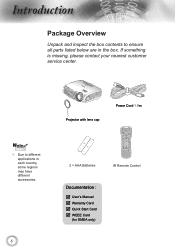
If something is missing, please contact your nearest customer service center. ntroduction Package Overview Unpack and inspect the box contents to different applications in the box. POWER SOURCE Noottee Due to ensure all parts listed below are in each country, some regions may have different accessories. 6 Projector with lens cap Power Cord 1.8m Lamp 2 × AAA Batteries IR Remote Control Documentation : User's Manual Warranty Card Quick Start Card WEEE Card (for EMEA only)
If something is missing, please contact your nearest customer service center. ntroduction Package Overview Unpack and inspect the box contents to different applications in the box. POWER SOURCE Noottee Due to ensure all parts listed below are in each country, some regions may have different accessories. 6 Projector with lens cap Power Cord 1.8m Lamp 2 × AAA Batteries IR Remote Control Documentation : User's Manual Warranty Card Quick Start Card WEEE Card (for EMEA only)
User's Manual
Page 8
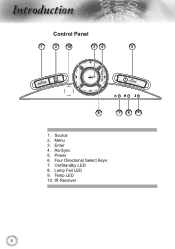
Re-Sync 5. Four Directional Select Keys 7. Temp LED 10. Source 2. Lamp Fail LED 9. Power 6. On/Standby LED 8. Menu 3. ntroduction Control Panel 1 2 10 34 5 SOURCE POWER 6 789 1. Enter 4. IR Receiver 8
Re-Sync 5. Four Directional Select Keys 7. Temp LED 10. Source 2. Lamp Fail LED 9. Power 6. On/Standby LED 8. Menu 3. ntroduction Control Panel 1 2 10 34 5 SOURCE POWER 6 789 1. Enter 4. IR Receiver 8
User's Manual
Page 10
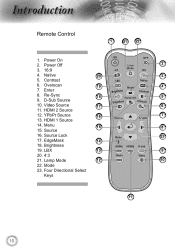
HDMI 2 Source 12. YPbPr Source 16 7 13. Power Off Lamp 2 3. 16:9 4. Contrast 6. Menu 15 8 15. LBX 13 9 20. 4:3 21. Mode 23. Native 20 3 5. D-Sub Source 10. HDMI 1 Source 14. Lamp Mode 12 10 22. Overscan 19 4 7. Video Source 17 6 11. Source Lock 23 17. Brightness 19. Enter 8. Four Directional Select Keys 11 10 ntroduction Remote Control 1 21 22 1. Power On 2. Re-Sync 18 5 9. Source 16. EdgeMask 14 18.
HDMI 2 Source 12. YPbPr Source 16 7 13. Power Off Lamp 2 3. 16:9 4. Contrast 6. Menu 15 8 15. LBX 13 9 20. 4:3 21. Mode 23. Native 20 3 5. D-Sub Source 10. HDMI 1 Source 14. Lamp Mode 12 10 22. Overscan 19 4 7. Video Source 17 6 11. Source Lock 23 17. Brightness 19. Enter 8. Four Directional Select Keys 11 10 ntroduction Remote Control 1 21 22 1. Power On 2. Re-Sync 18 5 9. Source 16. EdgeMask 14 18.

User's Manual
Page 13
The projector will now turn Amber. 3. Turn on the lamp by pressing " " button either on the top of the projector or on the projector first and then select the signal sources. 1 Lens Cap 13 ...
The projector will now turn Amber. 3. Turn on the lamp by pressing " " button either on the top of the projector or on the projector first and then select the signal sources. 1 Lens Cap 13 ...
User's Manual
Page 14
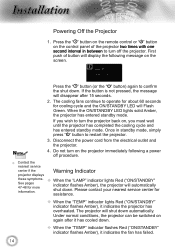
... until the projector has completed the cooling cycle and has entered standby mode. Please contact your nearest service center for more information. When the "LAMP" indicator lights Red ("ON/STANDBY" indicator flashes Amber), the projector will Flash Green. The cooling fans continue to operate for about 60 seconds for...
... until the projector has completed the cooling cycle and has entered standby mode. Please contact your nearest service center for more information. When the "LAMP" indicator lights Red ("ON/STANDBY" indicator flashes Amber), the projector will Flash Green. The cooling fans continue to operate for about 60 seconds for...

User's Manual
Page 17
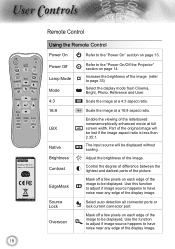
...select an input signal. SOURCE Press "SOURCE" to the input source. To exit OSD, Press "Menu" again. Four Directional Select Keys Lamp LED Use to select items or make adjustments to control the functions: Control Panel and Remote Control. Menu Press "Menu" to the "Power... on -screen display (OSD) menu. Temp LED Indicate the projector's temperature status. Enter Confirm your selection. Indicate the projector's lamp status. On/Standby LED Indicate the projector's status. 17 ser ontrols Control Panel & Remote Control There are two ways for you to your...
...select an input signal. SOURCE Press "SOURCE" to the input source. To exit OSD, Press "Menu" again. Four Directional Select Keys Lamp LED Use to select items or make adjustments to control the functions: Control Panel and Remote Control. Menu Press "Menu" to the "Power... on -screen display (OSD) menu. Temp LED Indicate the projector's temperature status. Enter Confirm your selection. Indicate the projector's lamp status. On/Standby LED Indicate the projector's status. 17 ser ontrols Control Panel & Remote Control There are two ways for you to your...
User's Manual
Page 18
Power Off Lamp Mode Mode 4:3 Refer to the "Power On" section on page 13. Adjust the brightness of the image. (refer to page 33) Select the display mode ... auto detection all connector ports or lock current connector port. Mask off a few pixels on each edge of the image to be displayed. ser ontrols Lamp 18 Remote Control Using the Remote Control Power On Refer to the "Power On/Off the Projector" section on page 14. Use this function to...
Power Off Lamp Mode Mode 4:3 Refer to the "Power On" section on page 13. Adjust the brightness of the image. (refer to page 33) Select the display mode ... auto detection all connector ports or lock current connector port. Mask off a few pixels on each edge of the image to be displayed. ser ontrols Lamp 18 Remote Control Using the Remote Control Power On Refer to the "Power On/Off the Projector" section on page 14. Use this function to...

User's Manual
Page 19
... input signal. Press "Video" to the input source. Re-sync Menu HDMI 1 HDMI 2 D-Sub YPbPr Video Automatically synchronizes the projector to choose Composite video source. Lamp Source Press "Source" to your item selection. English ser ontrols Remote Control Using the Remote Control Enter Confirm your selection. 19
... input signal. Press "Video" to the input source. Re-sync Menu HDMI 1 HDMI 2 D-Sub YPbPr Video Automatically synchronizes the projector to choose Composite video source. Lamp Source Press "Source" to your item selection. English ser ontrols Remote Control Using the Remote Control Enter Confirm your selection. 19
User's Manual
Page 27
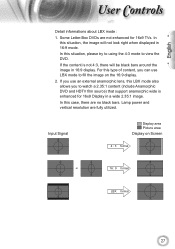
... on the 16:9 display. 2. Some Letter-Box DVDs are no black bars. In this situation, please try to using the 4:3 mode to view the DVD. Lamp power and vertical resolution are fully utilized. If the content is enhanced for 16x9 TVs. If you use an external anamorphic lens, this type of...
... on the 16:9 display. 2. Some Letter-Box DVDs are no black bars. In this situation, please try to using the 4:3 mode to view the DVD. Lamp power and vertical resolution are fully utilized. If the content is enhanced for 16x9 TVs. If you use an external anamorphic lens, this type of...
User's Manual
Page 31
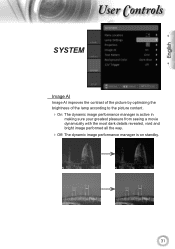
English ser ontrols SYSTEM Image AI Image AI improves the contrast of the picture by optimizing the brightness of the lamp according to the picture content. On: The dynamic image performance manager is active in making sure your greatest pleasure from seeing a movie dynamically with the most dark details revealed, vivid and bright image performed all the way. Off: The dynamic image performance manager is on standby. 31
English ser ontrols SYSTEM Image AI Image AI improves the contrast of the picture by optimizing the brightness of the lamp according to the picture content. On: The dynamic image performance manager is active in making sure your greatest pleasure from seeing a movie dynamically with the most dark details revealed, vivid and bright image performed all the way. Off: The dynamic image performance manager is on standby. 31
User's Manual
Page 33
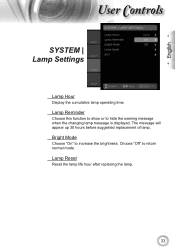
Choose "Off" to hide the warning message when the changing lamp message is displayed. Lamp Reminder Choose this function to show or to return normal mode. Lamp Reset Reset the lamp life hour after replacing the lamp. 33 English ser ontrols SYSTEM | Lamp Settings Lamp Hour Display the cumulative lamp operating time. The message will appear up 30 hours before suggested replacement of lamp. Bright Mode Choose "On" to increase the brightness.
Choose "Off" to hide the warning message when the changing lamp message is displayed. Lamp Reminder Choose this function to show or to return normal mode. Lamp Reset Reset the lamp life hour after replacing the lamp. 33 English ser ontrols SYSTEM | Lamp Settings Lamp Hour Display the cumulative lamp operating time. The message will appear up 30 hours before suggested replacement of lamp. Bright Mode Choose "On" to increase the brightness.

User's Manual
Page 38
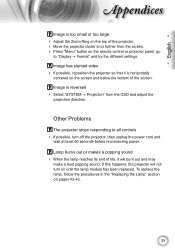
See page 16. Image is out of connectors are not bent or broken. Check if the projection lamp has been securely installed. The image is stretched when displaying 16:9 DVD title When you play anamorphic DVD or 16:9 DVD, the projector will ... a problem persists, please contact your local reseller or service center. ppendices Troubleshooting If you experience a problem with your projector, please refer to the "Replacing the lamp" section. Make sure you have removed the lens cap and the projector is switched on.
See page 16. Image is out of connectors are not bent or broken. Check if the projection lamp has been securely installed. The image is stretched when displaying 16:9 DVD title When you play anamorphic DVD or 16:9 DVD, the projector will ... a problem persists, please contact your local reseller or service center. ppendices Troubleshooting If you experience a problem with your projector, please refer to the "Replacing the lamp" section. Make sure you have removed the lens cap and the projector is switched on.
User's Manual
Page 39
... or further from the OSD and adjust the projection direction. To replace the lamp, follow the procedures in the "Replacing the Lamp" section on until the lamp module has been replaced. Lamp burns out or makes a popping sound When the lamp reaches its end of the screen. Image has slanted sides If possible...
... or further from the OSD and adjust the projection direction. To replace the lamp, follow the procedures in the "Replacing the Lamp" section on until the lamp module has been replaced. Lamp burns out or makes a popping sound When the lamp reaches its end of the screen. Image has slanted sides If possible...
User's Manual
Page 40
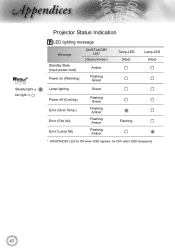
ppendices Noottee Steady light No light Projector Status Indication LED lighting message Message Standby State (Input power cord) Power on (Warming) ON/STANDBY LED (Green/Amber) Amber Flashing Green Temp-LED (Red) Lamp-LED (Red) Lamp lighting Green Power off (Cooling) Error (Over Temp.) Error (Fan fail) Error (Lamp fail) Flashing Green Flashing Amber Flashing Amber Flashing Amber Flashing * ON/STANDBY LED be ON when OSD appears, be OFF when OSD disappears. 40
ppendices Noottee Steady light No light Projector Status Indication LED lighting message Message Standby State (Input power cord) Power on (Warming) ON/STANDBY LED (Green/Amber) Amber Flashing Green Temp-LED (Red) Lamp-LED (Red) Lamp lighting Green Power off (Cooling) Error (Over Temp.) Error (Fan fail) Error (Lamp fail) Flashing Green Flashing Amber Flashing Amber Flashing Amber Flashing * ON/STANDBY LED be ON when OSD appears, be OFF when OSD disappears. 40

User's Manual
Page 41
... ppendices On Screen Messages Fan failed: The projector will switch off automatically. Over temperature: The projector will switch off automatically. Replacing the lamp: Lamp is within 8 m of the projector. Make sure the batteries are inserted correctly. Replace batteries if they are not any obstructions between the remote...
... ppendices On Screen Messages Fan failed: The projector will switch off automatically. Over temperature: The projector will switch off automatically. Replacing the lamp: Lamp is within 8 m of the projector. Make sure the batteries are inserted correctly. Replace batteries if they are not any obstructions between the remote...
User's Manual
Page 42
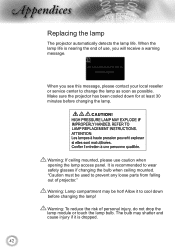
... parts from falling out of projector." The bulb may be used to cool down for at least 30 minutes before changing the lamp! Make sure the projector has been cooled down before changing the lamp. "Caution must be hot! It is nearing the end of personal injury, do not drop the... lamp module or touch the lamp bulb. Warning: To reduce the risk of use caution when opening the lamp access panel. When the lamp life is recommended to change the lamp as soon as possible. Warning: If ceiling mounted, please use , you...
... parts from falling out of projector." The bulb may be used to cool down for at least 30 minutes before changing the lamp! Make sure the projector has been cooled down before changing the lamp. "Caution must be hot! It is nearing the end of personal injury, do not drop the... lamp module or touch the lamp bulb. Warning: To reduce the risk of use caution when opening the lamp access panel. When the lamp life is recommended to change the lamp as soon as possible. Warning: If ceiling mounted, please use , you...
User's Manual
Page 43
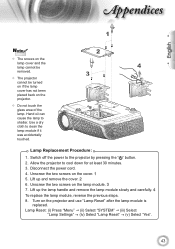
... cord. 4. Lift up the lamp handle and remove the lamp module slowly and carefully. 4 To replace the lamp module, reverse the previous steps. 8. Turn on the lamp module. 3 7. Allow the projector to clean the lamp module if it was accidentally touched. 2 4 3 Lamp Replacement Procedure: 1. Unscrew the ...on the projector. Do not touch the glass area of the lamp. Lift up and remove the cover. 2 6. Lamp Reset: (i) Press "Menu" (ii) Select "SYSTEM" (iii) Select "Lamp Settings" (iv) Select "Lamp Reset" (v) Select "Yes". 43 Use a dry cloth ...
... cord. 4. Lift up the lamp handle and remove the lamp module slowly and carefully. 4 To replace the lamp module, reverse the previous steps. 8. Turn on the lamp module. 3 7. Allow the projector to clean the lamp module if it was accidentally touched. 2 4 3 Lamp Replacement Procedure: 1. Unscrew the ...on the projector. Do not touch the glass area of the lamp. Lift up and remove the cover. 2 6. Lamp Reset: (i) Press "Menu" (ii) Select "SYSTEM" (iii) Select "Lamp Settings" (iv) Select "Lamp Reset" (v) Select "Yes". 43 Use a dry cloth ...


