
User's Manual
Page 3
... not use lens cap when projector is in this projector to page 33). ▀■ Warning- When the lamp is on -screen display "System | Lamp Settings" menu after replacing the lamp module (refer to rain or moisture. ▀■ Warning- The bright light may cause electric shock. ▀■ Warning- Please...
... not use lens cap when projector is in this projector to page 33). ▀■ Warning- When the lamp is on -screen display "System | Lamp Settings" menu after replacing the lamp module (refer to rain or moisture. ▀■ Warning- The bright light may cause electric shock. ▀■ Warning- Please...
User's Manual
Page 12
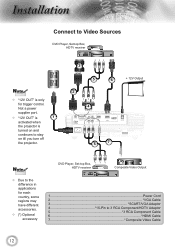
... HDMI 2 12V OUT 5 7 Noottee Due to the difference in applications for trigger control. nstallation Connect to Video Sources DVD Player, Set-top Box, HDTV receiver Noottee "12V OUT" is turned on and continues to stay on till you turn off the projector. Not..."12V OUT" is 1 activated when the projector is only for each country, some regions may have different accessories. (*) Optional accessory DVD Player, Set-top Box, HDTV receiver Composite Video Output 1...Power Cord 2 VGA Cable 3 SCART/VGA Adaptor 4 15-Pin to 3 RCA Component/HDTV Adaptor 5 3...
... HDMI 2 12V OUT 5 7 Noottee Due to the difference in applications for trigger control. nstallation Connect to Video Sources DVD Player, Set-top Box, HDTV receiver Noottee "12V OUT" is turned on and continues to stay on till you turn off the projector. Not..."12V OUT" is 1 activated when the projector is only for each country, some regions may have different accessories. (*) Optional accessory DVD Player, Set-top Box, HDTV receiver Composite Video Output 1...Power Cord 2 VGA Cable 3 SCART/VGA Adaptor 4 15-Pin to 3 RCA Component/HDTV Adaptor 5 3...
User's Manual
Page 13
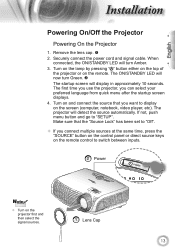
Turn on and connect the source that the "Source Lock" has been set to "Off". If you connect multiple sources at the same time, press the "SOURCE" button on the control panel or direct source keys on ...
Turn on and connect the source that the "Source Lock" has been set to "Off". If you connect multiple sources at the same time, press the "SOURCE" button on the control panel or direct source keys on ...

User's Manual
Page 20
To exit, press "Menu" again. Main Menu Settings Sub Menu 20 To open the OSD menu, press "Menu" on a particular page, press ... adjusted in the main menu. How to make image adjustments and change a variety of settings. The OSD menu will close and the projector will automatically detect the source. The projector will automatically save the new... settings. ser ontrols On-screen Display Menus The Projector has multilingual On-screen Display menus that allow you...
To exit, press "Menu" again. Main Menu Settings Sub Menu 20 To open the OSD menu, press "Menu" on a particular page, press ... adjusted in the main menu. How to make image adjustments and change a variety of settings. The OSD menu will close and the projector will automatically detect the source. The projector will automatically save the new... settings. ser ontrols On-screen Display Menus The Projector has multilingual On-screen Display menus that allow you...

User's Manual
Page 22
ser ontrols IMAGE Mode There are all configured to standard reference levels. User: User's settings. Contrast The contrast controls the degree of difference between the lightest and darkest parts of images. Cinema: For home theater. Bright: Maximum ...image. Press the to reproduce, as close as possible, the image the way the movie director intended. Color, color temperature, brightness, contrast and gamma settings are many factory presets optimized for displaying photographic images. Reference: This mode is intended to lighten the image. 22
ser ontrols IMAGE Mode There are all configured to standard reference levels. User: User's settings. Contrast The contrast controls the degree of difference between the lightest and darkest parts of images. Cinema: For home theater. Bright: Maximum ...image. Press the to reproduce, as close as possible, the image the way the movie director intended. Color, color temperature, brightness, contrast and gamma settings are many factory presets optimized for displaying photographic images. Reference: This mode is intended to lighten the image. 22
User's Manual
Page 24
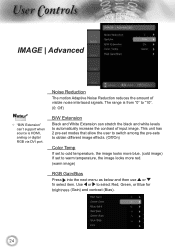
... that allow the user to switch among the pre-sets to obtain different image effects. (Off/On) Color Temp If set to cold temperature, the image looks more blue. (cold image) If set to warm temperature, the image looks more red. (warm image) RGB Gain/Bias Press into the next menu as below...
... that allow the user to switch among the pre-sets to obtain different image effects. (Off/On) Color Temp If set to cold temperature, the image looks more blue. (cold image) If set to warm temperature, the image looks more red. (warm image) RGB Gain/Bias Press into the next menu as below...

User's Manual
Page 25
...;Graphics: for image source. Standard: for color adjustments. 25 English ser ontrols IMAGE | Advanced Gamma This allows you to return the factory default settings for standardized setting. Curve: The type of gamma curve. Offset: The input offset of gamma can range the start level of base point in gamma...
...;Graphics: for image source. Standard: for color adjustments. 25 English ser ontrols IMAGE | Advanced Gamma This allows you to return the factory default settings for standardized setting. Curve: The type of gamma curve. Offset: The input offset of gamma can range the start level of base point in gamma...
User's Manual
Page 28
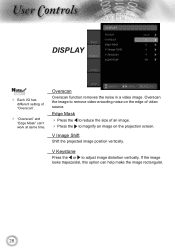
...; Press the to reduce the size of an image. Press the to adjust image distortion vertically. ser ontrols DISPLAY Noottee Each I/O has different setting of video source. V Image Shift Shift the projected image position vertically. V Keystone Press the or to magnify an image on the edge of "Overscan". ...
...; Press the to reduce the size of an image. Press the to adjust image distortion vertically. ser ontrols DISPLAY Noottee Each I/O has different setting of video source. V Image Shift Shift the projected image position vertically. V Keystone Press the or to magnify an image on the edge of "Overscan". ...
User's Manual
Page 33
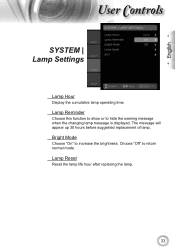
Choose "Off" to increase the brightness. Lamp Reset Reset the lamp life hour after replacing the lamp. 33 Bright Mode Choose "On" to return normal mode. The message will appear up 30 hours before suggested replacement of lamp. English ser ontrols SYSTEM | Lamp Settings Lamp Hour Display the cumulative lamp operating time. Lamp Reminder Choose this function to show or to hide the warning message when the changing lamp message is displayed.
Choose "Off" to increase the brightness. Lamp Reset Reset the lamp life hour after replacing the lamp. 33 Bright Mode Choose "On" to return normal mode. The message will appear up 30 hours before suggested replacement of lamp. English ser ontrols SYSTEM | Lamp Settings Lamp Hour Display the cumulative lamp operating time. Lamp Reminder Choose this function to show or to hide the warning message when the changing lamp message is displayed.

User's Manual
Page 35
Auto Power Off (min) Set the interval of power-off , the projector will search for proper high altitude cooling of the system, if there is lost. High Altitude Choose "On" ... turned off of the projector. Color Space Select an appropriate color matrix type from RGB or YCbCr. Reset Return the adjustments and settings to factory default values. Current : Return the current menu's settings to factory default. All : Return the settings for all menus to allow for a specified connection port.
Auto Power Off (min) Set the interval of power-off , the projector will search for proper high altitude cooling of the system, if there is lost. High Altitude Choose "On" ... turned off of the projector. Color Space Select an appropriate color matrix type from RGB or YCbCr. Reset Return the adjustments and settings to factory default values. Current : Return the current menu's settings to factory default. All : Return the settings for all menus to allow for a specified connection port.
User's Manual
Page 39
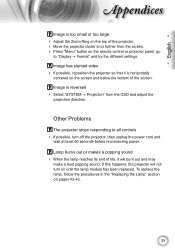
Other Problems The projector stops responding to "Display Format" and try the different settings. To replace the lamp, follow the procedures in the "Replacing the Lamp" section on pages 42-43. 39 Lamp burns out or makes a popping sound &#...
Other Problems The projector stops responding to "Display Format" and try the different settings. To replace the lamp, follow the procedures in the "Replacing the Lamp" section on pages 42-43. 39 Lamp burns out or makes a popping sound &#...
User's Manual
Page 43
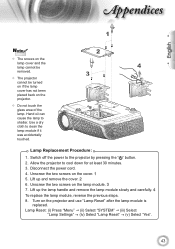
... the cover. 1 5. Allow the projector to shatter. Lift up and remove the cover. 2 6. Lamp Reset: (i) Press "Menu" (ii) Select "SYSTEM" (iii) Select "Lamp Settings" (iv) Select "Lamp Reset" (v) Select "Yes". 43 English ppendices 1 Noottee The screws on the lamp cover and the lamp cannot be removed...
... the cover. 1 5. Allow the projector to shatter. Lift up and remove the cover. 2 6. Lamp Reset: (i) Press "Menu" (ii) Select "SYSTEM" (iii) Select "Lamp Settings" (iv) Select "Lamp Reset" (v) Select "Yes". 43 English ppendices 1 Noottee The screws on the lamp cover and the lamp cannot be removed...


