

User Manual
Page 1
... On-Screen Display Menus 18 How to Operate 18 Menu Tree ...19 Picture ...20 Image ...22 System ...24 Display ...25 Appendices Troubleshooting 27 Changing the Lamp 30 Specifications ...31 Compatibility Modes 32 1
... On-Screen Display Menus 18 How to Operate 18 Menu Tree ...19 Picture ...20 Image ...22 System ...24 Display ...25 Appendices Troubleshooting 27 Changing the Lamp 30 Specifications ...31 Compatibility Modes 32 1
User Manual
Page 2
...maximize the life of its life, it shows warning messages. This product will burn out and may make a loud popping sound. Turn on until the lamp module has been replaced. If this happens, the projector will not turn back on the projector first and then the signal sources. When changing the... lamp, please allow unit to change the lamp when it will detect the life of fire or electric shock, do not open or disassemble the product as recommended in this...
...maximize the life of its life, it shows warning messages. This product will burn out and may make a loud popping sound. Turn on until the lamp module has been replaced. If this happens, the projector will not turn back on the projector first and then the signal sources. When changing the... lamp, please allow unit to change the lamp when it will detect the life of fire or electric shock, do not open or disassemble the product as recommended in this...

User Manual
Page 7
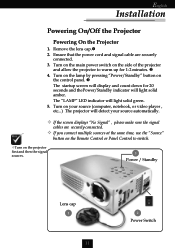
Format 5. Power /Standby 7 Picture Mode 4. Re-sync 11. Freeze 10. Zoom 6. Enter 9. Source 12. Four Directional Select Keys 8. Temperature Warning LED 3. Lamp Warning LED 2. Menu/Exit 7. Panel Control English Introduction 2 7 1 3 9 4 10 5 11 6 12 8 1.
Format 5. Power /Standby 7 Picture Mode 4. Re-sync 11. Freeze 10. Zoom 6. Enter 9. Source 12. Four Directional Select Keys 8. Temperature Warning LED 3. Lamp Warning LED 2. Menu/Exit 7. Panel Control English Introduction 2 7 1 3 9 4 10 5 11 6 12 8 1.
User Manual
Page 11
...or Panel Control to warm up for 20 seconds and thePower/Standby indicator will display and count down for 1-2 minutes. 4. Turn on the lamp by pressing “Power/Standby” button on the side of the projector and allow the projector to switch. v If the screen displays “..., or video player , etc...) The projector will light solid green. 5. English Installation Powering On/Off the Projector Powering On the Projector 1. The “LAMP” LED indicator will detect your source automatically. Ensure that the power cord and signal cable are securely connected.
...or Panel Control to warm up for 20 seconds and thePower/Standby indicator will display and count down for 1-2 minutes. 4. Turn on the lamp by pressing “Power/Standby” button on the side of the projector and allow the projector to switch. v If the screen displays “..., or video player , etc...) The projector will light solid green. 5. English Installation Powering On/Off the Projector Powering On the Projector 1. The “LAMP” LED indicator will detect your source automatically. Ensure that the power cord and signal cable are securely connected.
User Manual
Page 12
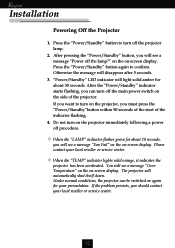
...the projector. After pressing the “Power/Standby” button, you can be switched on -screen display. v When the “LAMP” indicator flashes green for your presentation. The projector will see a message “Power off the main power switch on the projector... immediately following a power off the projector lamp. 2. Under normal conditions, the projector can turn on the side of the indicator flashing. 4. English Installation Powering Off the Projector 1....
...the projector. After pressing the “Power/Standby” button, you can be switched on -screen display. v When the “LAMP” indicator flashes green for your presentation. The projector will see a message “Power off the main power switch on the projector... immediately following a power off the projector lamp. 2. Under normal conditions, the projector can turn on the side of the indicator flashing. 4. English Installation Powering Off the Projector 1....
User Manual
Page 19
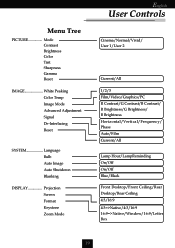
... Cinema/Normal/Vivid/ User 1/User 2 Current/All 1/2/3 Film/Video/Graphics/PC R Contrast/G Contrast/B Contrast/ R Brightness/G Brightness/ B Brightness Horizontal/Vertical/Frequency/ Phase Auto/Film Current/All Lamp Hour/LampReminding On/Off On/Off Blue/Black Front Desktop/Front Ceiling/Rear Desktop/Rear Ceiling 4:3/16:9 4:3=>Native/4:3/16:9 16:9=>Native/Window/16:9/Letter Box...
... Cinema/Normal/Vivid/ User 1/User 2 Current/All 1/2/3 Film/Video/Graphics/PC R Contrast/G Contrast/B Contrast/ R Brightness/G Brightness/ B Brightness Horizontal/Vertical/Frequency/ Phase Auto/Film Current/All Lamp Hour/LampReminding On/Off On/Off Blue/Black Front Desktop/Front Ceiling/Rear Desktop/Rear Ceiling 4:3/16:9 4:3=>Native/4:3/16:9 16:9=>Native/Window/16:9/Letter Box...
User Manual
Page 24
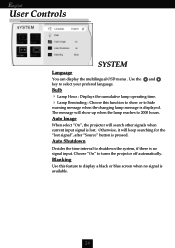
Blanking Use this function to show up when the lamp reaches to hide warning message when the changing lamp message is no signal is pressed. Use the and key to display a black or blue screen when no signal input. Otherwise, it will keep searching ... is lost signal”, after “Source” button is available. 24 English User Controls SYSTEM Language You can display the multilingual OSD menu . Bulb 4 Lamp Hour : Displays the cumulative lamp operating time. 4 Lamp Reminding : Choose this feature to select your prefered language.
Blanking Use this function to show up when the lamp reaches to hide warning message when the changing lamp message is no signal is pressed. Use the and key to display a black or blue screen when no signal input. Otherwise, it will keep searching ... is lost signal”, after “Source” button is available. 24 English User Controls SYSTEM Language You can display the multilingual OSD menu . Bulb 4 Lamp Hour : Displays the cumulative lamp operating time. 4 Lamp Reminding : Choose this feature to select your prefered language.
User Manual
Page 27
...Remote Control or Panel Control. 4 If you use a PC: If the resolution of connectors are not crooked or broken. 4 Check if the projection lamp has been securely installed. For Windows 95,98,2K,XP: 1. Verify that your local reseller or service center. Problem : Partial, scrolling or incorrectly ...double click the “Display” icon. 2. If the projector is switched on. Follow the steps outlined below to the “Changing the lamp” section. 4 Make sure you have removed the lens cap and the projector is still not projecting the whole image, you will find the...
...Remote Control or Panel Control. 4 If you use a PC: If the resolution of connectors are not crooked or broken. 4 Check if the projection lamp has been securely installed. For Windows 95,98,2K,XP: 1. Verify that your local reseller or service center. Problem : Partial, scrolling or incorrectly ...double click the “Display” icon. 2. If the projector is switched on. Follow the steps outlined below to the “Changing the lamp” section. 4 Make sure you have removed the lens cap and the projector is still not projecting the whole image, you will find the...
User Manual
Page 29
... 4 If you will automatically detect 16:9 DVD and adjust the aspect ratio by referring to adjust the projection. Problem : Lamp burns out or makes a popping sound 4 When the lamp reaches its end of life, it will not turn back on the projector lens. 4 Make sure the projection screen is ...between the required distance 3.74ft.(1.14m)~ 32.81ft.(10.00m) from the projector. To replace the lamp, follow the procedures in the “Changing the Lamp”. 29 Problem : Image is outstretched when displaying 16:9 DVD. The projector itself will also need to adjust the...
... 4 If you will automatically detect 16:9 DVD and adjust the aspect ratio by referring to adjust the projection. Problem : Lamp burns out or makes a popping sound 4 When the lamp reaches its end of life, it will not turn back on the projector lens. 4 Make sure the projection screen is ...between the required distance 3.74ft.(1.14m)~ 32.81ft.(10.00m) from the projector. To replace the lamp, follow the procedures in the “Changing the Lamp”. 29 Problem : Image is outstretched when displaying 16:9 DVD. The projector itself will also need to adjust the...

User Manual
Page 30
...the risk of personal injury, do not drop the lamp module or touch the lamp bulb. Remove the cover. 7. Make sure the projector has been cooled down for at least 30 minutes. 3. Lamp Changing Procedure: 1. English Appendices Changing the Lamp The projector will show you see this message, please... contact your local reseller or service center to change the lamp as soon as possible. Turn off the power to the projector by pressing the Power/ Standby button. 2. Warning : Lamp compartment is dropped. Allow it is hot! Turn off the main power switch. ...
...the risk of personal injury, do not drop the lamp module or touch the lamp bulb. Remove the cover. 7. Make sure the projector has been cooled down for at least 30 minutes. 3. Lamp Changing Procedure: 1. English Appendices Changing the Lamp The projector will show you see this message, please... contact your local reseller or service center to change the lamp as soon as possible. Turn off the power to the projector by pressing the Power/ Standby button. 2. Warning : Lamp compartment is dropped. Allow it is hot! Turn off the main power switch. ...

User Manual
Page 31
...PAL/PAL-M/PAL-N/SECAM and HDTV compatible - 15kHz~100kHz horizontal scan - 43Hz~120Hz vertical refresh - English Appendices Specifications Light Valve Lamp Number of Pixels Displayable Color Projection Lens Projection Screen Size Projection Distance Video Compatibility H. DVI Terminal: Digital RGB, Analog RGB and ... - 6.4 lbs (2.9 kgs) - 10.9 x 3.3 x 8.9 inches (277 x 85 x 225 mm) - Single Chip DLPTM Technology - 200W Replaceable UHP Lamp - 1024 pixels(H) X 768 lines(V) - 16.7M colors - Frequency V. Input Frequency 50-60Hz - 320 watts at normal operation - S-Video Terminal -
...PAL/PAL-M/PAL-N/SECAM and HDTV compatible - 15kHz~100kHz horizontal scan - 43Hz~120Hz vertical refresh - English Appendices Specifications Light Valve Lamp Number of Pixels Displayable Color Projection Lens Projection Screen Size Projection Distance Video Compatibility H. DVI Terminal: Digital RGB, Analog RGB and ... - 6.4 lbs (2.9 kgs) - 10.9 x 3.3 x 8.9 inches (277 x 85 x 225 mm) - Single Chip DLPTM Technology - 200W Replaceable UHP Lamp - 1024 pixels(H) X 768 lines(V) - 16.7M colors - Frequency V. Input Frequency 50-60Hz - 320 watts at normal operation - S-Video Terminal -


