
User Manual
Page 1
... & Remote Control 15 Onscreen Display Menus 18 How to Operate 18 Menu Tree ...19 Picture ...20 Image ...22 System ...24 Display ...25 Appendices Troubleshooting 26 Replacing the Lamp 29 1
... & Remote Control 15 Onscreen Display Menus 18 How to Operate 18 Menu Tree ...19 Picture ...20 Image ...22 System ...24 Display ...25 Appendices Troubleshooting 26 Replacing the Lamp 29 1

User Manual
Page 2
...off the product, follow the cooling fan to cool down before changing the lamp; Warning- Warning- Be sure to replace the lamp when it will display a warning message when the lamp is about to rain or moisture. Warning- The bright light may make ...turn back on the projector first and then select the signal sources. To replace the lamp, follow the lamp replacement instructions listed under "Replacing the Lamp." 2 carefully follow the procedures listed under "Replacing the Lamp." Warning- Warning- Warning- English Usage Notice Precautions Follow all warnings, ...
...off the product, follow the cooling fan to cool down before changing the lamp; Warning- Warning- Be sure to replace the lamp when it will display a warning message when the lamp is about to rain or moisture. Warning- The bright light may make ...turn back on the projector first and then select the signal sources. To replace the lamp, follow the lamp replacement instructions listed under "Replacing the Lamp." 2 carefully follow the procedures listed under "Replacing the Lamp." Warning- Warning- Warning- English Usage Notice Precautions Follow all warnings, ...
User Manual
Page 4
mode support Apple Macintosh compatible 4 English Introduction Product Features This product is a SVGA single chip 0.55-inch DLPTM projector. Its outstanding features follow: Masked wide 480p (800 x 480); perfect for DVD 4.6-pounds/2.0kg compact design Single chip DLPTM technology HDTV compatible (480i/p, 576i/p, 1080i, 720p) NTSC/NTSC4.43/PAL/PAL-M/PAL-N/SECAM, and HDTV compatible Wireless remote control User-friendly multilingual on-screen display menu Advanced keystone correction User-friendly control panel 180-watt replaceable P-VIP lamp with Economy-
mode support Apple Macintosh compatible 4 English Introduction Product Features This product is a SVGA single chip 0.55-inch DLPTM projector. Its outstanding features follow: Masked wide 480p (800 x 480); perfect for DVD 4.6-pounds/2.0kg compact design Single chip DLPTM technology HDTV compatible (480i/p, 576i/p, 1080i, 720p) NTSC/NTSC4.43/PAL/PAL-M/PAL-N/SECAM, and HDTV compatible Wireless remote control User-friendly multilingual on-screen display menu Advanced keystone correction User-friendly control panel 180-watt replaceable P-VIP lamp with Economy-
User Manual
Page 24
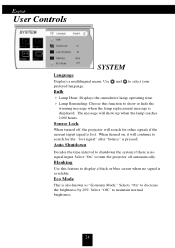
Source Lock When turned off automatically. Use and to maintain normal brightness. 24 Bulb 4 Lamp Hour: Displays the cumulative lamp operating time. 4 Lamp Reminding: Choose this feature to search for other signals if the current input signal is displayed. When turned on, it will continue...2,000 hours. Auto Shutdown Decides the time interval to turn the projector off , the projector will show or hide the warning message when the lamp replacement message is lost signal" after "Source" is also known as "Economy Mode." Select "On" to shutdown the system if there is available....
Source Lock When turned off automatically. Use and to maintain normal brightness. 24 Bulb 4 Lamp Hour: Displays the cumulative lamp operating time. 4 Lamp Reminding: Choose this feature to search for other signals if the current input signal is displayed. When turned on, it will continue...2,000 hours. Auto Shutdown Decides the time interval to turn the projector off , the projector will show or hide the warning message when the lamp replacement message is lost signal" after "Source" is also known as "Economy Mode." Select "On" to shutdown the system if there is available....
User Manual
Page 26
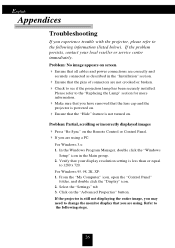
... Click on the Remote Control or Control Panel. 4 If you are correctly and securely connected as described in the Main group. 2. Refer to the "Replacing the Lamp" section for more information. 4 Make sure that you have removed that the lens cap and the projector is powered on. 4 Ensure that the "Hide".... If the problem persists, contact your display resolution setting is still not displaying the entire image, you may need to see if the projection lamp has been securely installed. If the projector is less than or equal to the following steps. 26 Problem: No image appears on . In ...
... Click on the Remote Control or Control Panel. 4 If you are correctly and securely connected as described in the Main group. 2. Refer to the "Replacing the Lamp" section for more information. 4 Make sure that you have removed that the lens cap and the projector is powered on. 4 Ensure that the "Hide".... If the problem persists, contact your display resolution setting is still not displaying the entire image, you may need to see if the projection lamp has been securely installed. If the projector is less than or equal to the following steps. 26 Problem: No image appears on . In ...
User Manual
Page 28
If this happens, the projector will burn out and make a loud popping sound. Problem: Lamp burns out or makes a popping sound 4 When the lamp reaches its end of focus 4 Adjust the focus using the remote control. To replace the lamp, follow the procedures in "Replacing the Lamp" page 29. 28 Problem: Image is out of life, it will not turn back on until the lamp module has been replaced. English Appendices Problem: Image is reversed. 4 Press "Menu," then select "Display" to adjust the projection.
If this happens, the projector will burn out and make a loud popping sound. Problem: Lamp burns out or makes a popping sound 4 When the lamp reaches its end of focus 4 Adjust the focus using the remote control. To replace the lamp, follow the procedures in "Replacing the Lamp" page 29. 28 Problem: Image is out of life, it will not turn back on until the lamp module has been replaced. English Appendices Problem: Image is reversed. 4 Press "Menu," then select "Display" to adjust the projection.
User Manual
Page 29
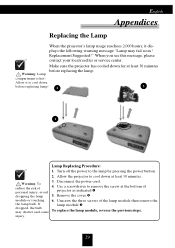
.... Allow the projector to cool down at least 30 minutes before replacing lamp! 2 3 1 Warning: To reduce the risk of personal injury, avoid dropping the lamp module or touching the lamp bulb. Disconnect the power cord. 4. Unscrew the three screws of projector as indicated. 5. Replacement Suggested !" Lamp Replacing Procedure: 1. Remove the cover. 6. If dropped, the bulb may fail...
.... Allow the projector to cool down at least 30 minutes before replacing lamp! 2 3 1 Warning: To reduce the risk of personal injury, avoid dropping the lamp module or touching the lamp bulb. Disconnect the power cord. 4. Unscrew the three screws of projector as indicated. 5. Replacement Suggested !" Lamp Replacing Procedure: 1. Remove the cover. 6. If dropped, the bulb may fail...


