

User manual
Page 3
Setup screen type menu...38 Setup lamp settings menu...38 Setup filter settings menu...38 Setup power settings menu...39 Setup security menu...40 Setup HDMI link settings menu 40 Setup test ... remote settings menu...41 Setup projector ID menu...41 Setup options menu...41 Setup reset all menu...42 Info menu...42 maintenance 43 Replacing the lamp...43 Installing and cleaning the dust filter 45 additional information 46 Compatible resolutions...46 Image size and projection distance 49 Projector dimensions and ceiling mount...
Setup screen type menu...38 Setup lamp settings menu...38 Setup filter settings menu...38 Setup power settings menu...39 Setup security menu...40 Setup HDMI link settings menu 40 Setup test ... remote settings menu...41 Setup projector ID menu...41 Setup options menu...41 Setup reset all menu...42 Info menu...42 maintenance 43 Replacing the lamp...43 Installing and cleaning the dust filter 45 additional information 46 Compatible resolutions...46 Image size and projection distance 49 Projector dimensions and ceiling mount...
User manual
Page 4
...135;‡ Do not block any other hazards. As an example, do not open or disassemble the projector as this user's guide. The lamp inside . ‡‡ Do not place the projector on an unstable surface. Opening or removing covers may expose you send the unit for...; Do not block the light coming out of important operating and maintenance (servicing) instructions in the literature accompanying the appliance. Please call Optoma before you to dangerous voltages or other apparatus such as radiators, heaters, stoves or any ventilation openings. They may touch dangerous voltage points...
...135;‡ Do not block any other hazards. As an example, do not open or disassemble the projector as this user's guide. The lamp inside . ‡‡ Do not place the projector on an unstable surface. Opening or removing covers may expose you send the unit for...; Do not block the light coming out of important operating and maintenance (servicing) instructions in the literature accompanying the appliance. Please call Optoma before you to dangerous voltages or other apparatus such as radiators, heaters, stoves or any ventilation openings. They may touch dangerous voltage points...

User manual
Page 5
...quality of the projector performance. ‡‡ Please follow the correct projector orientation installation as recommended before you experience any of the lamp itself. Please contact your child use attachments/accessories specified by the manufacturer. ‡‡ Do not look into straight into the ...plug from the AC outlet before using the 3D function. ‡‡ Even those who are sleep deprived or under "Replacing the Lamp" section on the screen. Please be closely supervised when viewing these symptoms. Parents should avoid utilizing the unit's 3D functionality. ‡&#...
...quality of the projector performance. ‡‡ Please follow the correct projector orientation installation as recommended before you experience any of the lamp itself. Please contact your child use attachments/accessories specified by the manufacturer. ‡‡ Do not look into straight into the ...plug from the AC outlet before using the 3D function. ‡‡ Even those who are sleep deprived or under "Replacing the Lamp" section on the screen. Please be closely supervised when viewing these symptoms. Parents should avoid utilizing the unit's 3D functionality. ‡&#...
User manual
Page 9
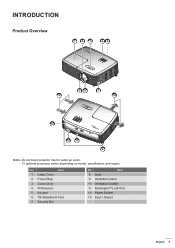
Lens 9. Power Socket 13. Zoom Lever 4. Keypad 6. Focus Ring 3. KensingtonTM Lock Port 12. INTRODUCTION Product Overview 1 2 3 45 68 7 9 10 13 12 11 6 Note: Do not block projector inlet or outlet air vents. (*) optional accessory varies depending on model, specification, and region. No Item 1. IR Receiver 5. Security Bar No Item 8. Ventilation (outlet) 11. Input / Output English 9 Tilt-Adjustment Foot 7. Lamp Cover 2. Ventilation (inlet) 10.
Lens 9. Power Socket 13. Zoom Lever 4. Keypad 6. Focus Ring 3. KensingtonTM Lock Port 12. INTRODUCTION Product Overview 1 2 3 45 68 7 9 10 13 12 11 6 Note: Do not block projector inlet or outlet air vents. (*) optional accessory varies depending on model, specification, and region. No Item 1. IR Receiver 5. Security Bar No Item 8. Ventilation (outlet) 11. Input / Output English 9 Tilt-Adjustment Foot 7. Lamp Cover 2. Ventilation (inlet) 10.
User manual
Page 11
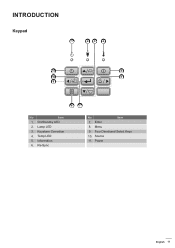
Re-Sync No Item 7. Keystone Correction 4. Enter 8. Source 11. INTRODUCTION Keypad 1 23 4 11 5 10 6 9 8 7 No Item 1. Temp LED 5. Menu 9. On/Standby LED 2. Four Directional Select Keys 10. Information 6. Lamp LED 3. Power English 11
Re-Sync No Item 7. Keystone Correction 4. Enter 8. Source 11. INTRODUCTION Keypad 1 23 4 11 5 10 6 9 8 7 No Item 1. Temp LED 5. Menu 9. On/Standby LED 2. Four Directional Select Keys 10. Information 6. Lamp LED 3. Power English 11

User manual
Page 12
Mute 14. Video 17. Lamp Mode Some keys may have no function for the first time, remove the transparent insulation tape. INTRODUCTION Remote control 10 11 1 12 2 3 13 14 4 4 5 6 15 2 7 ...
Mute 14. Video 17. Lamp Mode Some keys may have no function for the first time, remove the transparent insulation tape. INTRODUCTION Remote control 10 11 1 12 2 3 13 14 4 4 5 6 15 2 7 ...

User manual
Page 13
... rest of four possible positions. Your room layout or personal preference will invalidate the warranty and may shorten the lifetime of the projector lamp or the projector itself. Note: The further away the projector is designed to distance table on page 48. Any other that table... top or ceiling mount. For none standard installation advise please contact Optoma. Table mount front Ceiling mount front Table mount rear Ceiling mount rear Projector should be placed flat on a surface and 90 degrees /...
... rest of four possible positions. Your room layout or personal preference will invalidate the warranty and may shorten the lifetime of the projector lamp or the projector itself. Note: The further away the projector is designed to distance table on page 48. Any other that table... top or ceiling mount. For none standard installation advise please contact Optoma. Table mount front Ceiling mount front Table mount rear Ceiling mount rear Projector should be placed flat on a surface and 90 degrees /...

User manual
Page 18
... and the IR sensor on the top side of the remote control is not being shined by sunlight or fluorescent lamps directly. ‡‡ Please keep the remote controller away from fluorescent lamps for over 2 meters or the remote controller might become malfunction. ‡‡ If the remote control is located on... of the projector. Approx. 10° 18 English SETUP AND INSTALLATION Effective range Infra-Red (IR) remote control sensor is closed to Inverter-Type fluorescent lamps, it might become ineffective from time to function correctly.
... and the IR sensor on the top side of the remote control is not being shined by sunlight or fluorescent lamps directly. ‡‡ Please keep the remote controller away from fluorescent lamps for over 2 meters or the remote controller might become malfunction. ‡‡ If the remote control is located on... of the projector. Approx. 10° 18 English SETUP AND INSTALLATION Effective range Infra-Red (IR) remote control sensor is closed to Inverter-Type fluorescent lamps, it might become ineffective from time to function correctly.

User manual
Page 24
V: 0 H: 0; V: 0 H: 0; V: 0 H: 0; V: -100 H: 100; V: 0 H: 100; Position Exit Brightness Mode [Lamp Base Data] Reset 3D Mode 3D Display 3D->2D 3D Format 3D sync invert Aspect Ratio Edge Mask Zoom Image shift Keystone H: 0; Position V. USING THE ...
V: 0 H: 0; V: 0 H: 0; V: 0 H: 0; V: -100 H: 100; V: 0 H: 100; Position Exit Brightness Mode [Lamp Base Data] Reset 3D Mode 3D Display 3D->2D 3D Format 3D sync invert Aspect Ratio Edge Mask Zoom Image shift Keystone H: 0; Position V. USING THE ...

User manual
Page 25
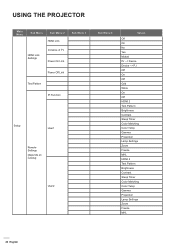
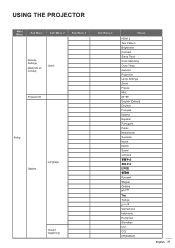
USING THE PROJECTOR Main Menu Sub Menu Audio Mute Volume Sub Menu 2 Sub Menu 3 Projection Screen Type [WXGA WUXGA models] Lamp Settings Lamp Reminder Lamp Reset Optional Filter Installed Filter Usage Hours Filter Settings Filter Reminder Setup Filter Reset Direct Power On Signal Power On Auto Power Off (min) Power ...
USING THE PROJECTOR Main Menu Sub Menu Audio Mute Volume Sub Menu 2 Sub Menu 3 Projection Screen Type [WXGA WUXGA models] Lamp Settings Lamp Reminder Lamp Reset Optional Filter Installed Filter Usage Hours Filter Settings Filter Reminder Setup Filter Reset Direct Power On Signal Power On Auto Power Off (min) Power ...
User manual
Page 26
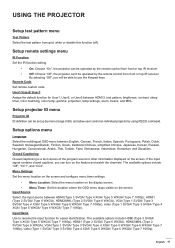
USING THE PROJECTOR Main Menu Sub Menu Sub Menu 2 HDMI Link Sub Menu 3 HDMI Link Settings Inclusive of TV Power On Link Power Off Link Test Pattern IR Function Setup User1 Remote Settings [depends on remote] User2 Sub Menu 4 Values Off On No Yes Mutual PJ --> Device Device --> PJ Off On Off Grid White On Off HDMI 2 Test Pattern Brightness Contrast Sleep Timer Color Matching Color Temp Gamma Projection Lamp Settings Zoom Freeze MHL HDMI 2 Test Pattern Brightness Contrast Sleep Timer Color Matching Color Temp Gamma Projection Lamp Settings Zoom Freeze MHL 26 English
USING THE PROJECTOR Main Menu Sub Menu Sub Menu 2 HDMI Link Sub Menu 3 HDMI Link Settings Inclusive of TV Power On Link Power Off Link Test Pattern IR Function Setup User1 Remote Settings [depends on remote] User2 Sub Menu 4 Values Off On No Yes Mutual PJ --> Device Device --> PJ Off On Off Grid White On Off HDMI 2 Test Pattern Brightness Contrast Sleep Timer Color Matching Color Temp Gamma Projection Lamp Settings Zoom Freeze MHL HDMI 2 Test Pattern Brightness Contrast Sleep Timer Color Matching Color Temp Gamma Projection Lamp Settings Zoom Freeze MHL 26 English
User manual
Page 27
USING THE PROJECTOR Main Menu Sub Menu Sub Menu 2 Sub Menu 3 Remote Settings [depends on remote] User3 Projector ID Setup Options Language Closed Captioning Sub Menu 4 Values HDMI 2 Test Pattern Brightness Contrast Sleep Timer Color Matching Color Temp Gamma Projection Lamp Settings Zoom Freeze MHL 00~99 English [Default] Deutsch Français Italiano Español Português Polski Nederlands Svenska Norsk Dansk Suomi Magyar Čeština ไทย Türkçe Vietnamese Indonesia Romanian Slovakian CC1 CC2 Off [Default] English 27
USING THE PROJECTOR Main Menu Sub Menu Sub Menu 2 Sub Menu 3 Remote Settings [depends on remote] User3 Projector ID Setup Options Language Closed Captioning Sub Menu 4 Values HDMI 2 Test Pattern Brightness Contrast Sleep Timer Color Matching Color Temp Gamma Projection Lamp Settings Zoom Freeze MHL 00~99 English [Default] Deutsch Français Italiano Español Português Polski Nederlands Svenska Norsk Dansk Suomi Magyar Čeština ไทย Türkçe Vietnamese Indonesia Romanian Slovakian CC1 CC2 Off [Default] English 27

User manual
Page 29
... OSD Reset to Default Regulatory Serial Number Current Input Source Resolution Refresh Rate Projector ID Display Mode Information Power mode(standby) Brightness Mode Filter Hours Lamp Hours FW Version Bright mode Eco mode Dynamic mode Eco+ mode Total hours System MCU Sub Menu 4 Values Off [Default] On Off [Default] On Off...
... OSD Reset to Default Regulatory Serial Number Current Input Source Resolution Refresh Rate Projector ID Display Mode Information Power mode(standby) Brightness Mode Filter Hours Lamp Hours FW Version Bright mode Eco mode Dynamic mode Eco+ mode Total hours System MCU Sub Menu 4 Values Off [Default] On Off [Default] On Off...

User manual
Page 30
Select "Yes" to save the settings. ‡‡ Each display mode can be adjusted and saved the value. ‡‡ In 3D timing mode, the zoom/edge mask will only reset both Lamp Hours in OSD and Lamp Hours in service mode. USING THE PROJECTOR ‡‡ The "LAMP RESET" in OSD will be disabled to prevent from image break. 30 English The Projection Hours in service mode will not be reset. ‡‡ When you made the changes on the "IR Function", "Projection", or "Keypad Lock" function, a confirmation message will appear on the screen.
Select "Yes" to save the settings. ‡‡ Each display mode can be adjusted and saved the value. ‡‡ In 3D timing mode, the zoom/edge mask will only reset both Lamp Hours in OSD and Lamp Hours in service mode. USING THE PROJECTOR ‡‡ The "LAMP RESET" in OSD will be disabled to prevent from image break. 30 English The Projection Hours in service mode will not be reset. ‡‡ When you made the changes on the "IR Function", "Projection", or "Keypad Lock" function, a confirmation message will appear on the screen.

User manual
Page 33
...135;‡ R (Right): Display the right frame of 3D content. 3D Format Use this option to dim the lamp power which will lower power consumption and extend the lamp life. ‡‡ Dynamic: Choose "Dynamic" to enable/disable the 3D sync invert function. Return the factory ...default settings for color settings. English 33 USING THE PROJECTOR Brightness Mode (Lamp base data) Adjust the brightness mode settings for lamp-based projectors. ‡‡ Bright: Choose "Bright" to increase the brightness. ‡‡ Eco: Choose "Eco"...
...135;‡ R (Right): Display the right frame of 3D content. 3D Format Use this option to dim the lamp power which will lower power consumption and extend the lamp life. ‡‡ Dynamic: Choose "Dynamic" to enable/disable the 3D sync invert function. Return the factory ...default settings for color settings. English 33 USING THE PROJECTOR Brightness Mode (Lamp base data) Adjust the brightness mode settings for lamp-based projectors. ‡‡ Bright: Choose "Bright" to increase the brightness. ‡‡ Eco: Choose "Eco"...

User manual
Page 34
...) that supports anamorphic wide is 16:10, the screen type will be scaled to 1024x614. -If source is enhanced for 16x9 Display in 16:9 mode. Lamp power and vertical resolution are not enhanced for 16:10 input sources, like widescreen laptops. ‡‡ LBX (except SVGA and XGA models): This format...
...) that supports anamorphic wide is 16:10, the screen type will be scaled to 1024x614. -If source is enhanced for 16x9 Display in 16:9 mode. Lamp power and vertical resolution are not enhanced for 16:10 input sources, like widescreen laptops. ‡‡ LBX (except SVGA and XGA models): This format...

User manual
Page 38
...function to show or to turn mute on. ‡‡ Off: Choose the "Off" to hide the warning message when the changing lamp message is "Yes". ‡‡ No: Turn off . Setup filter settings menu Optional Filter Installed Set the warning message setting. &#...135;‡ Yes: Display warning message after replacing the lamp. Note: "Mute" function affects both internal and external speaker volume. Setup menu Setup projection menu Projection Select the preferred projection between front...
...function to show or to turn mute on. ‡‡ Off: Choose the "Off" to hide the warning message when the changing lamp message is "Yes". ‡‡ No: Turn off . Setup filter settings menu Optional Filter Installed Set the warning message setting. &#...135;‡ Yes: Display warning message after replacing the lamp. Note: "Mute" function affects both internal and external speaker volume. Setup menu Setup projection menu Projection Select the preferred projection between front...
User manual
Page 41
... able to rename the input function for User1, User2, or User3 between HDMI 2, test pattern, brightness, contrast, sleep timer, color matching, color temp, gamma, projection, lamp settings, zoom, freeze, and MHL.
... able to rename the input function for User1, User2, or User3 between HDMI 2, test pattern, brightness, contrast, sleep timer, color matching, color temp, gamma, projection, lamp settings, zoom, freeze, and MHL.
User manual
Page 42
...; Refresh Rate ‡‡ Projector ID ‡‡ Display Mode ‡‡ Power mode(standby) ‡‡ Brightness Mode ‡‡ Filter Hours ‡‡ Lamp Hours ‡‡ FW Version 42 English However, the projector can be operated by the remote control. If changes are made, they will be locked...
...; Refresh Rate ‡‡ Projector ID ‡‡ Display Mode ‡‡ Power mode(standby) ‡‡ Brightness Mode ‡‡ Filter Hours ‡‡ Lamp Hours ‡‡ FW Version 42 English However, the projector can be operated by the remote control. If changes are made, they will be locked...
User manual
Page 43
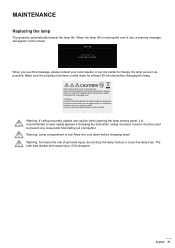
... soon as possible. Allow it is recommended to cool down for at least 30 minutes before changing lamp! maintenance Replacing the lamp The projector automatically detects the lamp life. Warning: To reduce the risk of projector. When you see this message, please contact your local reseller or service ...center to prevent any loose parts from falling out of personal injury, do not drop the lamp module or touch the lamp bulb. Warning: If ceiling mounted, please use , a warning message will appear on the screen. Make sure the projector has ...
... soon as possible. Allow it is recommended to cool down for at least 30 minutes before changing lamp! maintenance Replacing the lamp The projector automatically detects the lamp life. Warning: To reduce the risk of projector. When you see this message, please contact your local reseller or service ...center to prevent any loose parts from falling out of personal injury, do not drop the lamp module or touch the lamp bulb. Warning: If ceiling mounted, please use , a warning message will appear on the screen. Make sure the projector has ...


