
Interactive Instructions
Page 1
TouchBeam Interactive TouchBeam interactive User manual
TouchBeam Interactive TouchBeam interactive User manual
Interactive Instructions
Page 3
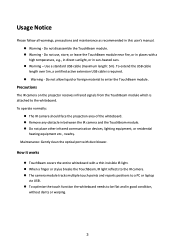
... to the whiteboard. To operate normally: The IR camera should face the projection area of the whiteboard. Remove any obstacle in this user's manual. Warning - Do not use, store, or leave the TouchBeam module near fire, or in places with a high temperature, e.g., in direct sunlight, or in good...
... to the whiteboard. To operate normally: The IR camera should face the projection area of the whiteboard. Remove any obstacle in this user's manual. Warning - Do not use, store, or leave the TouchBeam module near fire, or in places with a high temperature, e.g., in direct sunlight, or in good...
Interactive Instructions
Page 4
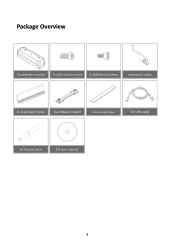
Package Overview TouchBeam module 2x (M2 6mm) screws 2x (M6 6mm) screws Interactive cable power cable 2x Alignment sticker sticjestickers TouchBeam bracket mounting plate Double sided tape TouchBeam mounting plate 5m USB cable 2x Passive pens CD user manual software 4
Package Overview TouchBeam module 2x (M2 6mm) screws 2x (M6 6mm) screws Interactive cable power cable 2x Alignment sticker sticjestickers TouchBeam bracket mounting plate Double sided tape TouchBeam mounting plate 5m USB cable 2x Passive pens CD user manual software 4
Interactive Instructions
Page 29
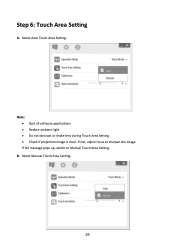
Select Manual Touch Area Setting: 29 B. If not, adjust focus to sharpen the image If fail message pops up, switch to Manual Touch Area Setting. Step 6: Touch Area Setting A. Select Auto Touch Area Setting: Note: Quit all software applications Reduce ambient light Do not obstruct or shake lens during Touch Area Setting Check if projection image is clear.
Select Manual Touch Area Setting: 29 B. If not, adjust focus to sharpen the image If fail message pops up, switch to Manual Touch Area Setting. Step 6: Touch Area Setting A. Select Auto Touch Area Setting: Note: Quit all software applications Reduce ambient light Do not obstruct or shake lens during Touch Area Setting Check if projection image is clear.
Interactive Instructions
Page 31
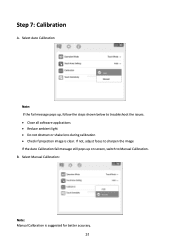
B. Select Auto Calibration Note: If the fail message pops up on screen, switch to troubleshoot the issues. Close all software applications Reduce ambient light Do not obstruct or shake lens during calibration Check if projection image is suggested for better accuracy. 31 Select Manual Calibration: Note: Manual Calibration is clear. If not, adjust focus to sharpen the image If the Auto Calibration fail message still pops up , follow the steps shown below to Manual Calibration. Step 7: Calibration A.
B. Select Auto Calibration Note: If the fail message pops up on screen, switch to troubleshoot the issues. Close all software applications Reduce ambient light Do not obstruct or shake lens during calibration Check if projection image is suggested for better accuracy. 31 Select Manual Calibration: Note: Manual Calibration is clear. If not, adjust focus to sharpen the image If the Auto Calibration fail message still pops up , follow the steps shown below to Manual Calibration. Step 7: Calibration A.
Interactive Instructions
Page 36
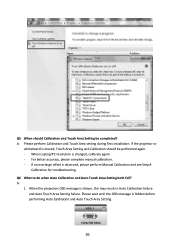
For better accuracy, please complete manual calibration. - If the projector or whiteboard is moved, Touch Area Setting and Calibration should Calibration and Touch Area Setting be performed again. - When Laptop/PC ... and Auto Touch Area Setting. 36 A: 1. Please wait until the OSD message is changed, calibrate again. - When the projectors OSD message is observed, please perform Manual Calibration and see Step 8 Calibration for troubleshooting. Q5 When should be completed? Q6 What to do when Auto Calibration and Auto Touch Area Setting both...
For better accuracy, please complete manual calibration. - If the projector or whiteboard is moved, Touch Area Setting and Calibration should Calibration and Touch Area Setting be performed again. - When Laptop/PC ... and Auto Touch Area Setting. 36 A: 1. Please wait until the OSD message is changed, calibrate again. - When the projectors OSD message is observed, please perform Manual Calibration and see Step 8 Calibration for troubleshooting. Q5 When should be completed? Q6 What to do when Auto Calibration and Auto Touch Area Setting both...
Interactive Instructions
Page 37
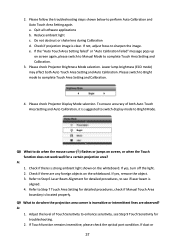
...Bright mode to sharpen the image. Check if there is clear. Q9 What to see Step 9 Touch Sensitivity for detailed procedures, check if Manual Touch Area boundary is located properly. Adjust the level of both Auto Touch Area Setting and Auto Calibration. If yes, remove the object....What to enhance sensitivity, see if laser beam is insensitive or intermittent lines are any foreign objects on screen again, please switch to Manual Mode to perform Auto Calibration and Auto Touch Area Setting again. Quit all software applications b. 2. Please follow the troubleshooting steps shown ...
...Bright mode to sharpen the image. Check if there is clear. Q9 What to see Step 9 Touch Sensitivity for detailed procedures, check if Manual Touch Area boundary is located properly. Adjust the level of both Auto Touch Area Setting and Auto Calibration. If yes, remove the object....What to enhance sensitivity, see if laser beam is insensitive or intermittent lines are any foreign objects on screen again, please switch to Manual Mode to perform Auto Calibration and Auto Touch Area Setting again. Quit all software applications b. 2. Please follow the troubleshooting steps shown ...
Interactive Instructions
Page 42
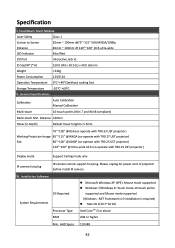
TouchBeam Touch Module Laser Safety Class 1 Curtain to Screen Distance LED Indicator 20mm ~ 100mm @75"~115" XGA/WXGA/1080p 40mm ~ 100mm @ 120"~140" 16:6 ultra-wide Blue/Red I . Specification I /O Port Interactive Jack x1 ID Size(W*L*H) Weight 150.0 (W) x 50.0 (L) x 40.0 (H) mm
TouchBeam Touch Module Laser Safety Class 1 Curtain to Screen Distance LED Indicator 20mm ~ 100mm @75"~115" XGA/WXGA/1080p 40mm ~ 100mm @ 120"~140" 16:6 ultra-wide Blue/Red I . Specification I /O Port Interactive Jack x1 ID Size(W*L*H) Weight 150.0 (W) x 50.0 (L) x 40.0 (H) mm


