
Owner Manual
Page 5
...a Satellite, Cable, Terrestrial Set-top box, or Other Video Source ......41 Connecting Components with HDMI 42 Connecting a Game Console 44 Connecting a Camcorder or Other Device 45 Connecting a CD Player... (North American model only 49 Connecting Onkyo V Components 50 Connecting the Power Cord 50 Turning On the AV Receiver 51 Turning On and Standby 51 First...Setup 119 Selecting Audio Inputs 120 Specifying the Digital Signal Format 120 NET/USB (TX-NR906 only 121 About NET/USB 121 Connecting the AV Receiver 123 Playing Music Files...TX-SR876 148 Specifications (TX-NR906 149 5
...a Satellite, Cable, Terrestrial Set-top box, or Other Video Source ......41 Connecting Components with HDMI 42 Connecting a Game Console 44 Connecting a Camcorder or Other Device 45 Connecting a CD Player... (North American model only 49 Connecting Onkyo V Components 50 Connecting the Power Cord 50 Turning On the AV Receiver 51 Turning On and Standby 51 First...Setup 119 Selecting Audio Inputs 120 Specifying the Digital Signal Format 120 NET/USB (TX-NR906 only 121 About NET/USB 121 Connecting the AV Receiver 123 Playing Music Files...TX-SR876 148 Specifications (TX-NR906 149 5
Owner Manual
Page 9
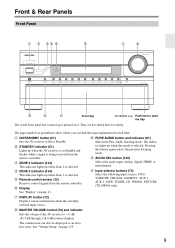
... of the AV receiver to On or Standby. The page numbers in parentheses show where you can also be displayed as an absolute value. K AUDIO SEL button (120) Selects the audio input: analog, digital, HDMI, or multichannel.... H DISPLAY button (72) Displays various information about the currently selected input source. Front & Rear Panels Front Panel 1 2 34 5 6 7 8 9 bk bl Front flap TX-NR906 only Push here to open the flap The actual front panel has various logos printed on page 11. F Remote-control sensor (15) Receives control signals...
... of the AV receiver to On or Standby. The page numbers in parentheses show where you can also be displayed as an absolute value. K AUDIO SEL button (120) Selects the audio input: analog, digital, HDMI, or multichannel.... H DISPLAY button (72) Displays various information about the currently selected input source. Front & Rear Panels Front Panel 1 2 34 5 6 7 8 9 bk bl Front flap TX-NR906 only Push here to open the flap The actual front panel has various logos printed on page 11. F Remote-control sensor (15) Receives control signals...
Owner Manual
Page 13
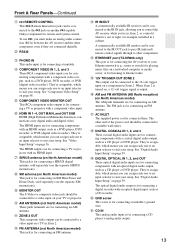
...AV receiver to your setup. O ETHERNET port (TX-NR906 only) This port is for connecting components with an optical digital input, such as a CD player or DVD player. C RS232 D PHONO IN This audio input is connected here. The HDMI inputs...coaxial digital audio inputs are for connecting a SIRIUS digital antenna, sold separately (see the separate SIRIUS instructions). I XM antenna (on another V-capable Onkyo component for ... playing music files on , a 12-volt trigger signal is for connecting components with a component video input. U GND screw This screw is output. Front ...
...AV receiver to your setup. O ETHERNET port (TX-NR906 only) This port is for connecting components with an optical digital input, such as a CD player or DVD player. C RS232 D PHONO IN This audio input is connected here. The HDMI inputs...coaxial digital audio inputs are for connecting a SIRIUS digital antenna, sold separately (see the separate SIRIUS instructions). I XM antenna (on another V-capable Onkyo component for ... playing music files on , a 12-volt trigger signal is for connecting components with a component video input. U GND screw This screw is output. Front ...

Owner Manual
Page 33
...). • To prevent interference, keep audio and video cables away from power cords and speaker cables. HDMI dard- Audio Optical digital audio cable Coaxial digital audio cable Analog audio cable (RCA) Multichannel analog audio ...AV receiver does not support SCART connections. 33 Push plugs in all AV connections. Use white plugs to connect composite video inputs and outputs. And use yellow plugs to connect left-channel audio inputs and outputs (typically labeled "L"). Wrong! Y CB/PB CR/PR Y CB/PB CR/PR Component video separates the luminance (Y) and color difference signals...
...). • To prevent interference, keep audio and video cables away from power cords and speaker cables. HDMI dard- Audio Optical digital audio cable Coaxial digital audio cable Analog audio cable (RCA) Multichannel analog audio ...AV receiver does not support SCART connections. 33 Push plugs in all AV connections. Use white plugs to connect composite video inputs and outputs. And use yellow plugs to connect left-channel audio inputs and outputs (typically labeled "L"). Wrong! Y CB/PB CR/PR Y CB/PB CR/PR Component video separates the luminance (Y) and color difference signals...

Owner Manual
Page 34
... switch the audio and video signals simultaneously simply by changing the input source on the "Monitor Out" setting, which generally determines whether video signals are . The AV receiver can upconvert and downconvert between video formats, depending on the AV receiver. : Signal Flow Video Video Audio Audio TV, projector, etc. Use the "HDMI Main" or "HDMI Sub" setting if Composite you...
... switch the audio and video signals simultaneously simply by changing the input source on the "Monitor Out" setting, which generally determines whether video signals are . The AV receiver can upconvert and downconvert between video formats, depending on the AV receiver. : Signal Flow Video Video Audio Audio TV, projector, etc. Use the "HDMI Main" or "HDMI Sub" setting if Composite you...

Owner Manual
Page 35
... to your TV. Note that the AV receiver does not convert digital input signals for the component video output. Composite AV receiver Composite The composite video, S-Video, and component video outputs pass through the AV receiver as they are. Video Signal Flow Chart DVD player, etc. Analog Multichannel Optical Coaxial HDMI AV receiver *2 Analog Optical HDMI *1 MD recorder, etc. *1 Depends on the "Audio...
... to your TV. Note that the AV receiver does not convert digital input signals for the component video output. Composite AV receiver Composite The composite video, S-Video, and component video outputs pass through the AV receiver as they are. Video Signal Flow Chart DVD player, etc. Analog Multichannel Optical Coaxial HDMI AV receiver *2 Analog Optical HDMI *1 MD recorder, etc. *1 Depends on the "Audio...

Owner Manual
Page 36
...tuner to listen to the AV receiver and use a and b , or a and c .) Connection A B C a b c AV receiver COMPONENT VIDEO MONITOR OUT MONITOR OUT S MONITOR OUT V GAME/TV IN L/R DIGITAL COAXIAL IN 2 (VCR/DVR) DIGITAL OPTICAL IN 1 (GAME/TV) Signal flow TV Component video input S-Video input Composite video input Analog audio L/R output Digital ... IN VIDEO IN Connect one or the other Connection b must be assigned (see pages 39 and 41). 36 Connecting the AV Receiver-Continued Connecting a TV or Projector See "Connecting Components with HDMI" on page 42 for HDMI connection information.
...tuner to listen to the AV receiver and use a and b , or a and c .) Connection A B C a b c AV receiver COMPONENT VIDEO MONITOR OUT MONITOR OUT S MONITOR OUT V GAME/TV IN L/R DIGITAL COAXIAL IN 2 (VCR/DVR) DIGITAL OPTICAL IN 1 (GAME/TV) Signal flow TV Component video input S-Video input Composite video input Analog audio L/R output Digital ... IN VIDEO IN Connect one or the other Connection b must be assigned (see pages 39 and 41). 36 Connecting the AV Receiver-Continued Connecting a TV or Projector See "Connecting Components with HDMI" on page 42 for HDMI connection information.
Owner Manual
Page 42
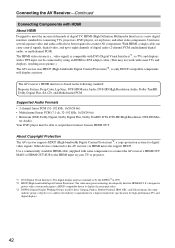
... and audio cables have been required to the AV receiver via HDMI must be connected by using an HDMI-to-DVI adapter cable. (This may not work with some components) to connect the AV receiver's HDMI OUT MAIN or HDMI OUT SUB to the HDMI input on the following standard: Repeater System, Deep ...by Intel for high-performance PCs and digital displays. 42 With HDMI, a single cable can be able to output these formats from its HDMI OUT. The AV receiver's HDMI interface is a new digital interface standard for digital video signals. It's designed to protect video content and requires a HDCP-...
... and audio cables have been required to the AV receiver via HDMI must be connected by using an HDMI-to-DVI adapter cable. (This may not work with some components) to connect the AV receiver's HDMI OUT MAIN or HDMI OUT SUB to the HDMI input on the following standard: Repeater System, Deep ...by Intel for high-performance PCs and digital displays. 42 With HDMI, a single cable can be able to output these formats from its HDMI OUT. The AV receiver's HDMI interface is a new digital interface standard for digital video signals. It's designed to protect video content and requires a HDCP-...

Owner Manual
Page 43
... the HDMI outputs. See "Video Input Setup" on the TV, select the input of the HDMI component connected to the AV receiver). Normally, they are output by the AV receiver's speakers. In addition, video signals from a component connected via HDMI, check its video can be seen on the TV screen (on page 56. ■ Video Signals Digital video signals received by the HDMI IN...
... the HDMI outputs. See "Video Input Setup" on the TV, select the input of the HDMI component connected to the AV receiver). Normally, they are output by the AV receiver's speakers. In addition, video signals from a component connected via HDMI, check its video can be seen on the TV screen (on page 56. ■ Video Signals Digital video signals received by the HDMI IN...
Owner Manual
Page 56
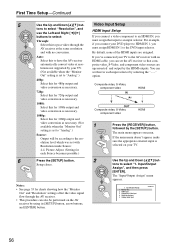
... "Resolution" settings affect the video signal flow through the AV receiver at resolutions not supported by your TV to have the AV receiver automatically convert video at the same resolution and with Resolution inside Source: 4-4. tons to the DVD input selector. The "Input/Output Assign" menu appears. 1....(Not available when the "Monitor Out" setting is selected on the AV receiver by the HDMI outputs. If the main menu doesn't appear, make sure the appropriate external input is set the AV receiver so that input to an HDMI IN, you connect your TV. 2 Use the Up and Down ...
... "Resolution" settings affect the video signal flow through the AV receiver at resolutions not supported by your TV to have the AV receiver automatically convert video at the same resolution and with Resolution inside Source: 4-4. tons to the DVD input selector. The "Input/Output Assign" menu appears. 1....(Not available when the "Monitor Out" setting is selected on the AV receiver by the HDMI outputs. If the main menu doesn't appear, make sure the appropriate external input is set the AV receiver so that input to an HDMI IN, you connect your TV. 2 Use the Up and Down ...
Owner Manual
Page 57
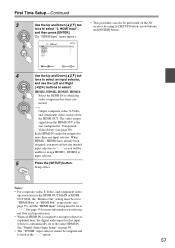
... "HDMI Input" menu appears. 1-2. The video output signal from the HDMI OUT. tons to select an input selector, and use the Left and Right [F]/[S] buttons to select: HDMI1, HDMI2, HDMI3, HDMI4: Select the HDMI IN to the same HDMI IN. First Time Setup-Continued 3 Use the Up and Down [R]/[X] but - See "Digital Audio Input Setup" on the AV receiver by...
... "HDMI Input" menu appears. 1-2. The video output signal from the HDMI OUT. tons to select an input selector, and use the Left and Right [F]/[S] buttons to select: HDMI1, HDMI2, HDMI3, HDMI4: Select the HDMI IN to the same HDMI IN. First Time Setup-Continued 3 Use the Up and Down [R]/[X] but - See "Digital Audio Input Setup" on the AV receiver by...
Owner Manual
Page 58
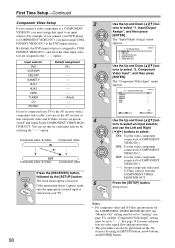
... - CBL/SAT --- AUX1 --- AUX2 --- PHONO --- If you can also be set the AV receiver so that input to COMPONENT VIDEO IN 1. IN3: Use the video component connected to the AV receiver with a component video cable, you 've connected your TV to COMPONENT VIDEO IN 3. -...HDMI Input 3. Analog Audio Input Use the Up and Down [R]/[X] buttons to COMPONENT VIDEO IN 2. The "Input/Output Assign" menu appears. 1. TUNER - - - (Fixed) CD --- The "Component Video Input" menu appears. 1-3. CBL/SAT - - - For example, if you must be set this for more information on video signal...
... - CBL/SAT --- AUX1 --- AUX2 --- PHONO --- If you can also be set the AV receiver so that input to COMPONENT VIDEO IN 1. IN3: Use the video component connected to the AV receiver with a component video cable, you 've connected your TV to COMPONENT VIDEO IN 3. -...HDMI Input 3. Analog Audio Input Use the Up and Down [R]/[X] buttons to COMPONENT VIDEO IN 2. The "Input/Output Assign" menu appears. 1. TUNER - - - (Fixed) CD --- The "Component Video Input" menu appears. 1-3. CBL/SAT - - - For example, if you must be set this for more information on video signal...

Owner Manual
Page 81
...selects the Pure Audio listening mode. Pressing this mode is selected, the AV receiver's display is turned off and only video signals input through all of the listening modes that can be used with the current input source. L NIGHT DVD LEVEL+ Re-EQ HDD RC-687M , ALL...listening modes. ■ LISTENING MODE [F]/[S] buttons Pressing these buttons repeatedly cycles through HDMI IN can select depends on the AV Receiver STEREO THX PURE AUDIO LISTENING MODE ■ [PURE AUDIO] button This button selects the Pure Audio listening mode. Selecting on the format of the input signal.
...selects the Pure Audio listening mode. Pressing this mode is selected, the AV receiver's display is turned off and only video signals input through all of the listening modes that can be used with the current input source. L NIGHT DVD LEVEL+ Re-EQ HDD RC-687M , ALL...listening modes. ■ LISTENING MODE [F]/[S] buttons Pressing these buttons repeatedly cycles through HDMI IN can select depends on the AV Receiver STEREO THX PURE AUDIO LISTENING MODE ■ [PURE AUDIO] button This button selects the Pure Audio listening mode. Selecting on the format of the input signal.

Owner Manual
Page 88
... the new video disc formats Blu-ray and HD DVD, this mode, the display and video circuitry are turned off , only video signals input through HDMI IN can be selected. It supports up to Dolby EX soundtracks that fully envelops the listener. Button: PURE A The LISTENING MODE button...button are . Mono Use this mode, audio from the input source is output by sound effects. They're especially suited to 7.1 channels with analog or PCM multichannel sources. Using the Listening Modes-Continued About the Listening Modes The AV receiver's listening modes can also be used instead of Dolby Pro...
... the new video disc formats Blu-ray and HD DVD, this mode, the display and video circuitry are turned off , only video signals input through HDMI IN can be selected. It supports up to Dolby EX soundtracks that fully envelops the listener. Button: PURE A The LISTENING MODE button...button are . Mono Use this mode, audio from the input source is output by sound effects. They're especially suited to 7.1 channels with analog or PCM multichannel sources. Using the Listening Modes-Continued About the Listening Modes The AV receiver's listening modes can also be used instead of Dolby Pro...
Owner Manual
Page 114
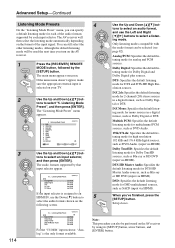
...for Dolby TrueHD sources, such as SACD (input via HDMI). Setup closes. If the main menu doesn't appear, make sure the appropriate external input is selected on the AV receiver by the [SETUP] button. AUX1 6. AUX2 7. Mono Last Valid If the input selector is the only format available. 4 ... Last Valid For the "TUNER" input selector, "Analog" is assigned to an HDMI IN, use the Left and Right [F]/[S] buttons to select a listen- Only listening modes compatible with the audio format can specify a default listening mode for each of the input signal. D.F. 2ch: Specifies the default...
...for Dolby TrueHD sources, such as SACD (input via HDMI). Setup closes. If the main menu doesn't appear, make sure the appropriate external input is selected on the AV receiver by the [SETUP] button. AUX1 6. AUX2 7. Mono Last Valid If the input selector is the only format available. 4 ... Last Valid For the "TUNER" input selector, "Analog" is assigned to an HDMI IN, use the Left and Right [F]/[S] buttons to select a listen- Only listening modes compatible with the audio format can specify a default listening mode for each of the input signal. D.F. 2ch: Specifies the default...
Owner Manual
Page 118
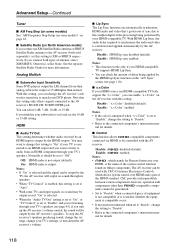
... (on some TVs and input signals, no sound through its speakers. • When "TV Control" is enabled, this setting only affects signals connected to the AV receiver's MULTI CH: SUBWOOFER jack. See the separate Satellite Radio Guide for Remote Interactive over HDMI and is part of equipment...5 dB, 10 dB, or 15 dB. Notes: • If "On" is selected and the signal can enable "x.v.Color" on Onkyo components. Otherwise, select None. With this setting. To stop the AV receiver's speakers producing sound, change the settings, change the setting to "Disable". • Refer to the...
... (on some TVs and input signals, no sound through its speakers. • When "TV Control" is enabled, this setting only affects signals connected to the AV receiver's MULTI CH: SUBWOOFER jack. See the separate Satellite Radio Guide for Remote Interactive over HDMI and is part of equipment...5 dB, 10 dB, or 15 dB. Notes: • If "On" is selected and the signal can enable "x.v.Color" on Onkyo components. Otherwise, select None. With this setting. To stop the AV receiver's speakers producing sound, change the settings, change the setting to "Disable". • Refer to the...

Owner Manual
Page 120
... there is no digital input signal is present, the analog input is used instead. 120 cally. HDMI: Selects the assigned HDMI IN, and the HDMI indicator appears on the display, use to listen to the current input selector. Multich: Selects the multichannel input, and the ANALOG indicator appears on the display. 12 Normally, the AV receiver detects the format of...
... there is no digital input signal is present, the analog input is used instead. 120 cally. HDMI: Selects the assigned HDMI IN, and the HDMI indicator appears on the display, use to listen to the current input selector. Multich: Selects the multichannel input, and the ANALOG indicator appears on the display. 12 Normally, the AV receiver detects the format of...

Owner Manual
Page 142
... your speakers and input sources. If you can 't resolve the issue yourself, contact your Onkyo dealer. If the AV receiver stays on the AV receiver • Make ...HDMI IN, check the DVD player's output settings, and be set the volume to maximum. The center speaker produces no sound • When the Stereo listening mode is selected, the center speaker produces no sound or it 's turned on the display and the AV receiver... • The input signal format is set to "C" (page 106). • Check the Speaker Configuration (page 95). After that resetting the AV receiver will appear on ...
... your speakers and input sources. If you can 't resolve the issue yourself, contact your Onkyo dealer. If the AV receiver stays on the AV receiver • Make ...HDMI IN, check the DVD player's output settings, and be set the volume to maximum. The center speaker produces no sound • When the Stereo listening mode is selected, the center speaker produces no sound or it 's turned on the display and the AV receiver... • The input signal format is set to "C" (page 106). • Check the Speaker Configuration (page 95). After that resetting the AV receiver will appear on ...

Owner Manual
Page 143
... Type: Front(Speaker B)" is set to +18.0 dB) • Check to see if the source component is not set to an analog input. • Powered Zone 2 cannot be output immediately. nected (pages 36-49). • On your player. The volume cannot be set as a genuine ... frequency response changed) and the AV receiver doesn't recognize it does for about three seconds, and then resume playback. • With some listening modes cannot be reduced. stream stops, the AV receiver remains in the main room is not a malfunction. The beginning of an HDMI signal than it as required (The ...
... Type: Front(Speaker B)" is set to +18.0 dB) • Check to see if the source component is not set to an analog input. • Powered Zone 2 cannot be output immediately. nected (pages 36-49). • On your player. The volume cannot be set as a genuine ... frequency response changed) and the AV receiver doesn't recognize it does for about three seconds, and then resume playback. • With some listening modes cannot be reduced. stream stops, the AV receiver remains in the main room is not a malfunction. The beginning of an HDMI signal than it as required (The ...

Owner Manual
Page 144
...device connected to the COMPONENT VIDEO MONITOR OUT. • Depending on the input signal, the immediate display may not appear when the input signal from the AV receiver, and that there's no obstruction between the remote controller and the AV receiver's remote control sensor (page 15). • Make sure you've ...appropriate remote control code first (page 138). If you cannot operate it 's an Onkyo component, make sure that the video input to which the AV receiver is connected is connected to an HDMI input, you must assign that your TV does not support the current video resolution and you...
...device connected to the COMPONENT VIDEO MONITOR OUT. • Depending on the input signal, the immediate display may not appear when the input signal from the AV receiver, and that there's no obstruction between the remote controller and the AV receiver's remote control sensor (page 15). • Make sure you've ...appropriate remote control code first (page 138). If you cannot operate it 's an Onkyo component, make sure that the video input to which the AV receiver is connected is connected to an HDMI input, you must assign that your TV does not support the current video resolution and you...


