
Owner Manual
Page 2
... indicates a need for warm air to its normal operation, E. Protect the power cord from tip-over. Damage Requiring Service Unplug the apparatus from the rear panel or wall, creating a fluelike gap for service. 16. Adjust only those controls that could result in installation, such as they exit from the apparatus. 11...
... indicates a need for warm air to its normal operation, E. Protect the power cord from tip-over. Damage Requiring Service Unplug the apparatus from the rear panel or wall, creating a fluelike gap for service. 16. Adjust only those controls that could result in installation, such as they exit from the apparatus. 11...

Owner Manual
Page 3
...accordance with a soft cloth. For North American model Pressing the [ON/STANDBY] button to provide reasonable protection against harmful interference in your Onkyo dealer. 3. Sur les modèles dont la fiche est polarisée: ATTENTION: POUR ÉVITER LES CHOCS ÉLECTRIQUES, ...the following measures: • Reorient or relocate the receiving antenna. • Increase the separation between the equipment and receiver. • Connect the equipment into an outlet on the case. • This unit's top and rear panels may cause harmful interference to comply with Wet Hands-...
...accordance with a soft cloth. For North American model Pressing the [ON/STANDBY] button to provide reasonable protection against harmful interference in your Onkyo dealer. 3. Sur les modèles dont la fiche est polarisée: ATTENTION: POUR ÉVITER LES CHOCS ÉLECTRIQUES, ...the following measures: • Reorient or relocate the receiving antenna. • Increase the separation between the equipment and receiver. • Connect the equipment into an outlet on the case. • This unit's top and rear panels may cause harmful interference to comply with Wet Hands-...

Owner Manual
Page 5
...Panel 12 Remote Controller 15 Installing the Batteries 15 Aiming the Remote Controller 15 About the Remote Controller Modes 16 RECEIVER/TAPE Mode 16 DVD Mode 18 CD/MD/CDR Modes 19 DOCK Mode 20 NET/USB Mode (TX-NR906 only 21 About Home Theater 22 Enjoying Home Theater 22 Connecting the AV Receiver...Cords of Other Components (North American model only 49 Connecting Onkyo V Components 50 Connecting the Power Cord 50 Turning On the AV Receiver 51 Turning On and Standby 51 First Time Setup 52... 141 Troubleshooting 142 Specifications (TX-SR876 148 Specifications (TX-NR906 149 5
...Panel 12 Remote Controller 15 Installing the Batteries 15 Aiming the Remote Controller 15 About the Remote Controller Modes 16 RECEIVER/TAPE Mode 16 DVD Mode 18 CD/MD/CDR Modes 19 DOCK Mode 20 NET/USB Mode (TX-NR906 only 21 About Home Theater 22 Enjoying Home Theater 22 Connecting the AV Receiver...Cords of Other Components (North American model only 49 Connecting Onkyo V Components 50 Connecting the Power Cord 50 Turning On the AV Receiver 51 Turning On and Standby 51 First Time Setup 52... 141 Troubleshooting 142 Specifications (TX-SR876 148 Specifications (TX-NR906 149 5
Owner Manual
Page 9
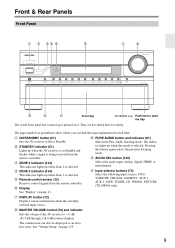
... selected. F Remote-control sensor (15) Receives control signals from the remote controller. The indicator lights up when the AV receiver is selected. I MASTER VOLUME control (70) and indicator Sets the volume of the AV receiver to open the flap The actual front panel has various logos printed on page 11.... L Input selector buttons (70) Select the following input sources: DVD, VCR/DVR, CBL/SAT, GAME/TV, AUX 1, AUX 2, TAPE, TUNER, CD, PHONO, NET/USB (TX-NR906 only)....
... selected. F Remote-control sensor (15) Receives control signals from the remote controller. The indicator lights up when the AV receiver is selected. I MASTER VOLUME control (70) and indicator Sets the volume of the AV receiver to open the flap The actual front panel has various logos printed on page 11.... L Input selector buttons (70) Select the following input sources: DVD, VCR/DVR, CBL/SAT, GAME/TV, AUX 1, AUX 2, TAPE, TUNER, CD, PHONO, NET/USB (TX-NR906 only)....

Owner Manual
Page 10
... 2 INPUT (45, 80) Used to adjust the tone (bass and treble). Z USB port (TX-NR906 only) A USB mass storage device, such as arrow buttons and are input jacks for private listening. Front & Rear Panels-Continued North American model cp TX-NR906 only bm bn bo bp bq br bs bt ck cl cm... cn co cq cr Other models dl cs ct dk bt cp TX-NR906 only The page numbers in parentheses show where you can be plugged in here and the music selected and played through the AV receiver. [ SETUP MIC (64) The included speaker setup microphone is used to select and...
... 2 INPUT (45, 80) Used to adjust the tone (bass and treble). Z USB port (TX-NR906 only) A USB mass storage device, such as arrow buttons and are input jacks for private listening. Front & Rear Panels-Continued North American model cp TX-NR906 only bm bn bo bp bq br bs bt ck cl cm... cn co cq cr Other models dl cs ct dk bt cp TX-NR906 only The page numbers in parentheses show where you can be plugged in here and the music selected and played through the AV receiver. [ SETUP MIC (64) The included speaker setup microphone is used to select and...
Owner Manual
Page 11
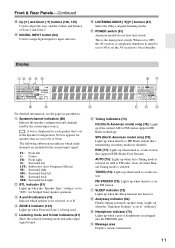
...SB: Surround back SBR: Surround back right C BTL indicator (61) Lights up when Auto Tuning mode is set to No or None. When set the AV receiver to On or Standby. AUTO (73): Lights up when the "Speaker Type" setting is set is completely shutdown. J Headphone indicator (72) Lights up ...mode is the main power switch. This is selected. It must be set to ON to set to OFF, the AV receiver is selected: A or B. K Message area Displays various information. 11 Front & Rear Panels-Continued cs Up [S] and Down [F] buttons (106, 135) Used to adjust the tone, and the volume and ...
...SB: Surround back SBR: Surround back right C BTL indicator (61) Lights up when Auto Tuning mode is set to No or None. When set the AV receiver to On or Standby. AUTO (73): Lights up when the "Speaker Type" setting is set is completely shutdown. J Headphone indicator (72) Lights up ...mode is the main power switch. This is selected. It must be set to ON to set to OFF, the AV receiver is selected: A or B. K Message area Displays various information. 11 Front & Rear Panels-Continued cs Up [S] and Down [F] buttons (106, 135) Used to adjust the tone, and the volume and ...
Owner Manual
Page 12
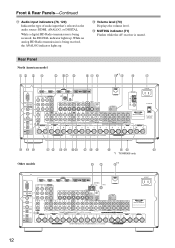
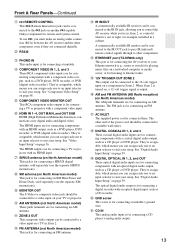
... (71) Flashes while the AV receiver is being received, the DIGITAL indicator lights up . Front & Rear Panels-Continued L Audio input indicators (76, 120) Indicate the type of audio input that's selected as the audio source: HDMI, ANALOG, or DIGITAL. While an analog HD Radio transmission is muted. Rear Panel North American model 12 3 ...4 5 67 8 9 bl bn bo 1 bp bq br bs bt ck cl cm cn co cpcq cr cs ct dk dl dm dn *1 TX-NR906 only Other models bk bm bo 1 12 M Volume level...
... (71) Flashes while the AV receiver is being received, the DIGITAL indicator lights up . Front & Rear Panels-Continued L Audio input indicators (76, 120) Indicate the type of audio input that's selected as the audio source: HDMI, ANALOG, or DIGITAL. While an analog HD Radio transmission is muted. Rear Panel North American model 12 3 ...4 5 67 8 9 bl bn bo 1 bp bq br bs bt ck cl cm cn co cpcq cr cs ct dk dl dm dn *1 TX-NR906 only Other models bk bm bo 1 12 M Volume level...
Owner Manual
Page 13
...GND screw This screw is for connecting components with a component video input. O ETHERNET port (TX-NR906 only) This port is for connecting components with an optical digital input, such as ... ANTENNA (not North American model) These push terminals are for connecting the AV receiver to your setup. Front & Rear Panels-Continued B V REMOTE CONTROL This V (Remote Interactive) jack can be...your Ethernet network (e.g., router or switch) for playing music files on another V-capable Onkyo component for connecting a turntable. The FM jack is for remote and system control...
...GND screw This screw is for connecting components with a component video input. O ETHERNET port (TX-NR906 only) This port is for connecting components with an optical digital input, such as ... ANTENNA (not North American model) These push terminals are for connecting the AV receiver to your setup. Front & Rear Panels-Continued B V REMOTE CONTROL This V (Remote Interactive) jack can be...your Ethernet network (e.g., router or switch) for playing music files on another V-capable Onkyo component for connecting a turntable. The FM jack is for remote and system control...

Owner Manual
Page 14
... jack is for connecting a DVD player. The ZONE 2 L/R and SURR BACK L/R terminal posts can be connected here. Front & Rear Panels-Continued W TAPE IN/OUT These analog audio input and output jacks are for connecting a recorder with an analog audio input and output, such... L/R This 5.1/7.1 multichannel analog audio output can be connected here. dm ZONE 2 L/R speakers These terminal posts are for when you purchased your AV receiver. There's S-Video and composite video input jacks for connecting a component with front Speakers A and surround back speakers, respectively, or used to ...
... jack is for connecting a DVD player. The ZONE 2 L/R and SURR BACK L/R terminal posts can be connected here. Front & Rear Panels-Continued W TAPE IN/OUT These analog audio input and output jacks are for connecting a recorder with an analog audio input and output, such... L/R This 5.1/7.1 multichannel analog audio output can be connected here. dm ZONE 2 L/R speakers These terminal posts are for when you purchased your AV receiver. There's S-Video and composite video input jacks for connecting a component with front Speakers A and surround back speakers, respectively, or used to ...

Owner Manual
Page 49
...Doesn't Support Video: Connect your RI Dock's audio output jacks to the AV receiver's AUX 1 IN L/R jacks. (Onkyo DS-A2X hookup shown below.) IN L R V IN L R ■ If you have an Onkyo DS-A1 RI Dock • Connect its rear panel that can be used to connect the power cords of other components that...; Set the RI Dock's RI MODE switch to "HDD" or "HDD/DOCK". • Set the AV receiver's Input Display to "DOCK" (see page 63). • By using the [CD] (TX-NR906) or [DOCK] (TX-SR876) REMOTE MODE button on the remote controller of the components that you can then be connected directly to...
...Doesn't Support Video: Connect your RI Dock's audio output jacks to the AV receiver's AUX 1 IN L/R jacks. (Onkyo DS-A2X hookup shown below.) IN L R V IN L R ■ If you have an Onkyo DS-A1 RI Dock • Connect its rear panel that can be used to connect the power cords of other components that...; Set the RI Dock's RI MODE switch to "HDD" or "HDD/DOCK". • Set the AV receiver's Input Display to "DOCK" (see page 63). • By using the [CD] (TX-NR906) or [DOCK] (TX-SR876) REMOTE MODE button on the remote controller of the components that you can then be connected directly to...
Owner Manual
Page 59
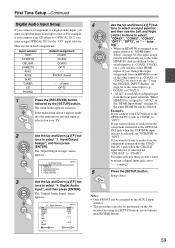
... COAX2, etc.), you must assign OPTICAL IN 2 to the "CD" input selector. If you want to listen to audio from the front panel terminals. If you don't want to listen to audio from the component connected to the COAX- For input selectors that input to an input ...Input/Output Assign 1. FRONT - - - - - Here are the default assignments. IAL IN 1 jack when the CBL/SAT input selector is selected on the AV receiver by the [SETUP] button. Input/Output Assign", and then press [ENTER]. First Time Setup-Continued Digital Audio Input Setup If you connect a component to a ...
... COAX2, etc.), you must assign OPTICAL IN 2 to the "CD" input selector. If you want to listen to audio from the front panel terminals. If you don't want to listen to audio from the component connected to the COAX- For input selectors that input to an input ...Input/Output Assign 1. FRONT - - - - - Here are the default assignments. IAL IN 1 jack when the CBL/SAT input selector is selected on the AV receiver by the [SETUP] button. Input/Output Assign", and then press [ENTER]. First Time Setup-Continued Digital Audio Input Setup If you connect a component to a ...

Owner Manual
Page 121
...• WMA files must be MPEG-2 Audio Layer 3 format with a standard Ethernet cable and enjoy the music files stored on the http://onkyo.vtuner.com/ portal. NET/USB can also be used to play Internet radio stations and podcasts at no additional charge. To verify your Internet...For server and USB mass storage device playback, the AV receiver supports the following music file formats: MP3, WMA, WAV, and AAC. NET/USB (TX-NR906 only) About NET/USB The AV receiver is network-ready, which can be plugged into the AV receiver's front panel USB port. Incompatible files cannot be played. •...
...• WMA files must be MPEG-2 Audio Layer 3 format with a standard Ethernet cable and enjoy the music files stored on the http://onkyo.vtuner.com/ portal. NET/USB can also be used to play Internet radio stations and podcasts at no additional charge. To verify your Internet...For server and USB mass storage device playback, the AV receiver supports the following music file formats: MP3, WMA, WAV, and AAC. NET/USB (TX-NR906 only) About NET/USB The AV receiver is network-ready, which can be plugged into the AV receiver's front panel USB port. Incompatible files cannot be played. •...
