
Owner Manual
Page 5
...(TX-SR875 only) ....24 Connecting Antennas 25 Connecting the Indoor FM Antenna 25 Connecting the AM Loop Antenna 25 Connecting an Outdoor FM Antenna 26 Connecting an Outdoor AM Antenna 26 Connecting Your Components 27 About AV Connections 27 Connecting Audio and Video Signals to the AV Receiver ...only).......42 Connecting Onkyo Components 43 Connecting the Power Cord 43 Turning On the AV Receiver 44 Turning On and Standby 44 First Time Setup 45 Speaker Settings 45 HDMI Monitor Setup 46 HDMI Input Setup 48 Component Video Input Setup 50 Changing the Input Display 51 Digital ...
...(TX-SR875 only) ....24 Connecting Antennas 25 Connecting the Indoor FM Antenna 25 Connecting the AM Loop Antenna 25 Connecting an Outdoor FM Antenna 26 Connecting an Outdoor AM Antenna 26 Connecting Your Components 27 About AV Connections 27 Connecting Audio and Video Signals to the AV Receiver ...only).......42 Connecting Onkyo Components 43 Connecting the Power Cord 43 Turning On the AV Receiver 44 Turning On and Standby 44 First Time Setup 45 Speaker Settings 45 HDMI Monitor Setup 46 HDMI Input Setup 48 Component Video Input Setup 50 Changing the Input Display 51 Digital ...

Owner Manual
Page 9
...62) Sets the volume of the AV receiver to On or Standby. Pressing this indicator. The volume level can also be displayed as an absolute value. The indicator lights up when the AV receiver is being received from the remote controller. G Display See "Display" on it. D ZONE 2 indicator...AUDIO SEL button (70) Selects the audio input: analog, digital, HDMI, or multichannel. H DISPLAY button (69) Displays various information about the currently selected input source. Getting to Know the AV Receiver Front Panel 3 Not North American model 1 2 45 6 7 89 STANDBY/ON STANDBY READY...
...62) Sets the volume of the AV receiver to On or Standby. Pressing this indicator. The volume level can also be displayed as an absolute value. The indicator lights up when the AV receiver is being received from the remote controller. G Display See "Display" on it. D ZONE 2 indicator...AUDIO SEL button (70) Selects the audio input: analog, digital, HDMI, or multichannel. H DISPLAY button (69) Displays various information about the currently selected input source. Getting to Know the AV Receiver Front Panel 3 Not North American model 1 2 45 6 7 89 STANDBY/ON STANDBY READY...

Owner Manual
Page 10
... ] buttons are used to turn off Zone 2 or Zone 3. The ZONE 3 button is used when setting Zone 3. P TONE button (106) Used to Know the AV Receiver-Continued North American model M N OP Q RS TUV W X Y PHONES ZONE 2 OFF LEVEL TONE HDMI OUT STEREO THX TUNING DIMMER MEMORY MODE SETUP ZONE 3 DIGITAL INPUT..., Arrow, and ENTER buttons When AM or FM is the RT/PTY/TP button, and it's used when setting Zone 2. Y RETURN button Selects the previously displayed onscreen setup menu. b Up [ ] and Down [ ] buttons (82, 106) Used to connect a camcorder, game console, and so on. S THX button ...
... ] buttons are used to turn off Zone 2 or Zone 3. The ZONE 3 button is used when setting Zone 3. P TONE button (106) Used to Know the AV Receiver-Continued North American model M N OP Q RS TUV W X Y PHONES ZONE 2 OFF LEVEL TONE HDMI OUT STEREO THX TUNING DIMMER MEMORY MODE SETUP ZONE 3 DIGITAL INPUT..., Arrow, and ENTER buttons When AM or FM is the RT/PTY/TP button, and it's used when setting Zone 2. Y RETURN button Selects the previously displayed onscreen setup menu. b Up [ ] and Down [ ] buttons (82, 106) Used to connect a camcorder, game console, and so on. S THX button ...

Owner Manual
Page 11
... or Standby. d LISTENING MODE [ ]/[ ] buttons (71) Select the Onkyo original listening modes. This is muted. 11 FL: Front left - LFE: Subwoofer (Low Frequency Effects) - SBR: Surround back right 2 BTL indicator (45) (TX-SR875 only) Lights up when Auto Tuning mode is set to BTL for ...69) Lights up when the Sleep function has been set to a radio station. B MUTING indicator (68) Flashes while the AV receiver is the main power switch. A Volume level (62) Displays the volume level. No box appears for AM or FM radio. When set . 7 Audyssey indicator (55) Lights up during...
... or Standby. d LISTENING MODE [ ]/[ ] buttons (71) Select the Onkyo original listening modes. This is muted. 11 FL: Front left - LFE: Subwoofer (Low Frequency Effects) - SBR: Surround back right 2 BTL indicator (45) (TX-SR875 only) Lights up when Auto Tuning mode is set to BTL for ...69) Lights up when the Sleep function has been set to a radio station. B MUTING indicator (68) Flashes while the AV receiver is the main power switch. A Volume level (62) Displays the volume level. No box appears for AM or FM radio. When set . 7 Audyssey indicator (55) Lights up during...

Owner Manual
Page 15
..., you can control an Onkyo DVD player in an Onkyo RI Dock that mode to control an Onkyo cassette recorder connected via . RECEIVER/TAPE Mode RECEIVER/TAPE mode is for controlling an Apple iPod in this mode. PREV CH DISPLAY CABLE SAT TOP MENU DOCK MENU RECEIVER TAPE/AMP SLEEP ENTER VOL...you can control a CD player, MD recorder, or CD recorder made by using the REMOTE MODE buttons. ■ RECEIVER/TAPE Mode In RECEIVER/TAPE mode, you can control the AV receiver and an Onkyo cassette recorder connected via . ■ TV and VCR Modes With these modes, you can control a TV and VCR...
..., you can control an Onkyo DVD player in an Onkyo RI Dock that mode to control an Onkyo cassette recorder connected via . RECEIVER/TAPE Mode RECEIVER/TAPE mode is for controlling an Apple iPod in this mode. PREV CH DISPLAY CABLE SAT TOP MENU DOCK MENU RECEIVER TAPE/AMP SLEEP ENTER VOL...you can control a CD player, MD recorder, or CD recorder made by using the REMOTE MODE buttons. ■ RECEIVER/TAPE Mode In RECEIVER/TAPE mode, you can control the AV receiver and an Onkyo cassette recorder connected via . ■ TV and VCR Modes With these modes, you can control a TV and VCR...

Owner Manual
Page 16
..., regardless of each speaker. The Fast Forward [ ] button starts fast forward. A STANDBY button (44) Sets the AV receiver to select the input source. I DISPLAY button (69) Displays information about the current input source. U AUDIO SEL button (70) Selects the audio input: analog, digital, HDMI, or...Next [ ]/[ ] buttons may not work properly with some cassette tapes. E DIMMER button (68) Adjusts the display brightness. S Re-EQ button (81) Turns the Re-EQ function on the AV receiver. J LISTENING MODE buttons (71) Used to select and adjust settings. K TEST TONE, CH SEL, LEVEL...
..., regardless of each speaker. The Fast Forward [ ] button starts fast forward. A STANDBY button (44) Sets the AV receiver to select the input source. I DISPLAY button (69) Displays information about the current input source. U AUDIO SEL button (70) Selects the audio input: analog, digital, HDMI, or...Next [ ]/[ ] buttons may not work properly with some cassette tapes. E DIMMER button (68) Adjusts the display brightness. S Re-EQ button (81) Turns the Re-EQ function on the AV receiver. J LISTENING MODE buttons (71) Used to select and adjust settings. K TEST TONE, CH SEL, LEVEL...
Owner Manual
Page 17
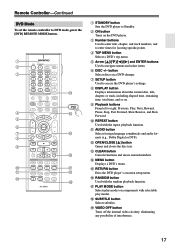
... S VIDEO OFF button Turns off the internal video circuitry, eliminating any possibility of interference. 17 PREV CH DISPLAY CABLE SAT TOP MENU DOCK MENU RECEIVER TAPE/AMP SLEEP ENTER VOL GUIDE SETUP EXIT RETURN MUTING REC PLAYLIST RANDOM STEREO LISTENING MODE SURR REPEAT AUDIO SUBTITLE...VCR LEVEL- C Number buttons Used to enter title, chapter, and track numbers, and to navigate menus and select items. F DISC +/- H DISPLAY button Displays information about the current disc, title, chapter, or track, including elapsed time, remaining time, total time, and so on the DVD player....
... S VIDEO OFF button Turns off the internal video circuitry, eliminating any possibility of interference. 17 PREV CH DISPLAY CABLE SAT TOP MENU DOCK MENU RECEIVER TAPE/AMP SLEEP ENTER VOL GUIDE SETUP EXIT RETURN MUTING REC PLAYLIST RANDOM STEREO LISTENING MODE SURR REPEAT AUDIO SUBTITLE...VCR LEVEL- C Number buttons Used to enter title, chapter, and track numbers, and to navigate menus and select items. F DISC +/- H DISPLAY button Displays information about the current disc, title, chapter, or track, including elapsed time, remaining time, total time, and so on the DVD player....

Owner Manual
Page 18
... INPUT SELECTOR MACRO 1 2 3 ZONE3 DVD REMOTE MODE VCR CD CDR/MD ZONE2 TV DIMMER + CH DISC ALBUM - PREV CH DISPLAY CABLE SAT TOP MENU DOCK RECEIVER TAPE/AMP SLEEP MENU ENTER VOL GUIDE SETUP EXIT RETURN MUTING K CD CDR/MD L REC PLAYLIST RANDOM STEREO LISTENING MODE SURR REPEAT...with some components. C Number buttons Used to right: Previous, Play, Next, Rewind, Pause, Stop, and Fast Forward. In order to control an Onkyo MD recorder or CD recorder, or a component made by another manufacturer, press the [CD] REMOTE MODE button to select the CD/MD/CDR remote ...
... INPUT SELECTOR MACRO 1 2 3 ZONE3 DVD REMOTE MODE VCR CD CDR/MD ZONE2 TV DIMMER + CH DISC ALBUM - PREV CH DISPLAY CABLE SAT TOP MENU DOCK RECEIVER TAPE/AMP SLEEP MENU ENTER VOL GUIDE SETUP EXIT RETURN MUTING K CD CDR/MD L REC PLAYLIST RANDOM STEREO LISTENING MODE SURR REPEAT...with some components. C Number buttons Used to right: Previous, Play, Next, Rewind, Pause, Stop, and Fast Forward. In order to control an Onkyo MD recorder or CD recorder, or a component made by another manufacturer, press the [CD] REMOTE MODE button to select the CD/MD/CDR remote ...

Owner Manual
Page 19
...* Turns on the backlight for more information. G Previous [ ] button Restarts the current song. If the component is for controlling an Apple iPod in an Onkyo RI Dock that's connected via . P Fast Forward [ ] button Press and hold to select the previous or next playlist on the iPod. C TOP MENU ...the RI Dock to the TAPE IN or GAME/TV IN L/R jacks. • Set the RI Dock's RI MODE switch to HDD. • Set the AV receiver's Input Display to DOCK (see page 51). • See to select the previous song. K REPEAT button* Used with the shuffle function. Q RANDOM button* Used...
...* Turns on the backlight for more information. G Previous [ ] button Restarts the current song. If the component is for controlling an Apple iPod in an Onkyo RI Dock that's connected via . P Fast Forward [ ] button Press and hold to select the previous or next playlist on the iPod. C TOP MENU ...the RI Dock to the TAPE IN or GAME/TV IN L/R jacks. • Set the RI Dock's RI MODE switch to HDD. • Set the AV receiver's Input Display to DOCK (see page 51). • See to select the previous song. K REPEAT button* Used with the shuffle function. Q RANDOM button* Used...

Owner Manual
Page 28
...that you choose will depend on the AV receiver. : Signal Flow Video Video Audio Audio TV, projector, etc. The composite video, S-Video, and component video outputs pass through their respective input signals as a guide. The format you set the Immediate Display preference to Off (page 97). ■...; HDMI Monitor Setting Set to Yes With the HDMI Monitor setting set to Yes (see page 22 for the HDMI output. Use this setting if you connect the AV receiver's HDMI OUT to your other AV components to the AV receiver,...
...that you choose will depend on the AV receiver. : Signal Flow Video Video Audio Audio TV, projector, etc. The composite video, S-Video, and component video outputs pass through their respective input signals as a guide. The format you set the Immediate Display preference to Off (page 97). ■...; HDMI Monitor Setting Set to Yes With the HDMI Monitor setting set to Yes (see page 22 for the HDMI output. Use this setting if you connect the AV receiver's HDMI OUT to your other AV components to the AV receiver,...

Owner Manual
Page 36
... interface standard for connecting TVs, projectors, DVD players, set by the DDWG*3 in no picture.) The AV receiver uses HDCP (High-bandwidth Digital Content Protection), so only HDCP-compatible components will display a picture. About Copyright Protection The AV receiver supports HDCP (High-bandwidth Digital Content Protection),*2 a copy-protection system for high-performance PCs and digital...
... interface standard for connecting TVs, projectors, DVD players, set by the DDWG*3 in no picture.) The AV receiver uses HDCP (High-bandwidth Digital Content Protection), so only HDCP-compatible components will display a picture. About Copyright Protection The AV receiver supports HDCP (High-bandwidth Digital Content Protection),*2 a copy-protection system for high-performance PCs and digital...

Owner Manual
Page 37
... the HDMI IN jacks are normally output by the HDMI OUT for display on or a different input is not turned on your TV's settings, or turn down the AV receiver's volume. To stop the AV receiver's speakers producing sound, change the settings, change your TV. Note: • When the HDMI Audio setting is...is set to On (see page 99). Composite video, S-Video, and component video sources can be output by the HDMI IN jacks through the AV receiver's speakers, set your HDMI-compatible DVD player, TV, projector, and so on page 28 for the HDMI output. When listening to audio from an...
... the HDMI IN jacks are normally output by the HDMI OUT for display on or a different input is not turned on your TV's settings, or turn down the AV receiver's volume. To stop the AV receiver's speakers producing sound, change the settings, change your TV. Note: • When the HDMI Audio setting is...is set to On (see page 99). Composite video, S-Video, and component video sources can be output by the HDMI IN jacks through the AV receiver's speakers, set your HDMI-compatible DVD player, TV, projector, and so on page 28 for the HDMI output. When listening to audio from an...

Owner Manual
Page 39
... TONE HDMI OUT STEREO THX TUNING DIMMER MEMORY MODE SETUP DIGITAL INPUT LISTENING MODE CLEAR TUNING PRESET TUNING RETURN ENTER CD PHONO SETUP MIC DISPLAY AUX 2 INPUT PUSH TO OPEN S VIDEO VIDEO L AUDIO R DIGITAL INPUT S VIDEO A VIDEO INPUT B INPUT b DIGITAL a...OPTICAL OUT Camcorder, etc. Connecting Your Components-Continued Connecting a Camcorder or Other AV Component Step 1: Video Connection Choose a video connection that matches your camcorder ( A or B ), and then make the connection. Connection A B a b AV receiver AUX 2 INPUT S VIDEO AUX 2 INPUT VIDEO AUX 2 INPUT L/R ...
... TONE HDMI OUT STEREO THX TUNING DIMMER MEMORY MODE SETUP DIGITAL INPUT LISTENING MODE CLEAR TUNING PRESET TUNING RETURN ENTER CD PHONO SETUP MIC DISPLAY AUX 2 INPUT PUSH TO OPEN S VIDEO VIDEO L AUDIO R DIGITAL INPUT S VIDEO A VIDEO INPUT B INPUT b DIGITAL a...OPTICAL OUT Camcorder, etc. Connecting Your Components-Continued Connecting a Camcorder or Other AV Component Step 1: Video Connection Choose a video connection that matches your camcorder ( A or B ), and then make the connection. Connection A B a b AV receiver AUX 2 INPUT S VIDEO AUX 2 INPUT VIDEO AUX 2 INPUT L/R ...
Owner Manual
Page 42
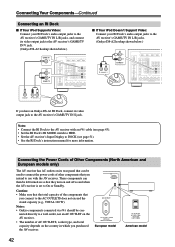
...-AMP FRONT R IN 2 (CD) OUT FRONT R (BTL) ■ If Your iPod Doesn't Support Video: Connect your RI Dock's audio output jacks to the AV receiver's GAME/TV IN L/R jacks. (Onkyo DS-A2 hookup shown below.) IN L R GAME/TV RS232 HDMI ASSIGNABLE IN 4 IN 3 IN 2 IN 1 COMPONENT VIDEO ASSIGNABLE IN 3 IN 2 IN 1(DVD) ... have an Onkyo DS-A1 RI Dock, connect its rear panel that can then be left turned on so that they turn on and off as and when the AV receiver is set to DOCK (see page 43). • Set the RI Dock's RI MODE switch to HDD. • Set the AV receiver's Input Display to...
...-AMP FRONT R IN 2 (CD) OUT FRONT R (BTL) ■ If Your iPod Doesn't Support Video: Connect your RI Dock's audio output jacks to the AV receiver's GAME/TV IN L/R jacks. (Onkyo DS-A2 hookup shown below.) IN L R GAME/TV RS232 HDMI ASSIGNABLE IN 4 IN 3 IN 2 IN 1 COMPONENT VIDEO ASSIGNABLE IN 3 IN 2 IN 1(DVD) ... have an Onkyo DS-A1 RI Dock, connect its rear panel that can then be left turned on so that they turn on and off as and when the AV receiver is set to DOCK (see page 43). • Set the RI Dock's RI MODE switch to HDD. • Set the AV receiver's Input Display to...

Owner Manual
Page 43
... the power cord, connect all your DVD player is connected to the AV receiver's multichannel input, you can use the AV receiver's remote controller to point the remote controller at the AV receiver and not the other -capable Onkyo components. With (Remote Interactive), you 'll need to press the [...Display (see page 70), as the input source. Refer to the manuals supplied with an analog audio cable (RCA). If this is a problem, plug the AV receiver into a suitable wall outlet. • Turning on , the Auto Power On/Standby and Direct Change functions do not work with Onkyo...
... the power cord, connect all your DVD player is connected to the AV receiver's multichannel input, you can use the AV receiver's remote controller to point the remote controller at the AV receiver and not the other -capable Onkyo components. With (Remote Interactive), you 'll need to press the [...Display (see page 70), as the input source. Refer to the manuals supplied with an analog audio cable (RCA). If this is a problem, plug the AV receiver into a suitable wall outlet. • Turning on , the Auto Power On/Standby and Direct Change functions do not work with Onkyo...
Owner Manual
Page 44
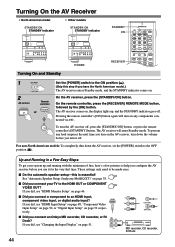
... the [STANDBY/ON] button. These settings only need to the OFF position ( ). If you connect an Onkyo MD recorder, CD recorder, or RI Dock? Turning On the AV Receiver • North American model • Other models STANDBY/ON STANDBY indicator STANDBY/ON STANDBY indicator STANDBY/ON STANDBY...SAT 2 3 GAME/TV 4 AUX1 5 AUX2 6 + TV CH - The AV receiver comes on, the display lights up and running with the minimum of fuss, here's a few pointers to help you configure the AV receiver before you connect a component to the HDMI OUT or COMPONENT VIDEO OUT? TUN TV...
... the [STANDBY/ON] button. These settings only need to the OFF position ( ). If you connect an Onkyo MD recorder, CD recorder, or RI Dock? Turning On the AV Receiver • North American model • Other models STANDBY/ON STANDBY indicator STANDBY/ON STANDBY indicator STANDBY/ON STANDBY...SAT 2 3 GAME/TV 4 AUX1 5 AUX2 6 + TV CH - The AV receiver comes on, the display lights up and running with the minimum of fuss, here's a few pointers to help you configure the AV receiver before you connect a component to the HDMI OUT or COMPONENT VIDEO OUT? TUN TV...
Owner Manual
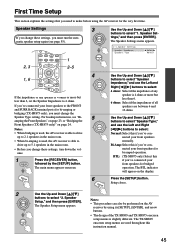
Page 45
... using its [SETUP], [ENTER], and arrow buttons. • The design of the TX-SR805 and TX-SR875 onscreen setup menus is slightly different. PHONO D. PREV CH ENTER GUIDE SETUP EXIT RETURN VOL DISPLAY MUTING REC PLAYLIST RANDOM If the impedance of any speaker is 4 ohms or more but...Speakers (TX-SR875 only)" on the display. The main menu appears onscreen. Setup closes. 2 ENTER ENTER Use the Up and Down [ ]/[ ] buttons to the FRONT and SURR BACK terminal posts for the very first time. Notes: • This procedure can also be performed on the AV receiver by the...
... using its [SETUP], [ENTER], and arrow buttons. • The design of the TX-SR805 and TX-SR875 onscreen setup menus is slightly different. PHONO D. PREV CH ENTER GUIDE SETUP EXIT RETURN VOL DISPLAY MUTING REC PLAYLIST RANDOM If the impedance of any speaker is 4 ohms or more but...Speakers (TX-SR875 only)" on the display. The main menu appears onscreen. Setup closes. 2 ENTER ENTER Use the Up and Down [ ]/[ ] buttons to the FRONT and SURR BACK terminal posts for the very first time. Notes: • This procedure can also be performed on the AV receiver by the...
Owner Manual
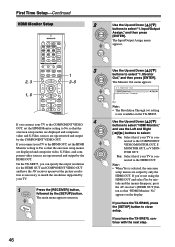
Page 46
...OUT. If you 're not using the HDMI OUT and select Yes by mistake and the menus disappear, press the AV receiver's [HDMI OUT] button so that the onscreen setup menus are displayed and composite video and S-Video sources are upconverted and output by the [SETUP] button. TAPE TUNER CD 7 8 ... "HDMI Monitor: No" appears on the TX-SR805. SETUP 2 ENTER ENTER 3 ENTER ENTER 4 ENTER ENTER Use the Up and Down [ ]/[ ] buttons to select "1. Use the Up and Down [ ]/[ ] buttons to select "1. PREV CH DISPLAY CABLE SAT TOP MENU DOCK MENU RECEIVER TAPE/AMP SLEEP ENTER VOL GUIDE SETUP EXIT...
...OUT. If you 're not using the HDMI OUT and select Yes by mistake and the menus disappear, press the AV receiver's [HDMI OUT] button so that the onscreen setup menus are displayed and composite video and S-Video sources are upconverted and output by the [SETUP] button. TAPE TUNER CD 7 8 ... "HDMI Monitor: No" appears on the TX-SR805. SETUP 2 ENTER ENTER 3 ENTER ENTER 4 ENTER ENTER Use the Up and Down [ ]/[ ] buttons to select "1. Use the Up and Down [ ]/[ ] buttons to select "1. PREV CH DISPLAY CABLE SAT TOP MENU DOCK MENU RECEIVER TAPE/AMP SLEEP ENTER VOL GUIDE SETUP EXIT...

Owner Manual
Page 47
... current setting is displayed. 2 HDMI OUT Press the [HDMI OUT] button repeatedly to select: No: Select this for 1080i output and video conversion as necessary. 1080p: Select this if your TV is connected to No or Yes by using the [HDMI OUT] button on the AV receiver by using the HDMI... If you're not using its [SETUP], [ENTER], and arrow buttons. tor and Resolution settings affect the video signal flow through the AV receiver at resolutions not supported by your TV. 480p: Select this for charts showing how the HDMI Moni- Yes: Select this if your TV is connected...
... current setting is displayed. 2 HDMI OUT Press the [HDMI OUT] button repeatedly to select: No: Select this for 1080i output and video conversion as necessary. 1080p: Select this if your TV is connected to No or Yes by using the [HDMI OUT] button on the AV receiver by using the HDMI... If you're not using its [SETUP], [ENTER], and arrow buttons. tor and Resolution settings affect the video signal flow through the AV receiver at resolutions not supported by your TV. 480p: Select this for charts showing how the HDMI Moni- Yes: Select this if your TV is connected...

Owner Manual
Page 48
...DISPLAY CABLE SAT TOP MENU DOCK MENU RECEIVER TAPE/AMP SLEEP ENTER VOL GUIDE SETUP EXIT RETURN MUTING 1 2-4 REC PLAYLIST RANDOM STEREO LISTENING MODE SURR REPEAT AUDIO SUBTITLE PLAY MODE PURE A DIRECT THX ALL ST If you connect a video component to an HDMI IN, you can be set the AV receiver...input selector, and use the Left and Right [ ]/[ ] buttons to select: IN1: Select if the video component is connected to HDMI IN 4. (TX-SR875 only.) - - -: Select this for the HDMI OUT, the HDMI Monitor setting must assign that composite video, S-Video, and component video sources ...
...DISPLAY CABLE SAT TOP MENU DOCK MENU RECEIVER TAPE/AMP SLEEP ENTER VOL GUIDE SETUP EXIT RETURN MUTING 1 2-4 REC PLAYLIST RANDOM STEREO LISTENING MODE SURR REPEAT AUDIO SUBTITLE PLAY MODE PURE A DIRECT THX ALL ST If you connect a video component to an HDMI IN, you can be set the AV receiver...input selector, and use the Left and Right [ ]/[ ] buttons to select: IN1: Select if the video component is connected to HDMI IN 4. (TX-SR875 only.) - - -: Select this for the HDMI OUT, the HDMI Monitor setting must assign that composite video, S-Video, and component video sources ...

