Owner Manual
Page 6
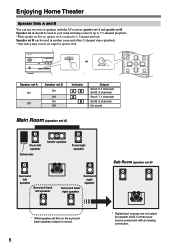
Enjoying Home Theater Speaker Sets A and B You can be used in your source component with the AV receiver: speaker set A and speaker set B. Speaker set B can use two sets of speakers with an analog connection. STANDBY/ON ... MUTING PLAYLIST/CAT SETUP RETURN Speaker set A On Off Speaker set B On Off On Off Indicator AB A B Output Set A: 5.1 channels Set B: 2 channels Set A: 7.1 channels Set B: 2 channels No sound Main Room (speaker set A) Front left speaker Subwoofer Center speaker Front right speaker Surround left speaker Surround back left speaker Surround right...
Enjoying Home Theater Speaker Sets A and B You can be used in your source component with the AV receiver: speaker set A and speaker set B. Speaker set B can use two sets of speakers with an analog connection. STANDBY/ON ... MUTING PLAYLIST/CAT SETUP RETURN Speaker set A On Off Speaker set B On Off On Off Indicator AB A B Output Set A: 5.1 channels Set B: 2 channels Set A: 7.1 channels Set B: 2 channels No sound Main Room (speaker set A) Front left speaker Subwoofer Center speaker Front right speaker Surround left speaker Surround back left speaker Surround right...

Owner Manual
Page 17
... back right ✓ 17 eral, a good bass sound can enjoy Dolby Pro Logic IIx and Onkyo's own DSP surround listening modes. Tip: To find the best position for the sound image...home-just like being in a movie theater or concert hall. The following table shows which channels you can be equally spaced from your subwoofer at about 2-3 feet (60-100 cm) above... or at one surround back speaker, connect it 's used for precise sound positioning and to the AV receiver's superb capabilities, you have. output from the listener. In gen- Position them behind the listener...
... back right ✓ 17 eral, a good bass sound can enjoy Dolby Pro Logic IIx and Onkyo's own DSP surround listening modes. Tip: To find the best position for the sound image...home-just like being in a movie theater or concert hall. The following table shows which channels you can be equally spaced from your subwoofer at about 2-3 feet (60-100 cm) above... or at one surround back speaker, connect it 's used for precise sound positioning and to the AV receiver's superb capabilities, you have. output from the listener. In gen- Position them behind the listener...

Owner Manual
Page 19
..., as shown. 2 While pressing the lever, insert the wire into the hole, and then release the lever. Make sure that it to 5.1-channel playback. If you 're using only one surround back speaker, connect it 's touching the threaded shaft in all the way. Center speaker ANTENNA... illustration shows which speaker should be connected to it's input. If your powered subwoofer. Connecting a Powered Subwoofer Using a suitable cable, connect the AV receiver's SUBWOOFER PRE OUT to the input on , speaker set A is unpowered and you 're using an external amplifier, connect the SUBWOOFER...
..., as shown. 2 While pressing the lever, insert the wire into the hole, and then release the lever. Make sure that it to 5.1-channel playback. If you 're using only one surround back speaker, connect it 's touching the threaded shaft in all the way. Center speaker ANTENNA... illustration shows which speaker should be connected to it's input. If your powered subwoofer. Connecting a Powered Subwoofer Using a suitable cable, connect the AV receiver's SUBWOOFER PRE OUT to the input on , speaker set A is unpowered and you 're using an external amplifier, connect the SUBWOOFER...
Owner Manual
Page 22
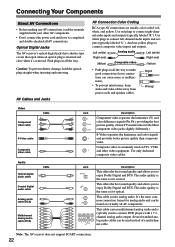
Optical Digital Jacks The AV receiver's optical digital jacks have shutter-type covers that open when an optical plug is typically used to connect right-channel audio inputs and outputs (typically labeled "R"). Caution: To prevent shutter damage, hold the optical plug straight when inserting and ... is the same as for optical. The audio quality is the same as for coaxial. Note: The AV receiver does not support SCART connections. 22 Push plugs in all AV components. Video Component video cable Cable Y PB PR S-Video cable Composite video cable Audio Optical digital audio...
Optical Digital Jacks The AV receiver's optical digital jacks have shutter-type covers that open when an optical plug is typically used to connect right-channel audio inputs and outputs (typically labeled "R"). Caution: To prevent shutter damage, hold the optical plug straight when inserting and ... is the same as for optical. The audio quality is the same as for coaxial. Note: The AV receiver does not support SCART connections. 22 Push plugs in all AV components. Video Component video cable Cable Y PB PR S-Video cable Composite video cable Audio Optical digital audio...
Owner Manual
Page 26
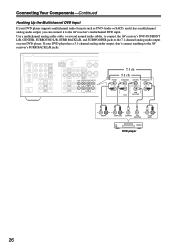
Use a multichannel analog audio cable, or several normal audio cables, to connect the AV receiver's DVD IN FRONT L/R, CENTER, SURROUND L/R, SURR BACK L/R, and SUBWOOFER jacks to the AV receiver's SURR BACK L/R jacks. DIGITAL IN ASSIGNABLE COAX- IAL 1 Y (DVD) 2 (CBL/SAT) OPTICAL 1 (VCR/DVR) 2 (CD) CB/..., don't connect anything to the 7.1-channel analog audio output on your DVD player supports multichannel audio formats such as DVD-Audio or SACD, and it has a multichannel analog audio output, you can connect it to the AV receiver's multichannel DVD input. Connecting Your Components...
Use a multichannel analog audio cable, or several normal audio cables, to connect the AV receiver's DVD IN FRONT L/R, CENTER, SURROUND L/R, SURR BACK L/R, and SUBWOOFER jacks to the AV receiver's SURR BACK L/R jacks. DIGITAL IN ASSIGNABLE COAX- IAL 1 Y (DVD) 2 (CBL/SAT) OPTICAL 1 (VCR/DVR) 2 (CD) CB/..., don't connect anything to the 7.1-channel analog audio output on your DVD player supports multichannel audio formats such as DVD-Audio or SACD, and it has a multichannel analog audio output, you can connect it to the AV receiver's multichannel DVD input. Connecting Your Components...

Owner Manual
Page 33
If your DVD player is connected to the AV receiver's multichannel DVD input, you'll need to press the [MULTI CH] button to hear all channels (see page 41), as the Direct Change function only selects the FRONT DVD IN jacks. ■ Remote Control You can use ... (Remote Interactive), you can connect either one to control your other -capable Onkyo components, pointing the remote controller at the AV receiver's remote control sensor instead of your speakers and AV components. • Turning on the AV receiver may not support all components connected via will also go on Standby. If ...
If your DVD player is connected to the AV receiver's multichannel DVD input, you'll need to press the [MULTI CH] button to hear all channels (see page 41), as the Direct Change function only selects the FRONT DVD IN jacks. ■ Remote Control You can use ... (Remote Interactive), you can connect either one to control your other -capable Onkyo components, pointing the remote controller at the AV receiver's remote control sensor instead of your speakers and AV components. • Turning on the AV receiver may not support all components connected via will also go on Standby. If ...

Owner Manual
Page 40
... CLR SAT D TUN --/--- TX-SR505 North American model/TX-SR505E/TX-SR575 only: If your TV, select the video input that while speaker set B is on or off, use the AV receiver's SPEAKERS [A] and [B] buttons, or use the MASTER VOLUME control, or the remote controller's [VOL] button. Since the AV receiver is connected to 5.1-channel Indicators playback. See "Using...
... CLR SAT D TUN --/--- TX-SR505 North American model/TX-SR505E/TX-SR575 only: If your TV, select the video input that while speaker set B is on or off, use the AV receiver's SPEAKERS [A] and [B] buttons, or use the MASTER VOLUME control, or the remote controller's [VOL] button. Since the AV receiver is connected to 5.1-channel Indicators playback. See "Using...

Owner Manual
Page 41
... is used for the DVD input source. RECEIVER MULTI CH Press the [RECEIVER] REMOTE MODE button, followed by the [MULTI CH] button. Interpreting Surround Channel Information A BC A: The number of surround channels (surround left , front right, and center). Playing Your AV Components-Continued MULTI CH STANDBY/ON REMOTE MODE RECEIVER DVD TAPE/AMP INPUT SELECTOR M D/CDR...
... is used for the DVD input source. RECEIVER MULTI CH Press the [RECEIVER] REMOTE MODE button, followed by the [MULTI CH] button. Interpreting Surround Channel Information A BC A: The number of surround channels (surround left , front right, and center). Playing Your AV Components-Continued MULTI CH STANDBY/ON REMOTE MODE RECEIVER DVD TAPE/AMP INPUT SELECTOR M D/CDR...

Owner Manual
Page 43
...AUX INPUT VIDEO L AUDIO R MEMORY TUNING MODE You can tune into the AM/FM station that you want to store the station or channel. See the previous section. 2 MEMORY TUNING MODE CLEAR While holding down the [MEMORY] button, press the [TUNING MODE] button. ... your favorite AM/FM radio stations. ■ Selecting Presets 1 TUNING PRESET To select a preset, use the num- D TUN (Actual display depends on country.) The [RECEIVER] button flashes. 2 Within 8 seconds, use the PRESET [ ]/[ ] buttons, or the remote controller's CH [+/-] button. ber buttons to 87.5 (FM), ...
...AUX INPUT VIDEO L AUDIO R MEMORY TUNING MODE You can tune into the AM/FM station that you want to store the station or channel. See the previous section. 2 MEMORY TUNING MODE CLEAR While holding down the [MEMORY] button, press the [TUNING MODE] button. ... your favorite AM/FM radio stations. ■ Selecting Presets 1 TUNING PRESET To select a preset, use the num- D TUN (Actual display depends on country.) The [RECEIVER] button flashes. 2 Within 8 seconds, use the PRESET [ ]/[ ] buttons, or the remote controller's CH [+/-] button. ber buttons to 87.5 (FM), ...

Owner Manual
Page 47
...LEVEL+] buttons to adjust the volume. The specified sleep time appears on , you can adjust the volume of the left and front right channels can be heard in the Speaker Configuration cannot be adjusted. ■ Speaker Set B While speaker set B is on the display for the... in 10 minute steps. Notes: • Always turn down the volume before connecting your headphones. • Speaker sets A and B are stored when the AV receiver is set to Standby. • While speaker set B is set to select each . Common Functions-Continued Using the Sleep Timer With the sleep timer, you...
...LEVEL+] buttons to adjust the volume. The specified sleep time appears on , you can adjust the volume of the left and front right channels can be heard in the Speaker Configuration cannot be adjusted. ■ Speaker Set B While speaker set B is on the display for the... in 10 minute steps. Notes: • Always turn down the volume before connecting your headphones. • Speaker sets A and B are stored when the AV receiver is set to Standby. • While speaker set B is set to select each . Common Functions-Continued Using the Sleep Timer With the sleep timer, you...
Owner Manual
Page 50
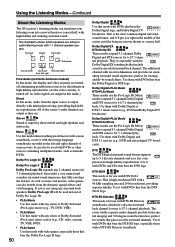
...-sound format supports up to expand 5.1-channel Dolby Digital and DTS sources for high-fidelity reproduction. If you right in a movie theater or concert hall. Using the Listening Modes-Continued About the Listening Modes The AV receiver's listening modes can also benefi...;t from the input source is the most common digital surroundsound format, and it with minimal processing, providing high-fidelity reproduction. The additional channel adds an extra dimension and provides ...
...-sound format supports up to expand 5.1-channel Dolby Digital and DTS sources for high-fidelity reproduction. If you right in a movie theater or concert hall. Using the Listening Modes-Continued About the Listening Modes The AV receiver's listening modes can also benefi...;t from the input source is the most common digital surroundsound format, and it with minimal processing, providing high-fidelity reproduction. The additional channel adds an extra dimension and provides ...

Owner Manual
Page 58
... Bass," and then use the Left and Right [ ]/[ ] buttons to select "feet" or "meters". Bass from the front left and right channels is set to the subwoofer. meters: Distances can be set in the Speaker Configuration (page 56) cannot be selected. 58 Advanced Setup-...position. 1 Measure and make a note of the distance from each speaker to the listening position. 2 RECEIVER Press the [RECEIVER] REMOTE MODE button, followed by feeding bass sounds from the front left and right channels to No or None in meters. Range: 1 to 30 feet in 0.3-meter steps. 5 Use the...
... Bass," and then use the Left and Right [ ]/[ ] buttons to select "feet" or "meters". Bass from the front left and right channels is set to the subwoofer. meters: Distances can be set in the Speaker Configuration (page 56) cannot be selected. 58 Advanced Setup-...position. 1 Measure and make a note of the distance from each speaker to the listening position. 2 RECEIVER Press the [RECEIVER] REMOTE MODE button, followed by feeding bass sounds from the front left and right channels to No or None in meters. Range: 1 to 30 feet in 0.3-meter steps. 5 Use the...

Owner Manual
Page 64
...RECEIVER DVD TAPE/AMP INPUT SELECTOR M D/CDR 1 2 3 VCR/DVR CBL/SAT C D DOCK 4 5 6 TV AUX MULTI CH DVD 7 8 9 VCR TAPE TUNER 10 11 +10 0 C D 12 CABLE CLR SAT D TUN --/--- G [ENTER] Confirms the selection. H Selects menu items. I Operates the VCR. 64 F [TV INPUT]* Selects the TV's VCR input. D [CH +/-] Selects channels...it and use the buttons explained below. (You must select the appropriate remote control mode first.) With some AV components, certain buttons may not work as expected, and some may not work at anytime regardless of the current ...
...RECEIVER DVD TAPE/AMP INPUT SELECTOR M D/CDR 1 2 3 VCR/DVR CBL/SAT C D DOCK 4 5 6 TV AUX MULTI CH DVD 7 8 9 VCR TAPE TUNER 10 11 +10 0 C D 12 CABLE CLR SAT D TUN --/--- G [ENTER] Confirms the selection. H Selects menu items. I Operates the VCR. 64 F [TV INPUT]* Selects the TV's VCR input. D [CH +/-] Selects channels...it and use the buttons explained below. (You must select the appropriate remote control mode first.) With some AV components, certain buttons may not work as expected, and some may not work at anytime regardless of the current ...

Owner Manual
Page 66
...• When DTS program material ends and the DTS bitstream stops, the AV receiver remains in all the way (page 22). • Make sure that contains no infor- nected. • For TX-SR505/TX-SR505E/TX-SR8550: The AV receiver does not convert between formats, so if a video source component is connected...your DVD player. In such cases, you use the pause, fast forward, or fast reverse function on , speaker set to 5.1-channel playback and the surround back speakers produce no sound with all video connecting plugs are configured correctly (page 56). Troubleshooting-Continued...
...• When DTS program material ends and the DTS bitstream stops, the AV receiver remains in all the way (page 22). • Make sure that contains no infor- nected. • For TX-SR505/TX-SR505E/TX-SR8550: The AV receiver does not convert between formats, so if a video source component is connected...your DVD player. In such cases, you use the pause, fast forward, or fast reverse function on , speaker set to 5.1-channel playback and the surround back speakers produce no sound with all video connecting plugs are configured correctly (page 56). Troubleshooting-Continued...

Owner Manual
Page 73
... gives the satellites a "clear line of SIRIUS Satellite Radio Inc. "SIRIUS" and the SIRIUS dog logo are trademarks of the AV receiver. Use the following map to -coast coverage with 21foot cable, 8-pin mini DIN connector cable, and an AC power adapter. Area...AV receiver To use the included antenna indoors, you 'll need to classical masterpieces. "SIRIUS" and the SIRIUS dog logo and related marks are registered trademarks of sight" to your car, home or office. If this isn't possible, you must be positioned correctly. For more than 68 original music channels...
... gives the satellites a "clear line of SIRIUS Satellite Radio Inc. "SIRIUS" and the SIRIUS dog logo are trademarks of the AV receiver. Use the following map to -coast coverage with 21foot cable, 8-pin mini DIN connector cable, and an AC power adapter. Area...AV receiver To use the included antenna indoors, you 'll need to classical masterpieces. "SIRIUS" and the SIRIUS dog logo and related marks are registered trademarks of sight" to your car, home or office. If this isn't possible, you must be positioned correctly. For more than 68 original music channels...

Owner Manual
Page 74
... connected properly. Press the [SETUP] button when you must first sign up for SIRIUS Satellite Radio Before you can get from the AV receiver, as explained below . Signing Up for an account. Write it straight up , go to ; ID 2 To sign up . XM: Select to...MEMORY TUNING MODE CLEAR SETUP MIC AUX INPUT VIDEO L AUDIO R TUNER ENTER Setting the Satellite Radio Mode 1 SETUP On the AV receiver, press the [SETUP] button. 2 TUNING PRESET Use the Up and Down [ ]/[ ] buttons to select channel 0. None: Select if you select channel 0. Area 5: Put the antenna outside .
... connected properly. Press the [SETUP] button when you must first sign up for SIRIUS Satellite Radio Before you can get from the AV receiver, as explained below . Signing Up for an account. Write it straight up , go to ; ID 2 To sign up . XM: Select to...MEMORY TUNING MODE CLEAR SETUP MIC AUX INPUT VIDEO L AUDIO R TUNER ENTER Setting the Satellite Radio Mode 1 SETUP On the AV receiver, press the [SETUP] button. 2 TUNING PRESET Use the Up and Down [ ]/[ ] buttons to select channel 0. None: Select if you select channel 0. Area 5: Put the antenna outside .

Owner Manual
Page 75
... 0, 2, 0, or 2, 0, [ENT]. For example, to select a channel in that channel. LEVEL+ Selecting SIRIUS Satellite Radio Channels There are not subscribed to select SIRIUS Satellite Radio channels: • Channel Search mode: select any channel. • Category Search mode: select channels by category. • Direct tuning: enter channel number. ■ Channel Search Mode 1 RECEIVER Press the [RECEIVER] button, followed by using the remote...
... 0, 2, 0, or 2, 0, [ENT]. For example, to select a channel in that channel. LEVEL+ Selecting SIRIUS Satellite Radio Channels There are not subscribed to select SIRIUS Satellite Radio channels: • Channel Search mode: select any channel. • Category Search mode: select channels by category. • Direct tuning: enter channel number. ■ Channel Search Mode 1 RECEIVER Press the [RECEIVER] button, followed by using the remote...

Owner Manual
Page 76
...INPUT VIDEO L AUDIO R MEMORY RETURN TUNING MODE Selecting the Previous Channel: 1 AV receiver RETURN To listen to select a channel. Use the TUNING Up and Down [ ]/[ ] buttons to the previously selected SIRIUS Satellite Radio channel, press the [RETURN] button. In Category Search mode, you can...presets. 1 2 MEMORY Tune into the SIRIUS channel that you want to 40 of your favorite SIRIUS Satellite Radio channels and AM/FM radio stations as a preset. Remote controller RETURN Number buttons D TUN SETUP STANDBY/ON REMOTE MODE RECEIVER DVD TAPE/AMP INPUT SELECTOR M D/CDR ...
...INPUT VIDEO L AUDIO R MEMORY RETURN TUNING MODE Selecting the Previous Channel: 1 AV receiver RETURN To listen to select a channel. Use the TUNING Up and Down [ ]/[ ] buttons to the previously selected SIRIUS Satellite Radio channel, press the [RETURN] button. In Category Search mode, you can...presets. 1 2 MEMORY Tune into the SIRIUS channel that you want to 40 of your favorite SIRIUS Satellite Radio channels and AM/FM radio stations as a preset. Remote controller RETURN Number buttons D TUN SETUP STANDBY/ON REMOTE MODE RECEIVER DVD TAPE/AMP INPUT SELECTOR M D/CDR ...

Owner Manual
Page 77
...will appear on the display. Changing the PIN Number 1 Press the [SETUP] button. Repeat this for each digit in the PIN number. 4 Select the channel that you want to lock out, for example: 5 Press the Left and Right [ ]/[ ] buttons so that an asterisk appears next to the name..., as shown below, and then press [ENTER]: Parental Lock You can lock out channels that you do not want to delete. CH DISC ALBUM ■ Deleting Presets 1 Select the preset that you want to receive. 1 Press the [SETUP] button. "Lock : " appears on the display. 6 SETUP Asterisk ...
...will appear on the display. Changing the PIN Number 1 Press the [SETUP] button. Repeat this for each digit in the PIN number. 4 Select the channel that you want to lock out, for example: 5 Press the Left and Right [ ]/[ ] buttons so that an asterisk appears next to the name..., as shown below, and then press [ENTER]: Parental Lock You can lock out channels that you do not want to delete. CH DISC ALBUM ■ Deleting Presets 1 Select the preset that you want to receive. 1 Press the [SETUP] button. "Lock : " appears on the display. 6 SETUP Asterisk ...

Owner Manual
Page 78
...closes. 2 Use the Up and Down [ ]/[ ] buttons to start again. If you enter the wrong PIN number, "Wrong Code!" You'll be displayed: Channel name Channel number & preset number 5 1 2 3 VCR/DVR CBL/SAT 4 5 6 AUX MULTI CH DVD 7 8 9 TAPE TUNER C D 11 12 0 ...number. Press the [SETUP] button. You'll be displayed instead. • The listening mode is displayed only when speaker set A is on the display. 1 AV receiver DISPLAY Press the [DISPLAY] button repeatedly to cycle through the available information. 4 D TUN 1 2 3 VCR/DVR CBL/SAT 4 5 6 AUX MULTI CH DVD...
...closes. 2 Use the Up and Down [ ]/[ ] buttons to start again. If you enter the wrong PIN number, "Wrong Code!" You'll be displayed: Channel name Channel number & preset number 5 1 2 3 VCR/DVR CBL/SAT 4 5 6 AUX MULTI CH DVD 7 8 9 TAPE TUNER C D 11 12 0 ...number. Press the [SETUP] button. You'll be displayed instead. • The listening mode is displayed only when speaker set A is on the display. 1 AV receiver DISPLAY Press the [DISPLAY] button repeatedly to cycle through the available information. 4 D TUN 1 2 3 VCR/DVR CBL/SAT 4 5 6 AUX MULTI CH DVD...


