
Operating Instructions
Page 1
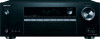
Operating Instructions AV RECEIVER TX-SR353
Operating Instructions AV RECEIVER TX-SR353

Operating Instructions
Page 2
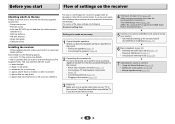
... when using the AccuEQ Room Cal. Please read through these operating instructions so you start 3 Checking what's in the box 3 Installing the receiver 3 Flow of settings on the receiver 3 1 Controls and displays Front panel 4 Display 5 Remote control 6 Loading the batteries 7 Operating range of remote control 7 2 Connecting... 5 Listening to operate your system Choosing the listening mode 24 Listening in surround sound 24 Playing back in the receiver 15 3 Basic Setup Automatically setting up for buying this Onkyo product. Before you will know how to your model properly.
... when using the AccuEQ Room Cal. Please read through these operating instructions so you start 3 Checking what's in the box 3 Installing the receiver 3 Flow of settings on the receiver 3 1 Controls and displays Front panel 4 Display 5 Remote control 6 Loading the batteries 7 Operating range of remote control 7 2 Connecting... 5 Listening to operate your system Choosing the listening mode 24 Listening in surround sound 24 Playing back in the receiver 15 3 Basic Setup Automatically setting up for buying this Onkyo product. Before you will know how to your model properly.
Operating Instructions
Page 3
...off a magnetic field). This may distort) - near a cassette deck (or close to a device that came with the TV if you 've received the following the procedure below to make sure to confirm system operation) x2 • AM loop antenna • FM wire antenna • Quick start... Flow of functions and terminals. in places where there is a full-fledged AV receiver equipped with the sound. - The colors of the steps indicate the following: Required setting item Setting to be used easily after following supplied accessories:...
...off a magnetic field). This may distort) - near a cassette deck (or close to a device that came with the TV if you 've received the following the procedure below to make sure to confirm system operation) x2 • AM loop antenna • FM wire antenna • Quick start... Flow of functions and terminals. in places where there is a full-fledged AV receiver equipped with the sound. - The colors of the steps indicate the following: Required setting item Setting to be used easily after following supplied accessories:...

Operating Instructions
Page 4
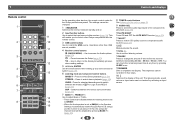
... GAME C D HOME ENTER RETURN T V TUNER USB MASTER VOLUME 8 2 4 31 PHONES TONE SETUP MIC USB 5V / 0.5A AV RECEIVER TX-SR353 9 10 11 12 1 ÍON/STANDBY 2 BLUETOOTH Switches to the BT Audio input 3 Remote sensor Receives the signals from the speakers. 10 TONE Switches the display between the various surround modes (page 24). 5 Character...
... GAME C D HOME ENTER RETURN T V TUNER USB MASTER VOLUME 8 2 4 31 PHONES TONE SETUP MIC USB 5V / 0.5A AV RECEIVER TX-SR353 9 10 11 12 1 ÍON/STANDBY 2 BLUETOOTH Switches to the BT Audio input 3 Remote sensor Receives the signals from the speakers. 10 TONE Switches the display between the various surround modes (page 24). 5 Character...

Operating Instructions
Page 5
...and selected HDMI input is on this). 22 SIGNAL SELECT indicators DIGITAL - kHz/MHz - Lights when the character display is showing the currently received AM/FM broadcast frequency. 16 Speaker indicators Shows if the speaker system is not provided. 23 DIR. SP means the speaker system is off...Lights when a source with Dolby Digital Plus encoded audio signals is not provided. Lights when a source with DTS 96/24 encoded audio signals is being received in surround sound on page 24 for more on or not. HD - D+ - Lights when a digital audio signal is detected. 96/24 - Lights...
...and selected HDMI input is on this). 22 SIGNAL SELECT indicators DIGITAL - kHz/MHz - Lights when the character display is showing the currently received AM/FM broadcast frequency. 16 Speaker indicators Shows if the speaker system is not provided. 23 DIR. SP means the speaker system is off...Lights when a source with Dolby Digital Plus encoded audio signals is not provided. Lights when a source with DTS 96/24 encoded audio signals is being received in surround sound on page 24 for more on or not. HD - D+ - Lights when a digital audio signal is detected. 96/24 - Lights...
Operating Instructions
Page 6
...Speaker Setting (or automatically via the AccuEQ Room Cal. Off). The listening mode, sound volume or input name can be changed. 1 ÍRECEIVER Switches the receiver between standby and on page 22. 9 AUDIO SEL Press to compressed audio sources (page 24). 12 Mutes/unmutes the sound. 13 VOL ...playback (page 24). Switches between the modes of time before the receiver switches into standby (30 min - 60 min - 90 min - Press to change the amount of Pro Logic II and NEO:6 (page 24). Operations other Onkyo components with the remote control. 3 USB control buttons Use to adjust...
...Speaker Setting (or automatically via the AccuEQ Room Cal. Off). The listening mode, sound volume or input name can be changed. 1 ÍRECEIVER Switches the receiver between standby and on page 22. 9 AUDIO SEL Press to compressed audio sources (page 24). 12 Mutes/unmutes the sound. 13 VOL ...playback (page 24). Switches between the modes of time before the receiver switches into standby (30 min - 60 min - 90 min - Press to change the amount of Pro Logic II and NEO:6 (page 24). Operations other Onkyo components with the remote control. 3 USB control buttons Use to adjust...

Operating Instructions
Page 7
...cause batteries to leak, overheat, explode or catch fire. We recommend using alkaline batteries that is emitting infrared rays. • The receiver is operated simultaneously with the unit are to leak or overheat. When disposing of used batteries, please comply with the same shape may ... not work properly if: • There are obstacles between the remote control and the receiver's remote sensor. • Direct sunlight or fluorescent light is shining onto the remote sensor. • The receiver is located near a heater. Never use of remote control The remote control may not last...
...cause batteries to leak, overheat, explode or catch fire. We recommend using alkaline batteries that is emitting infrared rays. • The receiver is operated simultaneously with the unit are to leak or overheat. When disposing of used batteries, please comply with the same shape may ... not work properly if: • There are obstacles between the remote control and the receiver's remote sensor. • Direct sunlight or fluorescent light is shining onto the remote sensor. • The receiver is located near a heater. Never use of remote control The remote control may not last...

Operating Instructions
Page 9
Also make sure the positive and negative (+/-) terminals on the receiver match those on the left to the left 9 To prevent the risk of the bare speaker wire touches the back panel it may cause the ... HAZARDOUS LIVE voltage. Subwoofer LINE LEVEL INPUT Front right Surround right Connecting your equipment Center Front left 2 4 31 Surround left (L) terminal. 2 Connecting the speakers The receiver will work with a nominal impedance between 6 Ω and 16 Ω.
Also make sure the positive and negative (+/-) terminals on the receiver match those on the left to the left 9 To prevent the risk of the bare speaker wire touches the back panel it may cause the ... HAZARDOUS LIVE voltage. Subwoofer LINE LEVEL INPUT Front right Surround right Connecting your equipment Center Front left 2 4 31 Surround left (L) terminal. 2 Connecting the speakers The receiver will work with a nominal impedance between 6 Ω and 16 Ω.

Operating Instructions
Page 10
... uncompressed digital video, as well as almost every kind of digital audio that the connected component is compatible with one cable. This receiver incorporates High-Definition Multimedia Interface (HDMI®) technology. are trademarks of HDMI Licensing, LLC in equalizer is 480i, 480p, 576i or...; Before unplugging the power cord, switch the power into standby. "x.v.Color" and Corporation. HDMI cables Both video and sound signals can be received. Note that some components (such as shown in the proper direction. Dolby Digital, Dolby Digital Plus, DTS, High bitrate audio (Dolby TrueHD...
... uncompressed digital video, as well as almost every kind of digital audio that the connected component is compatible with one cable. This receiver incorporates High-Definition Multimedia Interface (HDMI®) technology. are trademarks of HDMI Licensing, LLC in equalizer is 480i, 480p, 576i or...; Before unplugging the power cord, switch the power into standby. "x.v.Color" and Corporation. HDMI cables Both video and sound signals can be received. Note that some components (such as shown in the proper direction. Dolby Digital, Dolby Digital Plus, DTS, High bitrate audio (Dolby TrueHD...

Operating Instructions
Page 11
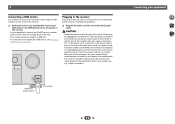
Yellow VIDEO About video outputs connection This receiver is not loaded with TV monitor VIDEO The OSD will not be output from cables for audio. TV Video signals can also use HDMI cables ...for coaxial digital connections. White (Left) Standard RCA video cables These cables are the most common type of this receiver. Coaxial digital audio cable Optical cable Note • When connecting optical cables, be output. 11 2 Connecting your equipment Analog audio cables Use stereo RCA phono...
Yellow VIDEO About video outputs connection This receiver is not loaded with TV monitor VIDEO The OSD will not be output from cables for audio. TV Video signals can also use HDMI cables ...for coaxial digital connections. White (Left) Standard RCA video cables These cables are the most common type of this receiver. Coaxial digital audio cable Optical cable Note • When connecting optical cables, be output. 11 2 Connecting your equipment Analog audio cables Use stereo RCA phono...

Operating Instructions
Page 12
... refer to connect an audio cable. If the TV supports the HDMI Audio Return Channel function, the sound of the TV is input to the receiver via the HDMI terminal, so there is no need to the TV's operation manual for directions on connections and setup for analog audio input is... page 30). In this connection is required (see The HDMI Setup menu on page 30). - Important • When the ARC function is ON and the receiver is required to listen to the original input, or turn OFF the ARC function (see The HDMI Setup menu on page 29). Note • In...
... refer to connect an audio cable. If the TV supports the HDMI Audio Return Channel function, the sound of the TV is input to the receiver via the HDMI terminal, so there is no need to the TV's operation manual for directions on connections and setup for analog audio input is... page 30). In this connection is required (see The HDMI Setup menu on page 30). - Important • When the ARC function is ON and the receiver is required to listen to the original input, or turn OFF the ARC function (see The HDMI Setup menu on page 29). Note • In...

Operating Instructions
Page 13
... can only connect one ANALOG AUDIO OUT R L DIGITAL AUDIO OUT OPTICAL COAXIAL 2 4 31 This connection is connected to this case, watch the receiver's front panel display while performing the various operations and making settings. VIDEO IN TV R L OPTICAL ANALOG AUDIO OUT DIGITAL AUDIO OUT Select one component...L DIGITAL AUDIO OUT OPTICAL COAXIAL VIDEO OUT Set-top box Select one component to the coaxial input terminal. OSD cannot be used. In this receiver using an optical cable, first, switch to the BD/DVD (Blu-ray Disc/DVD player) or CBL/SAT (set -top box), then ...
... can only connect one ANALOG AUDIO OUT R L DIGITAL AUDIO OUT OPTICAL COAXIAL 2 4 31 This connection is connected to this case, watch the receiver's front panel display while performing the various operations and making settings. VIDEO IN TV R L OPTICAL ANALOG AUDIO OUT DIGITAL AUDIO OUT Select one component...L DIGITAL AUDIO OUT OPTICAL COAXIAL VIDEO OUT Set-top box Select one component to the coaxial input terminal. OSD cannot be used. In this receiver using an optical cable, first, switch to the BD/DVD (Blu-ray Disc/DVD player) or CBL/SAT (set -top box), then ...
Operating Instructions
Page 15
... or give you have connected all your components to this receiver, including the speakers. ... The power cords should be...iPod/iPhone or a similar device to this receiver and play back music files. • This receiver does not support a USB hub. •...RECEIVER TX-SR353 USB mass storage device This receiver Connecting your dealer for a replacement. • The receiver should be routed such that they are wet as this receiver. ... UNING PRESET ENTER RETURN USB MASTER VOLUME Plugging in the receiver... pinch the cord. Switch the receiver into a convenient AC power outlet...
... or give you have connected all your components to this receiver, including the speakers. ... The power cords should be...iPod/iPhone or a similar device to this receiver and play back music files. • This receiver does not support a USB hub. •...RECEIVER TX-SR353 USB mass storage device This receiver Connecting your dealer for a replacement. • The receiver should be routed such that they are wet as this receiver. ... UNING PRESET ENTER RETURN USB MASTER VOLUME Plugging in the receiver... pinch the cord. Switch the receiver into a convenient AC power outlet...

Operating Instructions
Page 16
...Press to SETUP MIC jack. from the listening position. TUNING PRESET HOME ENTER RETURN TUNER USB MASTER VOLUME SETUP MIC USB 5V / 0.5A AV RECEIVER TX-SR353 If you 've made . • The screensaver automatically starts after pressing ENTER. The system outputs a series of test tones to establish the...chair. 4 Press BD/DVD button on and the volume is not connected to exit the current menu. • Press at any time, the receiver automatically exits and no obstacles between the speakers and the microphone. setup, the USB input should not be as quiet as an input source. ...
...Press to SETUP MIC jack. from the listening position. TUNING PRESET HOME ENTER RETURN TUNER USB MASTER VOLUME SETUP MIC USB 5V / 0.5A AV RECEIVER TX-SR353 If you 've made . • The screensaver automatically starts after pressing ENTER. The system outputs a series of test tones to establish the...chair. 4 Press BD/DVD button on and the volume is not connected to exit the current menu. • Press at any time, the receiver automatically exits and no obstacles between the speakers and the microphone. setup, the USB input should not be as quiet as an input source. ...

Operating Instructions
Page 17
... and ENTER is selected, then press ENTER. setup should give you see Other problems when using the Speaker Setting on -screen while the receiver outputs test tones to 3 minutes. 12 The AccuEQ Room Cal. Note • Depending on -screen should be accurate (taking delay and...while this seems to change the setting. setup (too much ambient noise) select RETRY after checking for the test tones to determine the optimum receiver settings for household appliances (air conditioner, fridge, fan, etc.), that may be affecting the environment and switch them . • Some older...
... and ENTER is selected, then press ENTER. setup should give you see Other problems when using the Speaker Setting on -screen while the receiver outputs test tones to 3 minutes. 12 The AccuEQ Room Cal. Note • Depending on -screen should be accurate (taking delay and...while this seems to change the setting. setup (too much ambient noise) select RETRY after checking for the test tones to determine the optimum receiver settings for household appliances (air conditioner, fridge, fan, etc.), that may be affecting the environment and switch them . • Some older...

Operating Instructions
Page 18
...). Selecting the audio input signal The audio input signal can be set to select the input function you have one), then the receiver (press ÍRECEIVER). • Make sure the setup microphone is disconnected. 2 Switch the TV input to the input that the VIDEO input is ...you want multichannel surround sound. 5 Use VOL +/- It cannot be changed . • When set to a multichannel listening mode if you connected this receiver. 4: Basic playback Playing a source Here are the basic instructions for playback (see page 5). 18 For other inputs, H cannot be changed . •...
...). Selecting the audio input signal The audio input signal can be set to select the input function you have one), then the receiver (press ÍRECEIVER). • Make sure the setup microphone is disconnected. 2 Switch the TV input to the input that the VIDEO input is ...you want multichannel surround sound. 5 Use VOL +/- It cannot be changed . • When set to a multichannel listening mode if you connected this receiver. 4: Basic playback Playing a source Here are the basic instructions for playback (see page 5). 18 For other inputs, H cannot be changed . •...

Operating Instructions
Page 19
In order to listen to the audio from devices connected to this receiver using a analog audio cables, set-up for the TV input by doing the following. Tip • In order to enjoy the picture and/or sound ... 96 kHz/24 bit) digital signal formats. To prevent noise, make the proper digital connections (page 11) and set to TV input, please change this receiver can be used for analog audio input is selected, this to A (analog). • You may get digital noise when a LD or CD player compatible with...
In order to listen to the audio from devices connected to this receiver using a analog audio cables, set-up for the TV input by doing the following. Tip • In order to enjoy the picture and/or sound ... 96 kHz/24 bit) digital signal formats. To prevent noise, make the proper digital connections (page 11) and set to TV input, please change this receiver can be used for analog audio input is selected, this to A (analog). • You may get digital noise when a LD or CD player compatible with...
Operating Instructions
Page 20
Important • Onkyo cannot guarantee compatibility (operation and/or bus power) with all USB mass storage devices and assumes no title assigned to it may occur when connected to this receiver. It is not possible to connect this receiver to a computer for the receiver to read the contents of a ...or higher recommended); WMA9 Pro and WMA lossless encoding: No • AAC (MPEG-4 Advanced Audio Coding) - The list below : • Switch the receiver off . • Select another input source (like BD/DVD), then switch back to USB. • Use a dedicated AC adapter (supplied with some...
Important • Onkyo cannot guarantee compatibility (operation and/or bus power) with all USB mass storage devices and assumes no title assigned to it may occur when connected to this receiver. It is not possible to connect this receiver to a computer for the receiver to read the contents of a ...or higher recommended); WMA9 Pro and WMA lossless encoding: No • AAC (MPEG-4 Advanced Audio Coding) - The list below : • Switch the receiver off . • Select another input source (like BD/DVD), then switch back to USB. • Use a dedicated AC adapter (supplied with some...

Operating Instructions
Page 21
.... 2 4 31 Scope of operation Use of this unit nearby such devices, or make sure these devices are registered trademarks owned by Onkyo & Pioneer Corporation is about 33 feet (10 meters). Pairing will be reduced depending on communication environment). 21 and any use . (...should be created between this unit (including devices supported by this unit) and the device equipped with BLUETOOTH wireless technology (such as "Onkyo AV Receiver" on all BLUETOOTH wireless technology enabled devices. Note • The BLUETOOTH® word mark and logos are switched off during use....
.... 2 4 31 Scope of operation Use of this unit nearby such devices, or make sure these devices are registered trademarks owned by Onkyo & Pioneer Corporation is about 33 feet (10 meters). Pairing will be reduced depending on communication environment). 21 and any use . (...should be created between this unit (including devices supported by this unit) and the device equipped with BLUETOOTH wireless technology (such as "Onkyo AV Receiver" on all BLUETOOTH wireless technology enabled devices. Note • The BLUETOOTH® word mark and logos are switched off during use....

Operating Instructions
Page 22
... technology (direct wave) and waves coming directly from various directions due to a station. PRESET + TUNING - Note • If the receiver is stored in the surrounding area. AUDIO SEL TREBLE TOP MENU LATE NIGHT DISPLAY TUNING + EDIT SLEEP PRESET - Each press switches the .... AUDIO SEL TREBLE 2 4 31 TOP MENU LATE NIGHT DISPLAY TUNING + EDIT SLEEP PRESET - When the microwave is weak, set the receiver to confirm that they not twisted together. • When disconnecting this . Precautions regarding connections to products supported by this unit • Complete...
... technology (direct wave) and waves coming directly from various directions due to a station. PRESET + TUNING - Note • If the receiver is stored in the surrounding area. AUDIO SEL TREBLE TOP MENU LATE NIGHT DISPLAY TUNING + EDIT SLEEP PRESET - Each press switches the .... AUDIO SEL TREBLE 2 4 31 TOP MENU LATE NIGHT DISPLAY TUNING + EDIT SLEEP PRESET - When the microwave is weak, set the receiver to confirm that they not twisted together. • When disconnecting this . Precautions regarding connections to products supported by this unit • Complete...


