Owner Manual
Page 1
... and connections 8 Setting up your TX-NR801/TX-NR801E 28 Enjoying Music and Movies 39 Useful Settings (Basic) 52 Useful Settings (Advanced) 56 Making full use of your new AV Receiver. Please retain this manual for purchasing an Onkyo AV Receiver. AV Receiver TX-NR801 TX-NR801E Instruction Manual Thank you to obtain optimum performance and listening enjoyment from your TX-NR801/TX-NR801E 64 Remote Controller 80...
... and connections 8 Setting up your TX-NR801/TX-NR801E 28 Enjoying Music and Movies 39 Useful Settings (Basic) 52 Useful Settings (Advanced) 56 Making full use of your new AV Receiver. Please retain this manual for purchasing an Onkyo AV Receiver. AV Receiver TX-NR801 TX-NR801E Instruction Manual Thank you to obtain optimum performance and listening enjoyment from your TX-NR801/TX-NR801E 64 Remote Controller 80...
Owner Manual
Page 3
...the point of the NEC which the receiver is not user-serviceable. For European Models Declaration of Conformity We, ONKYO EUROPE ELECTRONICS GmbH LIEGNITZERSTRASSE 6, 82194 GROEBENZELL, GERMANY declare in accordance with the letter N or coloured black. Dry the TX-NR801/TX-NR801E immediately afterwards with a soft cloth...the replacement fuse has a rating of this unit should dust the TX-NR801/TXNR801E all over with a clean cloth. NOTE: This equipment has been tested and found to BS1362. If this instruction manual is approved by qualified service personnel. IF THE FITTED ...
...the point of the NEC which the receiver is not user-serviceable. For European Models Declaration of Conformity We, ONKYO EUROPE ELECTRONICS GmbH LIEGNITZERSTRASSE 6, 82194 GROEBENZELL, GERMANY declare in accordance with the letter N or coloured black. Dry the TX-NR801/TX-NR801E immediately afterwards with a soft cloth...the replacement fuse has a rating of this unit should dust the TX-NR801/TXNR801E all over with a clean cloth. NOTE: This equipment has been tested and found to BS1362. If this instruction manual is approved by qualified service personnel. IF THE FITTED ...
Owner Manual
Page 7
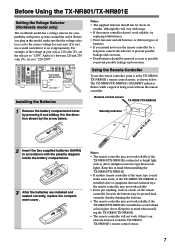
... R IMPEDANCE 4 OHMS MIN. L AV RECEIVER MODEL NO. TX-NR 801 VOLTAGE SELECTOR 120V 220-230V...TX-NR801/TX-NR801E is being received from the remote controller. If it isn't, use the remote controller, point it and the TX-NR801/ TX-NR801E's remote control sensor. 7 The TX-NR801/TX...TX-NR801/TX-NR801E is 120 volts ...at the TX-NR801/ TX-NR801E's ... Before Using the TX-NR801/TX-NR801E Setting the Voltage...TX-NR801/TX-NR801E 1 Remove the battery compartment cover by the arrow below . Keep this in mind when installing the TX-NR801/TX...mind when installing the TX-NR801/TX-NR801E. • The...
... R IMPEDANCE 4 OHMS MIN. L AV RECEIVER MODEL NO. TX-NR 801 VOLTAGE SELECTOR 120V 220-230V...TX-NR801/TX-NR801E is being received from the remote controller. If it isn't, use the remote controller, point it and the TX-NR801/ TX-NR801E's remote control sensor. 7 The TX-NR801/TX...TX-NR801/TX-NR801E is 120 volts ...at the TX-NR801/ TX-NR801E's ... Before Using the TX-NR801/TX-NR801E Setting the Voltage...TX-NR801/TX-NR801E 1 Remove the battery compartment cover by the arrow below . Keep this in mind when installing the TX-NR801/TX...mind when installing the TX-NR801/TX-NR801E. • The...
Owner Manual
Page 11
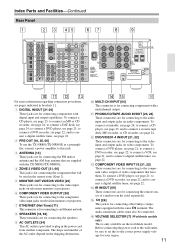
... IN/OUT [21-24] These jacks are for connecting other Onkyo components equipped with digital input and output capabilities. D IR IN/OUT [69] These connectors are for connecting components with the TX-NR801/TX-NR801E. 4 ZONE 2 VIDEO OUT [21, 66] This... to connect a DAT deck, see page 22; SURR BACK/ ZONE 2 SPEAKERS R L VOLTAGE SELECTOR 120V REMOTE CONTROL AV RECEIVER MODEL NO. to the video input and output jacks on television monitors or projectors. 7 ETHERNET (Net-Tune) [71]...a DVD recorder, see page 24; OR 6 OHMS MIN. / SPEAKER SEE INSTRUCTION MANUAL FOR CORRECT SETTINGS.
... IN/OUT [21-24] These jacks are for connecting other Onkyo components equipped with digital input and output capabilities. D IR IN/OUT [69] These connectors are for connecting components with the TX-NR801/TX-NR801E. 4 ZONE 2 VIDEO OUT [21, 66] This... to connect a DAT deck, see page 22; SURR BACK/ ZONE 2 SPEAKERS R L VOLTAGE SELECTOR 120V REMOTE CONTROL AV RECEIVER MODEL NO. to the video input and output jacks on television monitors or projectors. 7 ETHERNET (Net-Tune) [71]...a DVD recorder, see page 24; OR 6 OHMS MIN. / SPEAKER SEE INSTRUCTION MANUAL FOR CORRECT SETTINGS.
Owner Manual
Page 14
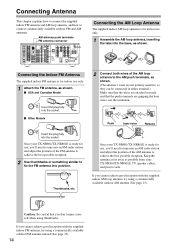
...MANUAL FOR CORRECT SETTINGS. Thumbtacks, etc. 2 Connect both wires of the AM antenna to tune into position. If you cannot achieve good reception with the supplied indoor AM loop antenna, try using thumbtacks. I Other Models FM 75 Insert the plug fully into the socket Once your TX-NR801/TX...2 SPEAKERS R L VOLTAGE SELECTOR 120V REMOTE CONTROL AV RECEIVER MODEL NO. TX-NR 801 220-230V Connecting the AM Loop Antenna The supplied indoor AM loop antenna is for indoor use only. 1 Attach the FM antenna, as possible from your TX-NR801/TX-NR801E is ready for use , you 'll ...
...MANUAL FOR CORRECT SETTINGS. Thumbtacks, etc. 2 Connect both wires of the AM antenna to tune into position. If you cannot achieve good reception with the supplied indoor AM loop antenna, try using thumbtacks. I Other Models FM 75 Insert the plug fully into the socket Once your TX-NR801/TX...2 SPEAKERS R L VOLTAGE SELECTOR 120V REMOTE CONTROL AV RECEIVER MODEL NO. TX-NR 801 220-230V Connecting the AM Loop Antenna The supplied indoor AM loop antenna is for indoor use only. 1 Attach the FM antenna, as possible from your TX-NR801/TX-NR801E is ready for use , you 'll ...

Owner Manual
Page 17
... • Place these three speakers all the speakers so that came with an arrow to indicate how they should be sure to refer to the manuals and instructions that the greatest difference between the lines from 8 9 each speaker to the listener and a line straight back from the listener are both very...
... • Place these three speakers all the speakers so that came with an arrow to indicate how they should be sure to refer to the manuals and instructions that the greatest difference between the lines from 8 9 each speaker to the listener and a line straight back from the listener are both very...
Owner Manual
Page 18
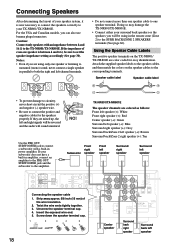
...R + L + - - VIDEO 4 PR 5. OR 6 OHMS MIN. / SPEAKER SEE INSTRUCTION MANUAL FOR CORRECT SETTINGS. Attach the supplied speaker labels to the speaker cables, and then match the colors on the TX-NR801/ TX-NR801E are using in the remote zone (Zone 2) to connect the positive and negative cables for...necessary to connect the speakers correctly to the corresponding terminals. SURR BACK/ ZONE 2 SPEAKERS R L VOLTAGE SELECTOR 120V REMOTE CONTROL AV RECEIVER MODEL NO. Connecting Speakers After determining the layout of your speaker system, it is between 4 and 16 Ω to the ...
...R + L + - - VIDEO 4 PR 5. OR 6 OHMS MIN. / SPEAKER SEE INSTRUCTION MANUAL FOR CORRECT SETTINGS. Attach the supplied speaker labels to the speaker cables, and then match the colors on the TX-NR801/ TX-NR801E are using in the remote zone (Zone 2) to connect the positive and negative cables for...necessary to connect the speakers correctly to the corresponding terminals. SURR BACK/ ZONE 2 SPEAKERS R L VOLTAGE SELECTOR 120V REMOTE CONTROL AV RECEIVER MODEL NO. Connecting Speakers After determining the layout of your speaker system, it is between 4 and 16 Ω to the ...

Owner Manual
Page 20
...connect CD players, LD players, DVD players, or other video components to the video inputs. OR 6 OHMS MIN. / SPEAKER SEE INSTRUCTION MANUAL FOR CORRECT SETTINGS. The directions given here are only output to COMPONENT VIDEO OUTPUT. COMPONENT VIDEO INPUT/OUTPUT For DVD players or other models... PB CENTER SPEAKER PR INPUT 2 Y PB PR CAUTION: SPEAKER IMPEDANCE 4 OHMS MIN. Connecting to Audio/Video Equipment Here is an explanation of the TX-NR801/ TX-NR801E. The result is vastly increased image quality, with only a video input, connect it to the MONITOR OUT S VIDEO jack of a television, ...
...connect CD players, LD players, DVD players, or other video components to the video inputs. OR 6 OHMS MIN. / SPEAKER SEE INSTRUCTION MANUAL FOR CORRECT SETTINGS. The directions given here are only output to COMPONENT VIDEO OUTPUT. COMPONENT VIDEO INPUT/OUTPUT For DVD players or other models... PB CENTER SPEAKER PR INPUT 2 Y PB PR CAUTION: SPEAKER IMPEDANCE 4 OHMS MIN. Connecting to Audio/Video Equipment Here is an explanation of the TX-NR801/ TX-NR801E. The result is vastly increased image quality, with only a video input, connect it to the MONITOR OUT S VIDEO jack of a television, ...
Owner Manual
Page 21
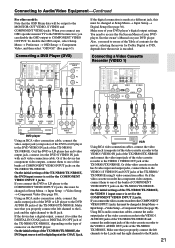
... player has an S video output jack, connect it to either the DIGITAL IN COAX jack or DIGITAL IN OPT jack of the TX-NR801/TX-NR801E, depending on the type of the TX-NR801/TX-NR801E, the VIDEO 1 input source is set for digital input at Setup Menu → Input Setup → Video Setup →...COMPONENT VIDEO OUTPUT. See the owner's Manual on the DVD player. If you connect the video cassette recorder to the R jack. Make sure that you properly connect the left channels to the L jacks and the right channels to one of the banks of the TX-NR801/TX-NR801E, the DVD input source is ...
... player has an S video output jack, connect it to either the DIGITAL IN COAX jack or DIGITAL IN OPT jack of the TX-NR801/TX-NR801E, depending on the type of the TX-NR801/TX-NR801E, the VIDEO 1 input source is set for digital input at Setup Menu → Input Setup → Video Setup →...COMPONENT VIDEO OUTPUT. See the owner's Manual on the DVD player. If you connect the video cassette recorder to the R jack. Make sure that you properly connect the left channels to the L jacks and the right channels to one of the banks of the TX-NR801/TX-NR801E, the DVD input source is ...
Owner Manual
Page 26
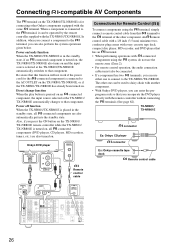
...function When the TX-NR801/TX-NR801E is for connecting other one to connect to that component. OR 6 OHMS MIN. / SPEAKER SEE INSTRUCTION MANUAL FOR CORRECT ...AV Components The terminal on the TX-NR801/TX-NR801E is placed in the standby state, if an -connected component is turned on, the TX-NR801/TX-NR801E also turns on and the input source selected at the TX-NR801/ TX-NR801E automatically changes to the TX-NR801/TX... terminal to the AC OUTLET on the TX-NR801/TX-NR801E, or if the TX-NR801/TX-NR801E has already been turned on. Onkyo DVD player REMOTE CONTROL DIGITAL OUT OPTICAL ...
...function When the TX-NR801/TX-NR801E is for connecting other one to connect to that component. OR 6 OHMS MIN. / SPEAKER SEE INSTRUCTION MANUAL FOR CORRECT ...AV Components The terminal on the TX-NR801/TX-NR801E is placed in the standby state, if an -connected component is turned on, the TX-NR801/TX-NR801E also turns on and the input source selected at the TX-NR801/ TX-NR801E automatically changes to the TX-NR801/TX... terminal to the AC OUTLET on the TX-NR801/TX-NR801E, or if the TX-NR801/TX-NR801E has already been turned on. Onkyo DVD player REMOTE CONTROL DIGITAL OUT OPTICAL ...
Owner Manual
Page 28
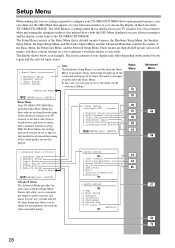
...Advanced Menu provides features such as you wish. Basic Menu 30 Advanced Menu 32 [ENTER]Quit:[SETUP] Basic Menu Your TX-NR801/TX-NR801E is an example. In this manual shows both the OSD Menu displayed on your television monitor and the display on the model of its items, the menu... Menu, the Speaker Setup Menu, the Input Setup Menu, and the Audio Adjust Menu, and the Advanced Menu that contains the menus of an AV receiver or for discrepancies between the video and audio timing. 3.Audio Adjust 54 1.Tone Control 2.Surround Speakers 54 3.Sound Effect 4.Delay 5.LFE Level 55...
...Advanced Menu provides features such as you wish. Basic Menu 30 Advanced Menu 32 [ENTER]Quit:[SETUP] Basic Menu Your TX-NR801/TX-NR801E is an example. In this manual shows both the OSD Menu displayed on your television monitor and the display on the model of its items, the menu... Menu, the Speaker Setup Menu, the Input Setup Menu, and the Audio Adjust Menu, and the Advanced Menu that contains the menus of an AV receiver or for discrepancies between the video and audio timing. 3.Audio Adjust 54 1.Tone Control 2.Surround Speakers 54 3.Sound Effect 4.Delay 5.LFE Level 55...

Owner Manual
Page 50
... IN (OPT) inputs will be output to the audio and video outputs the currently selected input source signal. When making digital recordings, consult the instruction manual that came with your digital recording equipment (e.g., MD recorder or DAT deck) to know what restrictions are imposed. • You cannot record the source connected... recording component as analog audio. • Digital input signals are actually listening to or watching it as desired. 2 Press the REC OUT button repeat- instruction manual that which you are only output to record.
... IN (OPT) inputs will be output to the audio and video outputs the currently selected input source signal. When making digital recordings, consult the instruction manual that came with your digital recording equipment (e.g., MD recorder or DAT deck) to know what restrictions are imposed. • You cannot record the source connected... recording component as analog audio. • Digital input signals are actually listening to or watching it as desired. 2 Press the REC OUT button repeat- instruction manual that which you are only output to record.

Owner Manual
Page 70
... a higher compression rate. The WAVE format has high sound quality (equivalent to register them easily with copyright protection enabled is available from Onkyo's websites. I Ethernet CAT-5 cable I Router (gateway) (a device that no compression. requires 128 MB, XP; Net-Tune Central supports... a LAN to ISP; Router requirements differ from ISP to the TX-NR801/ TX-NR801E. Net-Tune Central also provides this information with Macintosh systems. Notes: • If your ISP contract assumes manual configuration of tracks and artists, thus enabling high usability....
... a higher compression rate. The WAVE format has high sound quality (equivalent to register them easily with copyright protection enabled is available from Onkyo's websites. I Ethernet CAT-5 cable I Router (gateway) (a device that no compression. requires 128 MB, XP; Net-Tune Central supports... a LAN to ISP; Router requirements differ from ISP to the TX-NR801/ TX-NR801E. Net-Tune Central also provides this information with Macintosh systems. Notes: • If your ISP contract assumes manual configuration of tracks and artists, thus enabling high usability....
Owner Manual
Page 71
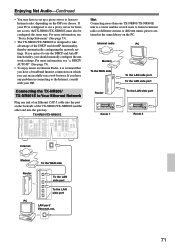
... connecting to Your Ethernet Network Plug one TX-NR801/TX-NR801E unit to a router enables several users to listen to take advantage of the TX-NR801/TX-NR801E and the other end into the gateway. SURR BACK/ ZONE 2 SPEAKERS R L VOLTAGE SELECTOR 120V REMOTE CONTROL AV RECEIVER MODEL NO. If you should manually configure the network settings. OR...
... connecting to Your Ethernet Network Plug one TX-NR801/TX-NR801E unit to a router enables several users to listen to take advantage of the TX-NR801/TX-NR801E and the other end into the gateway. SURR BACK/ ZONE 2 SPEAKERS R L VOLTAGE SELECTOR 120V REMOTE CONTROL AV RECEIVER MODEL NO. If you should manually configure the network settings. OR...
Owner Manual
Page 72
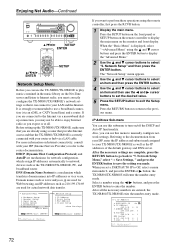
... c.SUBNET Mask :255.255.255. 0 d.Gateway :192.168. 9. 1 DNS Server e.1st:192.168. 9. 1 f.2nd: 0. 0. 0. 0 72 Domain names such as www.onkyo.co.jp are used for network configuration, which translates domain names into IP addresses or vice versa. When the "Basic Menu" is correctly... to use this menu to manually configure network settings. Network Setup Menu," select "→ Save Settings, " and press the ENTER button to save the setting you must correctly configure the TX-NR801/TX-NR801E's network settings so that the TX-NR801/TX-NR801E is displayed, select "&#...
... c.SUBNET Mask :255.255.255. 0 d.Gateway :192.168. 9. 1 DNS Server e.1st:192.168. 9. 1 f.2nd: 0. 0. 0. 0 72 Domain names such as www.onkyo.co.jp are used for network configuration, which translates domain names into IP addresses or vice versa. When the "Basic Menu" is correctly... to use this menu to manually configure network settings. Network Setup Menu," select "→ Save Settings, " and press the ENTER button to save the setting you must correctly configure the TX-NR801/TX-NR801E's network settings so that the TX-NR801/TX-NR801E is displayed, select "&#...
Owner Manual
Page 73
...TX-NR801/TX... TX-NR801/TX-...TX-NR801/TX-NR801E stores all the necessary numbers are set this menu item and press the ENTER or button, the TX-NR801/TX...TX-NR801/TX-NR801E is directly connected with an xDSL modem or terminal adapter, be sure to your ISP. If your TX-NR801/TX...-NR801E is directly connected with an xDSL modem or terminal adapter, be sure to On, the values for the TX-NR801/TX...TX-NR801/TX...TX-NR801/TX...TX-NR801/TX-NR801E enters the character-entry mode. c. Note: After setting, allow approx. 2 seconds until the TX-NR801/TX...TX-NR801/ TX...TX-NR801/TX...TX-NR801/TX...TX-NR801/TX...
...TX-NR801/TX... TX-NR801/TX-...TX-NR801/TX-NR801E stores all the necessary numbers are set this menu item and press the ENTER or button, the TX-NR801/TX...TX-NR801/TX-NR801E is directly connected with an xDSL modem or terminal adapter, be sure to your ISP. If your TX-NR801/TX...-NR801E is directly connected with an xDSL modem or terminal adapter, be sure to On, the values for the TX-NR801/TX...TX-NR801/TX...TX-NR801/TX...TX-NR801/TX-NR801E enters the character-entry mode. c. Note: After setting, allow approx. 2 seconds until the TX-NR801/TX...TX-NR801/ TX...TX-NR801/TX...TX-NR801/TX...TX-NR801/TX...

Owner Manual
Page 87
... is pressed). Letting the Remote Controller Learn the Codes from Other Remote Controllers-Continued Notes: • The remote controller codes for Onkyo compact disc players, cassette tape decks, DVD players, and mini disc recorder have already been programmed into the remote controller. Some ... erases all the commands programmed under a different MODE button. • When you want to program a command to a button to the instruction manual that came with that product for instructions on the remote controller. • Once you may change each function must be programmed to a separate...
... is pressed). Letting the Remote Controller Learn the Codes from Other Remote Controllers-Continued Notes: • The remote controller codes for Onkyo compact disc players, cassette tape decks, DVD players, and mini disc recorder have already been programmed into the remote controller. Some ... erases all the commands programmed under a different MODE button. • When you want to program a command to a button to the instruction manual that came with that product for instructions on the remote controller. • Once you may change each function must be programmed to a separate...
Owner Manual
Page 93
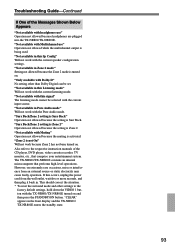
... the current input source. "Not available in Pure Audio mode" Will not work with Dolby D" No setting other settings to the respective instruction manuals of the Messages Shown Below Appears "Not available with the current speaker configuration settings. "Surr Back/Zone 2 setting is Zone 2"...Setting not allowed because the Zone 2 mode is activated. Also refer to the factory default settings, hold down the VIDEO 1 button with the TX-NR801/TX-NR801E turned on extremely rare occasions, noise or interference from the wall outlet, wait five or more seconds, and then plug it back...
... the current input source. "Not available in Pure Audio mode" Will not work with Dolby D" No setting other settings to the respective instruction manuals of the Messages Shown Below Appears "Not available with the current speaker configuration settings. "Surr Back/Zone 2 setting is Zone 2"...Setting not allowed because the Zone 2 mode is activated. Also refer to the factory default settings, hold down the VIDEO 1 button with the TX-NR801/TX-NR801E turned on extremely rare occasions, noise or interference from the wall outlet, wait five or more seconds, and then plug it back...

Owner Manual
Page 98
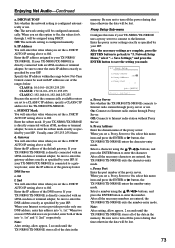
...ONKYO Web site (http://www.onkyousa.com/net-tune/). On the download page, you are required to the broadband router through Ethernet cable (See the figure above . 2. Playing the music stored on the remote controller. 4. Press the NET A button on the Net-Tune server 1. Connect the AV Receiver...3. Net Audio Quick Setup Guide Before connecting the AV Receiver AV Receiver Before connecting the AV Receiver, connect the cable/DSL modem, broadband router and PC according to the Net Audio pages in the AV receiver's instruction manual. And also refer to the figure on your ...
...ONKYO Web site (http://www.onkyousa.com/net-tune/). On the download page, you are required to the broadband router through Ethernet cable (See the figure above . 2. Playing the music stored on the remote controller. 4. Press the NET A button on the Net-Tune server 1. Connect the AV Receiver...3. Net Audio Quick Setup Guide Before connecting the AV Receiver AV Receiver Before connecting the AV Receiver, connect the cable/DSL modem, broadband router and PC according to the Net Audio pages in the AV receiver's instruction manual. And also refer to the figure on your ...

