

User Manual English Basic/Advanced
Page 1
Basic Manual Before Start 2 What's in the box 2 Part Names 3 Part Names 3 Install 7 Installation procedure 7 Step1: Speaker Layout 8 Step2: Connect the Speakers 14 Step3: Connect the TV & ... 26 Listening to the AM/FM Radio 27 Multi-zone 29 Listening Mode 30 AV RECEIVER TX-NR676/TX-NR676E The Basic Manual includes information needed when starting up and also instructions for frequently used operations. The Advanced Manual has more detailed information and advanced settings. > Before Start > Part Names > Install > Initial Setup > Playback > Advanced...
Basic Manual Before Start 2 What's in the box 2 Part Names 3 Part Names 3 Install 7 Installation procedure 7 Step1: Speaker Layout 8 Step2: Connect the Speakers 14 Step3: Connect the TV & ... 26 Listening to the AM/FM Radio 27 Multi-zone 29 Listening Mode 30 AV RECEIVER TX-NR676/TX-NR676E The Basic Manual includes information needed when starting up and also instructions for frequently used operations. The Advanced Manual has more detailed information and advanced settings. > Before Start > Part Names > Install > Initial Setup > Playback > Advanced...
User Manual English Basic/Advanced
Page 2
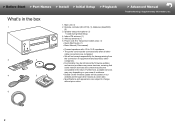
Speaker setup microphone (1) 0 Used during Initial Setup. 4. Power cord (For Taiwanese models only) (1) 0 Quick Start Guide (1) 0 Basic Manual (This manual) 0 Connect speakers with 4 Ω to change without prior notice. > Advanced Manual Troubleshooting | Supplementary Information, etc. 6 2 Furthermore, available services may vary depending on your area of residence. 0 Details on the firmware update will be posted...
Speaker setup microphone (1) 0 Used during Initial Setup. 4. Power cord (For Taiwanese models only) (1) 0 Quick Start Guide (1) 0 Basic Manual (This manual) 0 Connect speakers with 4 Ω to change without prior notice. > Advanced Manual Troubleshooting | Supplementary Information, etc. 6 2 Furthermore, available services may vary depending on your area of residence. 0 Details on the firmware update will be posted...

User Manual English Basic/Advanced
Page 3
... the cursors and press ENTER to work when this unit is within about 16´/5 m, at an angle of the display in the Advanced Manual. Front Panel 1. Í ON/STANDBY button 2. ZONE 2 button:... > Before Start > Part Names > Install > Initial Setup > Playback Part Names PartNames > Advanced Manual Troubleshooting | Supplementary Information, etc. (*)You can find details in three steps. PURE AUDIO button/indicator (European, Australian, Taiwanese and Asian models): Switches...
... the cursors and press ENTER to work when this unit is within about 16´/5 m, at an angle of the display in the Advanced Manual. Front Panel 1. Í ON/STANDBY button 2. ZONE 2 button:... > Before Start > Part Names > Install > Initial Setup > Playback Part Names PartNames > Advanced Manual Troubleshooting | Supplementary Information, etc. (*)You can find details in three steps. PURE AUDIO button/indicator (European, Australian, Taiwanese and Asian models): Switches...

User Manual English Basic/Advanced
Page 4
... and the listening mode. 4. DIGITAL: When digital signals are connected. > Before Start > Part Names > Install > Initial Setup > Playback > Advanced Manual Troubleshooting | Supplementary Information, etc. (*)You can find details in the Advanced Manual. 14.You can adjust the sound quality of the input signals. 7. Flashes if the USB is on. : When connected by...
... and the listening mode. 4. DIGITAL: When digital signals are connected. > Before Start > Part Names > Install > Initial Setup > Playback > Advanced Manual Troubleshooting | Supplementary Information, etc. (*)You can find details in the Advanced Manual. 14.You can adjust the sound quality of the input signals. 7. Flashes if the USB is on. : When connected by...

User Manual English Basic/Advanced
Page 5
... antennas are compatible with banana plugs.) You can be played. USB port: A USB storage device is connected. 11. You can find details in the Advanced Manual. 90° 180° (Taiwanese models) Rear Panel 1. GND terminal: ... to a monitor such as a TV or projector. 9. > Before Start > Part Names > Install > Initial Setup > Playback > Advanced Manual Troubleshooting | Supplementary Information, etc. (*)You can also supply power (5 V/1 A) to USB devices with a USB cable. 6.
... antennas are compatible with banana plugs.) You can be played. USB port: A USB storage device is connected. 11. You can find details in the Advanced Manual. 90° 180° (Taiwanese models) Rear Panel 1. GND terminal: ... to a monitor such as a TV or projector. 9. > Before Start > Part Names > Install > Initial Setup > Playback > Advanced Manual Troubleshooting | Supplementary Information, etc. (*)You can also supply power (5 V/1 A) to USB devices with a USB cable. 6.

User Manual English Basic/Advanced
Page 6
...AM/FM radio stations. LISTENING MODE buttons: Allows you with this unit.) 9. Up to two powered subwoofers can find details in the Advanced Manual. 15.SUBWOOFER PRE OUT jack: Connect a powered subwoofer with the cursors and press ENTER to operate RDS (P28). 12. The same ... played. 3. button: Returns the display to the previous state. 13.MODE button: Switches tuning to an AM/FM radio station between automatic tuning and manual tuning. 14.MEMORY button: Used to cancel muting. 8. Volume buttons 7. button: Switches the information on the TV screen. 11. Tips ...
...AM/FM radio stations. LISTENING MODE buttons: Allows you with this unit.) 9. Up to two powered subwoofers can find details in the Advanced Manual. 15.SUBWOOFER PRE OUT jack: Connect a powered subwoofer with the cursors and press ENTER to operate RDS (P28). 12. The same ... played. 3. button: Returns the display to the previous state. 13.MODE button: Switches tuning to an AM/FM radio station between automatic tuning and manual tuning. 14.MEMORY button: Used to cancel muting. 8. Volume buttons 7. button: Switches the information on the TV screen. 11. Tips ...

User Manual English Basic/Advanced
Page 7
... connect the speaker systems to this unit, refer to P14 if you refer to external devices. > Before Start > Part Names > Install > Initial Setup > Playback > Advanced Manual Troubleshooting | Supplementary Information, etc. The connection process will be smoother if you are installing, and the connections made to the illustrations and explanations, confirm the...
... connect the speaker systems to this unit, refer to P14 if you refer to external devices. > Before Start > Part Names > Install > Initial Setup > Playback > Advanced Manual Troubleshooting | Supplementary Information, etc. The connection process will be smoother if you are installing, and the connections made to the illustrations and explanations, confirm the...

User Manual English Basic/Advanced
Page 8
... front speakers should be positioned at ear height. 0 If you a natural sound even when playing music. > Before Start > Part Names > Install > Initial Setup > Playback > Advanced Manual Troubleshooting | Supplementary Information, etc.
... front speakers should be positioned at ear height. 0 If you a natural sound even when playing music. > Before Start > Part Names > Install > Initial Setup > Playback > Advanced Manual Troubleshooting | Supplementary Information, etc.

User Manual English Basic/Advanced
Page 9
... combinations" (P13) introduces some detailed examples of speaker combinations. 7,8 Height Speakers Choose one of height speakers. > Before Start > Part Names > Install > Initial Setup > Playback > Advanced Manual Troubleshooting | Supplementary Information, etc. 3´ (0.9 m) or more En 9 Front high speakers should be situated at least 3´/0.9 m higher than the front speakers. Front high speakers...
... combinations" (P13) introduces some detailed examples of speaker combinations. 7,8 Height Speakers Choose one of height speakers. > Before Start > Part Names > Install > Initial Setup > Playback > Advanced Manual Troubleshooting | Supplementary Information, etc. 3´ (0.9 m) or more En 9 Front high speakers should be situated at least 3´/0.9 m higher than the front speakers. Front high speakers...

User Manual English Basic/Advanced
Page 10
... height speakers, you can select the Dolby Atmos listening mode, which are types of height speakers. > Before Start > Part Names > Install > Initial Setup > Playback > Advanced Manual Troubleshooting | Supplementary Information, etc. ˎ3 ˎ2 ˎ1 1: 30e to 55e, 2: 65e to 100e, 3: 125e to 150e 5.1.2 Channel System-2 (Ceiling Speakers) This is...
... height speakers, you can select the Dolby Atmos listening mode, which are types of height speakers. > Before Start > Part Names > Install > Initial Setup > Playback > Advanced Manual Troubleshooting | Supplementary Information, etc. ˎ3 ˎ2 ˎ1 1: 30e to 55e, 2: 65e to 100e, 3: 125e to 150e 5.1.2 Channel System-2 (Ceiling Speakers) This is...

User Manual English Basic/Advanced
Page 11
...) 1: 22e to be coming from overhead. Dolby enabled speakers are both types of height speakers. > Before Start > Part Names > Install > Initial Setup > Playback > Advanced Manual Troubleshooting | Supplementary Information, etc. ˎ1 ˎ2 5.1.2 Channel System-3 (Dolby Enabled Speakers (Dolby Speakers)) This is a basic 5.1 channel system consisting of front speakers, a center speaker, surround...
...) 1: 22e to be coming from overhead. Dolby enabled speakers are both types of height speakers. > Before Start > Part Names > Install > Initial Setup > Playback > Advanced Manual Troubleshooting | Supplementary Information, etc. ˎ1 ˎ2 5.1.2 Channel System-3 (Dolby Enabled Speakers (Dolby Speakers)) This is a basic 5.1 channel system consisting of front speakers, a center speaker, surround...

User Manual English Basic/Advanced
Page 12
> Before Start > Part Names > Install > Initial Setup > Playback > Advanced Manual Troubleshooting | Supplementary Information, etc. ˎ1 ˎ2 Bi-Amping the Speakers With a 5.1 channel system, it is possible to connect front speakers that support Bi-Amping to ...
> Before Start > Part Names > Install > Initial Setup > Playback > Advanced Manual Troubleshooting | Supplementary Information, etc. ˎ1 ˎ2 Bi-Amping the Speakers With a 5.1 channel system, it is possible to connect front speakers that support Bi-Amping to ...

User Manual English Basic/Advanced
Page 13
... SURROUND (*1) You can be connected. SURROUND BACK (*2) (*2) HEIGHT (*3) (*3) (*3) (*3) Bi-AMP (*1) (*1) (*1) (*1) ZONE 2 (ZONE SPEAKER) (P20) (*1) (*1) (*1) (*1) En 13 > Before Start > Part Names > Install > Initial Setup > Playback > Advanced Manual Troubleshooting | Supplementary Information, etc. Speaker combinations 0 In any of the combinations, up to two powered subwoofers can select Bi-AMP or ZONE SPEAKER. (*2) No sound...
... SURROUND (*1) You can be connected. SURROUND BACK (*2) (*2) HEIGHT (*3) (*3) (*3) (*3) Bi-AMP (*1) (*1) (*1) (*1) ZONE 2 (ZONE SPEAKER) (P20) (*1) (*1) (*1) (*1) En 13 > Before Start > Part Names > Install > Initial Setup > Playback > Advanced Manual Troubleshooting | Supplementary Information, etc. Speaker combinations 0 In any of the combinations, up to two powered subwoofers can select Bi-AMP or ZONE SPEAKER. (*2) No sound...

User Manual English Basic/Advanced
Page 14
... be made in the Setup menu. If the exposed wires of the speaker terminals when connecting. > Before Start > Part Names > Install > Initial Setup > Playback > Advanced Manual Troubleshooting | Supplementary Information, etc. AccuEQ Room Calibration" in Initial Setup (P22). 0 If any of the connected speakers have connected need to be connected. Step2: Connect...
... be made in the Setup menu. If the exposed wires of the speaker terminals when connecting. > Before Start > Part Names > Install > Initial Setup > Playback > Advanced Manual Troubleshooting | Supplementary Information, etc. AccuEQ Room Calibration" in Initial Setup (P22). 0 If any of the connected speakers have connected need to be connected. Step2: Connect...

User Manual English Basic/Advanced
Page 15
... Setup menu. Refer to "Standard Connections (Pages 8 to 11)" (P14) to connect the center speaker, surround speakers, and powered subwoofer. 0 Also refer to the instruction manual for your speakers when using connections for the speaker configuration you need to be activated. Speaker" "Configuration" and set "Speaker Impedance" to less than 6 Ω... fitted between the woofer jacks and tweeter jacks of 4 Ω or more to "4ohms". En 15 > Before Start > Part Names > Install > Initial Setup > Playback > Advanced Manual Troubleshooting | Supplementary Information, etc.
... Setup menu. Refer to "Standard Connections (Pages 8 to 11)" (P14) to connect the center speaker, surround speakers, and powered subwoofer. 0 Also refer to the instruction manual for your speakers when using connections for the speaker configuration you need to be activated. Speaker" "Configuration" and set "Speaker Impedance" to less than 6 Ω... fitted between the woofer jacks and tweeter jacks of 4 Ω or more to "4ohms". En 15 > Before Start > Part Names > Install > Initial Setup > Playback > Advanced Manual Troubleshooting | Supplementary Information, etc.

User Manual English Basic/Advanced
Page 16
...the digital optical cable in "b". 0 Connection with one HDMI cable. "HDMI Out" to use an HDMI cable and connect according to the instruction manual for CEC features and audio output. Note that supports the ARC (Audio Return Channel) (*1) feature, use the ARC function. Refer to illustration ...is not necessary if you have connected to the HDMI OUT SUB jack. > Before Start > Part Names > Install > Initial Setup > Playback > Advanced Manual Troubleshooting | Supplementary Information, etc. Connect the TV To ARC TV For a TV that this unit. Select "Yes" in the Initial Setup. 0 Refer...
...the digital optical cable in "b". 0 Connection with one HDMI cable. "HDMI Out" to use an HDMI cable and connect according to the instruction manual for CEC features and audio output. Note that supports the ARC (Audio Return Channel) (*1) feature, use the ARC function. Refer to illustration ...is not necessary if you have connected to the HDMI OUT SUB jack. > Before Start > Part Names > Install > Initial Setup > Playback > Advanced Manual Troubleshooting | Supplementary Information, etc. Connect the TV To ARC TV For a TV that this unit. Select "Yes" in the Initial Setup. 0 Refer...

User Manual English Basic/Advanced
Page 17
> Before Start > Part Names > Install > Initial Setup > Playback > Advanced Manual Troubleshooting | Supplementary Information, etc. Connect the HDMI AV Component This is an example of a CECcompliant TV, and automatically switching this unit to standby when the ...
> Before Start > Part Names > Install > Initial Setup > Playback > Advanced Manual Troubleshooting | Supplementary Information, etc. Connect the HDMI AV Component This is an example of a CECcompliant TV, and automatically switching this unit to standby when the ...

User Manual English Basic/Advanced
Page 18
... the same name as Dolby Digital, you can also connect to match the jacks it has. > Before Start > Part Names > Install > Initial Setup > Playback > Advanced Manual Troubleshooting | Supplementary Information, etc. Note that you connect the video input jacks to the jacks with 480i or 576i resolution. If your player does not.... 0 To enjoy digital surround sound including Dolby Digital, audio output should also be converted to change assignment of the input jacks you see the Advanced Manual.
... the same name as Dolby Digital, you can also connect to match the jacks it has. > Before Start > Part Names > Install > Initial Setup > Playback > Advanced Manual Troubleshooting | Supplementary Information, etc. Note that you connect the video input jacks to the jacks with 480i or 576i resolution. If your player does not.... 0 To enjoy digital surround sound including Dolby Digital, audio output should also be converted to change assignment of the input jacks you see the Advanced Manual.

User Manual English Basic/Advanced
Page 19
... the turntable uses an MC type cartridge, install an audio equalizer compatible with an audio component. > Before Start > Part Names > Install > Initial Setup > Playback > Advanced Manual Troubleshooting | Supplementary Information, etc. 4. a OR b CD Turntable a Digital optical cable, b Analog audio cable If the turntable has a ground wire, connect it to another AUDIO IN...
... the turntable uses an MC type cartridge, install an audio equalizer compatible with an audio component. > Before Start > Part Names > Install > Initial Setup > Playback > Advanced Manual Troubleshooting | Supplementary Information, etc. 4. a OR b CD Turntable a Digital optical cable, b Analog audio cable If the turntable has a ground wire, connect it to another AUDIO IN...

User Manual English Basic/Advanced
Page 20
... have connected the front speakers using a digital coaxial cable, digital optical cable, or analog audio cable. > Before Start > Part Names > Install > Initial Setup > Playback > Advanced Manual Troubleshooting | Supplementary Information, etc. Connect the ZONE 2 LINE OUT jacks of the unit and the LINE IN jacks of the pre-main amplifier in Initial...
... have connected the front speakers using a digital coaxial cable, digital optical cable, or analog audio cable. > Before Start > Part Names > Install > Initial Setup > Playback > Advanced Manual Troubleshooting | Supplementary Information, etc. Connect the ZONE 2 LINE OUT jacks of the unit and the LINE IN jacks of the pre-main amplifier in Initial...