
Owner Manual
Page 1
onnnectinanntecnonna- iCle,i.i.i.n.r.„ii,taei-,l,',..;C,-i....'n.:'.-..t".'i,,".,f-,„..-r,."*o-.-.!-.-l:f-k I 0 0 OO O = = =- TX-8511 Audio Video Control Receiver Instruction Manual ===1 o= = o 6 I -:.' - - nse.ct-on4 - .!.'63inlctifg the ,i)bw ast :gperations- "...er-l---e,,•:j;,l.,,i,n*,,:.s-til ,::?..k:4r-4 ,... -; -- 491.4%46? ..,..,..v... ,444.--*Zi...krico-,.„",_ U0141)0SitiOnS'anovnaites 21--4- ONKYO. guide; .1 - 'P ki. ''1 I7s.-.!' --' ''. APEallt0 2 pppec4onf:gr;:,._ pn-:gropjzt 2•uRltei4iiZio6ofe-n.C.Ti.
onnnectinanntecnonna- iCle,i.i.i.n.r.„ii,taei-,l,',..;C,-i....'n.:'.-..t".'i,,".,f-,„..-r,."*o-.-.!-.-l:f-k I 0 0 OO O = = =- TX-8511 Audio Video Control Receiver Instruction Manual ===1 o= = o 6 I -:.' - - nse.ct-on4 - .!.'63inlctifg the ,i)bw ast :gperations- "...er-l---e,,•:j;,l.,,i,n*,,:.s-til ,::?..k:4r-4 ,... -; -- 491.4%46? ..,..,..v... ,444.--*Zi...krico-,.„",_ U0141)0SitiOnS'anovnaites 21--4- ONKYO. guide; .1 - 'P ki. ''1 I7s.-.!' --' ''. APEallt0 2 pppec4onf:gr;:,._ pn-:gropjzt 2•uRltei4iiZio6ofe-n.C.Ti.

Owner Manual
Page 2
...2 x 130 watts at 8 ohms, both channels driven from your plug, proceed as follows: The wire which provides guidelines for purchasing Me Onkyo TX-8511 Audio Video Control Rlteiier. This period is shorter when the unit is provided to call the CATV system installer's attention to the point of ...amp fuse is fitted in own responsibility, that it possible to charge the back-up system preserves the contents of 5 amps and that the ONKYO product described in this plug. Check for a receiver) ■ Multiroom Remote System capability (USA models are compatible with a polarized plug. If...
...2 x 130 watts at 8 ohms, both channels driven from your plug, proceed as follows: The wire which provides guidelines for purchasing Me Onkyo TX-8511 Audio Video Control Rlteiier. This period is shorter when the unit is provided to call the CATV system installer's attention to the point of ...amp fuse is fitted in own responsibility, that it possible to charge the back-up system preserves the contents of 5 amps and that the ONKYO product described in this plug. Check for a receiver) ■ Multiroom Remote System capability (USA models are compatible with a polarized plug. If...
Owner Manual
Page 6
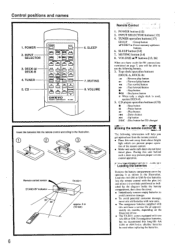
TUNER 5. O O (-3O Remote control sensor STAND-BY indicator 30' 30* TX-8511 approx. 5 m (16 feet) 6 RernOte'COntrol' ' 1. INI'UT SELECTOR buttons [13] 4. MUTING button [14] 8. The following information will be used , operate DECK-B. 5. Remove the ... indicated by opening it as shown in the illustration. SLEEP 7. SLEEP button [14] 7. INPUT SELECTOR 3. fY±-OCJ-W1L75n 1=1 A CI CI (= 4se VOLUME C] ONKYO REMOTE CONTROLLER RC-MS 6. VOLUME Insert the batteries into the remote control with two AA (R6 or UM-3) manganese batteries, but we recommend that long...
TUNER 5. O O (-3O Remote control sensor STAND-BY indicator 30' 30* TX-8511 approx. 5 m (16 feet) 6 RernOte'COntrol' ' 1. INI'UT SELECTOR buttons [13] 4. MUTING button [14] 8. The following information will be used , operate DECK-B. 5. Remove the ... indicated by opening it as shown in the illustration. SLEEP 7. SLEEP button [14] 7. INPUT SELECTOR 3. fY±-OCJ-W1L75n 1=1 A CI CI (= 4se VOLUME C] ONKYO REMOTE CONTROLLER RC-MS 6. VOLUME Insert the batteries into the remote control with two AA (R6 or UM-3) manganese batteries, but we recommend that long...
Owner Manual
Page 24
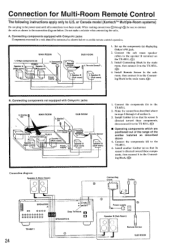
...Block in the main room, then connect it to the TX-8511. (0) 4. Remote Sensor\ 2. Speaker B (Sub room) 1. Install Connecting Block in the main room. Connecting components not equipped with Onkyo R I jacks Components mounted in the power cord until all... above in steps 2 through ®, be connected as shown in SPEAKERS B TX-8511 24 Connecting block Emitter U 0 Power supply Lev Speaker B (Sub Room) O Remote Sensor SUB ROOM Make the connections described above 4. Onkyo components (a) I 1. Connecting components equipped with OnkyoRl jacks 3. (Ecm) itter ...
...Block in the main room, then connect it to the TX-8511. (0) 4. Remote Sensor\ 2. Speaker B (Sub room) 1. Install Connecting Block in the main room. Connecting components not equipped with Onkyo R I jacks Components mounted in the power cord until all... above in steps 2 through ®, be connected as shown in SPEAKERS B TX-8511 24 Connecting block Emitter U 0 Power supply Lev Speaker B (Sub Room) O Remote Sensor SUB ROOM Make the connections described above 4. Onkyo components (a) I 1. Connecting components equipped with OnkyoRl jacks 3. (Ecm) itter ...
Owner Manual
Page 25
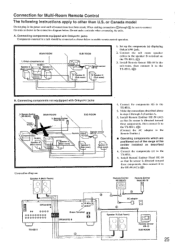
...-50(AC) Power supply', MAIN ROOM 1 5. Connect the components (b) to the speaker B terminal on the TX-8511. (0)) 3. Connecting components not equippped with Onkyo R I TX-8511 \ Spearke7 (Main room) 1/ . Onkyo components (a) TX-8511 L Speaker A -',/ Speaker A (Main room) / f* (Main room) 7 -\ \`. Set up the components (a) displaying Onkyo's R I jacks 3. Components(c) i I jacks Components mounted in a rack should be sure to the 11E-50 (AC...
...-50(AC) Power supply', MAIN ROOM 1 5. Connect the components (b) to the speaker B terminal on the TX-8511. (0)) 3. Connecting components not equippped with Onkyo R I TX-8511 \ Spearke7 (Main room) 1/ . Onkyo components (a) TX-8511 L Speaker A -',/ Speaker A (Main room) / f* (Main room) 7 -\ \`. Set up the components (a) displaying Onkyo's R I jacks 3. Components(c) i I jacks Components mounted in a rack should be sure to the 11E-50 (AC...
Owner Manual
Page 26
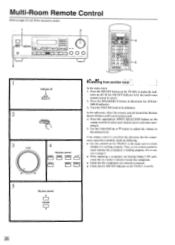
... 1 is lit, the multi-room system cannot be controlled, check the following: • Use the controls On the TX-8511 in the main room to make the indi- Press the SPEAKERS B button to select your desired source and start operating it. 5. In the sub-room, .... Then, use the remote control to the desired level. cator go off A UR Off fi 1 2 SPEAKERS. the remote control is directed toward the Remote Sensor (Onkyo multi-room system) and: 4. If it is working properly. Multi-Room Remote Control Refer to its minimum. g from the sub-room, but the compo- Turn...
... 1 is lit, the multi-room system cannot be controlled, check the following: • Use the controls On the TX-8511 in the main room to make the indi- Press the SPEAKERS B button to select your desired source and start operating it. 5. In the sub-room, .... Then, use the remote control to the desired level. cator go off A UR Off fi 1 2 SPEAKERS. the remote control is directed toward the Remote Sensor (Onkyo multi-room system) and: 4. If it is working properly. Multi-Room Remote Control Refer to its minimum. g from the sub-room, but the compo- Turn...


