Owner Manual
Page 5
... Components Controlling iPod 56 Controlling Other Components 60 Others Troubleshooting 64 Specifications 69 About HDMI 72 Using an RIHD-compatible TV, Player, or Recorder ... 73 Video Resolution Chart 75 To reset the AV receiver to prevent damage from leakage or corrosion. age or corrosion. • Remove expired batteries as soon as...
... Components Controlling iPod 56 Controlling Other Components 60 Others Troubleshooting 64 Specifications 69 About HDMI 72 Using an RIHD-compatible TV, Player, or Recorder ... 73 Video Resolution Chart 75 To reset the AV receiver to prevent damage from leakage or corrosion. age or corrosion. • Remove expired batteries as soon as...
Owner Manual
Page 6
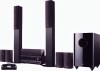
...of this device or its compliance with Audio Return Channel, 3D), Deep- U.S. Product includes software. © DTS, Inc. Features AV Receiver HT-R680 • 130 Watts/Channel @ 6 ohms • WRAT-Wide Range Amplifier Technology (5 Hz to 100 kHz bandwidth) • Optimum ...-bit Processing DSP • Jitter Cleaning Circuit Technology • 4 HDMI*4 Inputs and 1 Output • Onkyo Q for System Control • 4 Digital Inputs (2 Optical/2 Coaxial) • Component Video Switching (2 Inputs/1 Output) • Front "Line in" Input for Portable audio player • Universal Port...
...of this device or its compliance with Audio Return Channel, 3D), Deep- U.S. Product includes software. © DTS, Inc. Features AV Receiver HT-R680 • 130 Watts/Channel @ 6 ohms • WRAT-Wide Range Amplifier Technology (5 Hz to 100 kHz bandwidth) • Optimum ...-bit Processing DSP • Jitter Cleaning Circuit Technology • 4 HDMI*4 Inputs and 1 Output • Onkyo Q for System Control • 4 Digital Inputs (2 Optical/2 Coaxial) • Component Video Switching (2 Inputs/1 Output) • Front "Line in" Input for Portable audio player • Universal Port...

Owner Manual
Page 8
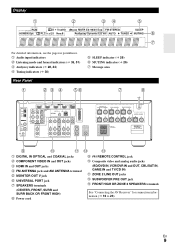
... buttons (BD/DVD, VCR/DVR, CBL/SAT, GAME, AUX, TUNER, TV/CD and PORT) (➔ 25) U AUX INPUT LINE IN jack (➔ 20) V AUX INPUT VIDEO jack (➔ 20) W AUX INPUT AUDIO jacks (➔ 20) X SETUP MIC jack (➔ 28) En 8
... buttons (BD/DVD, VCR/DVR, CBL/SAT, GAME, AUX, TUNER, TV/CD and PORT) (➔ 25) U AUX INPUT LINE IN jack (➔ 20) V AUX INPUT VIDEO jack (➔ 20) W AUX INPUT AUDIO jacks (➔ 20) X SETUP MIC jack (➔ 28) En 8
Owner Manual
Page 9
...; 26) G MUTING indicator (➔ 26) H Message area Rear Panel B CD E FG H F G H I J K LM N B DIGITAL IN OPTICAL and COAXIAL jacks J V REMOTE CONTROL jack C COMPONENT VIDEO IN and OUT jacks K Composite video and analog audio jacks D HDMI IN and OUT jacks E FM ANTENNA jack and AM ANTENNA terminal F MONITOR OUT V jack G UNIVERSAL PORT jack H SPEAKERS...
...; 26) G MUTING indicator (➔ 26) H Message area Rear Panel B CD E FG H F G H I J K LM N B DIGITAL IN OPTICAL and COAXIAL jacks J V REMOTE CONTROL jack C COMPONENT VIDEO IN and OUT jacks K Composite video and analog audio jacks D HDMI IN and OUT jacks E FM ANTENNA jack and AM ANTENNA terminal F MONITOR OUT V jack G UNIVERSAL PORT jack H SPEAKERS...
Owner Manual
Page 12
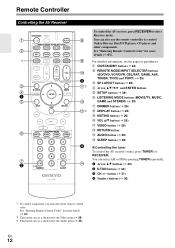
... (➔ 61). Remote Controller Controlling the AV Receiver B C *1 D E B F G H C I DISPLAY button (➔ 25) J MUTING button (➔ 26) K VOL R/X button (➔ 25) L VIDEO button (➔ 26) M RETURN button N AUDIO button (➔ 26) O SLEEP button (➔ 26) ■ Controlling the tuner To control the AV receiver's tuner, press TUNER... (MOVIE/TV, MUSIC, GAME and STEREO) (➔ 33) H DIMMER button (➔ 26) I J K D L*2 M N*3 E O To control the AV receiver, press RECEIVER to control Onkyo Blu-ray Disc/DVD player, CD player and other components. En 12
... (➔ 61). Remote Controller Controlling the AV Receiver B C *1 D E B F G H C I DISPLAY button (➔ 25) J MUTING button (➔ 26) K VOL R/X button (➔ 25) L VIDEO button (➔ 26) M RETURN button N AUDIO button (➔ 26) O SLEEP button (➔ 26) ■ Controlling the tuner To control the AV receiver's tuner, press TUNER... (MOVIE/TV, MUSIC, GAME and STEREO) (➔ 33) H DIMMER button (➔ 26) I J K D L*2 M N*3 E O To control the AV receiver, press RECEIVER to control Onkyo Blu-ray Disc/DVD player, CD player and other components. En 12
Owner Manual
Page 18
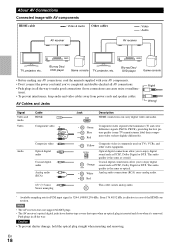
...is the same as PCM*, Dolby Digital or DTS. Orange Coaxial digital connections allow you to make good connections (loose connections can carry digital video and audio. L White Analog audio connections (RCA) carry analog audio. Push plugs in all the way to enjoy digital sound such as...have shutter-type covers that open when an optical plug is effective in all the way. En 18 Signal Video and Audio Video Audio Cable HDMI Component video Y PB/CB PR/CR Composite video Optical digital audio Coaxial digital audio Analog audio (RCA) 1/8" (3.5 mm) Stereo mini plug Jack HDMI ...
...is the same as PCM*, Dolby Digital or DTS. Orange Coaxial digital connections allow you to make good connections (loose connections can carry digital video and audio. L White Analog audio connections (RCA) carry analog audio. Push plugs in all the way to enjoy digital sound such as...have shutter-type covers that open when an optical plug is effective in all the way. En 18 Signal Video and Audio Video Audio Cable HDMI Component video Y PB/CB PR/CR Composite video Optical digital audio Coaxial digital audio Analog audio (RCA) 1/8" (3.5 mm) Stereo mini plug Jack HDMI ...
Owner Manual
Page 19
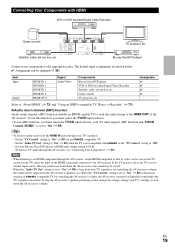
... the AV receiver's volume. Set the "Audio TV Out" setting to "On" (➔ 49) when the TV is set the HDMI component so that its video can be output from the AV receiver or the sound may be cut off. • When the "Audio TV Out" setting is not compatible with... HDMI VCR or DVD recorder/Digital Video Recorder Game console TV, projector, etc. To listen to "Off". - Note • When listening to an HDMI component through the AV receiver, see "Connecting Your...
... the AV receiver's volume. Set the "Audio TV Out" setting to "On" (➔ 49) when the TV is set the HDMI component so that its video can be output from the AV receiver or the sound may be cut off. • When the "Audio TV Out" setting is not compatible with... HDMI VCR or DVD recorder/Digital Video Recorder Game console TV, projector, etc. To listen to "Off". - Note • When listening to an HDMI component through the AV receiver, see "Connecting Your...
Owner Manual
Page 20
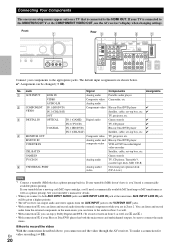
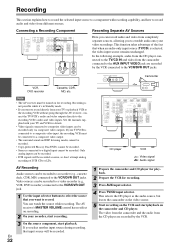
... for details. • When you are shown below. ✔: Assignment can be sure to connect the main stereo. ■ How to record the video With the connections described above, you can enjoy Dolby Digital and DTS. (To record or listen in Zone 2 as a phono preamp. If your turntable... receiver. GAME IN Game console TV/CD IN Analog audio TV, CD player, Turntable*1, cassette tape deck, MD, CD-R & UNIVERSAL PORT Analog audio/ video Universal port optional dock (UP-A1 etc.) Note *1 Connect a turntable (MM) that is connected to the appropriate jacks. No. If your Blu-ray ...
... for details. • When you are shown below. ✔: Assignment can be sure to connect the main stereo. ■ How to record the video With the connections described above, you can enjoy Dolby Digital and DTS. (To record or listen in Zone 2 as a phono preamp. If your turntable... receiver. GAME IN Game console TV/CD IN Analog audio TV, CD player, Turntable*1, cassette tape deck, MD, CD-R & UNIVERSAL PORT Analog audio/ video Universal port optional dock (UP-A1 etc.) Note *1 Connect a turntable (MM) that is connected to the appropriate jacks. No. If your Blu-ray ...
Owner Manual
Page 23
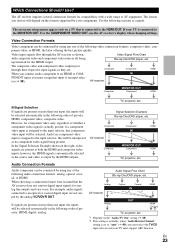
...will be selected automatically in the following order of AV equipment. If signals are present at more than one of the following video connection formats: composite video, com- Analog AV receiver *1 Optical Coaxial IN *1 *1 HDMI Analog OUT HDMI *1 *2 TV, projector, etc. *1 Depends on ...Blu-ray Disc/DVD player, etc. Use the following order of whether a component video signal is actually present, if a component video input is assigned to the HDMI OUT. Video Connection Formats Video component can be selected automatically in mind that input to an HDMI or COM- Blu...
...will be selected automatically in the following order of AV equipment. If signals are present at more than one of the following video connection formats: composite video, com- Analog AV receiver *1 Optical Coaxial IN *1 *1 HDMI Analog OUT HDMI *1 *2 TV, projector, etc. *1 Depends on ...Blu-ray Disc/DVD player, etc. Use the following order of whether a component video signal is actually present, if a component video input is assigned to the HDMI OUT. Video Connection Formats Video component can be selected automatically in mind that input to an HDMI or COM- Blu...
Owner Manual
Page 25
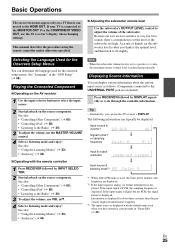
..." (➔ 33) • "Audyssey" (➔ 44) Note • When the subwoofer volume level is set the subwoofer level to the MONITOR OUT V or the COMPONENT VIDEO OUT, use the AV receiver's DISPLAY. Displaying Source Information You can determine the language used , the band, preset number, and frequency are less sensitive to...
..." (➔ 33) • "Audyssey" (➔ 44) Note • When the subwoofer volume level is set the subwoofer level to the MONITOR OUT V or the COMPONENT VIDEO OUT, use the AV receiver's DISPLAY. Displaying Source Information You can determine the language used , the band, preset number, and frequency are less sensitive to...
Owner Manual
Page 26
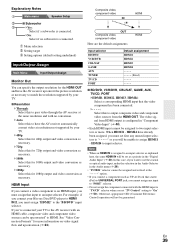
... the AV Receiver You can adjust the brightness of the AV receiver. Using the Audio and Video Menus By pressing AUDIO or VIDEO, you can have a quick access to frequently used menus without having to use the remote controller's AUDIO and arrow buttons. • See "Music Optimizer" for... Zone 2 is being displayed, you to change settings and view the current information. 1 Press RECEIVER followed by DIMMER repeatedly to Standby. BD/DVD Audio Bass Video Treble 0dB Info Subwoofer Level Input Sel Center Level Listening Mode Dynamic EQ Dynamic Volume BD/DVD Audio Wide Mode...
... the AV Receiver You can adjust the brightness of the AV receiver. Using the Audio and Video Menus By pressing AUDIO or VIDEO, you can have a quick access to frequently used menus without having to use the remote controller's AUDIO and arrow buttons. • See "Music Optimizer" for... Zone 2 is being displayed, you to change settings and view the current information. 1 Press RECEIVER followed by DIMMER repeatedly to Standby. BD/DVD Audio Bass Video Treble 0dB Info Subwoofer Level Input Sel Center Level Listening Mode Dynamic EQ Dynamic Volume BD/DVD Audio Wide Mode...
Owner Manual
Page 27
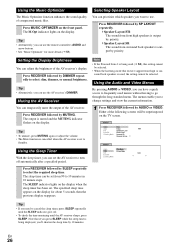
...Powered Zone 2 speakers are grouped in the PHONES jack, the speakers are turned off .) • When you connect a pair of the following items: "Audio", "Video" and "Tuner". ■ Input Sel*4*5 ` You can change the following items; "Brightness", "Contrast", "Hue", and "Saturation". But even if not, the ... selector, the name of Universal Port Option Dock will be displayed. → → Changing the Input Display When you connect an V-capable Onkyo component, you to the selected input source. ■ Listening Mode ` You can be done only from the front panel. 1 Press TV/CD...
...Powered Zone 2 speakers are grouped in the PHONES jack, the speakers are turned off .) • When you connect a pair of the following items: "Audio", "Video" and "Tuner". ■ Input Sel*4*5 ` You can change the following items; "Brightness", "Contrast", "Hue", and "Saturation". But even if not, the ... selector, the name of Universal Port Option Dock will be displayed. → → Changing the Input Display When you connect an V-capable Onkyo component, you to the selected input source. ■ Listening Mode ` You can be done only from the front panel. 1 Press TV/CD...
Owner Manual
Page 28
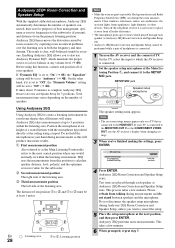
... on the number of speakers. Before using a tripod. Turn off the cell phone (even if it is connected to the MONITOR OUT V or the COMPONENT VIDEO OUT, use Audyssey Dynamic EQ®, which maintains the proper octave-to-octave balance at the next position, and then press ENTER. Do not hold...
... on the number of speakers. Before using a tripod. Turn off the cell phone (even if it is connected to the MONITOR OUT V or the COMPONENT VIDEO OUT, use Audyssey Dynamic EQ®, which maintains the proper octave-to-octave balance at the next position, and then press ENTER. Do not hold...
Owner Manual
Page 32
...playback on recording. 2 On your recorder, start recording. 3 On the source component, start playback. Video sources can record audio and video from the camcorder connected to the AUX INPUT VIDEO jack are recorded by the VCR connected to the VCR/DVR OUT jacks. You can be recorded. ... Prepare the camcorder and CD player for playback. 2 Prepare the VCR for recording. Note • The AV receiver must be connected to a composite video output. • The surround sound and DSP listening modes cannot be recorded. • Copy-protected Blu-ray Disc/DVDs cannot be recorded. •...
...playback on recording. 2 On your recorder, start recording. 3 On the source component, start playback. Video sources can record audio and video from the camcorder connected to the AUX INPUT VIDEO jack are recorded by the VCR connected to the VCR/DVR OUT jacks. You can be recorded. ... Prepare the camcorder and CD player for playback. 2 Prepare the VCR for recording. Note • The AV receiver must be connected to a composite video output. • The surround sound and DSP listening modes cannot be recorded. • Copy-protected Blu-ray Disc/DVDs cannot be recorded. •...
Owner Manual
Page 33
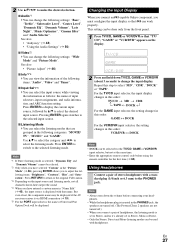
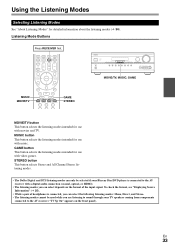
... Dolby Digital and DTS listening modes can select depends on the front panel). GAME button This button selects the listening modes intended for use with video games. To check the format, see "Displaying Source Information" (➔ 25). • While a pair of headphones is connected, you can select the following listening modes...
... Dolby Digital and DTS listening modes can select depends on the front panel). GAME button This button selects the listening modes intended for use with video games. To check the format, see "Displaying Source Information" (➔ 25). • While a pair of headphones is connected, you can select the following listening modes...
Owner Manual
Page 35
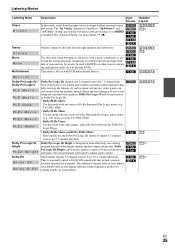
... is designed to expand 5.1-channel sources for 7.1-channel playback. % Dolby Pro Logic IIz Height P L z GH e i g h t Dolby Pro Logic IIz Height is for use with video games, especially those that bear the Dolby Pro Logic II logo. 4 • Dolby PLIIx Movie and Dolby PLIIx Music These modes use the Dolby Pro... b y cD i EXP These modes expand 5.1-channel sources for more effectively use ' it with DVDs or other sources containing multiplexed audio, such as music and movies, video games can be used to upmix a variety of sources from the dramatic spatial effects and vivid imaging.
... is designed to expand 5.1-channel sources for 7.1-channel playback. % Dolby Pro Logic IIz Height P L z GH e i g h t Dolby Pro Logic IIz Height is for use with video games, especially those that bear the Dolby Pro Logic II logo. 4 • Dolby PLIIx Movie and Dolby PLIIx Music These modes use the Dolby Pro... b y cD i EXP These modes expand 5.1-channel sources for more effectively use ' it with DVDs or other sources containing multiplexed audio, such as music and movies, video games can be used to upmix a variety of sources from the dramatic spatial effects and vivid imaging.
Owner Manual
Page 38
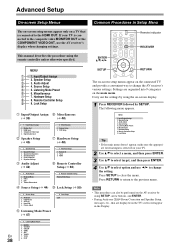
Input/Output Assign C 2. Source Setup F 5. Input/Output Assign 1. Component Video Input 4. OSD Setup H Hardware Setup (➔ 48) 2. Tuner 3. IntelliVolume 3. Picture Adjust F Listening Mode Preset (➔ 47) 9. Lock Setup Lock En 38 5...., arrow buttons, and ENTER. • During Audyssey 2EQ® Room Correction and Speaker Setup, messages, etc., that is connected to the composite video MONITOR OUT or the COMPONENT VIDEO OUT, use F/S to change the AV receiver's various settings. Lock Setup B Input/Output Assign G Miscellaneous (➔ 39) (➔ 48)...
Input/Output Assign C 2. Source Setup F 5. Input/Output Assign 1. Component Video Input 4. OSD Setup H Hardware Setup (➔ 48) 2. Tuner 3. IntelliVolume 3. Picture Adjust F Listening Mode Preset (➔ 47) 9. Lock Setup Lock En 38 5...., arrow buttons, and ENTER. • During Audyssey 2EQ® Room Correction and Speaker Setup, messages, etc., that is connected to the composite video MONITOR OUT or the COMPONENT VIDEO OUT, use F/S to change the AV receiver's various settings. Lock Setup B Input/Output Assign G Miscellaneous (➔ 39) (➔ 48)...
Owner Manual
Page 39
...ray Disc/DVD player to HDMI IN 2, you must set "TV Control" setting to assign HDMI1 - Composite video, component video IN HDMI Composite video, component video OUT Here are the default assignments. HDMI Input selector BD/DVD VCR/DVR CBL/SAT GAME AUX TUNER TV/CD... HDMI input cannot be unable to "On" (➔ 50). Otherwise, appropriate CEC (Consumer Electronics Control) operation will be assigned to output composite video and component video sources from HDMI output is configured in the "Digital Audio Input" (➔ 40). En 39 Explanatory Notes B Main menu Speaker Setup C ...
...ray Disc/DVD player to HDMI IN 2, you must set "TV Control" setting to assign HDMI1 - Composite video, component video IN HDMI Composite video, component video OUT Here are the default assignments. HDMI Input selector BD/DVD VCR/DVR CBL/SAT GAME AUX TUNER TV/CD... HDMI input cannot be unable to "On" (➔ 50). Otherwise, appropriate CEC (Consumer Electronics Control) operation will be assigned to output composite video and component video sources from HDMI output is configured in the "Digital Audio Input" (➔ 40). En 39 Explanatory Notes B Main menu Speaker Setup C ...
Owner Manual
Page 40
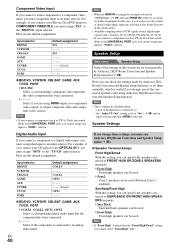
... is selected in this setting, you cannot select "Front High" here. For example, if you connect your Blu-ray Disc/DVD player to COMPONENT VIDEO IN 2, you must assign that input to an input selector. Here are disabled when: - SurrBack/Front High With this assignment. Here you can ... Front High/Zone2 With this section are set to "On" ( ➔ 49) and an input selector other than HDMI is connected to output composite video and component video sources. In this case, if you want to FRONT HIGH OR ZONE 2 SPEAKERS terminals. ` Front High: Front high speakers can be used. ` ...
... is selected in this setting, you cannot select "Front High" here. For example, if you connect your Blu-ray Disc/DVD player to COMPONENT VIDEO IN 2, you must assign that input to an input selector. Here are disabled when: - SurrBack/Front High With this assignment. Here you can ... Front High/Zone2 With this section are set to "On" ( ➔ 49) and an input selector other than HDMI is connected to output composite video and component video sources. In this case, if you want to FRONT HIGH OR ZONE 2 SPEAKERS terminals. ` Front High: Front high speakers can be used. ` ...

Owner Manual
Page 46
... "Film Mode". `3 : 2: Selected when the picture source is movie film, etc. `2 : 2: Selected when the picture source is fixed at "Video". The delay will decrease but in connecting a game console. "Film Mode", "Edge Enhancement", "Noise Reduction", "Brightness", "Contrast", "Hue" or "Saturation". ■..."3 : 2" or "2 : 2". ` Auto: Adjusts to the previous screen, press RETURN. ■ Game Mode ` Off: Game Mode off. ` On: Game Mode on a video component (i.e. Note • When the "Game Mode" is set to "On", this setting is fixed at "Full". ` 4:3: ` Full: ` Zoom: ` Wide Zoom: ` Auto...
... "Film Mode". `3 : 2: Selected when the picture source is movie film, etc. `2 : 2: Selected when the picture source is fixed at "Video". The delay will decrease but in connecting a game console. "Film Mode", "Edge Enhancement", "Noise Reduction", "Brightness", "Contrast", "Hue" or "Saturation". ■..."3 : 2" or "2 : 2". ` Auto: Adjusts to the previous screen, press RETURN. ■ Game Mode ` Off: Game Mode off. ` On: Game Mode on a video component (i.e. Note • When the "Game Mode" is set to "On", this setting is fixed at "Full". ` 4:3: ` Full: ` Zoom: ` Wide Zoom: ` Auto...
