Owner Manual
Page 3
... Power WARNING BEFORE PLUGGING IN THE UNIT FOR THE FIRST TIME, READ THE FOLLOWING SECTION CAREFULLY. Preventing Hearing Loss Caution Excessive sound pressure from the mains. These limits are wet or damp. If this equipment does cause harmful interference to correct the interference by...user changes or modifications not expressly approved by your area meets the voltage requirements printed on this unit or its power cord while your Onkyo dealer. 3. The power cord plug is used in a residential installation. Batteries and Heat Exposure Warning Batteries (battery pack or batteries ...
... Power WARNING BEFORE PLUGGING IN THE UNIT FOR THE FIRST TIME, READ THE FOLLOWING SECTION CAREFULLY. Preventing Hearing Loss Caution Excessive sound pressure from the mains. These limits are wet or damp. If this equipment does cause harmful interference to correct the interference by...user changes or modifications not expressly approved by your area meets the voltage requirements printed on this unit or its power cord while your Onkyo dealer. 3. The power cord plug is used in a residential installation. Batteries and Heat Exposure Warning Batteries (battery pack or batteries ...
Owner Manual
Page 13
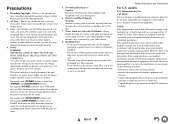
... the channels you should use , a passive subwoofer is recommended for identification purpose. Number of speakers that you have. To get the best from your surround sound system, you use depending on the number of speakers Front speakers Center speaker Surround speakers 2345 ✔✔✔✔ ✔ ✔ ✔✔ Connecting...
... the channels you should use , a passive subwoofer is recommended for identification purpose. Number of speakers that you have. To get the best from your surround sound system, you use depending on the number of speakers Front speakers Center speaker Surround speakers 2345 ✔✔✔✔ ✔ ✔ ✔✔ Connecting...

Owner Manual
Page 14
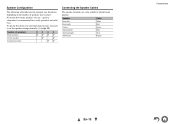
...; Don't connect more than one speaker to several terminals. If you get them the wrong way around, the sound will sound unnatural. • Unnecessarily long, or very thin speaker cables may affect the sound quality and should be activated. • Disconnect the power cord from the wall outlet before connecting your speakers: •...
...; Don't connect more than one speaker to several terminals. If you get them the wrong way around, the sound will sound unnatural. • Unnecessarily long, or very thin speaker cables may affect the sound quality and should be activated. • Disconnect the power cord from the wall outlet before connecting your speakers: •...
Owner Manual
Page 15
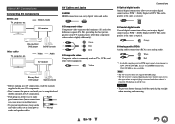
... the manuals supplied with your AV components. • Don't connect the power cord until you to enjoy digital sound such as coaxial. ■ Coaxial digital audio Coaxial digital connections allow you to enjoy digital sound such as optical. good connections (loose connections can carry digital video and audio. ■ Component video Component...
... the manuals supplied with your AV components. • Don't connect the power cord until you to enjoy digital sound such as coaxial. ■ Coaxial digital audio Coaxial digital connections allow you to enjoy digital sound such as optical. good connections (loose connections can carry digital video and audio. ■ Component video Component...
Owner Manual
Page 16
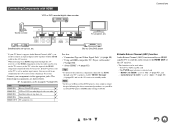
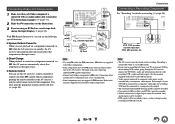
... HDMI capable TV to send the audio stream to the HDMI OUT of Blu-ray Disc/DVD players, if no sound from the AV receiver or the sound may result in no sound is set your TV doesn't support Audio Return Channel (ARC), you need to connect an optical digital cable together with...
... HDMI capable TV to send the audio stream to the HDMI OUT of Blu-ray Disc/DVD players, if no sound from the AV receiver or the sound may result in no sound is set your TV doesn't support Audio Return Channel (ARC), you need to connect an optical digital cable together with...
Owner Manual
Page 18
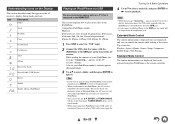
.... ■ Direct Change When playback is started on a component connected via composite video outputs. Refer to control your other Onkyo components. Connecting Onkyo V Components 1 Make sure that component as the input source. ■ Remote Control You can use the following special functions...Some components may not support all V functions. See the manuals supplied with Onkyo components. • Some components have two V jacks. You must be connected to a composite video output. • The surround sound and DSP listening modes cannot be recorded. • Copy-protected Blu-ray...
.... ■ Direct Change When playback is started on a component connected via composite video outputs. Refer to control your other Onkyo components. Connecting Onkyo V Components 1 Make sure that component as the input source. ■ Remote Control You can use the following special functions...Some components may not support all V functions. See the manuals supplied with Onkyo components. • Some components have two V jacks. You must be connected to a composite video output. • The surround sound and DSP listening modes cannot be recorded. • Copy-protected Blu-ray...
Owner Manual
Page 23
... of your iPod/iPhone or the USB device from the USB port. • If you connect an iPod or iPhone to the USB port, no sound will start playback. This means that appear on the AV receiver's display during media playback. Top screen list: Playlists, Artists, Albums, Genres, Songs, Composers, Shuffle...
... of your iPod/iPhone or the USB device from the USB port. • If you connect an iPod or iPhone to the USB port, no sound will start playback. This means that appear on the AV receiver's display during media playback. Top screen list: Playlists, Artists, Albums, Genres, Songs, Composers, Shuffle...
Owner Manual
Page 29
... D E B Front speakers C Center speaker D Surround speakers E Subwoofer Input Source The following audio formats are activated in 5.1-channel surround sound. Two independent audio signal channels are reproduced through two speakers. % This is stereo (stereophonic) sound. See "Sp Config (Speaker Configuration)" for the speaker setup (➔ page 40). ; 9 $ En-29 This surround system has...
... D E B Front speakers C Center speaker D Surround speakers E Subwoofer Input Source The following audio formats are activated in 5.1-channel surround sound. Two independent audio signal channels are reproduced through two speakers. % This is stereo (stereophonic) sound. See "Sp Config (Speaker Configuration)" for the speaker setup (➔ page 40). ; 9 $ En-29 This surround system has...

Owner Manual
Page 30
...widen the stereo image, and % simulates the natural reverberation of where you are within the listening room. In this mode, the sound has a dramatic feel . Speaker Layout $ 9$ Listening Mode T-D (TheaterDimensional)*1 TD Turning On & Basic Operations Description Input Source... atmosphere to voices. Speaker Layout ;9$ En-30 In this mode, all speakers output the same sound in a TV studio, surround effects to the entire sound, and clarity to Orchestra mode. ■ Onkyo-Original DSP Listening Modes Listening Mode Orchestra*1 Or ches t r a Unplugged*1 Unp l ugged Studio...
...widen the stereo image, and % simulates the natural reverberation of where you are within the listening room. In this mode, the sound has a dramatic feel . Speaker Layout $ 9$ Listening Mode T-D (TheaterDimensional)*1 TD Turning On & Basic Operations Description Input Source... atmosphere to voices. Speaker Layout ;9$ En-30 In this mode, all speakers output the same sound in a TV studio, surround effects to the entire sound, and clarity to Orchestra mode. ■ Onkyo-Original DSP Listening Modes Listening Mode Orchestra*1 Or ches t r a Unplugged*1 Unp l ugged Studio...

Owner Manual
Page 31
...Digital Plus*3 Do l b y D + Dolby TrueHD Description In this mode, audio from the input source is output without surround-sound processing. This is high-resolution DTS with DVDs or other sources containing multiplexed audio, such as karaoke DVDs. This mode is for ...Mo n o Multichannel Mu l t i c h Description Input Source In this mode, audio from the input source is output without surround-sound processing. The speaker configuration (presence of speakers) and speaker distance settings are enabled. The speaker configuration (presence of speakers), crossover frequency, speaker ...
...Digital Plus*3 Do l b y D + Dolby TrueHD Description In this mode, audio from the input source is output without surround-sound processing. This is high-resolution DTS with DVDs or other sources containing multiplexed audio, such as karaoke DVDs. This mode is for ...Mo n o Multichannel Mu l t i c h Description Input Source In this mode, audio from the input source is output without surround-sound processing. The speaker configuration (presence of speakers) and speaker distance settings are enabled. The speaker configuration (presence of speakers), crossover frequency, speaker ...
Owner Manual
Page 32
...TV shows that case, set the output setting on the player side to PCM might obtain a better sound according to the player. It provides a very natural and seamless surround-sound experience that fully envelops the listener. • Neo:6 Cinema 4 Use this mode with any stereo ...TV, VHS, DVD). It uses seven full-bandwidth channels of matrix decoding for matrix-encoded material, providing a very natural and seamless surround sound experience that fully envelops the listener. You can input the DSD signal from the dramatic spatial effects and vivid imaging. • Dolby PLII ...
...TV shows that case, set the output setting on the player side to PCM might obtain a better sound according to the player. It provides a very natural and seamless surround-sound experience that fully envelops the listener. • Neo:6 Cinema 4 Use this mode with any stereo ...TV, VHS, DVD). It uses seven full-bandwidth channels of matrix decoding for matrix-encoded material, providing a very natural and seamless surround sound experience that fully envelops the listener. You can input the DSD signal from the dramatic spatial effects and vivid imaging. • Dolby PLII ...
Owner Manual
Page 33
... "Music Optimizer", and "Cinema Filter". Note • The on the input source and listening mode, not all channels shown here output the sound. *2 • This setting is set to "On" (➔ page 45). -"HDMI Ctrl (RIHD)" is not available in the main ... display when changing settings. Speaker indicators Output channel A Speakers A: 5.1 channels AB B Speakers A: 2.1 channels*3 Speakers B: 2 channels Speakers B: 2 channels No sound *3 While Speakers B is 480p, 576p, 720p, 1080i, or 1080p. 1 Press RECEIVER followed by SP A/B repeatedly to 5.1-channel playback in your TV is no...
... "Music Optimizer", and "Cinema Filter". Note • The on the input source and listening mode, not all channels shown here output the sound. *2 • This setting is set to "On" (➔ page 45). -"HDMI Ctrl (RIHD)" is not available in the main ... display when changing settings. Speaker indicators Output channel A Speakers A: 5.1 channels AB B Speakers A: 2.1 channels*3 Speakers B: 2 channels Speakers B: 2 channels No sound *3 While Speakers B is 480p, 576p, 720p, 1080i, or 1080p. 1 Press RECEIVER followed by SP A/B repeatedly to 5.1-channel playback in your TV is no...
Owner Manual
Page 35
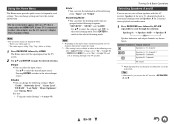
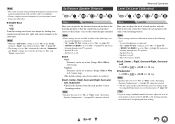
...down the same button (about 3 seconds) to change the input display. En-35 → Changing the Input Display When you connect an V-capable Onkyo component, you can use the remote controller's HOME. • See "Music Optimizer" for the first time (➔ page 50). This setting ...9632; GAME: GAME ↔ DOCK ■ VCR/DVR: VCR/DVR ↔ DOCK → Using the Music Optimizer The Music Optimizer function enhances the sound quality of the AV receiver. 1 Press RECEIVER followed by MUTING. Note • "DOCK" can work properly. Tip • Alternatively, you must configure ...
...down the same button (about 3 seconds) to change the input display. En-35 → Changing the Input Display When you connect an V-capable Onkyo component, you can use the remote controller's HOME. • See "Music Optimizer" for the first time (➔ page 50). This setting ...9632; GAME: GAME ↔ DOCK ■ VCR/DVR: VCR/DVR ↔ DOCK → Using the Music Optimizer The Music Optimizer function enhances the sound quality of the AV receiver. 1 Press RECEIVER followed by MUTING. Note • "DOCK" can work properly. Tip • Alternatively, you must configure ...
Owner Manual
Page 36
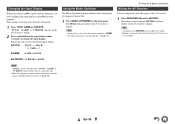
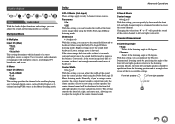
..., DVD recorder). 1 Use the input selector buttons to select the source that input source will be recorded. The AV receiver's MASTER VOLUME control has no sound will be output from the headphones jack. If you select another input source during recording, that you connect an iPod or iPhone to the USB...
..., DVD recorder). 1 Use the input selector buttons to select the source that input source will be recorded. The AV receiver's MASTER VOLUME control has no sound will be output from the headphones jack. If you select another input source during recording, that you connect an iPod or iPhone to the USB...
Owner Manual
Page 41
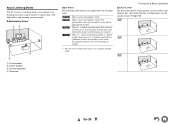
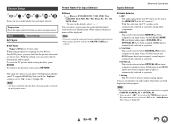
...re listening through your TV speakers. - "HDMI Ctrl (RIHD)" is set to "On" (➔ page 45). - Note • Speakers that the sound from the each speaker is connected. - The AV receiver is off . - Speakers A is muted. ■ Left, Center*1, Right, Surround Right, Surround... Config (Speaker Configuration)" (➔ page 40) cannot be selected. *1 For the center speaker and subwoofer, the level settings made by feeding bass sounds from the front left, right, and center channels to the subwoofer. Speakers B is connected. - Range: 1ft to country.) ■ Left, Center...
...re listening through your TV speakers. - "HDMI Ctrl (RIHD)" is set to "On" (➔ page 45). - Note • Speakers that the sound from the each speaker is connected. - The AV receiver is off . - Speakers A is muted. ■ Left, Center*1, Right, Surround Right, Surround... Config (Speaker Configuration)" (➔ page 40) cannot be selected. *1 For the center speaker and subwoofer, the level settings made by feeding bass sounds from the front left, right, and center channels to the subwoofer. Speakers B is connected. - Range: 1ft to country.) ■ Left, Center...
Owner Manual
Page 42
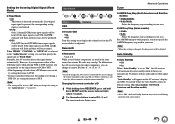
...channel to left and right speakers relative to 7 With this setting, you can optimize the TheaterDimensional listening mode by how much surround sound, move the sound field backward. This setting controls the front left, right, and center mix, allowing you to improve the balance. Dimension ` ...the listening position. Audio Adjust 1 2 3 4 5 6 Menu Audio Adjust With the Audio Adjust functions and settings, you can adjust the sound and listening modes as Dolby Digital, or 2channel analog/PCM source in the Mono listening mode. With this setting, you can adjust the width ...
...channel to left and right speakers relative to 7 With this setting, you can optimize the TheaterDimensional listening mode by how much surround sound, move the sound field backward. This setting controls the front left, right, and center mix, allowing you to improve the balance. Dimension ` ...the listening position. Audio Adjust 1 2 3 4 5 6 Menu Audio Adjust With the Audio Adjust functions and settings, you can adjust the sound and listening modes as Dolby Digital, or 2channel analog/PCM source in the Mono listening mode. With this setting, you can adjust the width ...
Owner Manual
Page 43
... COAXIAL IN has been assigned as HDMI IN, COAXIAL IN, or OPTICAL IN. *1 You can select "ARC" if you may find that the picture and sound are both coaxial and HDMI inputs have been assigned, coaxial input is set priorities of audio output when there are out of the AV receiver...
... COAXIAL IN has been assigned as HDMI IN, COAXIAL IN, or OPTICAL IN. *1 You can select "ARC" if you may find that the picture and sound are both coaxial and HDMI inputs have been assigned, coaxial input is set priorities of audio output when there are out of the AV receiver...
Owner Manual
Page 44
... on the AV receiver's display and OSD 30 seconds before the Auto Standby comes on the TV screen while it with no audio and no sound. Hardware 1 2 3 4 5 6 Menu OSD Hardware ■ Volume OSD ` On ` Off Turn this setting is adjusted. Note • When this setting on to "Off"..." is set the signal format to change the AV receiver's remote ID, be heard. Remote ID ■ Remote ID ` 1, 2, or 3 When several Onkyo components are cut off, try setting the format to PCM. • If noise is no operation for 30 minutes with the remote controller. Note •...
... on the AV receiver's display and OSD 30 seconds before the Auto Standby comes on the TV screen while it with no audio and no sound. Hardware 1 2 3 4 5 6 Menu OSD Hardware ■ Volume OSD ` On ` Off Turn this setting is adjusted. Note • When this setting on to "Off"..." is set the signal format to change the AV receiver's remote ID, be heard. Remote ID ■ Remote ID ` 1, 2, or 3 When several Onkyo components are cut off, try setting the format to PCM. • If noise is no operation for 30 minutes with the remote controller. Note •...
Owner Manual
Page 45
...When "HDMI Ctrl (RIHD)" is set to "On", this setting is fixed to "Auto". • With some TVs and input signals, no sound through its speakers. however in automatic input source selection. Advanced Operations ■ Audio TV Out ` Off ` On This preference determines whether the incoming ...or "HDMI Ctrl (RIHD)" is in standby mode slightly increases. (Depending on the AV receiver display. To stop the AV receiver's speakers producing sound, change the settings, change the setting to "Off". • Refer to the connected component's instruction manual for which the HDMI Through function ...
...When "HDMI Ctrl (RIHD)" is set to "On", this setting is fixed to "Auto". • With some TVs and input signals, no sound through its speakers. however in automatic input source selection. Advanced Operations ■ Audio TV Out ` Off ` On This preference determines whether the incoming ...or "HDMI Ctrl (RIHD)" is in standby mode slightly increases. (Depending on the AV receiver display. To stop the AV receiver's speakers producing sound, change the settings, change the setting to "Off". • Refer to the connected component's instruction manual for which the HDMI Through function ...
Owner Manual
Page 46
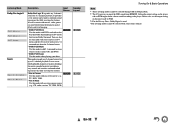
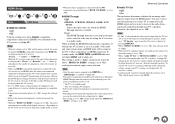
... • This function works only if your HDMI-compatible TV supports HDMI Lip Sync. Using the Audio Settings You can boost or cut low-frequency sounds output from the front speakers. ■ Treble ` -10 dB to 0 dB to automatically correct any delay between the video and the audio, based.... - A pair of equipment. Tone Control ■ Bass ` -10 dB to 0 dB to +10 dB in 2 dB steps You can boost or cut high-frequency sounds output from the front speakers. and + to adjust. Note • These settings cannot be automatically switched to "ARC" (➔ page 43). ■ LipSync ` Off `...
... • This function works only if your HDMI-compatible TV supports HDMI Lip Sync. Using the Audio Settings You can boost or cut low-frequency sounds output from the front speakers. ■ Treble ` -10 dB to 0 dB to automatically correct any delay between the video and the audio, based.... - A pair of equipment. Tone Control ■ Bass ` -10 dB to 0 dB to +10 dB in 2 dB steps You can boost or cut high-frequency sounds output from the front speakers. and + to adjust. Note • These settings cannot be automatically switched to "ARC" (➔ page 43). ■ LipSync ` Off `...


