Owner Manual
Page 1
Following the instructions in the unit. Please retain this manual will enable you for future reference. Contents Introduction 2 Connections 11 Turning On & Basic Operations ......19 Advanced Operations 33 Controlling iPod & Other Components 51 Others 59 En AV Receiver HT-RC260 Instruction Manual Thank you to obtain optimum performance and listening enjoyment from your new AV Receiver. Please read this manual thoroughly before making connections and plugging in this manual for purchasing an Onkyo AV Receiver.
Following the instructions in the unit. Please retain this manual will enable you for future reference. Contents Introduction 2 Connections 11 Turning On & Basic Operations ......19 Advanced Operations 33 Controlling iPod & Other Components 51 Others 59 En AV Receiver HT-RC260 Instruction Manual Thank you to obtain optimum performance and listening enjoyment from your new AV Receiver. Please read this manual thoroughly before making connections and plugging in this manual for purchasing an Onkyo AV Receiver.

Owner Manual
Page 4
...Speaker setup microphone (➔ 23) Remote controller and two batteries (AA/R6) * In catalogs and on packaging, the letter at the AV receiver's remote control sensor, as possible to prevent damage from leak- Aiming the Remote Controller To use the remote controller for Batteries (AA/... prevent damage from leakage or corrosion. age or corrosion. • Remove expired batteries as soon as shown below. Remote control sensor AV receiver Approx. 16 ft. (5 m) En 4 Specifications and operations are the same regardless of color. Supplied Accessories Make sure you intend ...
...Speaker setup microphone (➔ 23) Remote controller and two batteries (AA/R6) * In catalogs and on packaging, the letter at the AV receiver's remote control sensor, as possible to prevent damage from leak- Aiming the Remote Controller To use the remote controller for Batteries (AA/... prevent damage from leakage or corrosion. age or corrosion. • Remove expired batteries as soon as shown below. Remote control sensor AV receiver Approx. 16 ft. (5 m) En 4 Specifications and operations are the same regardless of color. Supplied Accessories Make sure you intend ...

Owner Manual
Page 5
... Panels 7 Front Panel 7 Display 8 Rear Panel 8 Remote Controller 9 Controlling the AV Receiver 9 About Home Theater 10 Enjoying Home Theater 10 Connections Connecting the AV Receiver 11 Connecting Your Speakers 11 About AV Connections 14 Connecting Components with HDMI 15 Connecting External Components 16 Connecting Onkyo V Components 17 Connecting Antenna 17 Which Connections Should I Use 18 Turning...
... Panels 7 Front Panel 7 Display 8 Rear Panel 8 Remote Controller 9 Controlling the AV Receiver 9 About Home Theater 10 Enjoying Home Theater 10 Connections Connecting the AV Receiver 11 Connecting Your Speakers 11 About AV Connections 14 Connecting Components with HDMI 15 Connecting External Components 16 Connecting Onkyo V Components 17 Connecting Antenna 17 Which Connections Should I Use 18 Turning...

Owner Manual
Page 8
..., GAME IN, TV/CD IN) L ZONE 2 LINE OUT jacks M SUBWOOFER PRE OUT jacks N FRONT HIGH OR FRONT WIDE OR ZONE 2 SPEAKERS terminals See "Connecting the AV Receiver" for connection information (➔ 11 to 18). En 8
..., GAME IN, TV/CD IN) L ZONE 2 LINE OUT jacks M SUBWOOFER PRE OUT jacks N FRONT HIGH OR FRONT WIDE OR ZONE 2 SPEAKERS terminals See "Connecting the AV Receiver" for connection information (➔ 11 to 18). En 8

Owner Manual
Page 9
... button (➔ 21) E Arrow R/X/F/S and ENTER buttons F SETUP button (➔ 33) G LISTENING MODE buttons (➔ 28) H DIMMER button (➔ 20) I D J K E L*2 M N*3 F O To control the AV receiver, press RECEIVER to control Onkyo Blu-ray Disc/DVD player, CD player, and other components. For detailed information, see the pages in parentheses. You can also use the remote...
... button (➔ 21) E Arrow R/X/F/S and ENTER buttons F SETUP button (➔ 33) G LISTENING MODE buttons (➔ 28) H DIMMER button (➔ 20) I D J K E L*2 M N*3 F O To control the AV receiver, press RECEIVER to control Onkyo Blu-ray Disc/DVD player, CD player, and other components. For detailed information, see the pages in parentheses. You can also use the remote...

Owner Manual
Page 10
...speakers These speakers are used mainly for Audyssey DSX. They significantly enhance the spatial experience. About Home Theater Enjoying Home Theater Thanks to the AV receiver's superb capabilities, you can enjoy surround sound with a real sense of movement in your listening position. With Blu-ray Discs, you ...can enjoy Dolby Pro Logic IIx, DTS Neo:6, or Onkyo's original DSP listening modes. In movies it close to your subwoofer at the sides of the listener, or slightly behind the listener. H ...
...speakers These speakers are used mainly for Audyssey DSX. They significantly enhance the spatial experience. About Home Theater Enjoying Home Theater Thanks to the AV receiver's superb capabilities, you can enjoy surround sound with a real sense of movement in your listening position. With Blu-ray Discs, you ...can enjoy Dolby Pro Logic IIx, DTS Neo:6, or Onkyo's original DSP listening modes. In movies it close to your subwoofer at the sides of the listener, or slightly behind the listener. H ...

Owner Manual
Page 11
...wiring polarity. If you need to do this automatically (➔ 23) or manually (➔ 35). Attaching the Speaker Cable Labels The AV receiver's positive (+) speaker terminals are all black). In other words, connect positive (+) terminals only to positive (+) terminals, and negative (-) ... ✔ ✔✔ Front high speakers*2 ✔✔✔✔ Front wide speakers*2 *1 If you have contact with the AV receiver's rear panel. No matter how many speakers you use, a powered subwoofer is to match the color of each speaker cable in accordance ...
...wiring polarity. If you need to do this automatically (➔ 23) or manually (➔ 35). Attaching the Speaker Cable Labels The AV receiver's positive (+) speaker terminals are all black). In other words, connect positive (+) terminals only to positive (+) terminals, and negative (-) ... ✔ ✔✔ Front high speakers*2 ✔✔✔✔ Front wide speakers*2 *1 If you have contact with the AV receiver's rear panel. No matter how many speakers you use, a powered subwoofer is to match the color of each speaker cable in accordance ...

Owner Manual
Page 12
..., as shown. • Don't connect more than one cable to the SURR BACK OR FRONT HIGH OR FRONT WIDE L terminals. Doing so may damage the AV receiver. • Don't connect one speaker to each speaker terminal. The following illustration shows which speaker should be connected to several terminals. Connecting the Speaker Cables...
..., as shown. • Don't connect more than one cable to the SURR BACK OR FRONT HIGH OR FRONT WIDE L terminals. Doing so may damage the AV receiver. • Don't connect one speaker to each speaker terminal. The following illustration shows which speaker should be connected to several terminals. Connecting the Speaker Cables...

Owner Manual
Page 13
...terminal posts connect to the front speakers' tweeter terminals. • Once you've completed the bi-amping connections shown below and turned on the AV receiver, you 're using an external amplifier, connect the SUBWOOFER PRE OUT jack to your powered subwoofer, as shown. Connecting a Powered Subwoofer Using ...a suitable cable, connect the AV receiver's SUBWOOFER PRE OUT jack to the FRONT HIGH OR FRONT WIDE OR ZONE 2 SPEAKERS terminals. En 13 When doing so, set "Front ...
...terminal posts connect to the front speakers' tweeter terminals. • Once you've completed the bi-amping connections shown below and turned on the AV receiver, you 're using an external amplifier, connect the SUBWOOFER PRE OUT jack to your powered subwoofer, as shown. Connecting a Powered Subwoofer Using ...a suitable cable, connect the AV receiver's SUBWOOFER PRE OUT jack to the FRONT HIGH OR FRONT WIDE OR ZONE 2 SPEAKERS terminals. En 13 When doing so, set "Front ...
Owner Manual
Page 14
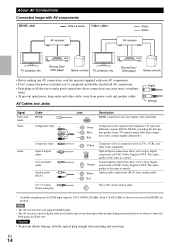
... connections allow you to enjoy digital sound such as optical. L White Analog audio connections (RCA) carry analog audio. Note • The AV receiver does not support SCART plugs. • The AV receiver's optical digital jacks have shutter-type covers that open when an optical plug is commonly used on TVs, VCRs, and V Yellow other...
... connections allow you to enjoy digital sound such as optical. L White Analog audio connections (RCA) carry analog audio. Note • The AV receiver does not support SCART plugs. • The AV receiver's optical digital jacks have shutter-type covers that open when an optical plug is commonly used on TVs, VCRs, and V Yellow other...
Owner Manual
Page 15
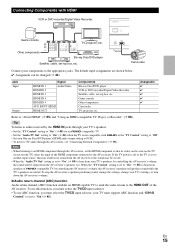
...Other components Camcorder TV, projector, etc. En 15 The default input assignments are muted. Tip To listen to audio received by controlling the AV receiver's volume, the AV receiver's speakers will be seen on the TV screen (on the TV, select the input of Q-compatible TV, by... VCR or DVD recorder/Digital Video Recorder Game console TV, projector, etc. Note • When listening to an HDMI component through the AV receiver, see "Connecting External Components" (➔ 16). Camcorder Connect your components to the appropriate jacks. Connecting Components with Q or the "TV...
...Other components Camcorder TV, projector, etc. En 15 The default input assignments are muted. Tip To listen to audio received by controlling the AV receiver's volume, the AV receiver's speakers will be seen on the TV screen (on the TV, select the input of Q-compatible TV, by... VCR or DVD recorder/Digital Video Recorder Game console TV, projector, etc. Note • When listening to an HDMI component through the AV receiver, see "Connecting External Components" (➔ 16). Camcorder Connect your components to the appropriate jacks. Connecting Components with Q or the "TV...

Owner Manual
Page 16
... INPUT AUDIO jacks and AUX INPUT LINE IN jack at the same time, AUX INPUT LINE IN jack will be given a higher priority. • The AV receiver can be sure to connect the main stereo. ■ How to the HDMI OUT. You can enjoy Dolby Digital and DTS. (To record or listen... your turntable has a moving coil (MC) type cartridge, you 'll need a commercially available MC head amp or MC transformer as well as well, use the AV receiver's display when changing settings. If your TV is connected to record the video En • With the connections described above, you are shown below. ✔...
... INPUT AUDIO jacks and AUX INPUT LINE IN jack at the same time, AUX INPUT LINE IN jack will be given a higher priority. • The AV receiver can be sure to connect the main stereo. ■ How to the HDMI OUT. You can enjoy Dolby Digital and DTS. (To record or listen... your turntable has a moving coil (MC) type cartridge, you 'll need a commercially available MC head amp or MC transformer as well as well, use the AV receiver's display when changing settings. If your TV is connected to record the video En • With the connections described above, you are shown below. ✔...
Owner Manual
Page 17
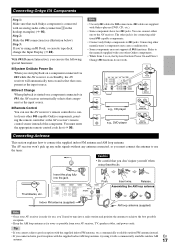
... section explains how to use the tuner. You can use the AV receiver's remote controller to control your other V-capable Onkyo components, pointing the remote controller at the AV receiver's remote control sensor instead of the component. Push. Connecting Onkyo V Components Step 1: Make sure that each Onkyo component is ready for use, you'll need to tune...
... section explains how to use the tuner. You can use the AV receiver's remote controller to control your other V-capable Onkyo components, pointing the remote controller at the AV receiver's remote control sensor instead of the component. Push. Connecting Onkyo V Components Step 1: Make sure that each Onkyo component is ready for use, you'll need to tune...

Owner Manual
Page 18
...And if no component video signal being upconverted for component video only, regardless of priority: HDMI, component video, composite video. Composite AV receiver Composite Component IN MONITOR OUT Component HDMI HDMI TV, projector, etc. Video Signal Flow Chart Blu-ray Disc/DVD player, etc.... be selected automatically in the following sections as no component video input is connected to the input selector, that the AV receiver does not convert digital input signals for compatibility with composite video and component video sources all being present. Video input...
...And if no component video signal being upconverted for component video only, regardless of priority: HDMI, component video, composite video. Composite AV receiver Composite Component IN MONITOR OUT Component HDMI HDMI TV, projector, etc. Video Signal Flow Chart Blu-ray Disc/DVD player, etc.... be selected automatically in the following sections as no component video input is connected to the input selector, that the AV receiver does not convert digital input signals for compatibility with composite video and component video sources all being present. Video input...

Owner Manual
Page 19
To prevent any loud surprises when you turn on the AV receiver, always turn down the volume before you turn it off . En 19 Turning On/Off the AV Receiver ON/STANDBY STANDBY indicator ON/STANDBY RECEIVER Front panel Remote controller Turning On Press ON/STANDBY on the front panel or the remote controller. The AV receiver comes on the remote controller. The AV receiver will enter Standby mode. Turning Off Press ON/STANDBY on the front panel. or Press RECEIVER followed by ON/STANDBY on , the display lights, and the STANDBY indicator goes off .
To prevent any loud surprises when you turn on the AV receiver, always turn down the volume before you turn it off . En 19 Turning On/Off the AV Receiver ON/STANDBY STANDBY indicator ON/STANDBY RECEIVER Front panel Remote controller Turning On Press ON/STANDBY on the front panel or the remote controller. The AV receiver comes on the remote controller. The AV receiver will enter Standby mode. Turning Off Press ON/STANDBY on the front panel. or Press RECEIVER followed by ON/STANDBY on , the display lights, and the STANDBY indicator goes off .

Owner Manual
Page 20
... by DISPLAY repeatedly to the Radio" (➔ 25) 3 To adjust the volume, use the AV receiver's DISPLAY. Playing the Connected Component ■ Operating on the AV receiver 1 Use the input selector buttons to the UNIVERSAL PORT jack are displayed. *2 If the input signal is ...source is connected to the Radio" (➔ 25) 3 To adjust the volume, use the AV receiver's display when changing settings. The following information can adjust the brightness of the AV receiver's display. Information is displayed for about the current input source as follows. (Components connected to ...
... by DISPLAY repeatedly to the Radio" (➔ 25) 3 To adjust the volume, use the AV receiver's DISPLAY. Playing the Connected Component ■ Operating on the AV receiver 1 Use the input selector buttons to the UNIVERSAL PORT jack are displayed. *2 If the input signal is ...source is connected to the Radio" (➔ 25) 3 To adjust the volume, use the AV receiver's display when changing settings. The following information can adjust the brightness of the AV receiver's display. Information is displayed for about the current input source as follows. (Components connected to ...

Owner Manual
Page 21
...), this setting cannot be selected. • When the listening mode that doesn't support front high, front wide or surround back speakers is set the AV receiver to select the desired input source. Press ENTER to switch to 10 minutes in the following items: "Audio", "Video", and "Tuner". ` Input*4*5... You can select the input source while viewing the information as follows: the name of the AV receiver. Using the Audio and Video Menus By pressing AUDIO or VIDEO, you can set to make the desired selection. ` Audio*1 You can change the...
...), this setting cannot be selected. • When the listening mode that doesn't support front high, front wide or surround back speakers is set the AV receiver to select the desired input source. Press ENTER to switch to 10 minutes in the following items: "Audio", "Video", and "Tuner". ` Input*4*5... You can select the input source while viewing the information as follows: the name of the AV receiver. Using the Audio and Video Menus By pressing AUDIO or VIDEO, you can set to make the desired selection. ` Audio*1 You can change the...
Owner Manual
Page 22
...). But even if not, the component name may be displayed if the AV receiver receives it is set to "Off", the "Dynamic Volume" setting will be set to change the input display. Changing the Input Display When you connect an V-capable Onkyo component, you must configure the input display so that V can be selected...
...). But even if not, the component name may be displayed if the AV receiver receives it is set to "Off", the "Dynamic Volume" setting will be set to change the input display. Changing the Input Display When you connect an V-capable Onkyo component, you must configure the input display so that V can be selected...

Owner Manual
Page 23
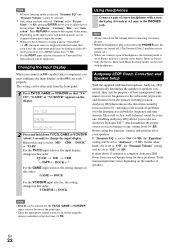
... at the Main Listening Position 1, and connect it away from this will enjoy, Audyssey 2EQ takes measurements at up test tones which the AV receiver is connected to the HDMI OUT. The distances from talking during measurements as possible. If your TV is connected. 1 Turn on a ... the subwoofer. Position the microphone at ear height of headphones is connected to the MONITOR OUT V or the COMPONENT VIDEO OUT, use the AV receiver's display when changing settings. 3 When you've finished making the settings, press ENTER. 2EQ: Auto Setup Speakers Type Speaker Terminal Assign Front...
... at the Main Listening Position 1, and connect it away from this will enjoy, Audyssey 2EQ takes measurements at up test tones which the AV receiver is connected to the HDMI OUT. The distances from talking during measurements as possible. If your TV is connected. 1 Turn on a ... the subwoofer. Position the microphone at ear height of headphones is connected to the MONITOR OUT V or the COMPONENT VIDEO OUT, use the AV receiver's display when changing settings. 3 When you've finished making the settings, press ENTER. 2EQ: Auto Setup Speakers Type Speaker Terminal Assign Front...

Owner Manual
Page 24
... of the first measurement. "No" means that of speakers detected was different from that no speaker was detected. Refer to your Onkyo dealer. • Speaker Detect Error This message appears if a speaker is not detected. Subwoofer Front Center Surround Front Wide Front High.... En 24 Retry Cancel Error message 7 Use R/X to the settings found during Audyssey 2EQ Room Correction and Speaker Setup. • If the AV receiver is too high. Review Speaker Configuration - - Check the speaker connection. • Writing Error! Try saving again. If this procedure simply by...
... of the first measurement. "No" means that of speakers detected was different from that no speaker was detected. Refer to your Onkyo dealer. • Speaker Detect Error This message appears if a speaker is not detected. Subwoofer Front Center Surround Front Wide Front High.... En 24 Retry Cancel Error message 7 Use R/X to the settings found during Audyssey 2EQ Room Correction and Speaker Setup. • If the AV receiver is too high. Review Speaker Configuration - - Check the speaker connection. • Writing Error! Try saving again. If this procedure simply by...


