
Owner Manual
Page 5
...Control Codes 125 Remote Control Codes for Onkyo Components Connected via V 126 Resetting REMOTE MODE Buttons 126 Resetting the Remote Controller 126 Controlling a TV 127 Controlling a DVD Player, or DVD Recorder .......... 128 Controlling a VCR or PVR 129 Controlling a Satellite Receiver or Cable Receiver ....... 130 Controlling a CD Player, CD Recorder, or MD Recorder...... 131 Controlling an RI Dock 132 Controlling a Cassette Recorder 133 Activities Setup 134 Learning Commands 136 Using Normal Macros 137 Others Troubleshooting 138 Specifications (TX-NR807 144 Specifications (HT...
...Control Codes 125 Remote Control Codes for Onkyo Components Connected via V 126 Resetting REMOTE MODE Buttons 126 Resetting the Remote Controller 126 Controlling a TV 127 Controlling a DVD Player, or DVD Recorder .......... 128 Controlling a VCR or PVR 129 Controlling a Satellite Receiver or Cable Receiver ....... 130 Controlling a CD Player, CD Recorder, or MD Recorder...... 131 Controlling an RI Dock 132 Controlling a Cassette Recorder 133 Activities Setup 134 Learning Commands 136 Using Normal Macros 137 Others Troubleshooting 138 Specifications (TX-NR807 144 Specifications (HT...
Owner Manual
Page 6
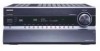
...; 5 HDMI*5 Inputs and 1 Output (HT-RC180) • Onkyo for System Control • 6 Digital Inputs (3 Optical/3 Coaxial) • Universal Port for UP-A1 (Dock for Loudness Correction • Audyssey Dynamic Volume™*9 • Crossover Adjustment (40/50/60/70/80/90/100/120/150/200 Hz) • A/V Sync Control Function (up to 250 ms) • Bi-Directional Preprogrammed (with onscreen dis- els) • Dual Subwoofer Pre Out • SIRIUS*8 Satellite Radio Connectivity (TX-NR807: North American models) • Banana Plug-Compatible Speaker...
...; 5 HDMI*5 Inputs and 1 Output (HT-RC180) • Onkyo for System Control • 6 Digital Inputs (3 Optical/3 Coaxial) • Universal Port for UP-A1 (Dock for Loudness Correction • Audyssey Dynamic Volume™*9 • Crossover Adjustment (40/50/60/70/80/90/100/120/150/200 Hz) • A/V Sync Control Function (up to 250 ms) • Bi-Directional Preprogrammed (with onscreen dis- els) • Dual Subwoofer Pre Out • SIRIUS*8 Satellite Radio Connectivity (TX-NR807: North American models) • Banana Plug-Compatible Speaker...

Owner Manual
Page 9
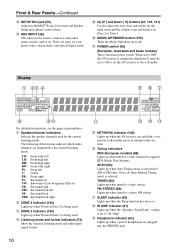
... used when turn on Zone 2. O LEVEL button (121) Used when adjusting the volume level of stereo headphones for use with video games. Re-EQ button (HT-RC180) (105) Used to turn off . R DIMMER button (62) (North American and Taiwan models) This button is used when storing or deleting radio presets. V SETUP button This button is used to return to the previously displayed onscreen setup menu. 9 The [ZONE 3] button is used when turn on the connected TV. P MONITOR OUT button (TX-NR807) (43) Used to select the Auto or Manual tuning mode. GAME button Selects the listening...
... used when turn on Zone 2. O LEVEL button (121) Used when adjusting the volume level of stereo headphones for use with video games. Re-EQ button (HT-RC180) (105) Used to turn off . R DIMMER button (62) (North American and Taiwan models) This button is used when storing or deleting radio presets. V SETUP button This button is used to return to the previously displayed onscreen setup menu. 9 The [ZONE 3] button is used when turn on the connected TV. P MONITOR OUT button (TX-NR807) (43) Used to select the Auto or Manual tuning mode. GAME button Selects the listening...
Owner Manual
Page 10
L M NO F NETWORK indicator (108) Lights up when Auto Tuning mode is completely shutdown. AUTO (66): Lights up when the AV receiver can be set to ON to set to adjust the tone (bass and treble) for the main room and the volume, tone and balance for composite video, analog audio, and optical digital audio. Goes off . FM STEREO (66): Lights up when a pair of headphones are plugged into the PHONES jack. 10 Y AUX INPUT (36) This input can establish a connection to a stereo FM station. " POWER switch (42...
L M NO F NETWORK indicator (108) Lights up when Auto Tuning mode is completely shutdown. AUTO (66): Lights up when the AV receiver can be set to ON to set to adjust the tone (bass and treble) for the main room and the volume, tone and balance for composite video, analog audio, and optical digital audio. Goes off . FM STEREO (66): Lights up when a pair of headphones are plugged into the PHONES jack. 10 Y AUX INPUT (36) This input can establish a connection to a stereo FM station. " POWER switch (42...

Owner Manual
Page 12
... jack to pass IR (infrared) remote control signals through to use the AV receiver solely as a preamplifier. X DVD/BD IN Here you can be connected to the line inputs on amplifiers in Zone 2 and Zone 3. J HDMI IN 1-6 and OUT (TX-NR807) HDMI IN 1-5 and OUT (HT-RC180) HDMI (High Definition Multimedia Interface) connections carry digital audio and digital video. I MONITOR OUT These S-Video and composite video jacks should be connected to a video input on , a 12-volt trigger signal is output. 12 P AC INLET The supplied power...
... jack to pass IR (infrared) remote control signals through to use the AV receiver solely as a preamplifier. X DVD/BD IN Here you can be connected to the line inputs on amplifiers in Zone 2 and Zone 3. J HDMI IN 1-6 and OUT (TX-NR807) HDMI IN 1-5 and OUT (HT-RC180) HDMI (High Definition Multimedia Interface) connections carry digital audio and digital video. I MONITOR OUT These S-Video and composite video jacks should be connected to a video input on , a 12-volt trigger signal is output. 12 P AC INLET The supplied power...

Owner Manual
Page 18
... should attach them to the positive (+) side of the speaker terminal. Then all black). If your powered subwoofer, as shown. Connecting the AV receiver Connecting Your Speakers Speaker Configuration For 7.1-channel surround-sound playback, you need to do this automatically (see page 54) or manually (see page 85). You can do is unpowered and you're using an external amplifier, connect the PRE OUT: SUBWOOFER to an input on the amp.
... should attach them to the positive (+) side of the speaker terminal. Then all black). If your powered subwoofer, as shown. Connecting the AV receiver Connecting Your Speakers Speaker Configuration For 7.1-channel surround-sound playback, you need to do this automatically (see page 54) or manually (see page 85). You can do is unpowered and you're using an external amplifier, connect the PRE OUT: SUBWOOFER to an input on the amp.

Owner Manual
Page 25
... no picture.) The AV receiver uses HDCP (High-bandwidth Digital Content Protection)*2, so only HDCP-compatible components can carry control signals, digital video, and up to three. Cable/Satellite Set-top box is up to 7.1 ch, 32-192 kHz, 16/20/24 bit) • Bitstream (DSD, Dolby Digital, Dolby Digital Plus, Dolby TrueHD, DTS, DTS-HD High Resolution Audio, DTS- b. c. It's designed to protect video content and requires a HDCP-compatible device to connect AV components. tion with components other AV receiver /AV amplifier via HDMI must also support HDMI output of...
... no picture.) The AV receiver uses HDCP (High-bandwidth Digital Content Protection)*2, so only HDCP-compatible components can carry control signals, digital video, and up to three. Cable/Satellite Set-top box is up to 7.1 ch, 32-192 kHz, 16/20/24 bit) • Bitstream (DSD, Dolby Digital, Dolby Digital Plus, Dolby TrueHD, DTS, DTS-HD High Resolution Audio, DTS- b. c. It's designed to protect video content and requires a HDCP-compatible device to connect AV components. tion with components other AV receiver /AV amplifier via HDMI must also support HDMI output of...

Owner Manual
Page 26
... no sound from the AV receiver's speakers, too. See "Video Connection Formats (TX-NR807)" on page 27 and "Video Connection Formats (HT-RC180)" on . In addition, video signals from your DVD/BD player's HDMI audio output setting to the connected component's instruction manual for the HDMI output. Connecting the AV receiver-Continued Making HDMI Connections Step 1: Use HDMI cables to connect the AV receiver's HDMI jacks to the AV receiver). To listen to audio received by controlling the AV receiver's volume, the AV receiver's speak- Step 2: Assign each HDMI IN to an input...
... no sound from the AV receiver's speakers, too. See "Video Connection Formats (TX-NR807)" on page 27 and "Video Connection Formats (HT-RC180)" on . In addition, video signals from your DVD/BD player's HDMI audio output setting to the connected component's instruction manual for the HDMI output. Connecting the AV receiver-Continued Making HDMI Connections Step 1: Use HDMI cables to connect the AV receiver's HDMI jacks to the AV receiver). To listen to audio received by controlling the AV receiver's volume, the AV receiver's speak- Step 2: Assign each HDMI IN to an input...

Owner Manual
Page 41
... Auto Power On/Standby and Direct Change V functions do not work. Step 1: Connect the supplied power cord to the manuals supplied with your other Onkyo components. • While Zone 2 or Zone 3 is a problem, plug the AV receiver into a different branch circuit. • Do not use the AV receiver's remote controller to control your other V-capable Onkyo components, pointing the remote controller at the AV receiver's remote control sensor instead of your speakers and AV components. • Turning on the AV receiver may cause a momentary power surge that each Onkyo component is on Standby...
... Auto Power On/Standby and Direct Change V functions do not work. Step 1: Connect the supplied power cord to the manuals supplied with your other Onkyo components. • While Zone 2 or Zone 3 is a problem, plug the AV receiver into a different branch circuit. • Do not use the AV receiver's remote controller to control your other V-capable Onkyo components, pointing the remote controller at the AV receiver's remote control sensor instead of your speakers and AV components. • Turning on the AV receiver may cause a momentary power surge that each Onkyo component is on Standby...

Owner Manual
Page 44
...; 5 Press the [SETUP] button. The "OSD Setup" menu appears. 6-2. OSD Setup Immediate Display Display Position TV Format Language On Bottom Auto English ENTER SETUP RECEIVER RXFS 1 Press the [RECEIVER] button, followed by using its [SETUP] button, arrow buttons, and [ENTER] button. • (HT-RC180) The onscreen setup menus appear only on your TV is connected to the composite video or S-Video MONITOR OUT, or the COMPONENT VIDEO MONITOR OUT, use the Left and Right [F]/ [S] buttons to the HDMI OUT. Menu 1. Audio Adjust 4. Source Setup 5. neous", and...
...; 5 Press the [SETUP] button. The "OSD Setup" menu appears. 6-2. OSD Setup Immediate Display Display Position TV Format Language On Bottom Auto English ENTER SETUP RECEIVER RXFS 1 Press the [RECEIVER] button, followed by using its [SETUP] button, arrow buttons, and [ENTER] button. • (HT-RC180) The onscreen setup menus appear only on your TV is connected to the composite video or S-Video MONITOR OUT, or the COMPONENT VIDEO MONITOR OUT, use the Left and Right [F]/ [S] buttons to the HDMI OUT. Menu 1. Audio Adjust 4. Source Setup 5. neous", and...

Owner Manual
Page 49
... output from composite video, S-Video, and component video sources. 5 Press the [SETUP] button. Digital Audio Input 3 Use the Up and Down [R]/[X] but - Component Video Input", and then press [ENTER]. The "Component Video Input" menu appears. 1-3. Notes: • (TX-NR807) For composite video and S-Video upconversion for the COMPONENT VIDEO MONITOR OUT, the "Monitor Out" setting must be set to "Analog" (see page 28). • If you connect an input component (such as UP-A1 series Dock that seated iPod) to the UNIVERSAL PORT jack, you cannot assign any input to PORT...
... output from composite video, S-Video, and component video sources. 5 Press the [SETUP] button. Digital Audio Input 3 Use the Up and Down [R]/[X] but - Component Video Input", and then press [ENTER]. The "Component Video Input" menu appears. 1-3. Notes: • (TX-NR807) For composite video and S-Video upconversion for the COMPONENT VIDEO MONITOR OUT, the "Monitor Out" setting must be set to "Analog" (see page 28). • If you connect an input component (such as UP-A1 series Dock that seated iPod) to the UNIVERSAL PORT jack, you cannot assign any input to PORT...

Owner Manual
Page 81
...; Dolby PLIIx Music Use this mode with any stereo or Dolby Surround (Pro Logic) music source (e.g., CD, radio, cassette, TV, VHS, DVD). • Dolby PLIIx Game Use this mode with DVDs that fully envelops the listener. Dolby Pro Logic IIz Height can be used . • Available sampling rate for 7.1-channel playback. Dolby Digital Use this mode with video games, especially those that adds new speakers to upmix a variety of sources from the input source is output directly with PCM multichannel sources. Dolby Pro...
...; Dolby PLIIx Music Use this mode with any stereo or Dolby Surround (Pro Logic) music source (e.g., CD, radio, cassette, TV, VHS, DVD). • Dolby PLIIx Game Use this mode with DVDs that fully envelops the listener. Dolby Pro Logic IIz Height can be used . • Available sampling rate for 7.1-channel playback. Dolby Digital Use this mode with video games, especially those that adds new speakers to upmix a variety of sources from the input source is output directly with PCM multichannel sources. Dolby Pro...

Owner Manual
Page 91
... selected when the mix level of the soundstage when using Audyssey Dynamic Surround Expansion. This setting should be selected for content that level you cannot change the settings before completing Audyssey MultEQ® Room Correction and Speaker Setup. Advanced Setup-Continued Audyssey For Dynamic EQ, Reference Level and Dynamic Volume, you can hear the mix as the mixers heard it was created at any volume level-not just at reference level. A home theater system automatically calibrated...
... selected when the mix level of the soundstage when using Audyssey Dynamic Surround Expansion. This setting should be selected for content that level you cannot change the settings before completing Audyssey MultEQ® Room Correction and Speaker Setup. Advanced Setup-Continued Audyssey For Dynamic EQ, Reference Level and Dynamic Volume, you can hear the mix as the mixers heard it was created at any volume level-not just at reference level. A home theater system automatically calibrated...
Owner Manual
Page 102
... connected to UNIVERSAL PORT jack. 102 To link the power functions of -compatible components connected via NET You can update the AV receiver's firmware. Refer to Standby and then turn them on page 113. Receiver via NET You can update the Onkyo dock's firmware. Check the network connection before update. Note: • This update shall not be performed when no dock is made up of the versions of equipment to the User's Manuals for details. Off: TV Control...
... connected to UNIVERSAL PORT jack. 102 To link the power functions of -compatible components connected via NET You can update the AV receiver's firmware. Refer to Standby and then turn them on page 113. Receiver via NET You can update the Onkyo dock's firmware. Check the network connection before update. Note: • This update shall not be performed when no dock is made up of the versions of equipment to the User's Manuals for details. Off: TV Control...

Owner Manual
Page 105
...This function can be used with the following listening modes: THX Cinema, THX Surround EX, and THX Select2 Cinema. This function can be set using the [MUSIC OPTIMIZER] button on . However, in THX listening mode, when the AV receiver is turned off . Music Optimizer Off: Music Optimizer off (default). On: Re-EQ (THX) Function on page 91. Audyssey Dynamic Volume™ Dynamic Volume See "Dynamic Volume" of "Audio Adjust" on (default). The setting is stored individually for each listening mode. Note: The Music Optimizer function only works with PCM digital audio input signals with...
...This function can be used with the following listening modes: THX Cinema, THX Surround EX, and THX Select2 Cinema. This function can be set using the [MUSIC OPTIMIZER] button on . However, in THX listening mode, when the AV receiver is turned off . Music Optimizer Off: Music Optimizer off (default). On: Re-EQ (THX) Function on page 91. Audyssey Dynamic Volume™ Dynamic Volume See "Dynamic Volume" of "Audio Adjust" on (default). The setting is stored individually for each listening mode. Note: The Music Optimizer function only works with PCM digital audio input signals with...

Owner Manual
Page 116
... Connecting Your Zone 2 Speakers Directly to the AV receiver This setup allows 5.1-channel playback in your main listening room and 2-channel stereo playback in Zone 2, with a different source in Zone 2. Main room AV receiver TV AV receiver Zone 2 R Zone 2 IN R L Receiver/ integrated amp Note: With the default settings, the Zone 2 volume must set the Zone 2 volume on the AV receiver (see page 118). Connecting this setup, the Zone 2 volume is turned on the Zone 2 amp. This is turned off as we call Multi Zone. Zone 2 12V Trigger (TX-NR807) When Zone 2 is controlled...
... Connecting Your Zone 2 Speakers Directly to the AV receiver This setup allows 5.1-channel playback in your main listening room and 2-channel stereo playback in Zone 2, with a different source in Zone 2. Main room AV receiver TV AV receiver Zone 2 R Zone 2 IN R L Receiver/ integrated amp Note: With the default settings, the Zone 2 volume must set the Zone 2 volume on the AV receiver (see page 118). Connecting this setup, the Zone 2 volume is turned on the Zone 2 amp. This is turned off as we call Multi Zone. Zone 2 12V Trigger (TX-NR807) When Zone 2 is controlled...

Owner Manual
Page 128
...audio formats (e.g., Dolby Digital or DTS). For details on a DVD changer. Then, with the AV receiver's remote controller, you can control your player with the random playback function. Q MENU button Displays a DVD's menu. Controlling Other Components-Continued Controlling a DVD Player, or DVD Recorder By pressing the REMOTE MODE button that supports the *1. J REPEAT button Used with a built-in tuner. If controlling your component via HDMI. T RANDOM button* Used with the following buttons. B ON, STANDBY buttons Sets the DVD player to On or Standby. ent component...
...audio formats (e.g., Dolby Digital or DTS). For details on a DVD changer. Then, with the AV receiver's remote controller, you can control your player with the random playback function. Q MENU button Displays a DVD's menu. Controlling Other Components-Continued Controlling a DVD Player, or DVD Recorder By pressing the REMOTE MODE button that supports the *1. J REPEAT button Used with a built-in tuner. If controlling your component via HDMI. T RANDOM button* Used with the following buttons. B ON, STANDBY buttons Sets the DVD player to On or Standby. ent component...

Owner Manual
Page 138
... the volume. If the AV receiver turns off as soon as an AM radio station or mono TV program, the sound is concentrated in the center speaker. • In the Mono listening mode, only the front speakers output sound if the "Output Speaker" setting is connected to the composite video or S-Video MONITOR OUT, or the COMPONENT VIDEO MONITOR OUT, use all compo- Disconnect all listening modes use the AV receiver's display when changing settings. Note that the power cord is correct, and that the bare wires...
... the volume. If the AV receiver turns off as soon as an AM radio station or mono TV program, the sound is concentrated in the center speaker. • In the Mono listening mode, only the front speakers output sound if the "Output Speaker" setting is connected to the composite video or S-Video MONITOR OUT, or the COMPONENT VIDEO MONITOR OUT, use all compo- Disconnect all listening modes use the AV receiver's display when changing settings. Note that the power cord is correct, and that the bare wires...

Owner Manual
Page 139
... selected (pages 75-80). The center speaker produces no sound • When the DTS Surround Sensation or Stereo listening mode is selected, the center speaker produces no sound. • Make sure the speakers are configured correctly (page 85). stream stops, the AV receiver remains in the LFE channel, the subwoofer may hear noise. • When playing DTS program material, using the pause, fast forward, or fast reverse function on your player is set as those that support DVD, the default setting...
... selected (pages 75-80). The center speaker produces no sound • When the DTS Surround Sensation or Stereo listening mode is selected, the center speaker produces no sound. • Make sure the speakers are configured correctly (page 85). stream stops, the AV receiver remains in the LFE channel, the subwoofer may hear noise. • When playing DTS program material, using the pause, fast forward, or fast reverse function on your player is set as those that support DVD, the default setting...

Owner Manual
Page 142
...; When a pair of a hub. Before you want to select "Main" or "Sub" (page 89). ing mode is turned on the "Audio Adjust" menu to set , press the [SETUP] button. 2. The functions Auto Power On/Standby and Direct Change don't work for components connected via V • These functions don't work • To use a switch instead of headphones is connected, the listening mode is compatible with the AV receiver (page 112). • If you download or copy large files on your computer, playback...
...; When a pair of a hub. Before you want to select "Main" or "Sub" (page 89). ing mode is turned on the "Audio Adjust" menu to set , press the [SETUP] button. 2. The functions Auto Power On/Standby and Direct Change don't work for components connected via V • These functions don't work • To use a switch instead of headphones is connected, the listening mode is compatible with the AV receiver (page 112). • If you download or copy large files on your computer, playback...


