
Owners Manual -English
Page 1
... reference. Please read this manual thoroughly before making connections and plugging in this manual for purchasing an Onkyo 5.1ch Home Theater System. Following the instructions in the unit. 5.1ch Home Theater System HT-S3300 AV Receiver (HT-R380) Speaker Package (HTP-380) Front Speakers (SKF-380 L/R) Center Speaker (SKC-380/SKC-380C) Surround Speakers (SKR...
... reference. Please read this manual thoroughly before making connections and plugging in this manual for purchasing an Onkyo 5.1ch Home Theater System. Following the instructions in the unit. 5.1ch Home Theater System HT-S3300 AV Receiver (HT-R380) Speaker Package (HTP-380) Front Speakers (SKF-380 L/R) Center Speaker (SKC-380/SKC-380C) Surround Speakers (SKR...
Owners Manual -English
Page 3
...AC fuse inside this unit for a long time, it 's for a Class B digital device, pursuant to radio or television reception, which the receiver is illegal without the permission of mild detergent and water. The power cord plug is used in a particular installation. NOTE: This equipment has been ...sunshine, fire or the like. 7. However, there is no guarantee that to which can be exposed to correct the interference by your Onkyo dealer. 8. If this unit from earphones and headphones can radiate radio frequency energy and, if not installed and used to disconnect this ...
...AC fuse inside this unit for a long time, it 's for a Class B digital device, pursuant to radio or television reception, which the receiver is illegal without the permission of mild detergent and water. The power cord plug is used in a particular installation. NOTE: This equipment has been ...sunshine, fire or the like. 7. However, there is no guarantee that to which can be exposed to correct the interference by your Onkyo dealer. 8. If this unit from earphones and headphones can radiate radio frequency energy and, if not installed and used to disconnect this ...
Owners Manual -English
Page 4
... 7. Note that discoloration can handle the specified input power when used in which neutralizes the magnetic field, thereby removing any of the following items: AV Receiver HT-R380 HT-R380 (➔ 7) Remote controller and two batteries (AA/R6) (➔ 5) Indoor FM antenna (➔ 18) AM loop antenna (➔ 18) * In catalogs and on . 4. Speaker Precautions...
... 7. Note that discoloration can handle the specified input power when used in which neutralizes the magnetic field, thereby removing any of the following items: AV Receiver HT-R380 HT-R380 (➔ 7) Remote controller and two batteries (AA/R6) (➔ 5) Indoor FM antenna (➔ 18) AM loop antenna (➔ 18) * In catalogs and on . 4. Speaker Precautions...

Owners Manual -English
Page 5
... Front & Rear Panels 7 Speaker Package 9 Remote Controller 10 About Home Theater 11 Connections Connecting the AV Receiver 12 Turning On & Basic Operations Turning On/Off the AV Receiver 20 Basic Operations 21 Listening to the Radio 23 Recording 26 Using the Listening Modes 27 Advanced Operations Advanced Setup...51 About HDMI 53 Using an RIHD-compatible TV, Player, or Recorder ... 54 To reset the AV receiver to its factory defaults, turn it at the AV receiver's remote control sensor, as possible to prevent damage from leak- Using the Remote Controller Contents Installing the ...
... Front & Rear Panels 7 Speaker Package 9 Remote Controller 10 About Home Theater 11 Connections Connecting the AV Receiver 12 Turning On & Basic Operations Turning On/Off the AV Receiver 20 Basic Operations 21 Listening to the Radio 23 Recording 26 Using the Listening Modes 27 Advanced Operations Advanced Setup...51 About HDMI 53 Using an RIHD-compatible TV, Player, or Recorder ... 54 To reset the AV receiver to its factory defaults, turn it at the AV receiver's remote control sensor, as possible to prevent damage from leak- Using the Remote Controller Contents Installing the ...
Owners Manual -English
Page 6
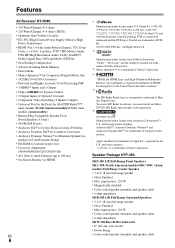
...; 192 kHz/24-bit D/A Converters • Powerful and Highly Accurate 32-bit Processing DSP • 3 HDMI*4 Inputs and 1 Output • Onkyo Q for System Control • 3 Digital Inputs (2 Optical/1 Coaxial) • Component Video Switching (2 Inputs/1 Output) • Universal Port for ... models)/SKC-380C (Asian models) Full-Range Center Speaker • 3-1/4" (8 cm) full-range speaker • Gloss Finished • Max. Features AV Receiver HT-R380 • 110 Watts/Channel @ 6 ohms • 120 Watts/Channel @ 6 ohms (JEITA) • Optimum Gain Volume Circuitry • H.C.P.S. (High...
...; 192 kHz/24-bit D/A Converters • Powerful and Highly Accurate 32-bit Processing DSP • 3 HDMI*4 Inputs and 1 Output • Onkyo Q for System Control • 3 Digital Inputs (2 Optical/1 Coaxial) • Component Video Switching (2 Inputs/1 Output) • Universal Port for ... models)/SKC-380C (Asian models) Full-Range Center Speaker • 3-1/4" (8 cm) full-range speaker • Gloss Finished • Max. Features AV Receiver HT-R380 • 110 Watts/Channel @ 6 ohms • 120 Watts/Channel @ 6 ohms (JEITA) • Optimum Gain Volume Circuitry • H.C.P.S. (High...

Owners Manual -English
Page 8
... video and analog audio jacks (BD/DVD IN, VCR/DVR IN and OUT, CBL/SAT IN, GAME IN, TV/CD IN) See "Connecting the AV Receiver" for connection information (➔ 12 to 19). En 8
... video and analog audio jacks (BD/DVD IN, VCR/DVR IN and OUT, CBL/SAT IN, GAME IN, TV/CD IN) See "Connecting the AV Receiver" for connection information (➔ 12 to 19). En 8

Owners Manual -English
Page 10
... 22) F Arrow R/X/F/S and ENTER buttons G SETUP button (➔ 30) H LISTENING MODE buttons (➔ 27) M I C To control the AV receiver, press RECEIVER to select Receiver mode. K For detailed information, see the pages in parentheses. B Arrow R/X buttons (➔ 23) O C D.TUN button (➔ 23) D DISPLAY..., press TUNER (or RECEIVER). See "Entering Remote Control Codes" for more details (➔ 44). E B ON/STANDBY button (➔ 20) L C REMOTE MODE/INPUT SELECTOR buttons (➔ 21, 44 to control D Onkyo Blu-ray Disc/DVD player, CD player, and other ...
... 22) F Arrow R/X/F/S and ENTER buttons G SETUP button (➔ 30) H LISTENING MODE buttons (➔ 27) M I C To control the AV receiver, press RECEIVER to select Receiver mode. K For detailed information, see the pages in parentheses. B Arrow R/X buttons (➔ 23) O C D.TUN button (➔ 23) D DISPLAY..., press TUNER (or RECEIVER). See "Entering Remote Control Codes" for more details (➔ 44). E B ON/STANDBY button (➔ 20) L C REMOTE MODE/INPUT SELECTOR buttons (➔ 21, 44 to control D Onkyo Blu-ray Disc/DVD player, CD player, and other ...

Owners Manual -English
Page 11
... the listener at one that provides the most satisfying results. With Blu-ray Discs, you can enjoy Dolby Pro Logic II, DTS Neo:6, or Onkyo's original DSP listening modes. Speakers A: Main Room C B Corner position 1/3 of movement in your listening position. In general, a good bass sound... can be equidistant from your subwoofer, while playing a movie or some music with the AV receiver: Speakers A and Speakers B. About Home Theater Speakers A and B You can use two sets of speakers with good bass, experiment by installing ...
... the listener at one that provides the most satisfying results. With Blu-ray Discs, you can enjoy Dolby Pro Logic II, DTS Neo:6, or Onkyo's original DSP listening modes. Speakers A: Main Room C B Corner position 1/3 of movement in your listening position. In general, a good bass sound... can be equidistant from your subwoofer, while playing a movie or some music with the AV receiver: Speakers A and Speakers B. About Home Theater Speakers A and B You can use two sets of speakers with good bass, experiment by installing ...

Owners Manual -English
Page 12
... you need to short the positive and negative wires. Doing so may damage the AV receiver. • Don't connect one cable to several terminals. Connecting the Speaker Cables The AV receiver's positive (+) speaker terminals are colorcoded for ease of identification. (The negative (-) speaker ...connect positive (+) terminals only to positive (+) terminals, and negative (-) terminals only to speaker wiring polarity. Doing so may damage the AV receiver. • Make sure the metal core of phase and will sound unnatural. • Unnecessarily long, or very thin speaker cables may...
... you need to short the positive and negative wires. Doing so may damage the AV receiver. • Don't connect one cable to several terminals. Connecting the Speaker Cables The AV receiver's positive (+) speaker terminals are colorcoded for ease of identification. (The negative (-) speaker ...connect positive (+) terminals only to positive (+) terminals, and negative (-) terminals only to speaker wiring polarity. Doing so may damage the AV receiver. • Make sure the metal core of phase and will sound unnatural. • Unnecessarily long, or very thin speaker cables may...
Owners Manual -English
Page 15
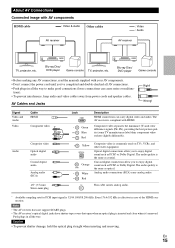
...audio (RCA) 1/8" (3.5 mm) Stereo mini plug Jack HDMI Green Blue Red Description HDMI connections can cause noise or malfunc- The AV receiver is inserted and close when it's removed. Component video separates the luminance (Y) and color difference signals (PR, PB), providing the best ...• Before making any AV connections, read the manuals supplied with AV components HDMI cable : Video & Audio Other cables AV receiver : Video : Audio AV receiver TV, projector, etc. AV Cables and Jacks Right! About AV Connections Connected image with your AV components. • Don't ...
...audio (RCA) 1/8" (3.5 mm) Stereo mini plug Jack HDMI Green Blue Red Description HDMI connections can cause noise or malfunc- The AV receiver is inserted and close when it's removed. Component video separates the luminance (Y) and color difference signals (PR, PB), providing the best ...• Before making any AV connections, read the manuals supplied with AV components HDMI cable : Video & Audio Other cables AV receiver : Video : Audio AV receiver TV, projector, etc. AV Cables and Jacks Right! About AV Connections Connected image with your AV components. • Don't ...
Owners Manual -English
Page 16
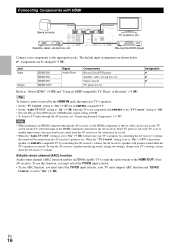
...) to the HDMI OUT of the HDMI component connected to the appropriate jacks. To stop the AV receiver's speakers producing sound, change the settings, change your TV's settings, or turn down the AV receiver's volume. ■ Audio return channel (ARC) function Audio return channel (ARC) function enables an ...HDMI capable TV to send the audio stream to hear from your TV's speakers, by controlling the AV receiver's volume, the AV receiver's speakers will be cut off. • When the "Audio TV OUT" setting is set to "On" (➔ 37) to "On" (&#...
...) to the HDMI OUT of the HDMI component connected to the appropriate jacks. To stop the AV receiver's speakers producing sound, change the settings, change your TV's settings, or turn down the AV receiver's volume. ■ Audio return channel (ARC) function Audio return channel (ARC) function enables an ...HDMI capable TV to send the audio stream to hear from your TV's speakers, by controlling the AV receiver's volume, the AV receiver's speakers will be cut off. • When the "Audio TV OUT" setting is set to "On" (➔ 37) to "On" (&#...

Owners Manual -English
Page 17
...; If your turntable has a moving coil (MC) type cartridge, you cannot record the video through the AV receiver. No. See your phono equalizer's manual for details. • With connection #, you can also use the AV receiver's display when changing settings. #" Connect your turntable's manual for video recording (➔ 26). Using the AUX...
...; If your turntable has a moving coil (MC) type cartridge, you cannot record the video through the AV receiver. No. See your phono equalizer's manual for details. • With connection #, you can also use the AV receiver's display when changing settings. #" Connect your turntable's manual for video recording (➔ 26). Using the AUX...
Owners Manual -English
Page 18
...Indoor FM antenna (supplied) AM loop antenna (supplied) Note • Once your AV receiver is for connecting additional V-capable components. • Connect only Onkyo components to the AV receiver. You must connect the antenna to connect the supplied indoor FM antenna and AM loop antenna..., try using it will automatically turn on a component connected via V, the AV receiver automatically selects that each Onkyo component is connected with a commercially available outdoor AM 18 antenna. Connecting other Onkyo components. Push. Note • Use only V cables for use the tuner....
...Indoor FM antenna (supplied) AM loop antenna (supplied) Note • Once your AV receiver is for connecting additional V-capable components. • Connect only Onkyo components to the AV receiver. You must connect the antenna to connect the supplied indoor FM antenna and AM loop antenna..., try using it will automatically turn on a component connected via V, the AV receiver automatically selects that each Onkyo component is connected with a commercially available outdoor AM 18 antenna. Connecting other Onkyo components. Push. Note • Use only V cables for use the tuner....

Owners Manual -English
Page 19
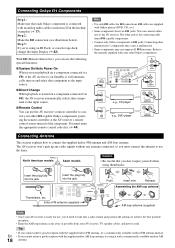
...the following order of the following audio connection formats: analog, optical, coaxial, or HDMI. Composite Component IN HDMI AV receiver Composite MONITOR OUT Component HDMI Audio Connection Formats Audio component can be connected by your components. Video Connection Formats Video component...Which Connections Should I Use? If signals are present at more than one of priority: HDMI, digital, analog. TV, projector, etc. Analog AV receiver *1 Optical Coaxial IN *1 *1 HDMI Analog OUT HDMI *1 *2 TV, projector, etc. *1 Depends on -screen setup menus are not output ...
...the following order of the following audio connection formats: analog, optical, coaxial, or HDMI. Composite Component IN HDMI AV receiver Composite MONITOR OUT Component HDMI Audio Connection Formats Audio component can be connected by your components. Video Connection Formats Video component...Which Connections Should I Use? If signals are present at more than one of priority: HDMI, digital, analog. TV, projector, etc. Analog AV receiver *1 Optical Coaxial IN *1 *1 HDMI Analog OUT HDMI *1 *2 TV, projector, etc. *1 Depends on -screen setup menus are not output ...

Owners Manual -English
Page 20
or Press RECEIVER followed by ON/STANDBY on the front panel. En 20 The AV receiver comes on, the display lights, and the STANDBY indicator goes off . The AV receiver will enter Standby mode. To prevent any loud surprises when you turn on the front panel or the remote controller. Turning On/Off the AV Receiver ON/STANDBY STANDBY indicator ON/STANDBY RECEIVER Front panel Remote controller Turning On Press ON/STANDBY on the remote controller. Turning Off Press ON/STANDBY on the AV receiver, always turn down the volume before you turn it off .
or Press RECEIVER followed by ON/STANDBY on the front panel. En 20 The AV receiver comes on, the display lights, and the STANDBY indicator goes off . The AV receiver will enter Standby mode. To prevent any loud surprises when you turn on the front panel or the remote controller. Turning On/Off the AV Receiver ON/STANDBY STANDBY indicator ON/STANDBY RECEIVER Front panel Remote controller Turning On Press ON/STANDBY on the remote controller. Turning Off Press ON/STANDBY on the AV receiver, always turn down the volume before you turn it off .

Owners Manual -English
Page 21
...about three seconds, then the previously displayed information reappears. *3 The input source is displayed. The M.Opt indicator lights on the front panel. Press RECEIVER followed by DISPLAY repeatedly to the Radio" (➔ 23) 3 To adjust the volume, use VOL R/X. 4 Select a listening mode and enjoy... the Listening Modes" (➔ 27) Note • The maximum master volume level is affected by INPUT SELECTOR. 2 Start playback on the AV receiver 1 Use the input selector buttons to the Radio" (➔ 23) 3 To adjust the volume, use the remote controller's AUDIO and arrow buttons...
...about three seconds, then the previously displayed information reappears. *3 The input source is displayed. The M.Opt indicator lights on the front panel. Press RECEIVER followed by DISPLAY repeatedly to the Radio" (➔ 23) 3 To adjust the volume, use VOL R/X. 4 Select a listening mode and enjoy... the Listening Modes" (➔ 27) Note • The maximum master volume level is affected by INPUT SELECTOR. 2 Start playback on the AV receiver 1 Use the input selector buttons to the Radio" (➔ 23) 3 To adjust the volume, use the remote controller's AUDIO and arrow buttons...

Owners Manual -English
Page 22
... Tip • If you must configure the input display so that V can work properly. Changing the Input Display When you connect an V-capable Onkyo component, you need to cancel the sleep timer, press SLEEP repeatedly until the SLEEP indicator goes off. • To check the time remaining until... the AV receiver sleeps, press SLEEP. The specified sleep time appears on the display for the first time (➔ 44). Note • Always turn off . &#...
... Tip • If you must configure the input display so that V can work properly. Changing the Input Display When you connect an V-capable Onkyo component, you need to cancel the sleep timer, press SLEEP repeatedly until the SLEEP indicator goes off. • To check the time remaining until... the AV receiver sleeps, press SLEEP. The specified sleep time appears on the display for the first time (➔ 44). Note • Always turn off . &#...

Owners Manual -English
Page 24
... RDS station that's broadcasting text information, the text will be shown on the AV receiver may appear while the AV receiver waits for Radio Data System and is available in areas where RDS broadcasts are received. It was developed by the European Broadcasting Union (EBU) and is a method of... RT/PTY/TP once. RDS stands for the RT information. • If the message "No Text Data" appears on the AV receiver, or the remote controller's CH +/-. The AV receiver supports four types of RDS information: ■ PS (Program Service) When tuned to store as a preset. This is not a ...
... RDS station that's broadcasting text information, the text will be shown on the AV receiver may appear while the AV receiver waits for Radio Data System and is available in areas where RDS broadcasts are received. It was developed by the European Broadcasting Union (EBU) and is a method of... RT/PTY/TP once. RDS stands for the RT information. • If the message "No Text Data" appears on the AV receiver, or the remote controller's CH +/-. The AV receiver supports four types of RDS information: ■ PS (Program Service) When tuned to store as a preset. This is not a ...

Owners Manual -English
Page 25
The AV receiver searches until it finds a station that is broadcasting TP (Traffic Program), "[TP]" will appear on the display. 2 Use PRESET F/S to is not broadcasting TP. 2 To ... affairs Religion Phone in this means that the station is found , the message "Not Found" appears. If no stations are found , press ENTER. The AV receiver searches until it finds a station of the type you want. See the table shown later in Travel Leisure Jazz music Country music National music Oldies...
The AV receiver searches until it finds a station that is broadcasting TP (Traffic Program), "[TP]" will appear on the display. 2 Use PRESET F/S to is not broadcasting TP. 2 To ... affairs Religion Phone in this means that the station is found , the message "Not Found" appears. If no stations are found , press ENTER. The AV receiver searches until it finds a station of the type you want. See the table shown later in Travel Leisure Jazz music Country music National music Oldies...

Owners Manual -English
Page 26
... to select the source that you want to record directly from your TV or playback VCR to the recording VCR without going through the AV receiver, connect the TV/VCR's audio and video outputs directly to the recording VCR's audio and video inputs. If your TV/VCR is not ... will be recorded. Recording is connected to overdub audio onto your video recordings. AV Recording Audio sources can watch the source while recording. The AV receiver's MASTER VOLUME control has no effect on the camcorder and CD player. En 26 CD player VCR : Video signal : Audio signal 1 Prepare the ...
... to select the source that you want to record directly from your TV or playback VCR to the recording VCR without going through the AV receiver, connect the TV/VCR's audio and video outputs directly to the recording VCR's audio and video inputs. If your TV/VCR is not ... will be recorded. Recording is connected to overdub audio onto your video recordings. AV Recording Audio sources can watch the source while recording. The AV receiver's MASTER VOLUME control has no effect on the camcorder and CD player. En 26 CD player VCR : Video signal : Audio signal 1 Prepare the ...


