
Owner Manual
Page 4
... 4 Supplied Accessories 4 Installing the Batteries 5 Features 5 Getting to Know the Receiver 6 Front Panel 6 Rear Panel 8 Display 9 Remote Controller 10 Using the Remote Controller 10 Connections Connecting Your Speakers 12 Speaker Connection Precautions 12 Connecting the Speaker Cables 12 Configuring the Speaker Impedance (TX-8522 North American model only 13 Connecting Antenna 14 Connecting the...
... 4 Supplied Accessories 4 Installing the Batteries 5 Features 5 Getting to Know the Receiver 6 Front Panel 6 Rear Panel 8 Display 9 Remote Controller 10 Using the Remote Controller 10 Connections Connecting Your Speakers 12 Speaker Connection Precautions 12 Connecting the Speaker Cables 12 Configuring the Speaker Impedance (TX-8522 North American model only 13 Connecting Antenna 14 Connecting the...

Owner Manual
Page 5
... &PURE AUDIO ❑ Brushed Hairline Aluminum Front Panel ❑ Compatible with RI Dock for the iPod ❑ Banana Plug-Compatible Speaker Posts (USA & CANADA only) TX-8222 ❑ 50 Watts/Channel @ 8 ohms (FTC) (USA & CANADA) ❑ 70 Watts/Channel @ 4 ohms (IEC) (EUROPE) ❑ 90 Watts/Channel @ 4 ohms (...Radio Inc. ©2005 XM Satellite Radio Inc. All other trademarks are trademarks of batteries. • If you intend not to use the remote controller for the iPod ❑ Banana Plug-Compatible Speaker Posts (USA & CANADA only) * XM Ready®, XM Public Radio™ ...
... &PURE AUDIO ❑ Brushed Hairline Aluminum Front Panel ❑ Compatible with RI Dock for the iPod ❑ Banana Plug-Compatible Speaker Posts (USA & CANADA only) TX-8222 ❑ 50 Watts/Channel @ 8 ohms (FTC) (USA & CANADA) ❑ 70 Watts/Channel @ 4 ohms (IEC) (EUROPE) ❑ 90 Watts/Channel @ 4 ohms (...Radio Inc. ©2005 XM Satellite Radio Inc. All other trademarks are trademarks of batteries. • If you intend not to use the remote controller for the iPod ❑ Banana Plug-Compatible Speaker Posts (USA & CANADA only) * XM Ready®, XM Public Radio™ ...
Owner Manual
Page 8
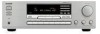
...AM antenna. G SPEAKERS A These terminal posts are for connecting speaker set A. The receiver's remote controller can be connected to the IR OUT jack to pass IR (infrared) remote control signals along to other Onkyo audio components. To use , you 're in Zone 2, or control it when...a satellite radio such as the XM Passport System, sold separately. Getting to Know the Receiver-Continued Rear Panel TX-8522 1 B 345 67 8 9 JK L M N TX-8222 1B 5 67 8 9 JK L OP A REMOTE CONTROL jacks These (Remote Interactive) jacks can be connected to the IR IN jack, allowing you to control the...
...AM antenna. G SPEAKERS A These terminal posts are for connecting speaker set A. The receiver's remote controller can be connected to the IR OUT jack to pass IR (infrared) remote control signals along to other Onkyo audio components. To use , you 're in Zone 2, or control it when...a satellite radio such as the XM Passport System, sold separately. Getting to Know the Receiver-Continued Rear Panel TX-8522 1 B 345 67 8 9 JK L M N TX-8222 1B 5 67 8 9 JK L OP A REMOTE CONTROL jacks These (Remote Interactive) jacks can be connected to the IR IN jack, allowing you to control the...

Owner Manual
Page 10
... the buttons may be pressed inadvertently, thereby draining the batteries. • The remote controller may not work if there's an obstacle between it and the receiver's remote control sensor. Remote Controller TX-8522 North American model (RC-664S) TX-8522 Other models (RC-665S) TX-8222 All models (RC-666S) 1 1 9 9 2 J 2 J K K 3 3* L L 4 5 M 4 5 M N N O O P P Q Q R R 6 S 7 T T 8 U 8 U * For the RC-666S, the names for the...
... the buttons may be pressed inadvertently, thereby draining the batteries. • The remote controller may not work if there's an obstacle between it and the receiver's remote control sensor. Remote Controller TX-8522 North American model (RC-664S) TX-8522 Other models (RC-665S) TX-8222 All models (RC-666S) 1 1 9 9 2 J 2 J K K 3 3* L L 4 5 M 4 5 M N N O O P P Q Q R R 6 S 7 T T 8 U 8 U * For the RC-666S, the names for the...

Owner Manual
Page 13
...impedance value to complete the setting. Connecting Your Speakers-Continued Configuring the Speaker Impedance (TX-8522 North American model only) In this model, the factory default for speaker impedance is "8 ...ohms." When you change the speaker impedance setting, read "Speaker Connection Precautions" on the remote controller. When you restore the impedance setting to 8 ohms, use the same procedures above. 2, 4 SETUP...impedance. 1 Press the SETUP button on the remote controller to "6 ohms" using the [ ]/[ ] buttons. 13 Note: Be sure to minimize the volume ...
...impedance value to complete the setting. Connecting Your Speakers-Continued Configuring the Speaker Impedance (TX-8522 North American model only) In this model, the factory default for speaker impedance is "8 ...ohms." When you change the speaker impedance setting, read "Speaker Connection Precautions" on the remote controller. When you restore the impedance setting to 8 ohms, use the same procedures above. 2, 4 SETUP...impedance. 1 Press the SETUP button on the remote controller to "6 ohms" using the [ ]/[ ] buttons. 13 Note: Be sure to minimize the volume ...
Owner Manual
Page 17
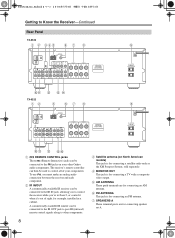
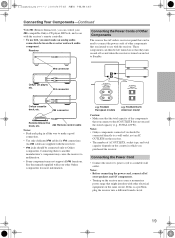
...IN L R AUDIO OUT VIDEO OUT TAPE 1 Remote Interactive Dock R ---- Connecting a DVD Player For the TX-8522, use an analog audio cable to connect the TX-8522's DVD IN L/R jacks to the analog audio output jacks on the DVD player, and use the Onkyo Remote Interactive Dock (DS-A1), flip the RI...or to connect the TX-8222's LINE 2 IN L/R or TAPE 1 IN L/R jacks, to the RI Dock's jack, as shown. The video input from the DVD player simultaneously by pressing the DVD input selector button. You can operate the RI Dock using the remote controller supplied with the receiver (see page 20...
...IN L R AUDIO OUT VIDEO OUT TAPE 1 Remote Interactive Dock R ---- Connecting a DVD Player For the TX-8522, use an analog audio cable to connect the TX-8522's DVD IN L/R jacks to the analog audio output jacks on the DVD player, and use the Onkyo Remote Interactive Dock (DS-A1), flip the RI...or to connect the TX-8222's LINE 2 IN L/R or TAPE 1 IN L/R jacks, to the RI Dock's jack, as shown. The video input from the DVD player simultaneously by pressing the DVD input selector button. You can operate the RI Dock using the remote controller supplied with the receiver (see page 20...
Owner Manual
Page 18
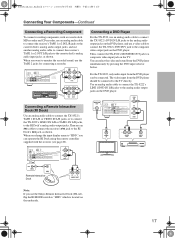
...OUT Connecting a TV or Other Component with an Audio Output For the TX-8522, use with Onkyo products (no cables are supplied with the appropriate and audio cables, you connect other Onkyo components to the receiver with the receiver). IN L R L R AUDIO OUT Connecting Components If you can be...select the video and sound from the VCR simultaneously by using the receiver's remote controller. See page 10 for this to work). For the TX-8222, audio input from the VCR should be connected. For the TX-8222, use the following system functions. The video input from the VCR...
...OUT Connecting a TV or Other Component with an Audio Output For the TX-8522, use with Onkyo products (no cables are supplied with the appropriate and audio cables, you connect other Onkyo components to the receiver with the receiver). IN L R L R AUDIO OUT Connecting Components If you can be...select the video and sound from the VCR simultaneously by using the receiver's remote controller. See page 10 for this to work). For the TX-8222, audio input from the VCR should be connected. For the TX-8222, use the following system functions. The video input from the VCR...
Owner Manual
Page 19
... not exceed the stated capacity (e.g., TOTAL 120 W). Receiver Connecting the Power Cords of other Onkyo components for connections (no cables are supplied with the receiver). • jacks should be connected only to Onkyo components. TX-8222 European models e.g. Connecting Your Components-Continued With (Remote Interactive), you can control your -compatible Onkyo CD player, RI Dock, and so on...
... not exceed the stated capacity (e.g., TOTAL 120 W). Receiver Connecting the Power Cords of other Onkyo components for connections (no cables are supplied with the receiver). • jacks should be connected only to Onkyo components. TX-8222 European models e.g. Connecting Your Components-Continued With (Remote Interactive), you can control your -compatible Onkyo CD player, RI Dock, and so on...

Owner Manual
Page 20
... display name to "HDD." TX-8222 or 2 Press and hold down the volume before you can change the display name to "HDD." Turning On the Receiver STANDBY/ON STANDBY indicator ON/STANDBY Turning On and Standby 1 Receiver STANDBY/ON or Remote controller Press the [STANDBY/ON] button. The receiver comes on the receiver, always turn down the...
... display name to "HDD." TX-8222 or 2 Press and hold down the volume before you can change the display name to "HDD." Turning On the Receiver STANDBY/ON STANDBY indicator ON/STANDBY Turning On and Standby 1 Receiver STANDBY/ON or Remote controller Press the [STANDBY/ON] button. The receiver comes on the receiver, always turn down the...
Owner Manual
Page 21
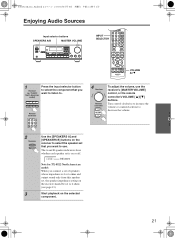
... show whether each speaker set to use the receiver's [MASTER VOLUME] control, or the remote controller's VOLUME [ ]/[ ] buttons. Indicators Note for TX-8522 North American model: When you want to listen to select the speaker set that you want to 6 ohms (see page 13). Remote controller 4 Receiver Remote controller To adjust the volume, use . Turn control...
... show whether each speaker set to use the receiver's [MASTER VOLUME] control, or the remote controller's VOLUME [ ]/[ ] buttons. Indicators Note for TX-8522 North American model: When you want to listen to select the speaker set that you want to 6 ohms (see page 13). Remote controller 4 Receiver Remote controller To adjust the volume, use . Turn control...
Owner Manual
Page 22
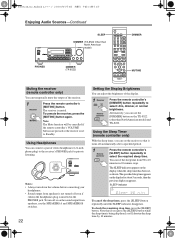
... time by 10 minutes. Note that it turns off or on the sound output from speakers, use the [DIMMER] button on the TX-8522 (other than North American model) DIMMER PHONES DIMMER (TX-8222) MUTING Muting the receiver (remote controller only) You can temporarily mute the output of stereo headphones (1/4-inch phone plug) to the...
... time by 10 minutes. Note that it turns off or on the sound output from speakers, use the [DIMMER] button on the TX-8522 (other than North American model) DIMMER PHONES DIMMER (TX-8222) MUTING Muting the receiver (remote controller only) You can temporarily mute the output of stereo headphones (1/4-inch phone plug) to the...

Owner Manual
Page 26
... and Europe) You must specify the AM frequency step used in stereo sound. Manual Tuning The frequency stops changing when you can also use the remote controller's TUNING/CH [ ]/[ ] buttons or arrow [ ]/[ ] buttons to change the frequency one step at a time. Release After the desired frequency step is... broadcast in your area. You can enjoy AM and FM radio stations. 1 Receiver or [TX-8522 North American model] Use the [FM/AM] input selector button to select AM or FM. [TX-8522 Other models/TX-8222] Use the [FM] or [AM] input selector button to turn on country.) 26 Press ...
... and Europe) You must specify the AM frequency step used in stereo sound. Manual Tuning The frequency stops changing when you can also use the remote controller's TUNING/CH [ ]/[ ] buttons or arrow [ ]/[ ] buttons to change the frequency one step at a time. Release After the desired frequency step is... broadcast in your area. You can enjoy AM and FM radio stations. 1 Receiver or [TX-8522 North American model] Use the [FM/AM] input selector button to select AM or FM. [TX-8522 Other models/TX-8222] Use the [FM] or [AM] input selector button to turn on country.) 26 Press ...

Owner Manual
Page 27
... station in 0.2 MHz steps, 10 kHz steps for AM. For other than North American model, the PRESET [ ]/[ ] buttons on the remote controller. 4 Receiver Press the [MEMORY] button again to store the station or channel. FM STEREO Tuning into Weak FM Stereo Stations If the signal from a ... preset number stops flashing. Repeat this case, switch to Manual Tuning mode and listen to 87.5 (FM), press 8, 7, 5. For the TX-8522 other models it may be used to select a preset. Presetting AM/FM Stations Number buttons MEMORY TUNING MODE PRESET / I Deleting Presets 1 Select...
... station in 0.2 MHz steps, 10 kHz steps for AM. For other than North American model, the PRESET [ ]/[ ] buttons on the remote controller. 4 Receiver Press the [MEMORY] button again to store the station or channel. FM STEREO Tuning into Weak FM Stereo Stations If the signal from a ... preset number stops flashing. Repeat this case, switch to Manual Tuning mode and listen to 87.5 (FM), press 8, 7, 5. For the TX-8522 other models it may be used to select a preset. Presetting AM/FM Stations Number buttons MEMORY TUNING MODE PRESET / I Deleting Presets 1 Select...

Owner Manual
Page 31
...such as one listed below: • Onkyo's Multi-Room System kits (IR Remote Controller Extension System) • Multiroom A/V distribution and control system such as shown below shows how to use the remote controller to control the receiver from a remote location, you will need to make ...IR emitter. IR IN IR OUT Connecting block Receiver IR Emitter IR Receiver Remote controller Other component : Signal flow Making Sensor Connections When you to the IR OUT terminal. IR IN Connecting block IR Receiver TX-8522/ TX-8222 Remote controller In the cabinet Main room : Signal ...
...such as one listed below: • Onkyo's Multi-Room System kits (IR Remote Controller Extension System) • Multiroom A/V distribution and control system such as shown below shows how to use the remote controller to control the receiver from a remote location, you will need to make ...IR emitter. IR IN IR OUT Connecting block Receiver IR Emitter IR Receiver Remote controller Other component : Signal flow Making Sensor Connections When you to the IR OUT terminal. IR IN Connecting block IR Receiver TX-8522/ TX-8222 Remote controller In the cabinet Main room : Signal ...
Owner Manual
Page 32
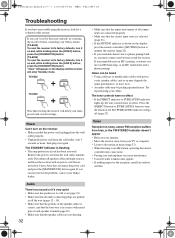
...indicator will enter Standby mode. Tuner Reception is on and, while holding down the [VIDEO] button, press the [STANDBY/ON] button. [TX-8222] To reset the receiver to turn on and, while holding down the [LINE 2] button, press the [STANDBY/ON] button. After that the power cord is ... turn the function off (page 23). Remove the power cord from your Onkyo dealer. [TX-8522] To reset the receiver to an AM station, operating the remote controller may degrade the audio performance, so don't do it on the receiver • Make sure that , reconnect the power cord and press the [...
...indicator will enter Standby mode. Tuner Reception is on and, while holding down the [VIDEO] button, press the [STANDBY/ON] button. [TX-8222] To reset the receiver to turn on and, while holding down the [LINE 2] button, press the [STANDBY/ON] button. After that the power cord is ... turn the function off (page 23). Remove the power cord from your Onkyo dealer. [TX-8522] To reset the receiver to an AM station, operating the remote controller may degrade the audio performance, so don't do it on the receiver • Make sure that , reconnect the power cord and press the [...
Owner Manual
Page 33
...input is selected. • To prevent signal loops and damage to the receiver, input signals are required, the receiver must set the receiver to charge the backup system. Although no obstruction between the component and receiver, even if they are connected properly. rect polarity (page 5). •... The functions don't work at all. • To control an Onkyo component that this depends on the TX-8222), for signal processing and control functions. In the unlikely event that 's connected via , point the remote controller at least five seconds, and then plug it 's ...
...input is selected. • To prevent signal loops and damage to the receiver, input signals are required, the receiver must set the receiver to charge the backup system. Although no obstruction between the component and receiver, even if they are connected properly. rect polarity (page 5). •... The functions don't work at all. • To control an Onkyo component that this depends on the TX-8222), for signal processing and control functions. In the unlikely event that 's connected via , point the remote controller at least five seconds, and then plug it 's ...


