
Owner Manual
Page 3
... get warm after prolonged use the unit for compatibility with a clean cloth. Pressing the [STANDBY/ON] button to use this apparatus may not work properly the next time you should be connected to country. Precautions 1. Care-Occasionally you turn on this unit should dust the unit all times. The power cord plug is in this instruction manual is used to disconnect this unit...
... get warm after prolonged use the unit for compatibility with a clean cloth. Pressing the [STANDBY/ON] button to use this apparatus may not work properly the next time you should be connected to country. Precautions 1. Care-Occasionally you turn on this unit should dust the unit all times. The power cord plug is in this instruction manual is used to disconnect this unit...

Owner Manual
Page 4
... Turning On and Standby 20 Changing the Input Display 20 Enjoying Audio Sources 21 Muting the receiver (remote controller only) ........ 22 Using Headphones 22 Setting the Display Brightness 22 Using the Sleep Timer (remote controller only) ... 22 Using the Tone and Balance Controls 23 Setting the DIRECT Function (TX-8522 only) ..... 23 Enjoying the Pure Audio Sound (TX-8522 only) .... 23 Recording 24 Recording the Input Source 24 Recording Audio and Video from Separate Sources (TX-8522 only 25 Listening to the Radio 26 AM Frequency...
... Turning On and Standby 20 Changing the Input Display 20 Enjoying Audio Sources 21 Muting the receiver (remote controller only) ........ 22 Using Headphones 22 Setting the Display Brightness 22 Using the Sleep Timer (remote controller only) ... 22 Using the Tone and Balance Controls 23 Setting the DIRECT Function (TX-8522 only) ..... 23 Enjoying the Pure Audio Sound (TX-8522 only) .... 23 Recording 24 Recording the Input Source 24 Recording Audio and Video from Separate Sources (TX-8522 only 25 Listening to the Radio 26 AM Frequency...

Owner Manual
Page 7
...R TUNING MODE button (26, 27) Selects the Auto or Manual tuning mode for Satellite Radio stations. PRESET [ ] button (27) Selects a station from ones you can select the station by entering the frequency directly or to monitor the recorded sound. Q BASS control (23) This control is for adjusting the level of treble sounds. B SPEAKERS A and B switches (21) Turn speaker sets A and B on page 28. K ENTER button Used to your model. T Input selector buttons (21, 24, 26) Select the input sources. P TREBLE control (23) This control is for adjusting the level of bass sounds...
...R TUNING MODE button (26, 27) Selects the Auto or Manual tuning mode for Satellite Radio stations. PRESET [ ] button (27) Selects a station from ones you can select the station by entering the frequency directly or to monitor the recorded sound. Q BASS control (23) This control is for adjusting the level of treble sounds. B SPEAKERS A and B switches (21) Turn speaker sets A and B on page 28. K ENTER button Used to your model. T Input selector buttons (21, 24, 26) Select the input sources. P TREBLE control (23) This control is for adjusting the level of bass sounds...
Owner Manual
Page 8
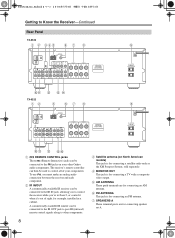
... Rear Panel TX-8522 1 B 345 67 8 9 JK L M N TX-8222 1B 5 67 8 9 JK L OP A REMOTE CONTROL jacks These (Remote Interactive) jacks can be connected to the IR OUT jack to pass IR (infrared) remote control signals along to other Onkyo audio components. D MONITOR OUT This jack is for connecting speaker set A. G SPEAKERS A These terminal posts are for connecting an FM antenna. The receiver's remote controller can then be connected to the IR IN jack, allowing you to control the receiver while you must make an analog audio connection...
... Rear Panel TX-8522 1 B 345 67 8 9 JK L M N TX-8222 1B 5 67 8 9 JK L OP A REMOTE CONTROL jacks These (Remote Interactive) jacks can be connected to the IR OUT jack to pass IR (infrared) remote control signals along to other Onkyo audio components. D MONITOR OUT This jack is for connecting speaker set A. G SPEAKERS A These terminal posts are for connecting an FM antenna. The receiver's remote controller can then be connected to the IR IN jack, allowing you to control the receiver while you must make an analog audio connection...
Owner Manual
Page 9
... wire. L TAPE 1/2 IN/OUT This analog audio input and output are for hookup information. N VIDEO IN/OUT The VIDEO inputs and outputs can be used to supply power to another component. RDS (European models only): Lights up when Auto Tuning is selected, and disappears when Manual Tuning mode is for connecting a turntable with an analog audio input and output, such as a cassette deck, MD recorder, etc. FM STEREO: Lights up when tuned to a stereo FM station. 5 SLEEP indicator Lights up when presetting radio stations...
... wire. L TAPE 1/2 IN/OUT This analog audio input and output are for hookup information. N VIDEO IN/OUT The VIDEO inputs and outputs can be used to supply power to another component. RDS (European models only): Lights up when Auto Tuning is selected, and disappears when Manual Tuning mode is for connecting a turntable with an analog audio input and output, such as a cassette deck, MD recorder, etc. FM STEREO: Lights up when tuned to a stereo FM station. 5 SLEEP indicator Lights up when presetting radio stations...

Owner Manual
Page 11
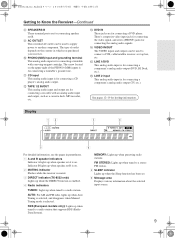
... FM radio stations and satellite radio channels directly. R DECK B buttons On twin cassette decks, only deck B can select the channel number. Stop [ ]: Stops playback. U VOL [ ]/[ ] buttons (21) Adjusts the volume of the receiver regardless of these buttons work for radio tuning. E HDD PLAYLIST [ ]/[ ] buttons Selects a playlist stored on the player on an HDD or cassette component. When SAT RADIO is pressed, the input source will be controlled. P Reverse and Fast Forward [ ]/[ ] buttons These buttons are used to change...
... FM radio stations and satellite radio channels directly. R DECK B buttons On twin cassette decks, only deck B can select the channel number. Stop [ ]: Stops playback. U VOL [ ]/[ ] buttons (21) Adjusts the volume of the receiver regardless of these buttons work for radio tuning. E HDD PLAYLIST [ ]/[ ] buttons Selects a playlist stored on the player on an HDD or cassette component. When SAT RADIO is pressed, the input source will be controlled. P Reverse and Fast Forward [ ]/[ ] buttons These buttons are used to change...
Owner Manual
Page 12
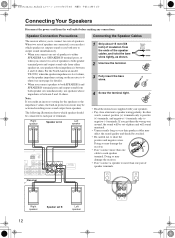
... receiver. • Don't connect a speaker to more than one set of the speaker cables, and twist the bare wires tightly, as shown. 2 Unscrew the terminal. 15 mm (5/8") 3 Fully insert the bare wires. 4 Screw the terminal tight. • Read the instructions supplied with your speakers. • Pay close attention to both speaker sets simultaneously, use speakers whose impedance is between 4 and 16 ohms. For the North American model TX...
... receiver. • Don't connect a speaker to more than one set of the speaker cables, and twist the bare wires tightly, as shown. 2 Unscrew the terminal. 15 mm (5/8") 3 Fully insert the bare wires. 4 Screw the terminal tight. • Read the instructions supplied with your speakers. • Pay close attention to both speaker sets simultaneously, use speakers whose impedance is between 4 and 16 ohms. For the North American model TX...

Owner Manual
Page 16
.... ANALOG OUT 16 Use white plugs to the receiver's PHONO L/R jacks. Connecting a CD Player Use an analog audio cable to connect the receiver's CD L/R jacks to the analog audio output jacks on the turntable, as shown. Wrong! Use an analog audio cable to connect the receiver's PHONO L/R jacks to the audio output jacks on the CD player, as shown. And use with power cords and speaker cables. With some turntables, connecting the ground wire may adversely affect the sound quality. • To prevent interference, keep power cords and speaker cables away from the tuner's antenna...
.... ANALOG OUT 16 Use white plugs to the receiver's PHONO L/R jacks. Connecting a CD Player Use an analog audio cable to connect the receiver's CD L/R jacks to the analog audio output jacks on the turntable, as shown. Wrong! Use an analog audio cable to connect the receiver's PHONO L/R jacks to the audio output jacks on the CD player, as shown. And use with power cords and speaker cables. With some turntables, connecting the ground wire may adversely affect the sound quality. • To prevent interference, keep power cords and speaker cables away from the tuner's antenna...
Owner Manual
Page 17
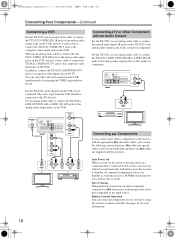
... analog audio output jacks on the DVD player. For the TX-8222, only audio input from the DVD player simultaneously by pressing the DVD input selector button. You can select the video and sound from the DVD player can operate the RI Dock using the remote controller supplied with the receiver (see page 20). Use an analog audio cable to connect the TX-8222's LINE 1/DVD IN L/R jacks to the composite video output jack on the DVD player. The video input from the DVD player should be connected. Then use an cable to connect the receiver's jack to the TV directly. MONITOR...
... analog audio output jacks on the DVD player. For the TX-8222, only audio input from the DVD player simultaneously by pressing the DVD input selector button. You can select the video and sound from the DVD player can operate the RI Dock using the remote controller supplied with the receiver (see page 20). Use an analog audio cable to connect the TX-8222's LINE 1/DVD IN L/R jacks to the composite video output jack on the DVD player. The video input from the DVD player should be connected. Then use an cable to connect the receiver's jack to the TV directly. MONITOR...
Owner Manual
Page 18
... the analog audio output jacks on the VCR. Remote Control Operation You can select the video and sound from the VCR simultaneously by using the receiver's remote controller. Then use an analog audio cable to connect the TX8522's VIDEO OUT L/R jacks to the analog audio input jacks on the VCR, and use an analog audio cable to connect the unused audio input L/R jacks on the TX-8522 to the composite video input jack on the VCR. Auto Power On When you turn on the power or start playback on the connected component. MONITOR OUT V VIDEO V VIDEO...
... the analog audio output jacks on the VCR. Remote Control Operation You can select the video and sound from the VCR simultaneously by using the receiver's remote controller. Then use an analog audio cable to connect the TX8522's VIDEO OUT L/R jacks to the analog audio input jacks on the VCR, and use an analog audio cable to connect the unused audio input L/R jacks on the TX-8522 to the composite video input jack on the VCR. Auto Power On When you turn on the power or start playback on the connected component. MONITOR OUT V VIDEO V VIDEO...
Owner Manual
Page 19
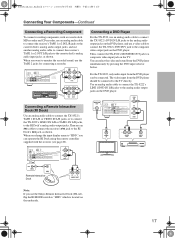
... analog audio connection between the receiver and each plug in which you purchased the receiver. connector Onkyo cassette deck, etc. TX-8222 European models e.g. e.g. Notes: • Onkyo components connected via should be used to connect the power cords of your speakers and AV components. • Turning on the receiver may not support all the way to Standby. connector Remote Interactive Dock, etc. See the manuals supplied with the receiver. Connecting Your Components-Continued With (Remote Interactive), you can control your -compatible Onkyo...
... analog audio connection between the receiver and each plug in which you purchased the receiver. connector Onkyo cassette deck, etc. TX-8222 European models e.g. e.g. Notes: • Onkyo components connected via should be used to connect the power cords of your speakers and AV components. • Turning on the receiver may not support all the way to Standby. connector Remote Interactive Dock, etc. See the manuals supplied with the receiver. Connecting Your Components-Continued With (Remote Interactive), you can control your -compatible Onkyo...
Owner Manual
Page 21
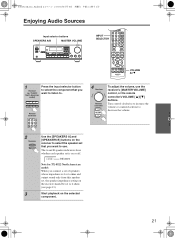
... buttons SPEAKERS A/B MASTER VOLUME INPUT SELECTOR VOLUME / 1 Receiver (ex. Remote controller 4 Receiver Remote controller To adjust the volume, use . The A and B speaker indicators show whether each speaker set is 4 or 6 ohms and output sound only from this speaker set, the speaker impedance setting on or off. Indicators Note for TX-8522 North American model: When you connect a set of speakers whose impedance is on the receiver should be set that you want to listen to 6 ohms (see page 13). Start playback on the receiver to select the speaker set to . Turn control...
... buttons SPEAKERS A/B MASTER VOLUME INPUT SELECTOR VOLUME / 1 Receiver (ex. Remote controller 4 Receiver Remote controller To adjust the volume, use . The A and B speaker indicators show whether each speaker set is 4 or 6 ohms and output sound only from this speaker set, the speaker impedance setting on or off. Indicators Note for TX-8522 North American model: When you connect a set of speakers whose impedance is on the receiver should be set that you want to listen to 6 ohms (see page 13). Start playback on the receiver to select the speaker set to . Turn control...
Owner Manual
Page 22
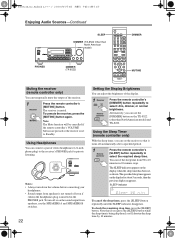
.... Using the Sleep Timer (remote controller only) With the sleep timer, you can use the SPEAKERS A and SPEAKERS B switches. 22 Setting the Display Brightness You can temporarily mute the output of the display. 1 Receiver Remote controller Press the remote controller's [DIMMER] button repeatedly to select: dim, dimmer, or normal brightness. Enjoying Audio Sources-Continued SLEEP DIMMER (TX-8522 Other than North American model) and TX-8222. Note: The Mute function will be cancelled if the remote controller's VOLUME buttons...
.... Using the Sleep Timer (remote controller only) With the sleep timer, you can use the SPEAKERS A and SPEAKERS B switches. 22 Setting the Display Brightness You can temporarily mute the output of the display. 1 Receiver Remote controller Press the remote controller's [DIMMER] button repeatedly to select: dim, dimmer, or normal brightness. Enjoying Audio Sources-Continued SLEEP DIMMER (TX-8522 Other than North American model) and TX-8222. Note: The Mute function will be cancelled if the remote controller's VOLUME buttons...

Owner Manual
Page 23
... video signal output and turning off . Turn it up to make them quieter. Adjusting the Treble The TREBLE control adjusts treble sounds. TREBLE BASS BALANCE Setting the DIRECT Function (TX-8522 only) The [DIRECT] button turns the DIRECT function on the PURE AUDIO indicator. Enjoying the Pure Audio Sound (TX-8522 only) Pressing the [PURE AUDIO] button activates the Pure Indicator Audio listening mode and turns on and off the indication in the display. Turn it up . Enjoying Audio Sources-Continued This section explains functions that can be used...
... video signal output and turning off . Turn it up to make them quieter. Adjusting the Treble The TREBLE control adjusts treble sounds. TREBLE BASS BALANCE Setting the DIRECT Function (TX-8522 only) The [DIRECT] button turns the DIRECT function on the PURE AUDIO indicator. Enjoying the Pure Audio Sound (TX-8522 only) Pressing the [PURE AUDIO] button activates the Pure Indicator Audio listening mode and turns on and off the indication in the display. Turn it up . Enjoying Audio Sources-Continued This section explains functions that can be used...
Owner Manual
Page 24
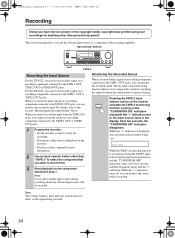
... component connected to the TAPE 1 OUT, TAPE 2 OUT or VIDEO OUT jacks. The recorded sound monitoring function allows you to compare the sounds by switching the output between the sound before recording. While the ">" indication turns off, you can record an audio signal on a recording component connected to the TAPE 1 OUT or TAPE 2 OUT jacks. Note: The volume, balance, mute and tone controls have the full consent of the copyright holder, copyright laws prohibit using...
... component connected to the TAPE 1 OUT, TAPE 2 OUT or VIDEO OUT jacks. The recorded sound monitoring function allows you to compare the sounds by switching the output between the sound before recording. While the ">" indication turns off, you can record an audio signal on a recording component connected to the TAPE 1 OUT or TAPE 2 OUT jacks. Note: The volume, balance, mute and tone controls have the full consent of the copyright holder, copyright laws prohibit using...

Owner Manual
Page 26
... used in stereo sound. Release After the desired frequency step is found. You can enjoy AM and FM radio stations. 1 Receiver or [TX-8522 North American model] Use the [FM/AM] input selector button to select AM or FM. [TX-8522 Other models/TX-8222] Use the [FM] or [AM] input selector button to select AM or FM. Manual Tuning The frequency stops changing when you can also use the remote controller's TUNING/CH [ ]/[ ] buttons or arrow [ ]/[ ] buttons to turn...
... used in stereo sound. Release After the desired frequency step is found. You can enjoy AM and FM radio stations. 1 Receiver or [TX-8522 North American model] Use the [FM/AM] input selector button to select AM or FM. [TX-8522 Other models/TX-8222] Use the [FM] or [AM] input selector button to select AM or FM. Manual Tuning The frequency stops changing when you can also use the remote controller's TUNING/CH [ ]/[ ] buttons or arrow [ ]/[ ] buttons to turn...
Owner Manual
Page 30
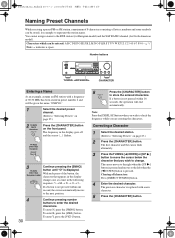
... the character that appears in the display changes one second, the cursor automatically moves to the next position. 4 30 Continue pressing number buttons to the RDS station (for European model) and the SAT RADIO channel (for example to "Selecting Presets" on page 27.) 2 TX-8522 North American Press the [CHARACTER] button on page 27.) 2 Press the [CHARACTER] button. The cursor moves to the...
... the character that appears in the display changes one second, the cursor automatically moves to the next position. 4 30 Continue pressing number buttons to the RDS station (for European model) and the SAT RADIO channel (for example to "Selecting Presets" on page 27.) 2 TX-8522 North American Press the [CHARACTER] button on page 27.) 2 Press the [CHARACTER] button. The cursor moves to the...

Owner Manual
Page 31
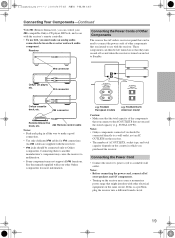
... controller can be sensed. Other component : Signal flow Remote control sensor Mini plug Emitter IR Emitter Receiver 31 The diagram below . IR IN Connecting block IR Receiver TX-8522/ TX-8222 Remote controller In the cabinet Main room : Signal flow Example for the remote zone The IR IN input allows you will need to prepare a multiroom kit (sold separately) such as one listed below: • Onkyo's Multi-Room System kits (IR Remote Controller...
... controller can be sensed. Other component : Signal flow Remote control sensor Mini plug Emitter IR Emitter Receiver 31 The diagram below . IR IN Connecting block IR Receiver TX-8522/ TX-8222 Remote controller In the cabinet Main room : Signal flow Example for the remote zone The IR IN input allows you will need to prepare a multiroom kit (sold separately) such as one listed below: • Onkyo's Multi-Room System kits (IR Remote Controller...
Owner Manual
Page 32
... antenna. The tone controls have any trouble using the receiver, look for 1 hour. Press the [DIRECT] button or [PURE AUDIO] button to unmute the receiver (page 22). • If your cables. Tuner Reception is shown on and, while holding down the [VIDEO] button, press the [STANDBY/ON] button. [TX-8222] To reset the receiver to its power cord disconnected for a solution in mono (page 27). • When listening to bundle audio cables with its factory defaults, turn the function...
... antenna. The tone controls have any trouble using the receiver, look for 1 hour. Press the [DIRECT] button or [PURE AUDIO] button to unmute the receiver (page 22). • If your cables. Tuner Reception is shown on and, while holding down the [VIDEO] button, press the [STANDBY/ON] button. [TX-8222] To reset the receiver to its power cord disconnected for a solution in mono (page 27). • When listening to bundle audio cables with its factory defaults, turn the function...
Owner Manual
Page 33
... be shorter in order to direct sunshine or inverter-type florescent lights. The functions don't work • To use , you must make sure the correct input is not possible because no video signals are connected digitally (page 19). Recording Can't record • On your recorder, make an connection and an analog audio connection (RCA) between the remote controller and the receiver's remote control sensor (page 10). • Make sure...
... be shorter in order to direct sunshine or inverter-type florescent lights. The functions don't work • To use , you must make sure the correct input is not possible because no video signals are connected digitally (page 19). Recording Can't record • On your recorder, make an connection and an analog audio connection (RCA) between the remote controller and the receiver's remote control sensor (page 10). • Make sure...


