Instruction Manual
Page 1
... different from digital apparatus as set out in the EU countries. U1-BS0001-01 AP0707 DIGITAL VOICE RECORDER WS-110/WS-210S EN INSTRUCTIONS Thank you test the record function and volume before use the return and collection systems available in North and South America USA RFI... of the Canadian Department of the FCC Rules. Applicable Product : WS-110/WS-210S - 1 - Canadian RFI This digital apparatus does not exceed the Class B limits for purchasing an Olympus Digital Voice Recorder. To ensure successful recordings, we recommend that you for radio noise emissions from that this...
... different from digital apparatus as set out in the EU countries. U1-BS0001-01 AP0707 DIGITAL VOICE RECORDER WS-110/WS-210S EN INSTRUCTIONS Thank you test the record function and volume before use the return and collection systems available in North and South America USA RFI... of the Canadian Department of the FCC Rules. Applicable Product : WS-110/WS-210S - 1 - Canadian RFI This digital apparatus does not exceed the Class B limits for purchasing an Olympus Digital Voice Recorder. To ensure successful recordings, we recommend that you for radio noise emissions from that this...
Instruction Manual
Page 2
..., overheating, fire or explosion. • Battery should never be destroyed or erased by a defect of children. • If you experience noise, move the recorder further away from the Olympus's liability. tors. G Avoid sand or dirt. Microsoft, Windows and Windows Media are the trademarks or registered trademarks of this product such as abnormal...
..., overheating, fire or explosion. • Battery should never be destroyed or erased by a defect of children. • If you experience noise, move the recorder further away from the Olympus's liability. tors. G Avoid sand or dirt. Microsoft, Windows and Windows Media are the trademarks or registered trademarks of this product such as abnormal...
Instruction Manual
Page 3
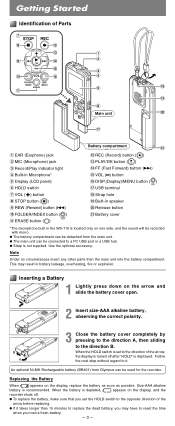
...(BR401) from the main unit. Size-AAA alkaline battery is not supplied. s The battery compartment can be detached from Olympus can be used for the recorder. Use the optional accessory. Getting Started Identification of Parts Main unit Battery compartment 1 EAR (Earphone) jack 2 MIC (Microphone) ...jack 3 Record/Play indicator light 4 Built-in the WS-110 is located only on one side, and the sound will be recorded with mono. Note Under no circumstances insert any other parts than 15 minutes to ...
...(BR401) from the main unit. Size-AAA alkaline battery is not supplied. s The battery compartment can be detached from Olympus can be used for the recorder. Use the optional accessory. Getting Started Identification of Parts Main unit Battery compartment 1 EAR (Earphone) jack 2 MIC (Microphone) ...jack 3 Record/Play indicator light 4 Built-in the WS-110 is located only on one side, and the sound will be recorded with mono. Note Under no circumstances insert any other parts than 15 minutes to ...

Instruction Manual
Page 4
...release the HOLD switch to complete the setup screen. Select the item from the set . button to set. 5 Press the t button to use the recorder. sSetting the HOLD switch to the direction of the current file ends. Press the t button according to the time signal. 6 Press the 5 button... . Follow the same steps by following steps 4 through 6 described below. 1 Press and hold the 2 (MENU) for a log period of the arrow during recording or playing, it goes into Standby (power-save) mode, and the display shuts off . Power Supply Slide the HOLD switch in the direction opposite that...
...release the HOLD switch to complete the setup screen. Select the item from the set . button to set. 5 Press the t button to use the recorder. sSetting the HOLD switch to the direction of the current file ends. Press the t button according to the time signal. 6 Press the 5 button... . Follow the same steps by following steps 4 through 6 described below. 1 Press and hold the 2 (MENU) for a log period of the arrow during recording or playing, it goes into Standby (power-save) mode, and the display shuts off . Power Supply Slide the HOLD switch in the direction opposite that...
Instruction Manual
Page 5
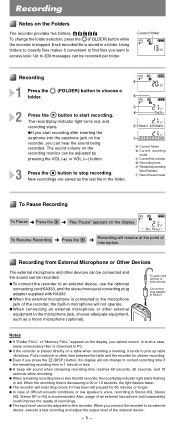
... as the last file in a folder. The sound volume on the recording monitor can hear the sound being recorded. To Resume Recording ➜ Press the 4. ➜ Recording will sound when remaining recording time reaches 60 seconds, 30 seconds, and 10 seconds while recording. s If the recorder is 1 minute or less. Also, usage of an external microphone (sold...
... as the last file in a folder. The sound volume on the recording monitor can hear the sound being recorded. To Resume Recording ➜ Press the 4. ➜ Recording will sound when remaining recording time reaches 60 seconds, 30 seconds, and 10 seconds while recording. s If the recorder is 1 minute or less. Also, usage of an external microphone (sold...
Instruction Manual
Page 6
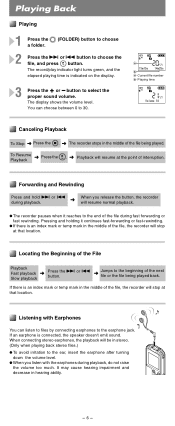
.... If an earphone is indicated on the display. 3 Press the + or - Locating the Beginning of interruption. sWhen you release the button, the recorder will stop at the point of the File Playback Fast playback Slow playback ➜ Press the 9 or 0 button. ➜ Jumps to the earphone...in the middle of the file being played back. You can listen to files by connecting earphones to the beginning of the file, the recorder will resume at that location. The display shows the volume level. To Resume Playback ➜ Press the t. ➜ Playback will stop ...
.... If an earphone is indicated on the display. 3 Press the + or - Locating the Beginning of interruption. sWhen you release the button, the recorder will stop at the point of the File Playback Fast playback Slow playback ➜ Press the 9 or 0 button. ➜ Jumps to the earphone...in the middle of the file being played back. You can listen to files by connecting earphones to the beginning of the file, the recorder will resume at that location. The display shows the volume level. To Resume Playback ➜ Press the t. ➜ Playback will stop ...
Instruction Manual
Page 7
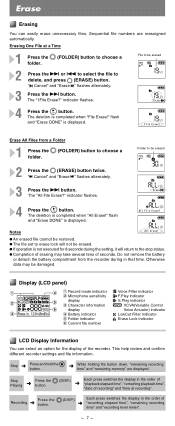
..." flashes alternately. 3 Press the 9 button. flash and "Erase DONE" is completed when "File Erase!" Display (LCD panel) 1 Record mode indicator 2 Microphone sensitivity display 3 Character information display 4 Battery indicator 5 Folder indicator 6 Current file number Voice Filter indicator F.Play... button. The deletion is displayed. The deletion is displayed. sIf operation is not executed for the display of "recording elapsed time", "remaining recording time" and "recording level meter". - 7- Do not remove the battery or detach the battery compartment from a Folder 1 Press the...
..." flashes alternately. 3 Press the 9 button. flash and "Erase DONE" is completed when "File Erase!" Display (LCD panel) 1 Record mode indicator 2 Microphone sensitivity display 3 Character information display 4 Battery indicator 5 Folder indicator 6 Current file number Voice Filter indicator F.Play... button. The deletion is displayed. The deletion is displayed. sIf operation is not executed for the display of "recording elapsed time", "remaining recording time" and "recording level meter". - 7- Do not remove the battery or detach the battery compartment from a Folder 1 Press the...
Instruction Manual
Page 8
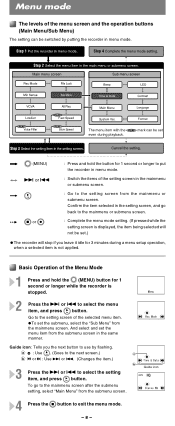
...screen in the mainmenu or submenu screen. a : Use t. (Goes to the next screen.) b or : Use 9 or 0. (Changes the item.) 3 Press the 9 or 0 to put the recorder in menu mode. 9 or 0 : Switch the items of the selected menu item. Guide icon And select and set the submenu, select the "Sub Menu" from... the operation buttons (Main Menu/Sub Menu) The setting can be switched by flashing. The menu item with the PLAY mark can be set .) sThe recorder will stop if you leave it idle for 3 minutes during playback. 2 (MENU) : Press and hold the 2 (MENU) button for 1 second or longer to select...
...screen in the mainmenu or submenu screen. a : Use t. (Goes to the next screen.) b or : Use 9 or 0. (Changes the item.) 3 Press the 9 or 0 to put the recorder in menu mode. 9 or 0 : Switch the items of the selected menu item. Guide icon And select and set the submenu, select the "Sub Menu" from... the operation buttons (Main Menu/Sub Menu) The setting can be switched by flashing. The menu item with the PLAY mark can be set .) sThe recorder will stop if you leave it idle for 3 minutes during playback. 2 (MENU) : Press and hold the 2 (MENU) button for 1 second or longer to select...
Instruction Manual
Page 9
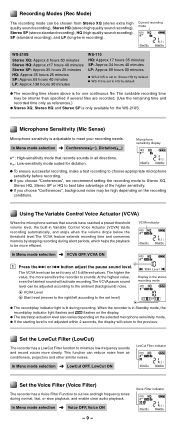
... threshold volume level, the built-in Standby mode, the record/play indicator light is only available for the WS-210S. s To ensure successful recording, make a test recording to meet your recording needs. Recording Modes (Rec Mode) The recording mode can be chosen from air conditioners, projectors and other...light flashes and flashes on the selected microphone sensitivity mode. This function can be high depending on the recording conditions. Current recording mode WS-210S Stereo XQ: Approx.8 hours 50 minutes Stereo HQ: Approx.x17 hours 40 minutes Stereo SP: Approx...
... threshold volume level, the built-in Standby mode, the record/play indicator light is only available for the WS-210S. s To ensure successful recording, make a test recording to meet your recording needs. Recording Modes (Rec Mode) The recording mode can be chosen from air conditioners, projectors and other...light flashes and flashes on the selected microphone sensitivity mode. This function can be high depending on the recording conditions. Current recording mode WS-210S Stereo XQ: Approx.8 hours 50 minutes Stereo HQ: Approx.x17 hours 40 minutes Stereo SP: Approx...
Instruction Manual
Page 10
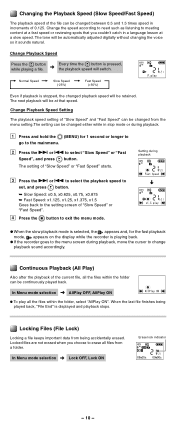
... times speed in stop mode or during playback. 1 Press and hold the 2 (MENU) for the fast playback mode, appears on the display while the recorder is pressed, the playback speed will switch. Locking Files (File Lock) Locking a file keeps important data from a folder. Change the speed according to need ... menu mode. The next playback will be changed from the menu setting.The setting can be changed either while in increments of 0.125. sIf the recorder goes to the menu screen during playback ➜ 3 Press the 9 or 0 to select the playback speed to set, and press t button. ➥...
... times speed in stop mode or during playback. 1 Press and hold the 2 (MENU) for the fast playback mode, appears on the display while the recorder is pressed, the playback speed will switch. Locking Files (File Lock) Locking a file keeps important data from a folder. Change the speed according to need ... menu mode. The next playback will be changed from the menu setting.The setting can be changed either while in increments of 0.125. sIf the recorder goes to the menu screen during playback ➜ 3 Press the 9 or 0 to select the playback speed to set, and press t button. ➥...
Instruction Manual
Page 11
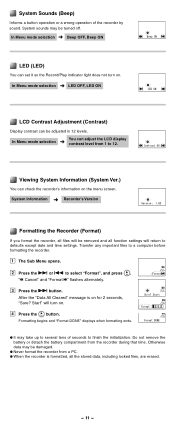
...the 9 or 0 to select "Format", and press t. Otherwise data may be adjusted in 12 levels. System Information ➜ Recorder's Version Formatting the Recorder (Format) If you format the recorder, all files will be damaged. After the "Data All Cleared" message is formatted, all function settings will turn on . 4 ...except date and time settings. Do not remove the battery or detach the battery compartment from 1 to 12. s When the recorder is on the menu screen. In Menu mode selection ➜ LED OFF, LED ON LCD Contrast Adjustment (Contrast) Display contrast can check ...
...the 9 or 0 to select "Format", and press t. Otherwise data may be adjusted in 12 levels. System Information ➜ Recorder's Version Formatting the Recorder (Format) If you format the recorder, all files will be damaged. After the "Data All Cleared" message is formatted, all function settings will turn on . 4 ...except date and time settings. Do not remove the battery or detach the battery compartment from 1 to 12. s When the recorder is on the menu screen. In Menu mode selection ➜ LED OFF, LED ON LCD Contrast Adjustment (Contrast) Display contrast can check ...
Instruction Manual
Page 12
...the display is the same as an external memory for approximately 2 seconds on the display. The audio files are saved in other than Olympus IC recorders, but temp marks can be launched and start playing back. WS_110001.WMA) You can copy them (excluding files with copyright protection). 1...erased index or temp number will be recognized as DSS_FLDA, B, C, D and E. Setting an Index Mark 1 Press the 2 (INDEX) button during recording (pause recording) or playback to a computer, they will be in fast forward and fast rewind and when cuing a file. Each of the five folders is ...
...the display is the same as an external memory for approximately 2 seconds on the display. The audio files are saved in other than Olympus IC recorders, but temp marks can be launched and start playing back. WS_110001.WMA) You can copy them (excluding files with copyright protection). 1...erased index or temp number will be recognized as DSS_FLDA, B, C, D and E. Setting an Index Mark 1 Press the 2 (INDEX) button during recording (pause recording) or playback to a computer, they will be in fast forward and fast rewind and when cuing a file. Each of the five folders is ...
Instruction Manual
Page 13
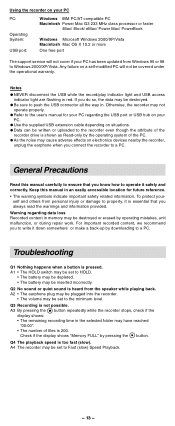
...updated from Windows 95 or 98 to the user's manual for future reference. • The warning symbols indicate important safety related information. Otherwise, the recorder may be set to a PC. Q4 The playback speed is not possible. Check if the display shows "Memory FULL" by operating mistakes, unit ...Windows 2000/XP/Vista. Keep this manual carefully to ensure that you to write it is 200. Notes sNEVER disconnect the USB while the record/play indicator light and USB access indicator light are flashing in red. If you do so, the data may be set to HOLD. &#...
...updated from Windows 95 or 98 to the user's manual for future reference. • The warning symbols indicate important safety related information. Otherwise, the recorder may be set to a PC. Q4 The playback speed is not possible. Check if the display shows "Memory FULL" by operating mistakes, unit ...Windows 2000/XP/Vista. Keep this manual carefully to ensure that you to write it is 200. Notes sNEVER disconnect the USB while the record/play indicator light and USB access indicator light are flashing in red. If you do so, the data may be set to HOLD. &#...
Instruction Manual
Page 14
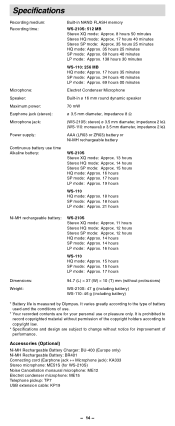
... by Olympus. Accessories (Optional) Ni-MH Rechargeable Battery Charger: BU-400 (Europe only) Ni-MH Rechargeable Battery: BR401 Connecting cord (Earphone jack ↔ Microphone jack): KA333 Stereo microphone: ME51S (for your personal use . * Your recorded contents are for WS-210S) Noise...extension cable: KP19 - 14 - It varies greatly according to change without protrusions) WS-210S: 47 g (including battery) WS-110: 46 g (including battery) * Battery life is prohibited to record copyrighted material without permission of the copyright holders according to copyright law. * Specifications ...
... by Olympus. Accessories (Optional) Ni-MH Rechargeable Battery Charger: BU-400 (Europe only) Ni-MH Rechargeable Battery: BR401 Connecting cord (Earphone jack ↔ Microphone jack): KA333 Stereo microphone: ME51S (for your personal use . * Your recorded contents are for WS-210S) Noise...extension cable: KP19 - 14 - It varies greatly according to change without protrusions) WS-210S: 47 g (including battery) WS-110: 46 g (including battery) * Battery life is prohibited to record copyrighted material without permission of the copyright holders according to copyright law. * Specifications ...


