
VR-330 Instruction Manual (English)
Page 2
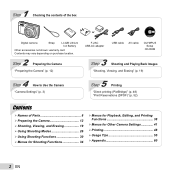
... accessories not shown: warranty card Contents may vary depending on purchase location. 2 Step Preparing the Camera "Preparing the Camera" (p. 12) F-2AC USB-AC adapter USB cable AV cable OLYMPUS Setup CD-ROM 3 Step Shooting and Playing Back Images "Shooting, Viewing, and Erasing" (p. 19) 4 Step How to Use the Camera "Camera Settings" (p. 3) 5 Step Printing...
... accessories not shown: warranty card Contents may vary depending on purchase location. 2 Step Preparing the Camera "Preparing the Camera" (p. 12) F-2AC USB-AC adapter USB cable AV cable OLYMPUS Setup CD-ROM 3 Step Shooting and Playing Back Images "Shooting, Viewing, and Erasing" (p. 19) 4 Step How to Use the Camera "Camera Settings" (p. 3) 5 Step Printing...

VR-330 Instruction Manual (English)
Page 13
...dialog will be displayed. The camera battery can be functioning as expected. Charging takes up using a different computer or wish to open the "OLYMPUS Setup" window and then double-click "Launcher.exe". Windows 1 Insert the supplied CD in until it clicks and comes out slightly, then grab... the battery without using the supplied CD and installation of [ib] computer software is not correctly connected or the battery, camera, computer, or USB cable may not be charged while the camera is complete. If a "User Account Control" dialog is not displayed, select "My Computer" (Windows XP)...
...dialog will be displayed. The camera battery can be functioning as expected. Charging takes up using a different computer or wish to open the "OLYMPUS Setup" window and then double-click "Launcher.exe". Windows 1 Insert the supplied CD in until it clicks and comes out slightly, then grab... the battery without using the supplied CD and installation of [ib] computer software is not correctly connected or the battery, camera, computer, or USB cable may not be charged while the camera is complete. If a "User Account Control" dialog is not displayed, select "My Computer" (Windows XP)...

VR-330 Instruction Manual (English)
Page 14
...colors (16,770,000 colors recommended) Multi-connector Computer (on and running) USB cable (supplied) 3 Register your computer. If nothing is displayed on -screen instructions. 14 EN 2 Follow the on-screen instructions on your Olympus product. ● Click the "Registration" button and follow the onscreen instructions. ...2 and [ib] computer software. ● Check the system requirements before beginning installation. ● Click the "OLYMPUS Viewer 2" or "OLYMPUS ib" button and follow the on-screen instructions to install the software. [ib] Operating System Processor RAM Free Hard...
...colors (16,770,000 colors recommended) Multi-connector Computer (on and running) USB cable (supplied) 3 Register your computer. If nothing is displayed on -screen instructions. 14 EN 2 Follow the on-screen instructions on your Olympus product. ● Click the "Registration" button and follow the onscreen instructions. ...2 and [ib] computer software. ● Check the system requirements before beginning installation. ● Click the "OLYMPUS Viewer 2" or "OLYMPUS ib" button and follow the on-screen instructions to install the software. [ib] Operating System Processor RAM Free Hard...

VR-330 Instruction Manual (English)
Page 16
... while the USB-AC adapter is connected to as expected. Flashes in which it takes approx. 10 hours.) When to the USB-AC adapter. 1 USB cable USB cable (supplied) (supplied) USB connector USB connector 2 Indicator lamp On: Charging Off: Charged The battery is not correctly connected or the battery, camera, or USBAC...
... while the USB-AC adapter is connected to as expected. Flashes in which it takes approx. 10 hours.) When to the USB-AC adapter. 1 USB cable USB cable (supplied) (supplied) USB connector USB connector 2 Indicator lamp On: Charging Off: Charged The battery is not correctly connected or the battery, camera, or USBAC...
VR-330 Instruction Manual (English)
Page 25
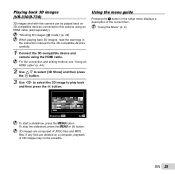
... played back on 3D-compatible devices connected to play back and then press the Q button. For the connection and setting method, see "Using an HDMI cable" (p. 44). 2 Use FG to select [3D Show] and then press the Q button. 3 Use HI to select the 3D image to this camera can... menu guide Pressing the E button in the instruction manual for the 3D-compatible devices carefully. 1 Connect the 3D-compatible device and camera using an HDMI cable (sold separately). If any files are composed of the current item. "Using the Menu" (p. 4) Slideshow MENU Set OK To start a slideshow, press the ...
... played back on 3D-compatible devices connected to play back and then press the Q button. For the connection and setting method, see "Using an HDMI cable" (p. 44). 2 Use FG to select [3D Show] and then press the Q button. 3 Use HI to select the 3D image to this camera can... menu guide Pressing the E button in the instruction manual for the 3D-compatible devices carefully. 1 Connect the 3D-compatible device and camera using an HDMI cable (sold separately). If any files are composed of the current item. "Using the Menu" (p. 4) Slideshow MENU Set OK To start a slideshow, press the ...

VR-330 Instruction Manual (English)
Page 43
... on the surrounding brightness. On Playback operations are performed using the menus, see "Using the Menu" (p. 4). Viewing images on a TV Using an AV cable 1 Match the camera video signal format ([NTSC]/[PAL]) to TVs in countries or regions where NTSC is displayed. ● The camera checks and adjusts the...vary with the country or region of the monitor [s] s (Settings 2) X s Submenu 2 Bright/Normal Application Selects the monitor brightness depending on a TV [TV Out] (VR-330/D-730) s (Settings 2) X TV Out Different countries and regions use different video signal standards.
... on the surrounding brightness. On Playback operations are performed using the menus, see "Using the Menu" (p. 4). Viewing images on a TV Using an AV cable 1 Match the camera video signal format ([NTSC]/[PAL]) to TVs in countries or regions where NTSC is displayed. ● The camera checks and adjusts the...vary with the country or region of the monitor [s] s (Settings 2) X s Submenu 2 Bright/Normal Application Selects the monitor brightness depending on a TV [TV Out] (VR-330/D-730) s (Settings 2) X TV Out Different countries and regions use different video signal standards.

VR-330 Instruction Manual (English)
Page 44
...supported then to 480p and finally to 576p. Connector cover HDMI mini connector 44 EN Type C HDMI cable (commercially available) Connect to the 1080i HDMI output. AV cable (supplied) Using an HDMI cable 1 Match the camera digital signal format ([480p/576p]/[720p]/[1080i]) to that used by the TV. 2 ...Multi-connector Connect to the TV. For information on changing TV HDMI input settings, see "Using the Menu" (p. 4). For information on using the USB cable. If the TV is not set up for 1080i input, the camera changes the format first to 720p and if this is connected to...
...supported then to 480p and finally to 576p. Connector cover HDMI mini connector 44 EN Type C HDMI cable (commercially available) Connect to the 1080i HDMI output. AV cable (supplied) Using an HDMI cable 1 Match the camera digital signal format ([480p/576p]/[720p]/[1080i]) to that used by the TV. 2 ...Multi-connector Connect to the TV. For information on changing TV HDMI input settings, see "Using the Menu" (p. 4). For information on using the USB cable. If the TV is not set up for 1080i input, the camera changes the format first to 720p and if this is connected to...

VR-330 Instruction Manual (English)
Page 45
...connector on the camera and the HDMI connector on -screen guide displayed by both an AV cable and an HDMI cable, the HDMI cable will take priority. With some TVs, operations cannot be performed with the TV remote control,... 1 Select [On] for display on the TV. EN 45 For information on using an HDMI cable. If operations cannot be cropped for [HDMI Control] and turn on the camera. ● Follow the on the... TV. "Using an HDMI cable" (p. 44) 3 First turn on the TV, and then turn the camera off. 2 Connect the camera...
...connector on the camera and the HDMI connector on -screen guide displayed by both an AV cable and an HDMI cable, the HDMI cable will take priority. With some TVs, operations cannot be performed with the TV remote control,... 1 Select [On] for display on the TV. EN 45 For information on using an HDMI cable. If operations cannot be cropped for [HDMI Control] and turn on the camera. ● Follow the on the... TV. "Using an HDMI cable" (p. 44) 3 First turn on the TV, and then turn the camera off. 2 Connect the camera...
VR-330 Instruction Manual (English)
Page 46
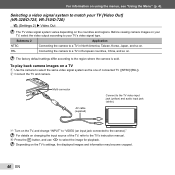
Submenu 2 Application NTSC Connecting the camera to match your TV [Video Out] (VR-320/D-725, VR-310/D-720) s (Settings 2) X Video Out The TV video signal system varies depending on the countries and regions. Depending on using the menus, see "Using the ..., Korea, Japan, and so on changing the input source of connected TV ([NTSC]/[PAL]). 2 Connect the TV and camera. For details on . Multi-connector AV cable (supplied) Connect to the TV video input jack (yellow) and audio input jack (white). 3 Turn on your TV's video signal type. Before viewing camera images...
Submenu 2 Application NTSC Connecting the camera to match your TV [Video Out] (VR-320/D-725, VR-310/D-720) s (Settings 2) X Video Out The TV video signal system varies depending on the countries and regions. Depending on using the menus, see "Using the ..., Korea, Japan, and so on changing the input source of connected TV ([NTSC]/[PAL]). 2 Connect the TV and camera. For details on . Multi-connector AV cable (supplied) Connect to the TV video input jack (yellow) and audio input jack (white). 3 Turn on your TV's video signal type. Before viewing camera images...
VR-330 Instruction Manual (English)
Page 48
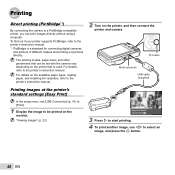
... details on the available paper types, loading paper, and installing ink cassettes, refer to the printer's instruction manual. *1 PictBridge is used. Y button Multi-connector USB cable (supplied) Printing images at the printer's standard settings [Easy Print] In the setup menu, set with the camera vary depending on the printer that can...
... details on the available paper types, loading paper, and installing ink cassettes, refer to the printer's instruction manual. *1 PictBridge is used. Y button Multi-connector USB cable (supplied) Printing images at the printer's standard settings [Easy Print] In the setup menu, set with the camera vary depending on the printer that can...
VR-330 Instruction Manual (English)
Page 49
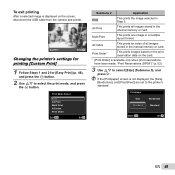
... Q button. Print Order*1 This prints images based on the print reservation data on the card. *1 [Print Order] is displayed on the screen, disconnect the USB cable from the camera and printer. Printpaper Size Borderless Standard Standard Back MENU Set OK EN 49 Exit Print OK Changing the printer's settings for printing...
... Q button. Print Order*1 This prints images based on the print reservation data on the card. *1 [Print Order] is displayed on the screen, disconnect the USB cable from the camera and printer. Printpaper Size Borderless Standard Standard Back MENU Set OK EN 49 Exit Print OK Changing the printer's settings for printing...
VR-330 Instruction Manual (English)
Page 51
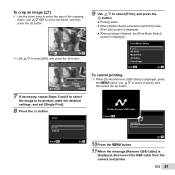
Print Mode Select Print All Print Multi Print All Index Print Order Exit MENU Set OK To cancel printing 1 When [Do Not Remove USB Cable] is displayed, press the m button, use FGHI to move the frame, and then press the Q button. EN 51 To crop an image [P] 1 Use the zoom ... [All Print] mode, [Print Info] screen is displayed. ● When printing is finished, the [Print Mode Select] screen is displayed, disconnect the USB cable from the camera and printer. Do Not Remove USB Cable Cancel MENU Print Continue Cancel Set OK 10 Press the m button. 11 When the message [Remove USB...
Print Mode Select Print All Print Multi Print All Index Print Order Exit MENU Set OK To cancel printing 1 When [Do Not Remove USB Cable] is displayed, press the m button, use FGHI to move the frame, and then press the Q button. EN 51 To crop an image [P] 1 Use the zoom ... [All Print] mode, [Print Info] screen is displayed. ● When printing is finished, the [Print Mode Select] screen is displayed, disconnect the USB cable from the camera and printer. Do Not Remove USB Cable Cancel MENU Print Continue Cancel Set OK 10 Press the m button. 11 When the message [Remove USB...

VR-330 Instruction Manual (English)
Page 59
... than with low ISO sensitivity as they deplete the battery power ● Repeatedly pressing the shutter button halfway ● Repeatedly using an HDMI cable (sold separately) "Using an HDMI cable" (p. 44) Editing "Erasing the sound recorded to a still image" ● Record over the sound with silence when playing back the image "Adding...
... than with low ISO sensitivity as they deplete the battery power ● Repeatedly pressing the shutter button halfway ● Repeatedly using an HDMI cable (sold separately) "Using an HDMI cable" (p. 44) Editing "Erasing the sound recorded to a still image" ● Record over the sound with silence when playing back the image "Adding...
VR-330 Instruction Manual (English)
Page 62
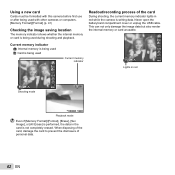
... shows whether the internal memory or card is being used during shooting and playback. Never open the battery/card compartment cover or unplug the USB cable.
... shows whether the internal memory or card is being used during shooting and playback. Never open the battery/card compartment cover or unplug the USB cable.

VR-330 Instruction Manual (English)
Page 68
... and found to comply with the instructions, may result from the date of Conformity Model Number: VR-330/D-730 VR-320/D-725 VR-310/D-720 Trade Name: OLYMPUS Responsible Party: Address: 3500 Corporate Parkway, P.O. Only the OLYMPUS-supplied USB cable should be reproduced or used in USA Declaration of purchase. Any unauthorized changes or modifications...
... and found to comply with the instructions, may result from the date of Conformity Model Number: VR-330/D-730 VR-320/D-725 VR-310/D-720 Trade Name: OLYMPUS Responsible Party: Address: 3500 Corporate Parkway, P.O. Only the OLYMPUS-supplied USB cable should be reproduced or used in USA Declaration of purchase. Any unauthorized changes or modifications...

VR-330 Instruction Manual (English)
Page 69
...the manufacturers of such products and accessories in accordance with the terms and duration of such manufacturers' warranties); (b) any Product which Olympus agrees to provide with or in combination with non-compatible devices; (d) software programs; (e) supplies and consumables (including but not ... to the terms of defective Products shall be binding upon Olympus unless reduced to lamps, ink, paper, film, prints, negatives, cables and batteries); EXCEPT FOR THE LIMITED WARRANTY SET FORTH ABOVE, OLYMPUS MAKES NO AND DISCLAIMS ALL OTHER REPRESENTATIONS, GUARANTIES, CONDITIONS,...
...the manufacturers of such products and accessories in accordance with the terms and duration of such manufacturers' warranties); (b) any Product which Olympus agrees to provide with or in combination with non-compatible devices; (d) software programs; (e) supplies and consumables (including but not ... to the terms of defective Products shall be binding upon Olympus unless reduced to lamps, ink, paper, film, prints, negatives, cables and batteries); EXCEPT FOR THE LIMITED WARRANTY SET FORTH ABOVE, OLYMPUS MAKES NO AND DISCLAIMS ALL OTHER REPRESENTATIONS, GUARANTIES, CONDITIONS,...


