
VG-160 Instruction Manual (English)
Page 1
... development stages and may differ from the actual product. DIGITAL CAMERA VG-160 Instruction Manual ● Thank you for future reference. ● We recommend that you start to use your camera before taking important photographs. ● In the interest of continually improving our products, Olympus reserves the right to enjoy optimum performance and a longer service...
... development stages and may differ from the actual product. DIGITAL CAMERA VG-160 Instruction Manual ● Thank you for future reference. ● We recommend that you start to use your camera before taking important photographs. ● In the interest of continually improving our products, Olympus reserves the right to enjoy optimum performance and a longer service...
VG-160 Instruction Manual (English)
Page 2
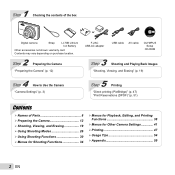
...-70B Lithium Ion Battery Other accessories not shown: warranty card Contents may vary depending on purchase location. 2 Step Preparing the Camera "Preparing the Camera" (p. 12) F-2AC USB-AC adapter USB cable AV cable OLYMPUS Setup CD-ROM 3 Step Shooting and Playing Back Images "Shooting, Viewing, and Erasing" (p. 19) 4 Step How to Use the...
...-70B Lithium Ion Battery Other accessories not shown: warranty card Contents may vary depending on purchase location. 2 Step Preparing the Camera "Preparing the Camera" (p. 12) F-2AC USB-AC adapter USB cable AV cable OLYMPUS Setup CD-ROM 3 Step Shooting and Playing Back Images "Shooting, Viewing, and Erasing" (p. 19) 4 Step How to Use the...
VG-160 Instruction Manual (English)
Page 3
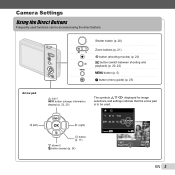
.... 02 . 26 12 : 30 Y/M/D 4/30 Cancel MENU Set OK Single Print NORM 14M FILE 100 0004 '11/02/26 12:30 Print OK More EN 3 Camera Settings Using the Direct Buttons Frequently used .
.... 02 . 26 12 : 30 Y/M/D 4/30 Cancel MENU Set OK Single Print NORM 14M FILE 100 0004 '11/02/26 12:30 Print OK More EN 3 Camera Settings Using the Direct Buttons Frequently used .
VG-160 Instruction Manual (English)
Page 4
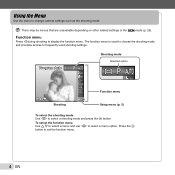
... shooting settings. The function menu is used to choose the shooting mode and provides access to display the function menu. Press the Q button to change camera settings such as the shooting mode. Using the Menu Use the menu to set the function menu. 4 EN There may be menus that are unavailable...
... shooting settings. The function menu is used to choose the shooting mode and provides access to display the function menu. Press the Q button to change camera settings such as the shooting mode. Using the Menu Use the menu to set the function menu. 4 EN There may be menus that are unavailable...
VG-160 Instruction Manual (English)
Page 5
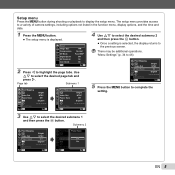
... menu provides access to highlight the page tabs. Icon Guide Exit MENU 14M Normal Face/iESP Off On On Set OK 2 Press H to a variety of camera settings, including options not listed in the function menu, display options, and the time and date. 1 Press the m button. ● The setup menu is selected...
... menu provides access to highlight the page tabs. Icon Guide Exit MENU 14M Normal Face/iESP Off On On Set OK 2 Press H to a variety of camera settings, including options not listed in the function menu, display options, and the time and date. 1 Press the m button. ● The setup menu is selected...
VG-160 Instruction Manual (English)
Page 7
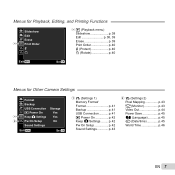
... Order 1? 2y 1 q (Playback menu) Slideshow p. 38 Edit p. 38, 39 Erase p. 39 Print Order p. 40 ? (Protect p. 40 y (Rotate p. 40 Exit MENU Set OK Menus for Other Camera Settings 1 Format 2 Backup USB Connection Storage q Power On Yes 1 1 Keep K Settings Yes 2 2 Pw On Setup On Sound Settings Exit MENU Set OK 1 r (Settings 1) Memory Format...
... Order 1? 2y 1 q (Playback menu) Slideshow p. 38 Edit p. 38, 39 Erase p. 39 Print Order p. 40 ? (Protect p. 40 y (Rotate p. 40 Exit MENU Set OK Menus for Other Camera Settings 1 Format 2 Backup USB Connection Storage q Power On Yes 1 1 Keep K Settings Yes 2 2 Pw On Setup On Sound Settings Exit MENU Set OK 1 r (Settings 1) Memory Format...
VG-160 Instruction Manual (English)
Page 9
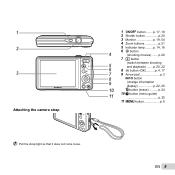
p. 14, 16 4 6 R button (shooting movies) ....... p. 17, 19 2 Shutter button p. 20 3 Monitor p. 19, 54 4 Zoom buttons p. 21 5 Indicator lamp......... p. 4, 17 7 9 Arrow pad p. 3 8 INFO button 9 (change information display p. 22, 25 10 D button (erase p. 24 11 10 E button (menu guide p. 25 11 m button p. 5 Pull the strap tight so that it does not come loose. EN 9 1 2 3 Attaching the camera strap 1 n button........ p. 20, 22 8 Q button (OK).......... p. 20 7 q button 5 6 (switch between shooting and playback) .......
p. 14, 16 4 6 R button (shooting movies) ....... p. 17, 19 2 Shutter button p. 20 3 Monitor p. 19, 54 4 Zoom buttons p. 21 5 Indicator lamp......... p. 4, 17 7 9 Arrow pad p. 3 8 INFO button 9 (change information display p. 22, 25 10 D button (erase p. 24 11 10 E button (menu guide p. 25 11 m button p. 5 Pull the strap tight so that it does not come loose. EN 9 1 2 3 Attaching the camera strap 1 n button........ p. 20, 22 8 Q button (OK).......... p. 20 7 q button 5 6 (switch between shooting and playback) .......
VG-160 Instruction Manual (English)
Page 10
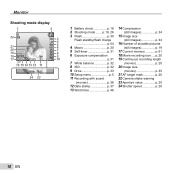
p. 20 19 Continuous recording length (movies p. 20 20 Image size (movies p. 35 21 AF target mark p. 20 22 Camera shake warning 23 Aperture value p. 20 24 Shutter speed p. 20 10 EN p. 19, 26 3 Flash p. 30 Flash standby/flash charge p. 54 4 Macro p. 30 5 Self-...
p. 20 19 Continuous recording length (movies p. 20 20 Image size (movies p. 35 21 AF target mark p. 20 22 Camera shake warning 23 Aperture value p. 20 24 Shutter speed p. 20 10 EN p. 19, 26 3 Flash p. 30 Flash standby/flash charge p. 54 4 Macro p. 30 5 Self-...
VG-160 Instruction Manual (English)
Page 12
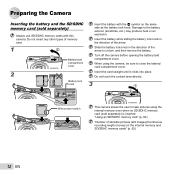
.../card compartment cover. Damage to close the battery/ card compartment cover. Insert the card straight until it clicks into place. Preparing the Camera Inserting the battery and the SD/SDHC memory card (sold separately) is inserted. When using the internal memory even when no SD/SDHC...)/Continuous recording length (movies) in the direction of memory card. 1 2 1 Battery/card compartment cover 2 Battery lock knob Insert the battery with this camera. "Using an SD/SDHC memory card" (p. 60) "Number of the arrow. Do not insert any other types of the arrow to take pictures using...
.../card compartment cover. Damage to close the battery/ card compartment cover. Insert the card straight until it clicks into place. Preparing the Camera Inserting the battery and the SD/SDHC memory card (sold separately) is inserted. When using the internal memory even when no SD/SDHC...)/Continuous recording length (movies) in the direction of memory card. 1 2 1 Battery/card compartment cover 2 Battery lock knob Insert the battery with this camera. "Using an SD/SDHC memory card" (p. 60) "Number of the arrow. Do not insert any other types of the arrow to take pictures using...

VG-160 Instruction Manual (English)
Page 13
...registration using a computer. If the "Setup" dialog is displayed, click "Yes" or "Continue". Click "OLYMPUS Setup" to open the "OLYMPUS Setup" window and then double-click "Launcher.exe". The camera battery can be functioning as expected. See "Charging the battery with Windows XP (Service Pack 2 or ...later), Windows Vista, or Windows 7. Double-click the CD-ROM (OLYMPUS Setup) icon to display the "Setup" dialog. Charging...
...registration using a computer. If the "Setup" dialog is displayed, click "Yes" or "Continue". Click "OLYMPUS Setup" to open the "OLYMPUS Setup" window and then double-click "Launcher.exe". The camera battery can be functioning as expected. See "Charging the battery with Windows XP (Service Pack 2 or ...later), Windows Vista, or Windows 7. Double-click the CD-ROM (OLYMPUS Setup) icon to display the "Setup" dialog. Charging...

VG-160 Instruction Manual (English)
Page 14
Connecting the camera Multi-connector OLYMPUS Viewer 2 Operating System Windows XP (Service Pack 2 or later) / Windows Vista / Windows 7 Processor Pentium 4 1.3 GHz or better RAM 1 GB or more (2 GB or more recommended) ...,770,000 colors recommended) A minimum of 64 MB video RAM with DirectX 9 or later. * See online help for information on using the software. 5 Install the camera manual. ● Click the "Camera Instruction Manual" button and follow the on-screen instructions. 14 EN If nothing is displayed on the...
Connecting the camera Multi-connector OLYMPUS Viewer 2 Operating System Windows XP (Service Pack 2 or later) / Windows Vista / Windows 7 Processor Pentium 4 1.3 GHz or better RAM 1 GB or more (2 GB or more recommended) ...,770,000 colors recommended) A minimum of 64 MB video RAM with DirectX 9 or later. * See online help for information on using the software. 5 Install the camera manual. ● Click the "Camera Instruction Manual" button and follow the on-screen instructions. 14 EN If nothing is displayed on the...

VG-160 Instruction Manual (English)
Page 15
...manual for your language to open the folder containing the camera manuals. For information on -screen instructions to install the software. Macintosh 1 Insert the supplied CD in a CD-ROM drive. ● Double-click the CD (OLYMPUS Setup) icon on the desktop. ● Double-...system requirements before beginning installation. ● Click the "OLYMPUS Viewer 2" button and follow the on using the software, see online help. 3 Copy the camera manual. ● Click the "Camera Instruction Manual" button to the computer. EN 15 OLYMPUS Viewer 2 Operating System Mac OS X v10.4.11-v10.6...
...manual for your language to open the folder containing the camera manuals. For information on -screen instructions to install the software. Macintosh 1 Insert the supplied CD in a CD-ROM drive. ● Double-click the CD (OLYMPUS Setup) icon on the desktop. ● Double-...system requirements before beginning installation. ● Click the "OLYMPUS Viewer 2" button and follow the on using the software, see online help. 3 Copy the camera manual. ● Click the "Camera Instruction Manual" button to the computer. EN 15 OLYMPUS Viewer 2 Operating System Mac OS X v10.4.11-v10.6...
VG-160 Instruction Manual (English)
Page 16
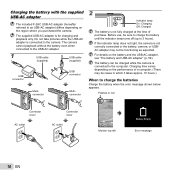
...differs depending on the battery and the USB-AC adapter, see "The battery and USB-AC adapter" (p. 59). Before use, be charged while the camera is connected to the USB-AC adapter. 1 USB cable USB cable (supplied) (supplied) USB connector USB connector Multiconnector Multiconnector 2 Indicator lamp On: ... cases in red Connector cover AC outlet Connector cover AC outlet 4 14M Monitor top left Battery Empty Error message 16 EN The camera cannot playback without the battery even when connected to the computer. The battery can be sure to charge the battery until the indicator...
...differs depending on the battery and the USB-AC adapter, see "The battery and USB-AC adapter" (p. 59). Before use, be charged while the camera is connected to the USB-AC adapter. 1 USB cable USB cable (supplied) (supplied) USB connector USB connector Multiconnector Multiconnector 2 Indicator lamp On: ... cases in red Connector cover AC outlet Connector cover AC outlet 4 14M Monitor top left Battery Empty Error message 16 EN The camera cannot playback without the battery even when connected to the computer. The battery can be sure to charge the battery until the indicator...
VG-160 Instruction Manual (English)
Page 17
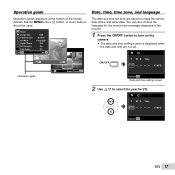
X Y M D Time Y/M/D Cancel MENU Date and time setting screen 2 Use FG to turn on the camera. ● The date and time setting screen is displayed when the date and time are saved to image file names, date prints, and other ...
X Y M D Time Y/M/D Cancel MENU Date and time setting screen 2 Use FG to turn on the camera. ● The date and time setting screen is displayed when the date and time are saved to image file names, date prints, and other ...
VG-160 Instruction Manual (English)
Page 19
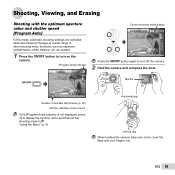
... while also allowing changes to a wide range of other shooting menu functions, such as needed. 1 Press the n button to turn on the camera. [Program Auto] indicator P Current shooting mode display Program Auto P 0.0 WB AUTO ISO AUTO 4 14M Press the n button again to turn off the... camera. 2 Hold the camera and compose the shot. 4 14M 0.0 WB AUTO ISO AUTO # Monitor Horizontal grip Number of storable still pictures (p. 62) Monitor (standby mode screen) If ...
... while also allowing changes to a wide range of other shooting menu functions, such as needed. 1 Press the n button to turn on the camera. [Program Auto] indicator P Current shooting mode display Program Auto P 0.0 WB AUTO ISO AUTO 4 14M Press the n button again to turn off the... camera. 2 Hold the camera and compose the shot. 4 14M 0.0 WB AUTO ISO AUTO # Monitor Horizontal grip Number of storable still pictures (p. 62) Monitor (standby mode screen) If ...
VG-160 Instruction Manual (English)
Page 20
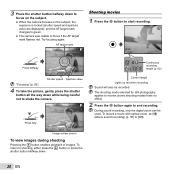
... when recording Sound will also be used. Try focusing again. To record a movie with optical zoom, set [R] (Movie sound recording) (p. 36) to shake the camera. AF target mark P Shooting movies 1 Press the R button to start recording. 0:34 REC 0:00 Press halfway 1/400 F2.8 Shutter speed Aperture value "Focusing" ...(p. 56) 4 To take the picture, gently press the shutter button all the way down to focus on the subject. ● When the camera focuses on the subject, the exposure is locked (shutter speed and aperture value are displayed), and the AF target mark changes to green. ●...
... when recording Sound will also be used. Try focusing again. To record a movie with optical zoom, set [R] (Movie sound recording) (p. 36) to shake the camera. AF target mark P Shooting movies 1 Press the R button to start recording. 0:34 REC 0:00 Press halfway 1/400 F2.8 Shutter speed Aperture value "Focusing" ...(p. 56) 4 To take the picture, gently press the shutter button all the way down to focus on the subject. ● When the camera focuses on the subject, the exposure is locked (shutter speed and aperture value are displayed), and the AF target mark changes to green. ●...
VG-160 Instruction Manual (English)
Page 21
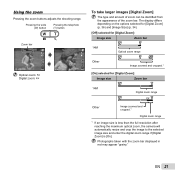
... Other Image zoomed and cropped.*1 Digital zoom range *1 If an image size is less than the full resolution after reaching the maximum optical zoom, the camera will automatically resize and crop the image to the selected image size and enter the digital zoom range if [Digital Zoom] is [On]. Photographs taken...
... Other Image zoomed and cropped.*1 Digital zoom range *1 If an image size is less than the full resolution after reaching the maximum optical zoom, the camera will automatically resize and crop the image to the selected image size and enter the digital zoom range if [Digital Zoom] is [On]. Photographs taken...
VG-160 Instruction Manual (English)
Page 26
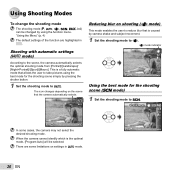
...and subject movement. 1 Set the shooting mode to take pictures using the function menu. When the camera cannot identify which is a fully automatic mode that the camera automatically selects. The icon changes depending on settings in . There are highlighted in M mode. 26 ...Auto] will be changed by using the best mode for the shooting scene (s mode) 1 Set the shooting mode to the scene, the camera automatically selects the optimal shooting mode from [Portrait]/[Landscape]/ [Night+Portrait]/[Sport]/[Macro]. Using Shooting Modes To change the shooting mode The shooting mode...
...and subject movement. 1 Set the shooting mode to take pictures using the function menu. When the camera cannot identify which is a fully automatic mode that the camera automatically selects. The icon changes depending on settings in . There are highlighted in M mode. 26 ...Auto] will be changed by using the best mode for the shooting scene (s mode) 1 Set the shooting mode to the scene, the camera automatically selects the optimal shooting mode from [Portrait]/[Landscape]/ [Night+Portrait]/[Sport]/[Macro]. Using Shooting Modes To change the shooting mode The shooting mode...

VG-160 Instruction Manual (English)
Page 27
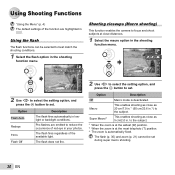
...a moving subject like a pet ([ Pet]) 1 Use HI to select [ Pet], and press the Q button to set. 2 Hold the camera to align the AF target mark on it continuously. To take pictures of a moving subject continuously (AF Tracking)" (p. 35). This approximately doubles the shooting .../F Landscape/ G Night Scene*1/M Night+Portrait/ C Sport/N Indoor/W Candle*1/ R Self Portrait/S Sunset*1/ X Fireworks*1/V Cuisine/ d Documents/K Beach & Snow/ Pet The camera takes a picture using the optimum settings for specific shooting scenes. 2 Press G to go to the submenu.
...a moving subject like a pet ([ Pet]) 1 Use HI to select [ Pet], and press the Q button to set. 2 Hold the camera to align the AF target mark on it continuously. To take pictures of a moving subject continuously (AF Tracking)" (p. 35). This approximately doubles the shooting .../F Landscape/ G Night Scene*1/M Night+Portrait/ C Sport/N Indoor/W Candle*1/ R Self Portrait/S Sunset*1/ X Fireworks*1/V Cuisine/ d Documents/K Beach & Snow/ Pet The camera takes a picture using the optimum settings for specific shooting scenes. 2 Press G to go to the submenu.
VG-160 Instruction Manual (English)
Page 30
The flash does not fire. Shooting closeups (Macro shooting) This function enables the camera to focus and shoot subjects at the most telephoto (T) position. *3 The zoom is deactivated. Super Macro*3 This enables shooting as 20 cm/7.9 in.*1 (60 cm/...
The flash does not fire. Shooting closeups (Macro shooting) This function enables the camera to focus and shoot subjects at the most telephoto (T) position. *3 The zoom is deactivated. Super Macro*3 This enables shooting as 20 cm/7.9 in.*1 (60 cm/...


