
SZ-20 Instruction Manual (English)
Page 2
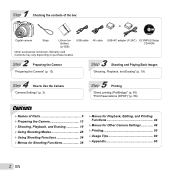
AV cable USB-AC adapter (F-2AC) OLYMPUS Setup CD-ROM 2 Step Preparing the Camera 3 Step Shooting and Playing Back Images "Preparing the Camera" (p. 13) "Shooting, Playback, and Erasing" (p. 19) 4 Step How to ... vary depending on purchase location. 1 Step Checking the contents of Parts 9 ¾ Preparing the Camera 13 ¾ Shooting, Playback, and Erasing 19 ¾ Using Shooting Modes 28 ¾ Using Shooting Functions 34 ¾ Menus for Shooting Functions 38 ¾ Menus for Playback, Editing, and Printing Functions 44 ¾ Menus for Other...
AV cable USB-AC adapter (F-2AC) OLYMPUS Setup CD-ROM 2 Step Preparing the Camera 3 Step Shooting and Playing Back Images "Preparing the Camera" (p. 13) "Shooting, Playback, and Erasing" (p. 19) 4 Step How to ... vary depending on purchase location. 1 Step Checking the contents of Parts 9 ¾ Preparing the Camera 13 ¾ Shooting, Playback, and Erasing 19 ¾ Using Shooting Modes 28 ¾ Using Shooting Functions 34 ¾ Menus for Shooting Functions 38 ¾ Menus for Playback, Editing, and Printing Functions 44 ¾ Menus for Other...

SZ-20 Instruction Manual (English)
Page 4
...) (p. 22, 25) H (left) I (right) G (down) / D button (erase) (p. 24) A button The wheel controller can be used. 1 Reset 2 Image Size 14M Compression Normal Shadow Adjust Auto 1 AF Mode Face/iESP 2 ESP/ ESP 3 Digital Zoom Off Sel. X 4/30 Y M D Time 2011. 02 . 26 00 : 00 Y/M/D Cancel MENU Set OK Single Print NORM 14M FILE 100...
...) (p. 22, 25) H (left) I (right) G (down) / D button (erase) (p. 24) A button The wheel controller can be used. 1 Reset 2 Image Size 14M Compression Normal Shadow Adjust Auto 1 AF Mode Face/iESP 2 ESP/ ESP 3 Digital Zoom Off Sel. X 4/30 Y M D Time 2011. 02 . 26 00 : 00 Y/M/D Cancel MENU Set OK Single Print NORM 14M FILE 100...

SZ-20 Instruction Manual (English)
Page 5
...the function menu. Press the A button to change camera settings such as the shooting mode. Function menu Press H during shooting to select the shooting mode and press the A button. Selected option Program Auto 3D P Shooting mode 0.0 WB AUTO ISO AUTO 4 14M Shooting Function menu Setup menu To select the ... the function menu. The function menu is used to choose the shooting mode and provides access to select a menu option. There may be menus that are unavailable depending on other related settings or the shooting mode. To select the function menu Use FG to select a menu and ...
...the function menu. Press the A button to change camera settings such as the shooting mode. Function menu Press H during shooting to select the shooting mode and press the A button. Selected option Program Auto 3D P Shooting mode 0.0 WB AUTO ISO AUTO 4 14M Shooting Function menu Setup menu To select the ... the function menu. The function menu is used to choose the shooting mode and provides access to select a menu option. There may be menus that are unavailable depending on other related settings or the shooting mode. To select the function menu Use FG to select a menu and ...

SZ-20 Instruction Manual (English)
Page 6
... FG to select the desired submenu 2 and then press the A button. ● Once a setting is displayed. 1 Reset 2 Image Size Compression Shadow Adjust 1 AF Mode 2 ESP/ 3 Digital Zoom Exit MENU 14M Normal Auto Face/iESP ESP Off Set OK 2 Press H to select the desired submenu 1 and then press the A button...the display returns to select the desired page tab and press I. "Menu Settings" (p. 38 to 54) 1 Reset 2 Image Size Compression Shadow Adjust 1 AF Mode 2 ESP/ 3 Digital Zoom Exit MENU 14M Normal Auto Face/iESP ESP On Set OK 5 Press the m button to display the setup menu. Setup menu ...
... FG to select the desired submenu 2 and then press the A button. ● Once a setting is displayed. 1 Reset 2 Image Size Compression Shadow Adjust 1 AF Mode 2 ESP/ 3 Digital Zoom Exit MENU 14M Normal Auto Face/iESP ESP Off Set OK 2 Press H to select the desired submenu 1 and then press the A button...the display returns to select the desired page tab and press I. "Menu Settings" (p. 38 to 54) 1 Reset 2 Image Size Compression Shadow Adjust 1 AF Mode 2 ESP/ 3 Digital Zoom Exit MENU 14M Normal Auto Face/iESP ESP On Set OK 5 Press the m button to display the setup menu. Setup menu ...
SZ-20 Instruction Manual (English)
Page 7
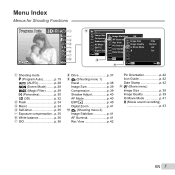
... 2 Date Stamp Exit MENU Set OK 1 3 2 0 Exit MENU Set OK 3 a Exit MENU 720p Normal Off On Set OK 1 Shooting mode P (Program Auto p. 19 M (iAUTO p. 28 s (Scene Mode) .........p. 28 P (Magic Filter) ..........p. 29 p (Panorama p. 30 W (3D p. 32 2 Flash p. 34 3 Macro p. 34 4 Self-timer p. 35 5...balance p. 36 7 ISO p. 36 8 Drive p. 37 9 p (Shooting menu 1) Reset p. 38 Image Size p. 39 Compression p. 39 Shadow Adjust p. 40 AF Mode p. 40 ESP/n p. 40 Digital Zoom p. 41 0 q (Shooting menu 2) Image Stabilizer p. 41 AF Illuminat p. 41 Rec View p. 42 Pic Orientation p. 42...
... 2 Date Stamp Exit MENU Set OK 1 3 2 0 Exit MENU Set OK 3 a Exit MENU 720p Normal Off On Set OK 1 Shooting mode P (Program Auto p. 19 M (iAUTO p. 28 s (Scene Mode) .........p. 28 P (Magic Filter) ..........p. 29 p (Panorama p. 30 W (3D p. 32 2 Flash p. 34 3 Macro p. 34 4 Self-timer p. 35 5...balance p. 36 7 ISO p. 36 8 Drive p. 37 9 p (Shooting menu 1) Reset p. 38 Image Size p. 39 Compression p. 39 Shadow Adjust p. 40 AF Mode p. 40 ESP/n p. 40 Digital Zoom p. 41 0 q (Shooting menu 2) Image Stabilizer p. 41 AF Illuminat p. 41 Rec View p. 42 Pic Orientation p. 42...

SZ-20 Instruction Manual (English)
Page 11
... 1 2 25 24 23 22 21 20 00:34 19 4 14M NORM P 3 4 5 0.0 6 WB AUTO ISO AUTO 7 8 9 DATE 18 17 16 15 14 13 12 11 10 1/100 F3.0 27 26 1 Battery check..........p. 16, 61 2 Shooting mode .......p. 19, 28 3 Flash p. 34 Flash standby/flash charge p. 60 4 Macro/super macro ......p. 34 5 ...p. 39, 68 17 Image size (still images p. 39, 68 18 Number of storable still pictures (still images p. 19 19 Current memory ...........p. 67 20 Movie recording icon ....p. 20 21 Remaining recording time (movies p. 20 22 Image size (movies) p. 39, 69 23 Histogram p. 22 24 AF target mark...
... 1 2 25 24 23 22 21 20 00:34 19 4 14M NORM P 3 4 5 0.0 6 WB AUTO ISO AUTO 7 8 9 DATE 18 17 16 15 14 13 12 11 10 1/100 F3.0 27 26 1 Battery check..........p. 16, 61 2 Shooting mode .......p. 19, 28 3 Flash p. 34 Flash standby/flash charge p. 60 4 Macro/super macro ......p. 34 5 ...p. 39, 68 17 Image size (still images p. 39, 68 18 Number of storable still pictures (still images p. 19 19 Current memory ...........p. 67 20 Movie recording icon ....p. 20 21 Remaining recording time (movies p. 20 22 Image size (movies) p. 39, 69 23 Histogram p. 22 24 AF target mark...
SZ-20 Instruction Manual (English)
Page 12
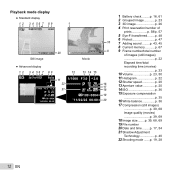
Playback mode display ● Standard display 1 2 3 4 56 7 8 9 1 3D 10 4/30 10 '11/02/26 00:00 20 Still image 00:12/00:34 9 Movie ● Advanced display 1 2 3 4 56 7 8... NORM 14M 18 FILE 100 0004 19 FILE 100 0004 '11/02/26 00:00 '11/02/26 00:00 20 1 Battery check..........p. 16, 61 2 Grouped image p. 23 3 3D image p. 26 4 Print reservation/number of ...total recording time (movies p. 23 10 Volume p. 23, 50 11 Histogram p. 22 12 Shutter speed p. 20 13 Aperture value p. 20 14 ISO p. 36 15 Exposure compensation p. 35 16 White balance p. 36 17 Compression (still images p. ...
Playback mode display ● Standard display 1 2 3 4 56 7 8 9 1 3D 10 4/30 10 '11/02/26 00:00 20 Still image 00:12/00:34 9 Movie ● Advanced display 1 2 3 4 56 7 8... NORM 14M 18 FILE 100 0004 19 FILE 100 0004 '11/02/26 00:00 '11/02/26 00:00 20 1 Battery check..........p. 16, 61 2 Grouped image p. 23 3 3D image p. 26 4 Print reservation/number of ...total recording time (movies p. 23 10 Volume p. 23, 50 11 Histogram p. 22 12 Shutter speed p. 20 13 Aperture value p. 20 14 ISO p. 36 15 Exposure compensation p. 35 16 White balance p. 36 17 Compression (still images p. ...
SZ-20 Instruction Manual (English)
Page 19
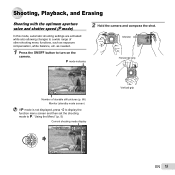
...functions, such as needed. 1 Press the n button to P. P mode indicator. "Using the Menu" (p. 5) Current shooting mode display Program Auto 3D P Vertical grip 0.0 WB AUTO ISO AUTO 4 14M MENU EN 19 In this mode, automatic shooting settings are activated while also allowing changes to a wide range... of storable still pictures (p. 68) Monitor (standby mode screen) If P mode is not displayed, press H to display the function menu screen and then set the shooting mode to turn on the camera. as exposure compensation, white balance, etc. Shooting, Playback...
...functions, such as needed. 1 Press the n button to P. P mode indicator. "Using the Menu" (p. 5) Current shooting mode display Program Auto 3D P Vertical grip 0.0 WB AUTO ISO AUTO 4 14M MENU EN 19 In this mode, automatic shooting settings are activated while also allowing changes to a wide range... of storable still pictures (p. 68) Monitor (standby mode screen) If P mode is not displayed, press H to display the function menu screen and then set the shooting mode to turn on the camera. as exposure compensation, white balance, etc. Shooting, Playback...
SZ-20 Instruction Manual (English)
Page 20
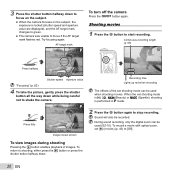
...[R] (movies) (p. 43) to [Off]. During sound recording, only the digital zoom can be used (SZ-10). To return to shooting, either press the q button or press the shutter button halfway down while ...value "Focusing" (p. 62) 4 To take the picture, gently press the shutter button all the way down . 20 EN Sound will also be used when shooting movies. Try focusing again. Shooting movies 1 Press the R button ... When the camera focuses on the subject, the exposure is performed in P mode. 2 Press the R button again to stop recording. To view images during shooting Pressing the q button ...
...[R] (movies) (p. 43) to [Off]. During sound recording, only the digital zoom can be used (SZ-10). To return to shooting, either press the q button or press the shutter button halfway down while ...value "Focusing" (p. 62) 4 To take the picture, gently press the shutter button all the way down . 20 EN Sound will also be used when shooting movies. Try focusing again. Shooting movies 1 Press the R button ... When the camera focuses on the subject, the exposure is performed in P mode. 2 Press the R button again to stop recording. To view images during shooting Pressing the q button ...
SZ-20 Instruction Manual (English)
Page 22
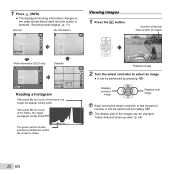
... distribution within the screen's center. 22 EN Number of frames/ Total number of images 4/30 0.0 WB AUTO ISO AUTO 00:34 4 14M MENU Movie information (SZ-20 only) P Detailed 00:34 4 14M 0.0 WB AUTO ISO AUTO 00:34 4 14M NORM Reading a histogram If the peak fills too much of the frame... reverse. If the peak fills too much of the images can be performed by pressing HI. It can be performed by holding HI. "Shooting mode display" (p. 11) Normal No information P P Viewing images 1 Press the q button.
... distribution within the screen's center. 22 EN Number of frames/ Total number of images 4/30 0.0 WB AUTO ISO AUTO 00:34 4 14M MENU Movie information (SZ-20 only) P Detailed 00:34 4 14M 0.0 WB AUTO ISO AUTO 00:34 4 14M NORM Reading a histogram If the peak fills too much of the frame... reverse. If the peak fills too much of the images can be performed by pressing HI. It can be performed by holding HI. "Shooting mode display" (p. 11) Normal No information P P Viewing images 1 Press the q button.
SZ-20 Instruction Manual (English)
Page 23
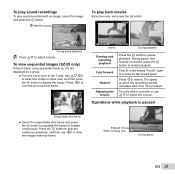
... controller or use HI to view the images frame by frame. Press I again to increase the fast forward speed. To view sequential images (SZ-20 only) Pictures taken using sequential mode (p. 37) are displayed as a group. ● Turn the zoom lever to rewind. Operations while playback is pressed. Press H to the T side. Movie...
... controller or use HI to view the images frame by frame. Press I again to increase the fast forward speed. To view sequential images (SZ-20 only) Pictures taken using sequential mode (p. 37) are displayed as a group. ● Turn the zoom lever to rewind. Operations while playback is pressed. Press H to the T side. Movie...

SZ-20 Instruction Manual (English)
Page 25
... zoom lever to move the viewing area. To scroll an image in the order shown below each time the button is pressed. "Creating panoramic images (p mode)" (p. 30) 1 Select a panorama image during playback. To stop [Photo Surfing] Use FG to pause playback. Normal 3D 10 4/30 Playing back panorama images...
... zoom lever to move the viewing area. To scroll an image in the order shown below each time the button is pressed. "Creating panoramic images (p mode)" (p. 30) 1 Select a panorama image during playback. To stop [Photo Surfing] Use FG to pause playback. Normal 3D 10 4/30 Playing back panorama images...

SZ-20 Instruction Manual (English)
Page 26
Stop playback: Press the m button. "Shooting 3D images (3D mode)" (p. 32) When playing back 3D images, read the warnings in the setup menu displays a description of JPEG files and MPO files. Using the ... OK If any files are composed of the current item. Playback direction: Press FGHI to pause playback and scroll the image in the standby mode screen or the playback screen. Playing back W images 3D images shot with this camera can be played back on a computer, playback of the pressed button...
Stop playback: Press the m button. "Shooting 3D images (3D mode)" (p. 32) When playing back 3D images, read the warnings in the setup menu displays a description of JPEG files and MPO files. Using the ... OK If any files are composed of the current item. Playback direction: Press FGHI to pause playback and scroll the image in the standby mode screen or the playback screen. Playing back W images 3D images shot with this camera can be played back on a computer, playback of the pressed button...
SZ-20 Instruction Manual (English)
Page 28
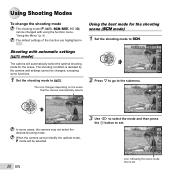
... condition is set . 0.0 WB AUTO 00:34 4 14M Icon indicating the scene mode that the camera automatically selects Using the best mode for the scene. Using Shooting Modes To change the shooting mode The shooting mode (P, M, s, P, p, W) can be changed with automatic settings (M mode) The camera will be changed, excepting some cases, the camera may not select...
... condition is set . 0.0 WB AUTO 00:34 4 14M Icon indicating the scene mode that the camera automatically selects Using the best mode for the scene. Using Shooting Modes To change the shooting mode The shooting mode (P, M, s, P, p, W) can be changed with automatic settings (M mode) The camera will be changed, excepting some cases, the camera may not select...
SZ-20 Instruction Manual (English)
Page 29
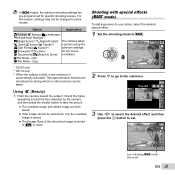
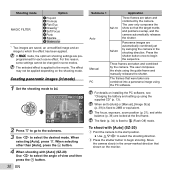
...for the scene d Documents/q Beach & Snow/ conditions. Shooting with special effects (P mode) To add expression to your photo, select the desired special effect. 1 Set the shooting mode to [n] or lower. This approximately doubles the shooting time during which no other ...Self Portrait/S Sunset*3/ optimum settings X Fireworks*3/V Cuisine/ for specific shooting scenes. Dog *1 SZ-20 only *2 SZ-10 only *3 When the subject is dark, noise reduction is automatically activated. In s modes, the optimum shooting settings are both saved. ● If the image cannot be retouched, only...
...for the scene d Documents/q Beach & Snow/ conditions. Shooting with special effects (P mode) To add expression to your photo, select the desired special effect. 1 Set the shooting mode to [n] or lower. This approximately doubles the shooting time during which no other ...Self Portrait/S Sunset*3/ optimum settings X Fireworks*3/V Cuisine/ for specific shooting scenes. Dog *1 SZ-20 only *2 SZ-10 only *3 When the subject is dark, noise reduction is automatically activated. In s modes, the optimum shooting settings are both saved. ● If the image cannot be retouched, only...
SZ-20 Instruction Manual (English)
Page 30
... a panorama image using the PC software. For this reason, some modes. To shoot with [Auto] (SZ-20) Use HI to the movie. Creating panoramic images (p mode) 1 Set the shooting mode to $ (Flash Off) mode. When selecting other than [Auto], press the A button. 4 When shooting with [Auto] (SZ-20) 1 Point the camera to the start position. ● Use FGHI...
... a panorama image using the PC software. For this reason, some modes. To shoot with [Auto] (SZ-20) Use HI to the movie. Creating panoramic images (p mode) 1 Set the shooting mode to $ (Flash Off) mode. When selecting other than [Auto], press the A button. 4 When shooting with [Auto] (SZ-20) 1 Point the camera to the start position. ● Use FGHI...
SZ-20 Instruction Manual (English)
Page 32
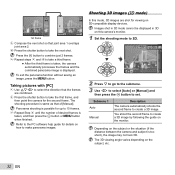
... displayed in 3D on how to set. To exit the panorama function without saving an image, press the m button. Shooting 3D images (W mode) In this camera's monitor. 1 Set the shooting mode to W. 3D Photo 3D P AUTO 4 14M MENU 2 Press G to go to the submenu. 3 Use HI to select [Auto] or [Manual] ... 3 and 4 to take the next shot. Taking pictures with [PC] 1 Use FGHI to select the direction that the frames are shot for details on this mode, 3D images are combined. 2 Press the shutter button to 10 frames. 3 Repeat Step 2 until the number of [Manual]. Panorama shooting is taken, and then ...
... displayed in 3D on how to set. To exit the panorama function without saving an image, press the m button. Shooting 3D images (W mode) In this camera's monitor. 1 Set the shooting mode to W. 3D Photo 3D P AUTO 4 14M MENU 2 Press G to go to the submenu. 3 Use HI to select [Auto] or [Manual] ... 3 and 4 to take the next shot. Taking pictures with [PC] 1 Use FGHI to select the direction that the frames are shot for details on this mode, 3D images are combined. 2 Press the shutter button to 10 frames. 3 Repeat Step 2 until the number of [Manual]. Panorama shooting is taken, and then ...

SZ-20 Instruction Manual (English)
Page 33
... taken when the subject overlaps the translucent image that is displayed on the monitor. Decide the position by referencing the image. To exit 3D shooting mode without saving an image, press the m button. The zoom ratio is taken. The first shot image is displayed on the monitor lightly. The focus...
... taken when the subject overlaps the translucent image that is displayed on the monitor. Decide the position by referencing the image. To exit 3D shooting mode without saving an image, press the m button. The zoom ratio is taken. The first shot image is displayed on the monitor lightly. The focus...

SZ-20 Instruction Manual (English)
Page 35
...seconds, and then the picture is taken. P 0.0 2 Use HI to select the setting option, and press the A button to set . SZ-10: 10 cm (4 in.)*1 160 cm (63 in.)*2 SZ-20: 10 cm (4 in.)*1 90 cm (35.4 in.)*2 This enables shooting as close as 1 cm/0.4 in the function menu. Exposure Comp. Auto.... When your pet (cat or dog) turns its face is recognized and the picture is taken automatically. *1 [Auto Release] is displayed only when the s mode is taken. The flash (p. 34) and zoom (p. 21) cannot be adjusted brighter or darker to obtain a desired shot. 1 Select the exposure compensation...
...seconds, and then the picture is taken. P 0.0 2 Use HI to select the setting option, and press the A button to set . SZ-10: 10 cm (4 in.)*1 160 cm (63 in.)*2 SZ-20: 10 cm (4 in.)*1 90 cm (35.4 in.)*2 This enables shooting as close as 1 cm/0.4 in the function menu. Exposure Comp. Auto.... When your pet (cat or dog) turns its face is recognized and the picture is taken automatically. *1 [Auto Release] is displayed only when the s mode is taken. The flash (p. 34) and zoom (p. 21) cannot be adjusted brighter or darker to obtain a desired shot. 1 Select the exposure compensation...

SZ-20 Instruction Manual (English)
Page 38
Menus for Shooting Functions The default settings of the function are highlighted in [I, J, A] (p. 38 to the default settings. • Shooting mode (p. 28) • Flash (p. 34) • Macro (p. 34) • Self-timer (p. 35) • Exposure compensation (p. 35) • White balance (p. 36) • ISO (p. 36) • Drive (p. 37) &#...
Menus for Shooting Functions The default settings of the function are highlighted in [I, J, A] (p. 38 to the default settings. • Shooting mode (p. 28) • Flash (p. 34) • Macro (p. 34) • Self-timer (p. 35) • Exposure compensation (p. 35) • White balance (p. 36) • ISO (p. 36) • Drive (p. 37) &#...


