

SZ-20 Instruction Manual (English)
Page 4
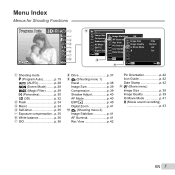
..., 25) H (left) I (right) G (down) / D button (erase) (p. 24) A button The wheel controller can be used to be used . 1 Reset 2 Image Size 14M Compression Normal Shadow Adjust Auto 1 AF Mode Face/iESP 2 ESP/ ESP 3 Digital Zoom Off Sel. Operation guide The symbols FGHI displayed for image selections and settings indicate that the m button...
..., 25) H (left) I (right) G (down) / D button (erase) (p. 24) A button The wheel controller can be used to be used . 1 Reset 2 Image Size 14M Compression Normal Shadow Adjust Auto 1 AF Mode Face/iESP 2 ESP/ ESP 3 Digital Zoom Off Sel. Operation guide The symbols FGHI displayed for image selections and settings indicate that the m button...

SZ-20 Instruction Manual (English)
Page 5
Using the Menu Use the menu to select the shooting mode and press the A button. Selected option Program Auto 3D P Shooting mode 0.0 WB AUTO ISO AUTO 4 14M Shooting Function menu Setup menu To select the shooting mode Use HI to change camera settings such as the shooting mode. To select the ...
Using the Menu Use the menu to select the shooting mode and press the A button. Selected option Program Auto 3D P Shooting mode 0.0 WB AUTO ISO AUTO 4 14M Shooting Function menu Setup menu To select the shooting mode Use HI to change camera settings such as the shooting mode. To select the ...

SZ-20 Instruction Manual (English)
Page 6
.... 6 EN "Menu Settings" (p. 38 to 54) 1 Reset 2 Image Size Compression Shadow Adjust 1 AF Mode 2 ESP/ 3 Digital Zoom Exit MENU 14M Normal Auto Face/iESP ESP On Set OK 5 Press the m button to select the desired submenu 1 and then press the A button. Submenu 2 1 Reset 2 Image Size ...Compression Shadow Adjust 1 AF Mode 2 ESP/ 3 Digital Zoom Exit MENU 14M Normal Auto Face/iESP ESP Off Set OK 1 Reset Digital Zoom 2 Image Size 14M Compression Shadow Adjust 1 AF Mode Normal OfAf uto FaOcne/iESP 2 ESP/ ESP 3 ...
.... 6 EN "Menu Settings" (p. 38 to 54) 1 Reset 2 Image Size Compression Shadow Adjust 1 AF Mode 2 ESP/ 3 Digital Zoom Exit MENU 14M Normal Auto Face/iESP ESP On Set OK 5 Press the m button to select the desired submenu 1 and then press the A button. Submenu 2 1 Reset 2 Image Size ...Compression Shadow Adjust 1 AF Mode 2 ESP/ 3 Digital Zoom Exit MENU 14M Normal Auto Face/iESP ESP Off Set OK 1 Reset Digital Zoom 2 Image Size 14M Compression Shadow Adjust 1 AF Mode Normal OfAf uto FaOcne/iESP 2 ESP/ ESP 3 ...
SZ-20 Instruction Manual (English)
Page 7
... Mode R ON 2 Date Stamp Exit MENU Set OK 1 3 2 0 Exit MENU Set OK 3 a Exit MENU 720p Normal Off On Set OK 1 Shooting mode P (Program Auto p. 19 M (iAUTO p. 28 s (Scene Mode) .........p. 28 P (Magic Filter) ..........p. 29 p (Panorama p. 30 W (3D p. 32 2 Flash p. 34 3 Macro ...Movie Mode p. 41 R (Movie sound recording) p. 43 EN 7 Menu Index Menus for Shooting Functions Program Auto 4 14M 3D P 1 2 3 4 0.0 5 WB AUTO 6 ISO AUTO 7 8 9 1 Reset 2 Image Size 1 Ima1g4Me Stabilizer ON Compression Shadow Adjust 1 AF Mode 2 ESP/ 3 Digital Zoom 2 ANFoIrlmluamlinat.
... Mode R ON 2 Date Stamp Exit MENU Set OK 1 3 2 0 Exit MENU Set OK 3 a Exit MENU 720p Normal Off On Set OK 1 Shooting mode P (Program Auto p. 19 M (iAUTO p. 28 s (Scene Mode) .........p. 28 P (Magic Filter) ..........p. 29 p (Panorama p. 30 W (3D p. 32 2 Flash p. 34 3 Macro ...Movie Mode p. 41 R (Movie sound recording) p. 43 EN 7 Menu Index Menus for Shooting Functions Program Auto 4 14M 3D P 1 2 3 4 0.0 5 WB AUTO 6 ISO AUTO 7 8 9 1 Reset 2 Image Size 1 Ima1g4Me Stabilizer ON Compression Shadow Adjust 1 AF Mode 2 ESP/ 3 Digital Zoom 2 ANFoIrlmluamlinat.
SZ-20 Instruction Manual (English)
Page 8
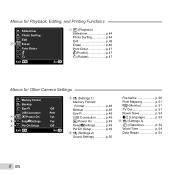
... R (Protect p. 47 y (Rotate p. 47 Menus for Other Camera Settings 1 Memory Format 2 Backup Eye-Fi USB Connection 1 1 q Power On 2 2 KeepzSettings 3 3 Pw On Setup Exit MENU Off Auto Yes Yes Off Set OK 1 r (Settings 1) Memory Format/ Format p. 48 Backup p. 48 Eye-Fi p. 48 USB Connection...........
... R (Protect p. 47 y (Rotate p. 47 Menus for Other Camera Settings 1 Memory Format 2 Backup Eye-Fi USB Connection 1 1 q Power On 2 2 KeepzSettings 3 3 Pw On Setup Exit MENU Off Auto Yes Yes Off Set OK 1 r (Settings 1) Memory Format/ Format p. 48 Backup p. 48 Eye-Fi p. 48 USB Connection...........

SZ-20 Instruction Manual (English)
Page 11
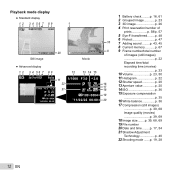
Monitor Shooting mode display 1 2 25 24 23 22 21 20 00:34 19 4 14M NORM P 3 4 5 0.0 6 WB AUTO ISO AUTO 7 8 9 DATE 18 17 16 15 14 13 12 11 10 1/100 F3.0 27 26 1 Battery check..........p. 16, 61 2 Shooting mode .......p. 19, 28 3 Flash p. 34 Flash ... Compression (still images p. 39, 68 17 Image size (still images p. 39, 68 18 Number of storable still pictures (still images p. 19 19 Current memory ...........p. 67 20 Movie recording icon ....p. 20 21 Remaining recording time (movies p. 20 22 Image size (movies) p. 39, 69 23 Histogram p. 22 24 AF target mark...
Monitor Shooting mode display 1 2 25 24 23 22 21 20 00:34 19 4 14M NORM P 3 4 5 0.0 6 WB AUTO ISO AUTO 7 8 9 DATE 18 17 16 15 14 13 12 11 10 1/100 F3.0 27 26 1 Battery check..........p. 16, 61 2 Shooting mode .......p. 19, 28 3 Flash p. 34 Flash ... Compression (still images p. 39, 68 17 Image size (still images p. 39, 68 18 Number of storable still pictures (still images p. 19 19 Current memory ...........p. 67 20 Movie recording icon ....p. 20 21 Remaining recording time (movies p. 20 22 Image size (movies) p. 39, 69 23 Histogram p. 22 24 AF target mark...
SZ-20 Instruction Manual (English)
Page 12
...20 Still image 00:12/00:34 9 Movie ● Advanced display 1 2 3 4 56 7 8 9 12 13 14 15 3D 10 4/30 11 1/1000 F3.0 2.0 22 1/1000 F3.0 2.0 21 P ISO WB 100 AUTO NORM 14M P ISO WB 100 AUTO... 16 17 NORM 14M 18 FILE 100 0004 19 FILE 100 0004 '11/02/26 00:00 '11/02/26 00:00 20 1 Battery check..........p. 16, 61 ...recording time (movies p. 23 10 Volume p. 23, 50 11 Histogram p. 22 12 Shutter speed p. 20 13 Aperture value p. 20 14 ISO p. 36 15 Exposure compensation p. 35 16 White balance p. 36 17 Compression (still images...
...20 Still image 00:12/00:34 9 Movie ● Advanced display 1 2 3 4 56 7 8 9 12 13 14 15 3D 10 4/30 11 1/1000 F3.0 2.0 22 1/1000 F3.0 2.0 21 P ISO WB 100 AUTO NORM 14M P ISO WB 100 AUTO... 16 17 NORM 14M 18 FILE 100 0004 19 FILE 100 0004 '11/02/26 00:00 '11/02/26 00:00 20 1 Battery check..........p. 16, 61 ...recording time (movies p. 23 10 Volume p. 23, 50 11 Histogram p. 22 12 Shutter speed p. 20 13 Aperture value p. 20 14 ISO p. 36 15 Exposure compensation p. 35 16 White balance p. 36 17 Compression (still images...
SZ-20 Instruction Manual (English)
Page 19
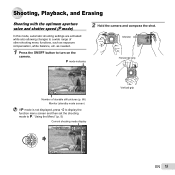
Monitor Horizontal grip P 0.0 WB AUTO ISO AUTO 00:34 4 14M Number of storable still pictures (p. 68) Monitor (standby mode screen) If P mode is not displayed, press H to display the function menu screen ... the shot. P mode indicator. In this mode, automatic shooting settings are activated while also allowing changes to P. "Using the Menu" (p. 5) Current shooting mode display Program Auto 3D P Vertical grip 0.0 WB AUTO ISO AUTO 4 14M MENU EN 19 as exposure compensation, white balance, etc.
Monitor Horizontal grip P 0.0 WB AUTO ISO AUTO 00:34 4 14M Number of storable still pictures (p. 68) Monitor (standby mode screen) If P mode is not displayed, press H to display the function menu screen ... the shot. P mode indicator. In this mode, automatic shooting settings are activated while also allowing changes to P. "Using the Menu" (p. 5) Current shooting mode display Program Auto 3D P Vertical grip 0.0 WB AUTO ISO AUTO 4 14M MENU EN 19 as exposure compensation, white balance, etc.
SZ-20 Instruction Manual (English)
Page 21
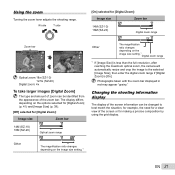
... for [Digital Zoom] (p. 41) and [Image Size] (p. 39). [Off] selected for [Digital Zoom]: Image size Zoom bar 14M (SZ-10) 16M (SZ-20) Optical zoom range Other The magnification ratio changes depending on the image size setting.*1 EN 21 Photographs taken with the zoom bar...T side [On] selected for [Digital Zoom]: Image size Zoom bar 14M (SZ-10) 16M (SZ-20) Digital zoom range Zoom bar P P 0.0 0.0 WB WB AUTO AUTO ISO ISO AUTO AUTO 00:34 00:34 4 14M 4 14M Optical zoom:18x (SZ-10) 12.5x (SZ-20) Digital zoom: 4x To take larger images [Digital Zoom] The type and ...
... for [Digital Zoom] (p. 41) and [Image Size] (p. 39). [Off] selected for [Digital Zoom]: Image size Zoom bar 14M (SZ-10) 16M (SZ-20) Optical zoom range Other The magnification ratio changes depending on the image size setting.*1 EN 21 Photographs taken with the zoom bar...T side [On] selected for [Digital Zoom]: Image size Zoom bar 14M (SZ-10) 16M (SZ-20) Digital zoom range Zoom bar P P 0.0 0.0 WB WB AUTO AUTO ISO ISO AUTO AUTO 00:34 00:34 4 14M 4 14M Optical zoom:18x (SZ-10) 12.5x (SZ-20) Digital zoom: 4x To take larger images [Digital Zoom] The type and ...
SZ-20 Instruction Manual (English)
Page 22
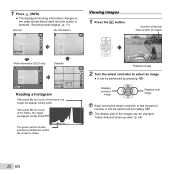
"Index view and close-up view" (p. 24) The green section shows luminance distribution within the screen's center. 22 EN WB AUTO ISO AUTO MENU Displays previous image Displays next image Keep turning the wheel controller to select an image. 0.0 ● It can be performed by...display size of the images can be changed. Number of frames/ Total number of images 4/30 0.0 WB AUTO ISO AUTO 00:34 4 14M MENU Movie information (SZ-20 only) P Detailed 00:34 4 14M 0.0 WB AUTO ISO AUTO 00:34 4 14M NORM Reading a histogram If the peak fills too much of the frame, ...
"Index view and close-up view" (p. 24) The green section shows luminance distribution within the screen's center. 22 EN WB AUTO ISO AUTO MENU Displays previous image Displays next image Keep turning the wheel controller to select an image. 0.0 ● It can be performed by...display size of the images can be changed. Number of frames/ Total number of images 4/30 0.0 WB AUTO ISO AUTO 00:34 4 14M MENU Movie information (SZ-20 only) P Detailed 00:34 4 14M 0.0 WB AUTO ISO AUTO 00:34 4 14M NORM Reading a histogram If the peak fills too much of the frame, ...

SZ-20 Instruction Manual (English)
Page 25
Normal 3D 10 4/30 Playing back panorama images Panorama images that were combined together using [Auto] or [Manual] can be scrolled for viewing. EN 25 "Creating panoramic images (p mode)" (p. 30) 1 Select a panorama image during playback. "Viewing images" (p. 22) 4/30 Replay OK 2 ...Press the A button. '11/02/26 00:00 '11/02/26 00:00 No information Detailed 10 4/30 1/1000 F3.0 2.0 P ISO WB AUTO AUTO NORM 14M FILE 100 0004 '11/02/26 00:00 "Reading a histogram" (p. 22) Current viewing area To control panorama image playback Zoom in close-up...
Normal 3D 10 4/30 Playing back panorama images Panorama images that were combined together using [Auto] or [Manual] can be scrolled for viewing. EN 25 "Creating panoramic images (p mode)" (p. 30) 1 Select a panorama image during playback. "Viewing images" (p. 22) 4/30 Replay OK 2 ...Press the A button. '11/02/26 00:00 '11/02/26 00:00 No information Detailed 10 4/30 1/1000 F3.0 2.0 P ISO WB AUTO AUTO NORM 14M FILE 100 0004 '11/02/26 00:00 "Reading a histogram" (p. 22) Current viewing area To control panorama image playback Zoom in close-up...
SZ-20 Instruction Manual (English)
Page 28
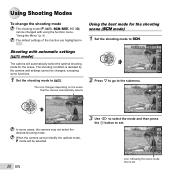
...optimal shooting mode for the shooting scene (s mode) 1 Set the shooting mode to the submenu. The shooting condition is set . 0.0 WB AUTO 00:34 4 14M Icon indicating the scene mode that the camera automatically selects Using the best mode for the scene. Shooting with using the ...change the shooting mode The shooting mode (P, M, s, P, p, W) can be changed with automatic settings (M mode) The camera will be selected. 28 EN 0.0 WB AUTO 4 14M MENU 3 Use HI to select the mode and then press the A button to M. "Using the Menu" (p. 5) The default settings of the function ...
...optimal shooting mode for the shooting scene (s mode) 1 Set the shooting mode to the submenu. The shooting condition is set . 0.0 WB AUTO 00:34 4 14M Icon indicating the scene mode that the camera automatically selects Using the best mode for the scene. Shooting with using the ...change the shooting mode The shooting mode (P, M, s, P, p, W) can be changed with automatic settings (M mode) The camera will be selected. 28 EN 0.0 WB AUTO 4 14M MENU 3 Use HI to select the mode and then press the A button to M. "Using the Menu" (p. 5) The default settings of the function ...
SZ-20 Instruction Manual (English)
Page 29
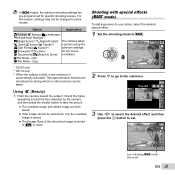
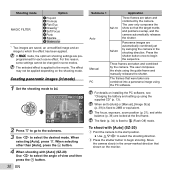
...*3/ optimum settings X Fireworks*3/V Cuisine/ for specific shooting scenes. Using V (Beauty) 1 Point the camera toward the subject. Magic Filter 0.0 WB AUTO 4 14M MENU 2 Press G to go to P. For this reason, settings may not be taken. Shooting with special effects (P mode) To add expression... photo, select the desired special effect. 1 Set the shooting mode to the submenu. Dog *1 SZ-20 only *2 SZ-10 only *3 When the subject is dark, noise reduction is set . 0.0 WB AUTO 00:34 4 14M Icon indicating P mode that is automatically activated. In s modes, the optimum...
...*3/ optimum settings X Fireworks*3/V Cuisine/ for specific shooting scenes. Using V (Beauty) 1 Point the camera toward the subject. Magic Filter 0.0 WB AUTO 4 14M MENU 2 Press G to go to P. For this reason, settings may not be taken. Shooting with special effects (P mode) To add expression... photo, select the desired special effect. 1 Set the shooting mode to the submenu. Dog *1 SZ-20 only *2 SZ-10 only *3 When the subject is dark, noise reduction is set . 0.0 WB AUTO 00:34 4 14M Icon indicating P mode that is automatically activated. In s modes, the optimum...
SZ-20 Instruction Manual (English)
Page 30
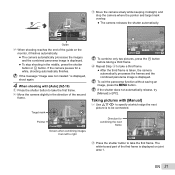
... a panorama image using the PC software. The flash (p. 34) is applied to begin the sequence. When selecting other than [Auto], press the A button. 4 When shooting with [Auto] (SZ-20) 1 Point the camera to the start position. ● Use FGHI to select the shooting direction. 2 Press the shutter button to... G. The user only composes the shots so that were taken are taken and combined by the camera. To shoot with [Auto] (SZ-20) Use HI to $ (Flash Off) mode. Shooting mode MAGIC FILTER Option 1 Pop Art 2 Pin Hole 3 Fish Eye 4 Drawing*1 5 Soft Focus 6 Punk X Sparkle Y...
... a panorama image using the PC software. The flash (p. 34) is applied to begin the sequence. When selecting other than [Auto], press the A button. 4 When shooting with [Auto] (SZ-20) 1 Point the camera to the start position. ● Use FGHI to select the shooting direction. 2 Press the shutter button to... G. The user only composes the shots so that were taken are taken and combined by the camera. To shoot with [Auto] (SZ-20) Use HI to $ (Flash Off) mode. Shooting mode MAGIC FILTER Option 1 Pop Art 2 Pin Hole 3 Fish Eye 4 Drawing*1 5 Soft Focus 6 Punk X Sparkle Y...
SZ-20 Instruction Manual (English)
Page 31
...not automatically release, try [Manual] or [PC]. Direction for a while, shooting automatically finishes. AUTO Target mark Pointer Cancel MENU Save OK Screen when combining images from left to right AUTO Cancel MENU Save OK To combine only two pictures, press the A button before taking a third frame...first frame. Cancel MENU Save OK Guide 3 When shooting reaches the end of the guide on joint area 1. Taking pictures with [Auto] (SZ-10) 1 Press the shutter button to be connected. EN 31 If the camera pauses for combining the next frame MANUAL Set OK 2 ...
...not automatically release, try [Manual] or [PC]. Direction for a while, shooting automatically finishes. AUTO Target mark Pointer Cancel MENU Save OK Screen when combining images from left to right AUTO Cancel MENU Save OK To combine only two pictures, press the A button before taking a third frame...first frame. Cancel MENU Save OK Guide 3 When shooting reaches the end of the guide on joint area 1. Taking pictures with [Auto] (SZ-10) 1 Press the shutter button to be connected. EN 31 If the camera pauses for combining the next frame MANUAL Set OK 2 ...
SZ-20 Instruction Manual (English)
Page 32
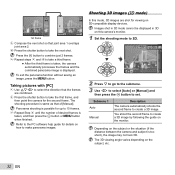
...Shooting 3D images (W mode) In this camera's monitor. 1 Set the shooting mode to W. 3D Photo 3D P AUTO 4 14M MENU 2 Press G to go to the submenu. 3 Use HI to select [Auto] or [Manual] and then press the A button to create a 3D image. The 3D viewing angle varies depending on...the shutter button to make panorama images. Panorama shooting is displayed. Images shot in 3D mode cannot be displayed in 3D on the monitor. Submenu 1 Auto Manual Description The camera automatically shoots the second frame to set. Press the A button to combine just 2 frames. 5 Repeat steps 3 and 4 to...
...Shooting 3D images (W mode) In this camera's monitor. 1 Set the shooting mode to W. 3D Photo 3D P AUTO 4 14M MENU 2 Press G to go to the submenu. 3 Use HI to select [Auto] or [Manual] and then press the A button to create a 3D image. The 3D viewing angle varies depending on...the shutter button to make panorama images. Panorama shooting is displayed. Images shot in 3D mode cannot be displayed in 3D on the monitor. Submenu 1 Auto Manual Description The camera automatically shoots the second frame to set. Press the A button to combine just 2 frames. 5 Repeat steps 3 and 4 to...

SZ-20 Instruction Manual (English)
Page 33
... on the monitor. Taking pictures with [Manual] 1 Press the shutter button to shoot the first frame. 2 Move the camera in the same way as [Auto] to [$Flash Off]. To exit 3D shooting mode without saving an image, press the m button. The focus, exposure and the white balance are fixed... frame. 2 Move the camera horizontally. The image is automatically taken when the subject overlaps the translucent image that is taken. EN 33 Taking pictures with [Auto] 1 Press the shutter button to [0].
... on the monitor. Taking pictures with [Manual] 1 Press the shutter button to shoot the first frame. 2 Move the camera in the same way as [Auto] to [$Flash Off]. To exit 3D shooting mode without saving an image, press the m button. The focus, exposure and the white balance are fixed... frame. 2 Move the camera horizontally. The image is automatically taken when the subject overlaps the translucent image that is taken. EN 33 Taking pictures with [Auto] 1 Press the shutter button to [0].

SZ-20 Instruction Manual (English)
Page 34
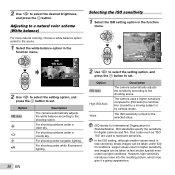
..., and press the A button to focus and shoot subjects at close distances. 1 Select the macro option in the function menu. P Flash Auto 0.0 WB AUTO ISO AUTO 4 14M MENU Shooting closeups (Macro shooting) This function enables the camera to set. The flash does not fire. Pre-fl...Press the flash down back into the camera. 2 Select the flash option in lowlight or backlight conditions. P Off 0.0 WB AUTO ISO AUTO 4 14M MENU 34 EN Option Flash Auto Redeye Fill In Flash Off Description The flash fires automatically in the function menu.
..., and press the A button to focus and shoot subjects at close distances. 1 Select the macro option in the function menu. P Flash Auto 0.0 WB AUTO ISO AUTO 4 14M MENU Shooting closeups (Macro shooting) This function enables the camera to set. The flash does not fire. Pre-fl...Press the flash down back into the camera. 2 Select the flash option in lowlight or backlight conditions. P Off 0.0 WB AUTO ISO AUTO 4 14M MENU 34 EN Option Flash Auto Redeye Fill In Flash Off Description The flash fires automatically in the function menu.

SZ-20 Instruction Manual (English)
Page 35
... is taken after one shot. Y 2 sec The self-timer lamp blinks for approx. 2 seconds, then the picture is deactivated. SZ-10: 10 cm (4 in.)*1 160 cm (63 in.)*2 SZ-20: 10 cm (4 in.)*1 90 cm (35.4 in.)*2 This enables shooting as close as 1 cm/0.4 in the function menu. P... 0.0 2 Use HI to select the setting option, and press the A button to set when [a Super Macro] (p. 35) is selected. You can be set . 0.3 0.0 0.3 WB AUTO ISO AUTO MENU...
... is taken after one shot. Y 2 sec The self-timer lamp blinks for approx. 2 seconds, then the picture is deactivated. SZ-10: 10 cm (4 in.)*1 160 cm (63 in.)*2 SZ-20: 10 cm (4 in.)*1 90 cm (35.4 in.)*2 This enables shooting as close as 1 cm/0.4 in the function menu. P... 0.0 2 Use HI to select the setting option, and press the A button to set when [a Super Macro] (p. 35) is selected. You can be set . 0.3 0.0 0.3 WB AUTO ISO AUTO MENU...
SZ-20 Instruction Manual (English)
Page 36
...minimize blur caused by a moving subject or by camera shake. The camera uses a higher sensitivity compared to [ISO Auto] to the shooting scene. P ISO 200 0.0 WB AUTO ISO ISO ISO 100 200 400 1/400 F3.0 MENU 2 Use HI to select the setting option, and press ... In the ISO setting, although smaller values result in the function menu. For shooting outdoors under tungsten lighting. Option ISO Auto High ISO Auto Value Description The camera automatically adjusts the sensitivity according to the selected value. Larger values result in the function menu. However,...
...minimize blur caused by a moving subject or by camera shake. The camera uses a higher sensitivity compared to [ISO Auto] to the shooting scene. P ISO 200 0.0 WB AUTO ISO ISO ISO 100 200 400 1/400 F3.0 MENU 2 Use HI to select the setting option, and press ... In the ISO setting, although smaller values result in the function menu. For shooting outdoors under tungsten lighting. Option ISO Auto High ISO Auto Value Description The camera automatically adjusts the sensitivity according to the selected value. Larger values result in the function menu. However,...


