

SP-600UZ Instruction Manual (English)
Page 4
... used to set frequently used in the function menu, and other settings such as date, time and screen display. 1 Select [SETUP] and then press the A button. ● The [SETUP] menu is displayed. 1 IMAGE SIZE 12M 2 COMPRESSION NORMAL SHADOW ADJUST AUTO AF MODE FACE/iESP 1 ESP/ ESP 2 FINE... mode Use HI to select the desired submenu 1 and then press the A button. Shooting mode Function menu o [SETUP] menu SLIDESHOW PHOTO SURFING EVENT BEAUTY FIX EDIT ERASE SETUP Use FG to display the function menu. Press the m button to select a menu and press the A button. ...
... used to set frequently used in the function menu, and other settings such as date, time and screen display. 1 Select [SETUP] and then press the A button. ● The [SETUP] menu is displayed. 1 IMAGE SIZE 12M 2 COMPRESSION NORMAL SHADOW ADJUST AUTO AF MODE FACE/iESP 1 ESP/ ESP 2 FINE... mode Use HI to select the desired submenu 1 and then press the A button. Shooting mode Function menu o [SETUP] menu SLIDESHOW PHOTO SURFING EVENT BEAUTY FIX EDIT ERASE SETUP Use FG to display the function menu. Press the m button to select a menu and press the A button. ...
SP-600UZ Instruction Manual (English)
Page 5
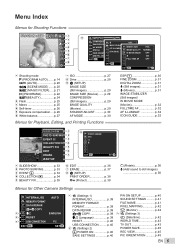
... p. 25 3 Macro p. 25 4 Self-timer p. 26 5 Exposure compensation....p. 26 6 White balance p. 27 7 ISO p. 27 8 Drive p. 28 9 o (SETUP) IMAGE SIZE (Still images p. 29 IMAGE SIZE (Movies) .......p. 29 COMPRESSION (Still images p. 29 IMAGE QUALITY (Movies p. 29 SHADOW ADJUST ...........p. 30 AF MODE p. 30...u COPY p. 39 D (Language p. 39 RESET p. 40 USB CONNECTION..........p. 40 2 s (Settings 2) q POWER ON p. 40 SAVE SETTINGS p. 40 PW ON SETUP p. 40 SOUND SETTINGS ..........p. 41 FILE NAME p. 41 PIXEL MAPPING p. 42 s (Monitor p. 42 3 t (Settings 3) X (Date/time p. 42 WORLD TIME ...
... p. 25 3 Macro p. 25 4 Self-timer p. 26 5 Exposure compensation....p. 26 6 White balance p. 27 7 ISO p. 27 8 Drive p. 28 9 o (SETUP) IMAGE SIZE (Still images p. 29 IMAGE SIZE (Movies) .......p. 29 COMPRESSION (Still images p. 29 IMAGE QUALITY (Movies p. 29 SHADOW ADJUST ...........p. 30 AF MODE p. 30...u COPY p. 39 D (Language p. 39 RESET p. 40 USB CONNECTION..........p. 40 2 s (Settings 2) q POWER ON p. 40 SAVE SETTINGS p. 40 PW ON SETUP p. 40 SOUND SETTINGS ..........p. 41 FILE NAME p. 41 PIXEL MAPPING p. 42 s (Monitor p. 42 3 t (Settings 3) X (Date/time p. 42 WORLD TIME ...

SP-600UZ Instruction Manual (English)
Page 8
... p. 25 Flash standby/flash charge .......... p. 51 4 Macro/super macro p. 25 5 Self-timer p. 26 6 Exposure compensation p. 26 7 White balance p. 27 8 ISO p. 27 9 Drive p. 28 10 [SETUP] menu p. 4, 5 11 World time p. 43 12 Image stabilization (still images)/ Digital image stabilization (movies) p. 32 13 Metering p. 30 14 Shadow Adjustment Technology p. 30 15 Compression...
... p. 25 Flash standby/flash charge .......... p. 51 4 Macro/super macro p. 25 5 Self-timer p. 26 6 Exposure compensation p. 26 7 White balance p. 27 8 ISO p. 27 9 Drive p. 28 10 [SETUP] menu p. 4, 5 11 World time p. 43 12 Image stabilization (still images)/ Digital image stabilization (movies) p. 32 13 Metering p. 30 14 Shadow Adjustment Technology p. 30 15 Compression...
SP-600UZ Instruction Manual (English)
Page 11
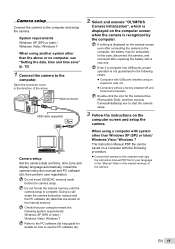
...Refer to the PC software (ib) help guide for the camera drive (Removable Disk), and then execute CameraInitialSetup.exe to the computer and setup the camera. then perform user registration. EN 11 install the camera instruction manual and PC software (ib); Doing so will erase the camera... be exhausted. Open the connector cover in the internal memory of the arrow. Multi-connector USB cable (supplied) 2 Select and execute "OLYMPUS Camera Initialization", which is complete. In this case, disconnect the camera, and reconnect after connecting the camera to the computer, the battery may...
...Refer to the PC software (ib) help guide for the camera drive (Removable Disk), and then execute CameraInitialSetup.exe to the computer and setup the camera. then perform user registration. EN 11 install the camera instruction manual and PC software (ib); Doing so will erase the camera... be exhausted. Open the connector cover in the internal memory of the arrow. Multi-connector USB cable (supplied) 2 Select and execute "OLYMPUS Camera Initialization", which is complete. In this case, disconnect the camera, and reconnect after connecting the camera to the computer, the battery may...
SP-600UZ Instruction Manual (English)
Page 13
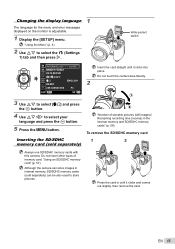
... memory cards with this camera. Changing the display language 1 The language for the menu and error messages displayed on the monitor is adjustable. 1 Display the [SETUP] menu. Inserting the SD/SDHC memory card (sold separately) can be also used to select your language and press the A button. 5 Press the m button...
... memory cards with this camera. Changing the display language 1 The language for the menu and error messages displayed on the monitor is adjustable. 1 Display the [SETUP] menu. Inserting the SD/SDHC memory card (sold separately) can be also used to select your language and press the A button. 5 Press the m button...
SP-600UZ Instruction Manual (English)
Page 19
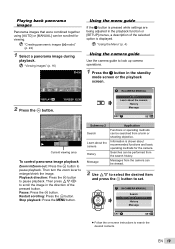
... Search Learn about the camera History Message EXIT SET OK ● Follow the on-screen instructions to scroll the image in the playback function or [SETUP] menus, a description of the pressed button.
... Search Learn about the camera History Message EXIT SET OK ● Follow the on-screen instructions to scroll the image in the playback function or [SETUP] menus, a description of the pressed button.

SP-600UZ Instruction Manual (English)
Page 22
... frames that the target marks and pointers overlap, and the camera automatically releases the shutter. For details on installing the PC software (ib), see "Camera setup" (p. 11). AUTO Target mark Pointer CANCEL MENU SAVE OK Screen when combining images from left to A. If the shutter does not automatically release, try [MANUAL...
... frames that the target marks and pointers overlap, and the camera automatically releases the shutter. For details on installing the PC software (ib), see "Camera setup" (p. 11). AUTO Target mark Pointer CANCEL MENU SAVE OK Screen when combining images from left to A. If the shutter does not automatically release, try [MANUAL...
SP-600UZ Instruction Manual (English)
Page 33
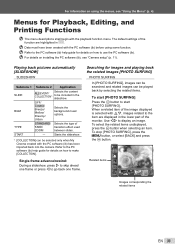
... (ib) help guide for Playback, Editing, and Printing Functions The menu descriptions shall begin with the PC software (ib) before using the menus, see "Camera setup" (p. 11). When a related item of the image displayed is selected with the PC software (ib) has been imported back into the camera. Use HI to...
... (ib) help guide for Playback, Editing, and Printing Functions The menu descriptions shall begin with the PC software (ib) before using the menus, see "Camera setup" (p. 11). When a related item of the image displayed is selected with the PC software (ib) has been imported back into the camera. Use HI to...
SP-600UZ Instruction Manual (English)
Page 40
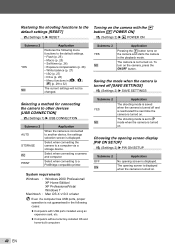
Select when connecting a camera and computer. Choosing the opening screen display [PW ON SETUP] s (Settings 2) X PW ON SETUP Submenu 2 OFF ON Application No opening screen is displayed when the camera is displayed. System requirements Windows : Windows 2000 Professional/ XP Home Edition/ XP Professional/...
Select when connecting a camera and computer. Choosing the opening screen display [PW ON SETUP] s (Settings 2) X PW ON SETUP Submenu 2 OFF ON Application No opening screen is displayed when the camera is displayed. System requirements Windows : Windows 2000 Professional/ XP Home Edition/ XP Professional/...
SP-600UZ Instruction Manual (English)
Page 46
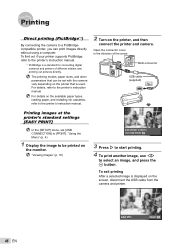
Multi-connector USB cable (supplied) Printing images at the printer's standard settings [EASY PRINT] In the [SETUP] menu, set with the camera vary depending on the monitor. Open the connector cover in the direction of different makers and printing out pictures directly. "...
Multi-connector USB cable (supplied) Printing images at the printer's standard settings [EASY PRINT] In the [SETUP] menu, set with the camera vary depending on the monitor. Open the connector cover in the direction of different makers and printing out pictures directly. "...
SP-600UZ Instruction Manual (English)
Page 49
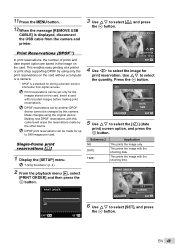
DPOF reservations set only for storing automatic printout information from the camera and printer. 11 Press the m button. 12 When the message [REMOVE USB CABLE] is a standard for the images stored on the card. Making new DPOF reservations with recorded images before making print reservations. Print reservations can be changed by this camera will erase the reservations made for up to 999 images per card. Single-frame print reservations [ Make changes using only the print reservations on the card. Insert a card with this camera. Print Reservations (DPOF*1) In print ...
DPOF reservations set only for storing automatic printout information from the camera and printer. 11 Press the m button. 12 When the message [REMOVE USB CABLE] is a standard for the images stored on the card. Making new DPOF reservations with recorded images before making print reservations. Print reservations can be changed by this camera will erase the reservations made for up to 999 images per card. Single-frame print reservations [ Make changes using only the print reservations on the card. Insert a card with this camera. Print Reservations (DPOF*1) In print ...
SP-600UZ Instruction Manual (English)
Page 52
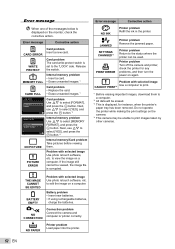
...and press the A button. MEMORY FULL • Erase unwanted images.*1 CARD FULL Card problem • Replace the card. • Erase unwanted images.*1 CARD SETUP POWER OFF FORMAT Card problem Use FG to print. Problem with selected image Use a computer to select [FORMAT], and press the A button. THE IMAGE CANNOT... problem Connect the camera and computer or printer correctly. Next, use FG to select [YES], and SET OK press the A button.*2 MEMORY SETUP Internal memory problem Use FG to the status where the printer can be unable to view the image on the camera. *4 This camera may be...
...and press the A button. MEMORY FULL • Erase unwanted images.*1 CARD FULL Card problem • Replace the card. • Erase unwanted images.*1 CARD SETUP POWER OFF FORMAT Card problem Use FG to print. Problem with selected image Use a computer to select [FORMAT], and press the A button. THE IMAGE CANNOT... problem Connect the camera and computer or printer correctly. Next, use FG to select [YES], and SET OK press the A button.*2 MEMORY SETUP Internal memory problem Use FG to the status where the printer can be unable to view the image on the camera. *4 This camera may be...

