
SP-320 Advanced Manual (English)
Page 8
Table of Contents 10 Appendix 152 Troubleshooting 153 Error messages 153 Troubleshooting 155 Camera care 162 Batteries 163 Accessories (optional 164 AC adapter 164 Safety Precautions 165 Glossary of terms 169 11 Miscellaneous 172 Menu list 173 List of factory default settings 182 Functions available in shooting modes and scenes 184 Index 187 8
Table of Contents 10 Appendix 152 Troubleshooting 153 Error messages 153 Troubleshooting 155 Camera care 162 Batteries 163 Accessories (optional 164 AC adapter 164 Safety Precautions 165 Glossary of terms 169 11 Miscellaneous 172 Menu list 173 List of factory default settings 182 Functions available in shooting modes and scenes 184 Index 187 8

SP-320 Advanced Manual (English)
Page 23
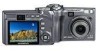
... take a and other casual shots. This does not affect recorded pictures. g"Direct buttons" (P. 12) Monitor Viewfinder 2 You can check the picture area Camera movement does not that the monitor uses more battery power camera actually records. Little battery power is not used for general to know the exact area the snapshots, landscape pictures Tips...
... take a and other casual shots. This does not affect recorded pictures. g"Direct buttons" (P. 12) Monitor Viewfinder 2 You can check the picture area Camera movement does not that the monitor uses more battery power camera actually records. Little battery power is not used for general to know the exact area the snapshots, landscape pictures Tips...
SP-320 Advanced Manual (English)
Page 25
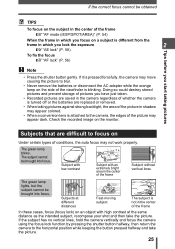
... stored pictures and prevent storage of pictures you have just taken. • Recorded pictures are saved in the camera regardless of whether the camera is turned off or the batteries are difficult to the horizontal position while keeping the button pressed halfway and take the picture. The green lamp blinks...picture in shadow may appear colored. • When a conversion lens is attached to the camera, the edges of the picture may move causing the picture to blur. • Never remove the batteries or disconnect the AC adapter while the orange lamp on the side of the viewfinder is blinking...
... stored pictures and prevent storage of pictures you have just taken. • Recorded pictures are saved in the camera regardless of whether the camera is turned off or the batteries are difficult to the horizontal position while keeping the button pressed halfway and take the picture. The green lamp blinks...picture in shadow may appear colored. • When a conversion lens is attached to the camera, the edges of the picture may move causing the picture to blur. • Never remove the batteries or disconnect the AC adapter while the orange lamp on the side of the viewfinder is blinking...

SP-320 Advanced Manual (English)
Page 56
Advanced shooting functions Top menu [MODE MENU] [CAMERA] [FULLTIME AF] [ON] / [OFF] g"Using the menus" (P. 17) 4 Note • Setting [FULLTIME AF] to [ON] consumes more battery power. • [FULLTIME AF] cannot be locked. Press the shutter button halfway to [ON] in n mode. AF lock The...and disengage the AF lock. 2 Press the shutter button fully. The focusing time is automatically kept in focus during movie recording. g"Customizing the camera (MY MODE SETUP/SHORT CUT/CUSTOM BUTTON)" (P. 115) 1 Position the AF target mark on the desired subject and press the [ button....
Advanced shooting functions Top menu [MODE MENU] [CAMERA] [FULLTIME AF] [ON] / [OFF] g"Using the menus" (P. 17) 4 Note • Setting [FULLTIME AF] to [ON] consumes more battery power. • [FULLTIME AF] cannot be locked. Press the shutter button halfway to [ON] in n mode. AF lock The...and disengage the AF lock. 2 Press the shutter button fully. The focusing time is automatically kept in focus during movie recording. g"Customizing the camera (MY MODE SETUP/SHORT CUT/CUSTOM BUTTON)" (P. 115) 1 Position the AF target mark on the desired subject and press the [ button....

SP-320 Advanced Manual (English)
Page 68
...menu [MODE MENU] [CAMERA] [TIMELAPSE] [ON] g"Using the menus" (P. 17) 1 Set [PICTURES] and [INTERVAL]. Timelapse shooting 1 Select the exposure differential and number of shots and press Z. 2 Take the picture. • Press the shutter button fully and keep it pressed to use fully charged batteries or the AC adapter.... You can stop shooting at any time by set to [RAW]. • As the maximum shutter speed is low and f blinks during sequential shooting, shooting stops and the camera starts saving the pictures you will be...
...menu [MODE MENU] [CAMERA] [TIMELAPSE] [ON] g"Using the menus" (P. 17) 1 Set [PICTURES] and [INTERVAL]. Timelapse shooting 1 Select the exposure differential and number of shots and press Z. 2 Take the picture. • Press the shutter button fully and keep it pressed to use fully charged batteries or the AC adapter.... You can stop shooting at any time by set to [RAW]. • As the maximum shutter speed is low and f blinks during sequential shooting, shooting stops and the camera starts saving the pictures you will be...
SP-320 Advanced Manual (English)
Page 69
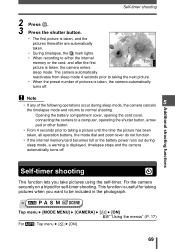
... turns off . This function is useful for self-timer shooting. Opening the battery compartment cover, opening the card cover, connecting the camera to a computer, operating the shutter button, arrow pad or other button. • From 4 seconds prior to taking pictures when you take pictures using the... buttons, the mode dial and zoom lever do not function. • If the internal memory/card becomes full or the battery power runs out during sleep mode, the camera cancels the timelapse mode and returns to either the internal memory or the card, and after the first picture is taken, ...
... turns off . This function is useful for self-timer shooting. Opening the battery compartment cover, opening the card cover, connecting the camera to a computer, operating the shutter button, arrow pad or other button. • From 4 seconds prior to taking pictures when you take pictures using the... buttons, the mode dial and zoom lever do not function. • If the internal memory/card becomes full or the battery power runs out during sleep mode, the camera cancels the timelapse mode and returns to either the internal memory or the card, and after the first picture is taken, ...

SP-320 Advanced Manual (English)
Page 102
... the internal memory is copied to avoid accidentally erasing pictures you use the AC adapter. • Never open the card cover or remove the batteries while the camera is backing up the data, the image data may not operate properly. Erasing pictures 1 Select [YES], and press Z. • All image ...time or all the pictures in the internal memory or on the card, [CARD FULL] is displayed and backup is canceled. • If the battery power runs out while the camera is backing up data. Pictures can be restored. Playback 6 Erasing pictures This function erases recorded pictures.
... the internal memory is copied to avoid accidentally erasing pictures you use the AC adapter. • Never open the card cover or remove the batteries while the camera is backing up the data, the image data may not operate properly. Erasing pictures 1 Select [YES], and press Z. • All image ...time or all the pictures in the internal memory or on the card, [CARD FULL] is displayed and backup is canceled. • If the battery power runs out while the camera is backing up data. Pictures can be restored. Playback 6 Erasing pictures This function erases recorded pictures.
SP-320 Advanced Manual (English)
Page 104
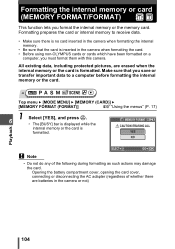
... (regardless of the following during formatting as such actions may damage the card. All existing data, including protected pictures, are batteries in the camera when formatting the card. • Before using non-OLYMPUS cards or cards which have been formatted on a computer, you must format them with this... camera. Formatting the internal memory or card (MEMORY FORMAT/FORMAT) This function lets you save or transfer important data to receive data....
... (regardless of the following during formatting as such actions may damage the card. All existing data, including protected pictures, are batteries in the camera when formatting the card. • Before using non-OLYMPUS cards or cards which have been formatted on a computer, you must format them with this... camera. Formatting the internal memory or card (MEMORY FORMAT/FORMAT) This function lets you save or transfer important data to receive data....

SP-320 Advanced Manual (English)
Page 113
... [D-M-Y] (Day/Month/Year), and press q. 2006 . 01 . 01 Y MD 00 : 00 • The camera proceeds to the year setting. • The following steps show the procedure used in the file name. SELECT SET GO... 01 . 01 00 : 00 7 SELECT SET GO OK • The time is left without batteries for a short time before being removed. Settings 113 Consequently, 2 p.m. Before taking important pictures, check...setting. • To move back to the previous setting, press p. • The first two digits of the year are fixed. 3 Repeat this procedure until the date and time are correct. ...
... [D-M-Y] (Day/Month/Year), and press q. 2006 . 01 . 01 Y MD 00 : 00 • The camera proceeds to the year setting. • The following steps show the procedure used in the file name. SELECT SET GO... 01 . 01 00 : 00 7 SELECT SET GO OK • The time is left without batteries for a short time before being removed. Settings 113 Consequently, 2 p.m. Before taking important pictures, check...setting. • To move back to the previous setting, press p. • The first two digits of the year are fixed. 3 Repeat this procedure until the date and time are correct. ...

SP-320 Advanced Manual (English)
Page 121
...mode when connected to print out pictures using the print reservation data. With the camera connected to the printer, select the pictures you can print out the picture displayed on the camera's monitor. g"Print settings (DPOF)" (P. 131) To find out if your ... the printer's instruction manual for connecting digital cameras and printers of prints, print paper and other settings. Direct printing (PictBridge) Using the direct printing function By connecting the camera to a PictBridge-compatible printer with the USB cable, you use batteries, make sure that support PictBridge have standard...
...mode when connected to print out pictures using the print reservation data. With the camera connected to the printer, select the pictures you can print out the picture displayed on the camera's monitor. g"Print settings (DPOF)" (P. 131) To find out if your ... the printer's instruction manual for connecting digital cameras and printers of prints, print paper and other settings. Direct printing (PictBridge) Using the direct printing function By connecting the camera to a PictBridge-compatible printer with the USB cable, you use batteries, make sure that support PictBridge have standard...

SP-320 Advanced Manual (English)
Page 137
... OLYMPUS Master software, also provided with the camera. Flow Using the USB cable provided with your camera, you can connect the camera and computer and download (transfer) the images to your computer first. Prepare the following items before starting. If the battery power runs out, the camera ...will stop whatever operation it is recommended that you use batteries, make sure you use the optional AC adapter when connecting the camera to the computer. Depending on the card. If ...
... OLYMPUS Master software, also provided with the camera. Flow Using the USB cable provided with your camera, you can connect the camera and computer and download (transfer) the images to your computer first. Prepare the following items before starting. If the battery power runs out, the camera ...will stop whatever operation it is recommended that you use batteries, make sure you use the optional AC adapter when connecting the camera to the computer. Depending on the card. If ...

SP-320 Advanced Manual (English)
Page 140
... and the need to reboot. • Disconnect the cable connecting the camera to the computer • Turn off the camera • Open the camera's card cover • Open the camera's battery compartment cover Windows 1 Insert the CD-ROM into the CD-ROM drive. • The OLYMPUS Master setup screen is displayed. • If the screen is...
... and the need to reboot. • Disconnect the cable connecting the camera to the computer • Turn off the camera • Open the camera's card cover • Open the camera's battery compartment cover Windows 1 Insert the CD-ROM into the CD-ROM drive. • The OLYMPUS Master setup screen is displayed. • If the screen is...

SP-320 Advanced Manual (English)
Page 146
...now.". • The downloaded images are displayed in the browse window. • To return to the main menu, click "Menu" in the camera are displayed. 3 Select the image files and click "Transfer Images". • A window indicating that the download is complete is displayed. All.... 1 Click "Transfer Images" on the OLYMPUS Master main menu. • The menu for selecting the source is displayed. 2 Click "From Camera" . • The window for selecting images is blinking. • Open the camera's card cover. • Open the camera's battery compartment cover. • Connect or disconnect ...
...now.". • The downloaded images are displayed in the browse window. • To return to the main menu, click "Menu" in the camera are displayed. 3 Select the image files and click "Transfer Images". • A window indicating that the download is complete is displayed. All.... 1 Click "Transfer Images" on the OLYMPUS Master main menu. • The menu for selecting the source is displayed. 2 Click "From Camera" . • The window for selecting images is blinking. • Open the camera's card cover. • Open the camera's battery compartment cover. • Connect or disconnect ...

SP-320 Advanced Manual (English)
Page 153
... erasing, download important pictures to a computer and cancel the read -only) on this camera. L NO PICTURE There are empty. The card cover is a problem with the selected picture and it cannot be used. CARD-COVER OPEN g BATTERY EMPTY The batteries are no pictures in The internal memory or the card the internal memory...
... erasing, download important pictures to a computer and cancel the read -only) on this camera. L NO PICTURE There are empty. The card cover is a problem with the selected picture and it cannot be used. CARD-COVER OPEN g BATTERY EMPTY The batteries are no pictures in The internal memory or the card the internal memory...
SP-320 Advanced Manual (English)
Page 154
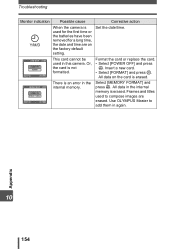
...press Z. Select [MEMORY FORMAT] and press Z. Insert a new card. • Select [FORMAT] and press Z. Use OLYMPUS Master to compose images are on the card is not formatted. Or, the card is erased. All data on the factory...There is an error in again. Frames and titles used for the first time or the batteries have been removed for a long time, the date and time are erased. Appendix 10 154 Set... the date/time. All data in this camera. CARD SETUP POWER OFF FORMAT SELECT GO OK This card cannot be used in the internal...
...press Z. Select [MEMORY FORMAT] and press Z. Insert a new card. • Select [FORMAT] and press Z. Use OLYMPUS Master to compose images are on the card is not formatted. Or, the card is erased. All data on the factory...There is an error in again. Frames and titles used for the first time or the batteries have been removed for a long time, the date and time are erased. Appendix 10 154 Set... the date/time. All data in this camera. CARD SETUP POWER OFF FORMAT SELECT GO OK This card cannot be used in the internal...
SP-320 Advanced Manual (English)
Page 155
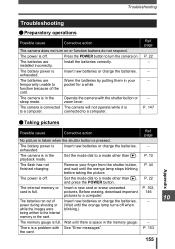
... while the images were blinking.) being written to a computer. 10 The batteries ran out of the cold. Troubleshooting Troubleshooting (Preparatory operations Possible cause Corrective action The camera does not turn the camera on or function buttons do not respond. connected to a computer. Press ...the POWER button to a mode other than q, and press the POWER button. The battery power is space in your finger...
... while the images were blinking.) being written to a computer. 10 The batteries ran out of the cold. Troubleshooting Troubleshooting (Preparatory operations Possible cause Corrective action The camera does not turn the camera on or function buttons do not respond. connected to a computer. Press ...the POWER button to a mode other than q, and press the POWER button. The battery power is space in your finger...
SP-320 Advanced Manual (English)
Page 156
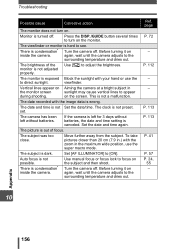
...P. 113 P. 41 P. 57 P. 24, 55 - The viewfinder or monitor is hard to [ON]. The clock is not a malfunction. If the camera is left without batteries, the date and time setting is out of the Use [s] to adjust the brightness. The picture is canceled. The subject was too close. Before turning ...out. The date recorded with your hand or use the super macro mode. The camera has been left for 3 days without batteries. There is not Set the date/time. Before turning it on Aiming the camera at a bright subject in the maximum wide position, use the to the surrounding ...
...P. 113 P. 41 P. 57 P. 24, 55 - The viewfinder or monitor is hard to [ON]. The clock is not a malfunction. If the camera is left without batteries, the date and time setting is out of the Use [s] to adjust the brightness. The picture is canceled. The subject was too close. Before turning ...out. The date recorded with your hand or use the super macro mode. The camera has been left for 3 days without batteries. There is not Set the date/time. Before turning it on Aiming the camera at a bright subject in the maximum wide position, use the to the surrounding ...

SP-320 Advanced Manual (English)
Page 157
...in flash does not fire in [MODE MENU]. P. 70 The battery run time is rapidly cooled and turns to fire on the side of water. Keep the camera warm by environment. without displaying the battery warning indicator. Appendix 10 157 The flash does not fire. ... Cancel panorama mode. power is set. Condensation occurs when the camera is set . The camera is set . Set [DRIVE] to [#]. The built-in flash does not fire in low - Set [&] to [$]. Insert new batteries or charge the batteries. zoom lever. Select a flash mode other than [$]. P. 47...
...in flash does not fire in [MODE MENU]. P. 70 The battery run time is rapidly cooled and turns to fire on the side of water. Keep the camera warm by environment. without displaying the battery warning indicator. Appendix 10 157 The flash does not fire. ... Cancel panorama mode. power is set. Condensation occurs when the camera is set . The camera is set . Set [DRIVE] to [#]. The built-in flash does not fire in low - Set [&] to [$]. Insert new batteries or charge the batteries. zoom lever. Select a flash mode other than [$]. P. 47...

SP-320 Advanced Manual (English)
Page 162
...are handled since this may form on the lens surface if the lens is left dirty. ( Storage • When storing the camera for extended periods, remove the batteries, AC adapter and card, and keep in a cool, dry place that is very dirty, soak the cloth in mild soapy ...water and wring well. If the camera is well ventilated. • Periodically insert the batteries and test the camera functions. Wipe the camera with the damp cloth and then dry it with a soft cloth. Camera care (Cleaning the camera Exterior: • Wipe gently with a dry cloth. Note &#...
...are handled since this may form on the lens surface if the lens is left dirty. ( Storage • When storing the camera for extended periods, remove the batteries, AC adapter and card, and keep in a cool, dry place that is very dirty, soak the cloth in mild soapy ...water and wring well. If the camera is well ventilated. • Periodically insert the batteries and test the camera functions. Wipe the camera with the damp cloth and then dry it with a soft cloth. Camera care (Cleaning the camera Exterior: • Wipe gently with a dry cloth. Note &#...

SP-320 Advanced Manual (English)
Page 163
... batteries Olympus NiMH batteries are used. ( During the conditions described below, power is consumed continuously and the batteries become exhausted quickly. • The zoom is connected to the situation. Do not remove the label on the battery pack. This camera uses one lithium battery pack. • AA Manganese (zinc-carbon) batteries cannot be used. ( Power consumption by the camera...
... batteries Olympus NiMH batteries are used. ( During the conditions described below, power is consumed continuously and the batteries become exhausted quickly. • The zoom is connected to the situation. Do not remove the label on the battery pack. This camera uses one lithium battery pack. • AA Manganese (zinc-carbon) batteries cannot be used. ( Power consumption by the camera...


