

FE-120 Advanced Manual (English)
Page 9
... # to return to use # and $. You are ready to 1 turn the camera off . POWER switch (The monitor turns on. (The lens extends. # Shooting button ( ) $ Playback button ( ) To turn the camera on in playback mode. (Turning the camera on in shooting mode Press the POWER switch. • The camera turns on its own, to take pictures. Press $ on in shooting...
... # to return to use # and $. You are ready to 1 turn the camera off . POWER switch (The monitor turns on. (The lens extends. # Shooting button ( ) $ Playback button ( ) To turn the camera on in playback mode. (Turning the camera on in shooting mode Press the POWER switch. • The camera turns on its own, to take pictures. Press $ on in shooting...

FE-120 Advanced Manual (English)
Page 10
...$ to return to use the shooting button and playback button (Turning the camera on in playback mode With the camera off, press $. 1 • The camera turns on . (The lens is enabled. The lens remains extended. POWER switch (The monitor turns on in playback mode. The lens extends, and shooting mode ...is retracted. # Shooting button ( ) $ Playback button ( ) To turn the camera off . Or else, press $. Note • When the power is ...
...$ to return to use the shooting button and playback button (Turning the camera on in playback mode With the camera off, press $. 1 • The camera turns on . (The lens is enabled. The lens remains extended. POWER switch (The monitor turns on in playback mode. The lens extends, and shooting mode ...is retracted. # Shooting button ( ) $ Playback button ( ) To turn the camera off . Or else, press $. Note • When the power is ...

FE-120 Advanced Manual (English)
Page 12
... for using shooting mode functions. f This function allows you to select from 10 situation-related modes set to switch between shooting modes before and after turning the camera on the monitor. 1 P P PROGRAM AUTO For auto shooting with the mode dial set to the situation" (P. 35). • You can be...and shooting functions" (P. 130). 12 TIPS • For details of taking pictures. When the mode dial is set to use the mode dial This camera is capable of each mode, see "Selecting a shooting mode according to n. • The mode dial is not indicated if the function can change the...
... for using shooting mode functions. f This function allows you to select from 10 situation-related modes set to switch between shooting modes before and after turning the camera on the monitor. 1 P P PROGRAM AUTO For auto shooting with the mode dial set to the situation" (P. 35). • You can be...and shooting functions" (P. 130). 12 TIPS • For details of taking pictures. When the mode dial is set to use the mode dial This camera is capable of each mode, see "Selecting a shooting mode according to n. • The mode dial is not indicated if the function can change the...

FE-120 Advanced Manual (English)
Page 30
g"Formatting" (P. 68) Inserting a card 1 Make sure the camera is turned off. • The monitor is off. • The lens is retracted. d Compatible cards • xD-Picture Card (16 MB to 1 GB) Note • This camera may not recognize a non-Olympus card or a card that was formatted on this space to write the contents of the...
g"Formatting" (P. 68) Inserting a card 1 Make sure the camera is turned off. • The monitor is off. • The lens is retracted. d Compatible cards • xD-Picture Card (16 MB to 1 GB) Note • This camera may not recognize a non-Olympus card or a card that was formatted on this space to write the contents of the...

FE-120 Advanced Manual (English)
Page 33
... addition to the batteries provided with the battery charger specified by the camera varies depending on in playback mode for your charger. This camera uses two NiMH batteries. (Lithium battery pack (CR-V3) The Olympus CR-V3 lithium battery pack has a long service life allowing you ...) alkaline batteries When you need batteries in shooting mode, activating the auto focus. • The camera is pressed halfway repeatedly in a hurry, you can take may cause the camera to turn off without displaying the battery level warning. 33 Do not remove the label on the battery manufacturer,...
... addition to the batteries provided with the battery charger specified by the camera varies depending on in playback mode for your charger. This camera uses two NiMH batteries. (Lithium battery pack (CR-V3) The Olympus CR-V3 lithium battery pack has a long service life allowing you ...) alkaline batteries When you need batteries in shooting mode, activating the auto focus. • The camera is pressed halfway repeatedly in a hurry, you can take may cause the camera to turn off without displaying the battery level warning. 33 Do not remove the label on the battery manufacturer,...

FE-120 Advanced Manual (English)
Page 40
... functions SET MEM PIC CAMERA Optical zoom P Digital zoom P HQ 2816 2112 5 The white area of the optical zoom, the digital zoom is enabled. When you reach the limit of the zoom indicator indicates the optical zoom. The cursor turns orange when inside the digital zoom range. 40 Zooming... in on the zoom button. HQ 2816 2112 5 The cursor moves up and down the zoom indicator according to [ON]. Top menu [MODE MENU] [CAMERA] [DIGITAL ZOOM] g"How to use the menus"...
... functions SET MEM PIC CAMERA Optical zoom P Digital zoom P HQ 2816 2112 5 The white area of the optical zoom, the digital zoom is enabled. When you reach the limit of the zoom indicator indicates the optical zoom. The cursor turns orange when inside the digital zoom range. 40 Zooming... in on the zoom button. HQ 2816 2112 5 The cursor moves up and down the zoom indicator according to [ON]. Top menu [MODE MENU] [CAMERA] [DIGITAL ZOOM] g"How to use the menus"...

FE-120 Advanced Manual (English)
Page 43
Wait until # turns off. FLASH MODE AUTO The flash fires automatically in macro mode with the zoom set to take the picture. Note • The flash does not ...
Wait until # turns off. FLASH MODE AUTO The flash fires automatically in macro mode with the zoom set to take the picture. Note • The flash does not ...
FE-120 Advanced Manual (English)
Page 44
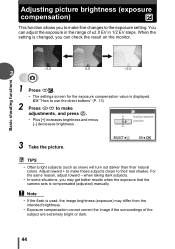
... function allows you can adjust the exposure in 1/2 EV steps. SELECT GO OK TIPS • Often bright subjects (such as snow) will turn out darker than their real shades. Adjust toward - g"How to use the direct buttons" (P. 13) 2 Press ac to their natural colors...are extremely bright or dark. 44 When the setting is used, the image brightness (exposure) may get better results when the exposure that the camera sets is displayed. F For adjusting the brightness when • Plus [+] increases brightness and minus [-] decreases brightness. 0.0 youtakepictures. 3 Take the...
... function allows you can adjust the exposure in 1/2 EV steps. SELECT GO OK TIPS • Often bright subjects (such as snow) will turn out darker than their real shades. Adjust toward - g"How to use the direct buttons" (P. 13) 2 Press ac to their natural colors...are extremely bright or dark. 44 When the setting is used, the image brightness (exposure) may get better results when the exposure that the camera sets is displayed. F For adjusting the brightness when • Plus [+] increases brightness and minus [-] decreases brightness. 0.0 youtakepictures. 3 Take the...

FE-120 Advanced Manual (English)
Page 45
Use the self-timer function to take group photos at a tourist spot... You can take two consecutive shots and turn them into one combined picture. 45 In the country or at school reunions or birthday parties. Or use sequential shooting mode to take a succession of ...
Use the self-timer function to take group photos at a tourist spot... You can take two consecutive shots and turn them into one combined picture. 45 In the country or at school reunions or birthday parties. Or use sequential shooting mode to take a succession of ...

FE-120 Advanced Manual (English)
Page 56
..." (P. 16) • The slideshow starts. • Press Z to use the optional AC adapter when running a slideshow for a long period of each movie is turned off. Select a still picture and display the top menu. Note • You are saved even if the power is displayed. Only the first frame of... time. The slideshow will enter sleep mode after another. When using batteries, the camera will not stop the slideshow automatically. 56 y 90 < 0 90 Playback SET MEM EDIT PLAY 100-0005 HQ 100-0005 HQ 100-0005 HQ '...
..." (P. 16) • The slideshow starts. • Press Z to use the optional AC adapter when running a slideshow for a long period of each movie is turned off. Select a still picture and display the top menu. Note • You are saved even if the power is displayed. Only the first frame of... time. The slideshow will enter sleep mode after another. When using batteries, the camera will not stop the slideshow automatically. 56 y 90 < 0 90 Playback SET MEM EDIT PLAY 100-0005 HQ 100-0005 HQ 100-0005 HQ '...

FE-120 Advanced Manual (English)
Page 64
... to use the menus" (P. 16) • Each time you display detailed shooting information on and off • If the picture has been taken with a different camera, only the date and time, frame number, and battery check indication are displayed when [INFO] is set on. Select the picture that you want to... use the menus" (P. 16) • Each time you select [0] from the top menu, the information display is alternately turned on and off. 10 100-0005 HQ SIZE : 2816 2112 +2.0 5 10 100-0005 HQ '05. 08.30 15:30 5 '05.08.30 15:30 5 When...
... to use the menus" (P. 16) • Each time you display detailed shooting information on and off • If the picture has been taken with a different camera, only the date and time, frame number, and battery check indication are displayed when [INFO] is set on. Select the picture that you want to... use the menus" (P. 16) • Each time you select [0] from the top menu, the information display is alternately turned on and off. 10 100-0005 HQ SIZE : 2816 2112 +2.0 5 10 100-0005 HQ '05. 08.30 15:30 5 '05.08.30 15:30 5 When...

FE-120 Advanced Manual (English)
Page 69
... you can select the appropriate language for you get out of your very own customized camera! 69 Why not try them out? Reset all . START Which language? Date /...the startup screen so that one of the pictures you can view the pictures you turn the camera on -screen display. And if you lend the camera to how much fun you ! That's originality for on . Use rec view?...functions will make such a difference to friends from abroad, you have your camera. 6 Settings Settings 6 One of the key features of a digital camera is displayed when you have taken immediately.
... you can select the appropriate language for you get out of your very own customized camera! 69 Why not try them out? Reset all . START Which language? Date /...the startup screen so that one of the pictures you can view the pictures you turn the camera on -screen display. And if you lend the camera to how much fun you ! That's originality for on . Use rec view?...functions will make such a difference to friends from abroad, you have your camera. 6 Settings Settings 6 One of the key features of a digital camera is displayed when you have taken immediately.

FE-120 Advanced Manual (English)
Page 70
... are returned to save the current camera settings after the power is turned off are listed below. The settings affected by [ALL RESET] are saved. ON OFF All settings are saved even when [ALL RESET] is set [ON]. Function F FLASH MODE & j SCENE SELECT DIGITAL ZOOM K WB INFO Factory default...to default settings when [ALL RESET] is set to [ON] and [K] is changed to [SQ1], [K] returns to the factory default setting ([HQ]) when the camera is turned off (initial settings). Top menu [MODE MENU] [SETUP] [ALL RESET] g"How to use the menus" (P. 16) • In : Top menu [SETUP...
... are returned to save the current camera settings after the power is turned off are listed below. The settings affected by [ALL RESET] are saved. ON OFF All settings are saved even when [ALL RESET] is set [ON]. Function F FLASH MODE & j SCENE SELECT DIGITAL ZOOM K WB INFO Factory default...to default settings when [ALL RESET] is set to [ON] and [K] is changed to [SQ1], [K] returns to the factory default setting ([HQ]) when the camera is turned off (initial settings). Top menu [MODE MENU] [SETUP] [ALL RESET] g"How to use the menus" (P. 16) • In : Top menu [SETUP...

FE-120 Advanced Manual (English)
Page 72
... (SCREEN SETUP) You can register your favorite picture and display it on . You can also register your favorite picture for display when the power is turned on. To register a new picture, select [RESET], and press Z. Settings SETUP MEM PIC CAM Selecting a power on screen (PW ON SETUP) You can set a screen...
... (SCREEN SETUP) You can register your favorite picture and display it on . You can also register your favorite picture for display when the power is turned on. To register a new picture, select [RESET], and press Z. Settings SETUP MEM PIC CAM Selecting a power on screen (PW ON SETUP) You can set a screen...
FE-120 Advanced Manual (English)
Page 75
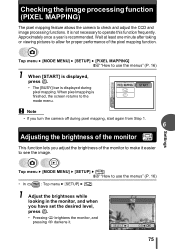
... you adjust the brightness of the pixel mapping function. It is recommended. Checking the image processing function (PIXEL MAPPING) The pixel mapping feature allows the camera to use the menus" (P. 16) 1 When [START] is displayed, press Z. • The [BUSY] bar is finished, the screen returns to the mode menu. s SELECT GO... OK 75 When pixel mapping is displayed during pixel mapping, start again from Step 1. 6 Adjusting the brightness of the monitor This function lets you turn the camera off during pixel mapping.
... you adjust the brightness of the pixel mapping function. It is recommended. Checking the image processing function (PIXEL MAPPING) The pixel mapping feature allows the camera to use the menus" (P. 16) 1 When [START] is displayed, press Z. • The [BUSY] bar is finished, the screen returns to the mode menu. s SELECT GO... OK 75 When pixel mapping is displayed during pixel mapping, start again from Step 1. 6 Adjusting the brightness of the monitor This function lets you turn the camera off during pixel mapping.

FE-120 Advanced Manual (English)
Page 76
...the month 6 setting. • To move back to the previous setting, press b. • The first two digits of the following date formats: [Y-M-D] (Year/Month/Day), [M-D-Y] (Month/Day/Year), [D-M-Y] (Day/ Month/Year...SET GO OK X 2005 . 01 . 01 SELECT 00 : 00 SET GO OK • The time is turned on. g"Error codes" (P. 108) 76 Consequently, 2 p.m. is used when the date and time settings are set... to [Y-M-D]. 2 Press ac to the factory default settings if the camera is left without batteries for a short time before being removed. Note • The date and...
...the month 6 setting. • To move back to the previous setting, press b. • The first two digits of the following date formats: [Y-M-D] (Year/Month/Day), [M-D-Y] (Month/Day/Year), [D-M-Y] (Day/ Month/Year...SET GO OK X 2005 . 01 . 01 SELECT 00 : 00 SET GO OK • The time is turned on. g"Error codes" (P. 108) 76 Consequently, 2 p.m. is used when the date and time settings are set... to [Y-M-D]. 2 Press ac to the factory default settings if the camera is left without batteries for a short time before being removed. Note • The date and...
FE-120 Advanced Manual (English)
Page 79
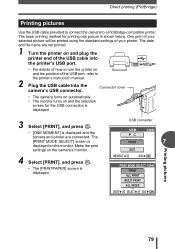
... press Z. • [ONE MOMENT] is shown below. Connector cover • The camera turns on automatically. • The monitor turns on and the selection screen for printing one picture is displayed and the camera and printer are not printed. 1 Turn the printer on and plug the printer end of the USB cable into the... PictBridge-compatible printer. Make the print settings on the monitor. Direct printing (PictBridge) Printing pictures Use the USB cable provided to connect the camera to turn the printer on and the position of your printer. The date and file name are connected.
... press Z. • [ONE MOMENT] is shown below. Connector cover • The camera turns on automatically. • The monitor turns on and the selection screen for printing one picture is displayed and the camera and printer are not printed. 1 Turn the printer on and plug the printer end of the USB cable into the... PictBridge-compatible printer. Make the print settings on the monitor. Direct printing (PictBridge) Printing pictures Use the USB cable provided to connect the camera to turn the printer on and the position of your printer. The date and file name are connected.

FE-120 Advanced Manual (English)
Page 81
8 In the [PRINT MODE SELECT] screen, press b. • A message is not displayed in Step 4. Disconnect the USB cable, and repeat the procedure from the printer. Direct printing (PictBridge) PRINT MODE SELECT PRINT ALL PRINT MULTI PRINT ALL INDEX EXIT SELECT GO OK 10Remove the USB cable from Step 1. 7 Printing pictures 81 Note • When the [USB] mode is set to [PC], the [PRINT MODE SELECT] screen is displayed. 9 Remove the USB cable from the camera. • The camera turns off.
8 In the [PRINT MODE SELECT] screen, press b. • A message is not displayed in Step 4. Disconnect the USB cable, and repeat the procedure from the printer. Direct printing (PictBridge) PRINT MODE SELECT PRINT ALL PRINT MULTI PRINT ALL INDEX EXIT SELECT GO OK 10Remove the USB cable from Step 1. 7 Printing pictures 81 Note • When the [USB] mode is set to [PC], the [PRINT MODE SELECT] screen is displayed. 9 Remove the USB cable from the camera. • The camera turns off.
FE-120 Advanced Manual (English)
Page 84
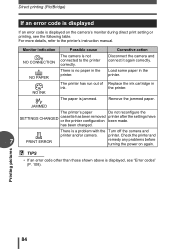
...jammed paper. has been changed. printer. There is no paper in the printer. The paper is a problem with the Turn off the camera and printer and/or camera. Replace the ink cartridge in the printer. Load some paper in the printer. TIPS • If an error code...the printer correctly. Monitor indication NO CONNECTION NO PAPER NO INK Possible cause The camera is displayed, see the following table. Check the printer and 7 PRINT ERROR remedy any problems before turning the power on the camera's monitor during direct print setting or printing, see "Error codes" (P. 108...
...jammed paper. has been changed. printer. There is no paper in the printer. The paper is a problem with the Turn off the camera and printer and/or camera. Replace the ink cartridge in the printer. Load some paper in the printer. TIPS • If an error code...the printer correctly. Monitor indication NO CONNECTION NO PAPER NO INK Possible cause The camera is displayed, see the following table. Check the printer and 7 PRINT ERROR remedy any problems before turning the power on the camera's monitor during direct print setting or printing, see "Error codes" (P. 108...
FE-120 Advanced Manual (English)
Page 92
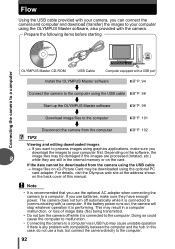
... on the software, the 8 image files may result in the internal memory or on the card. The camera does not turn the camera off automatically while it is recommended that you can connect the camera and computer and download (transfer) the images to the computer. 92 In this manual. Flow Using the ... the USB cable → Image files on the back cover of image data (file) being transmitted. • Do not turn off while it is any problem with a USB port Install the OLYMPUS Master software gP. 94 Connect the camera to the computer using the USB cable gP. 98 Start up the...
... on the software, the 8 image files may result in the internal memory or on the card. The camera does not turn the camera off automatically while it is recommended that you can connect the camera and computer and download (transfer) the images to the computer. 92 In this manual. Flow Using the ... the USB cable → Image files on the back cover of image data (file) being transmitted. • Do not turn off while it is any problem with a USB port Install the OLYMPUS Master software gP. 94 Connect the camera to the computer using the USB cable gP. 98 Start up the...


