

FE-120 Advanced Manual (English)
Page 9
...for displaying pictures you have taken. To enable playback mode → Press $. Basic operation How to 1 turn the camera on in playback mode. (Turning the camera on in shooting mode. The lens retracts, and the monitor turns off → Press the POWER switch. To switch ...between the two modes, use the shooting button and playback button This camera features a shooting mode and a playback mode. The lens remains extended, and playback mode is for taking pictures and making shooting settings, whereas...
...for displaying pictures you have taken. To enable playback mode → Press $. Basic operation How to 1 turn the camera on in playback mode. (Turning the camera on in shooting mode. The lens retracts, and the monitor turns off → Press the POWER switch. To switch ...between the two modes, use the shooting button and playback button This camera features a shooting mode and a playback mode. The lens remains extended, and playback mode is for taking pictures and making shooting settings, whereas...
FE-120 Advanced Manual (English)
Page 37
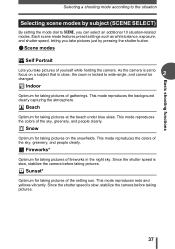
... Optimum for taking pictures. 37 Since the shutter speed is slow, stabilize the camera before taking pictures. * Sunset* Optimum for taking pictures at the beach under blue skies. This mode reproduces reds and yellows vibrantly. Each scene mode features preset settings such as white balance, exposure, and shutter speed, letting you take...
... Optimum for taking pictures. 37 Since the shutter speed is slow, stabilize the camera before taking pictures. * Sunset* Optimum for taking pictures at the beach under blue skies. This mode reproduces reds and yellows vibrantly. Each scene mode features preset settings such as white balance, exposure, and shutter speed, letting you take...

FE-120 Advanced Manual (English)
Page 69
... view? GOAL Now you have taken immediately. And if you lend the camera to how much fun you get out of your very own customized camera! 69 6 Settings Settings 6 One of the key features of a digital camera is displayed when you turn the camera on -screen display. Why not try them out? Reset all . START Which...
... view? GOAL Now you have taken immediately. And if you lend the camera to how much fun you get out of your very own customized camera! 69 6 Settings Settings 6 One of the key features of a digital camera is displayed when you turn the camera on -screen display. Why not try them out? Reset all . START Which...
FE-120 Advanced Manual (English)
Page 75
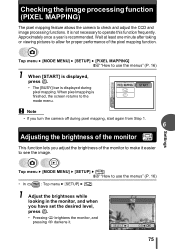
...you adjust the brightness of the pixel mapping function. PIXEL MAPPING s X START SETUP MEM PIC CAM Note • If you turn the camera off during pixel mapping. Top menu [MODE MENU] [SETUP] [s] g"How to make it . Wait at least one minute after taking ... [START] is displayed, press Z. • The [BUSY] bar is recommended. Checking the image processing function (PIXEL MAPPING) The pixel mapping feature allows the camera to operate this function frequently. Approximately once a year is displayed during pixel mapping, start again from Step 1. 6 Adjusting the brightness of the ...
...you adjust the brightness of the pixel mapping function. PIXEL MAPPING s X START SETUP MEM PIC CAM Note • If you turn the camera off during pixel mapping. Top menu [MODE MENU] [SETUP] [s] g"How to make it . Wait at least one minute after taking ... [START] is displayed, press Z. • The [BUSY] bar is recommended. Checking the image processing function (PIXEL MAPPING) The pixel mapping feature allows the camera to operate this function frequently. Approximately once a year is displayed during pixel mapping, start again from Step 1. 6 Adjusting the brightness of the ...

FE-120 Advanced Manual (English)
Page 120
...software, or for damages resulting from the use of the information contained therein. Safety Precautions Disclaimer of Warranty • Olympus makes no representations or warranties, either expressed or implied, by any means, electronic or mechanical, including photocopying and recording... obligation or advance notice. 9 120 Appendix Olympus assumes no responsibility for consequential or incidental damages, so the above limitations may not apply to you. • Olympus reserves all rights to alter the features and contents of Olympus. Olympus reserves the right to this publication...
...software, or for damages resulting from the use of the information contained therein. Safety Precautions Disclaimer of Warranty • Olympus makes no representations or warranties, either expressed or implied, by any means, electronic or mechanical, including photocopying and recording... obligation or advance notice. 9 120 Appendix Olympus assumes no responsibility for consequential or incidental damages, so the above limitations may not apply to you. • Olympus reserves all rights to alter the features and contents of Olympus. Olympus reserves the right to this publication...

FE-120 Basic Manual (English, Français, Español, Português)
Page 2
...feature 10 Mode dial 11 Shooting mode buttons 12 f modes 13 Macro mode 13 Self timer 14 Flash modes 14 MENUS AND SETTINGS 15 Top menu 15 Erase all pictures 15 Select a language 16 Monitor symbols & icons 16 Thumbnail (Index) display 18 CONNECTING THE CAMERA 19 Direct printing (PictBridge 19 OLYMPUS... MASTER SOFTWARE 21 SPECIFICATIONS 22 SAFETY PRECAUTIONS 24 „ Before using your camera, read this manual carefully to ensure correct use. „ We...
...feature 10 Mode dial 11 Shooting mode buttons 12 f modes 13 Macro mode 13 Self timer 14 Flash modes 14 MENUS AND SETTINGS 15 Top menu 15 Erase all pictures 15 Select a language 16 Monitor symbols & icons 16 Thumbnail (Index) display 18 CONNECTING THE CAMERA 19 Direct printing (PictBridge 19 OLYMPUS... MASTER SOFTWARE 21 SPECIFICATIONS 22 SAFETY PRECAUTIONS 24 „ Before using your camera, read this manual carefully to ensure correct use. „ We...

FE-120 Basic Manual (English, Français, Español, Português)
Page 10
..., it automatically retracts the lens and turns off automatically. If the camera is positioned above the lens. Horizontal grip Vertical grip Power save feature To save battery power, the camera automatically enters to turn on . To prevent the camera from the lens and flash. The monitor switches off . To resume...Monday, July 4, 2005 10:33 PM BASIC OPERATION Shooting tips Pictures may appear blurred as the result of moving , hold the camera firmly with the camera in the vertical position, hold the camera so that the flash is not operated for 3 minutes. Keep your sides.
..., it automatically retracts the lens and turns off automatically. If the camera is positioned above the lens. Horizontal grip Vertical grip Power save feature To save battery power, the camera automatically enters to turn on . To prevent the camera from the lens and flash. The monitor switches off . To resume...Monday, July 4, 2005 10:33 PM BASIC OPERATION Shooting tips Pictures may appear blurred as the result of moving , hold the camera firmly with the camera in the vertical position, hold the camera so that the flash is not operated for 3 minutes. Keep your sides.
FE-120 Basic Manual (English, Français, Español, Português)
Page 11
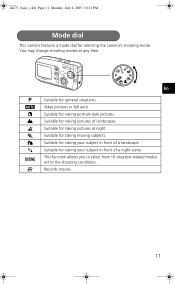
P h i l z j k / f n En Suitable for selecting the camera's shooting mode. Suitable for taking pictures of landscapes. You may change shooting modes at night. Takes pictures in front of a night scene. Suitable for taking ... taking portrait-style pictures. Suitable for taking your subject in full auto. d4271_basic_e.fm Page 11 Monday, July 4, 2005 10:33 PM Mode dial This camera features a mode dial for general situations.
P h i l z j k / f n En Suitable for selecting the camera's shooting mode. Suitable for taking pictures of landscapes. You may change shooting modes at night. Takes pictures in front of a night scene. Suitable for taking ... taking portrait-style pictures. Suitable for taking your subject in full auto. d4271_basic_e.fm Page 11 Monday, July 4, 2005 10:33 PM Mode dial This camera features a mode dial for general situations.
FE-120 Basic Manual (English, Français, Español, Português)
Page 12
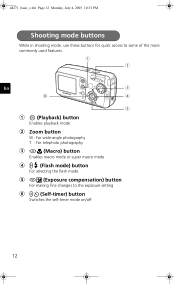
d4271_basic_e.fm Page 12 Monday, July 4, 2005 10:33 PM Shooting mode buttons While in shooting mode, use these buttons for quick access to some of the more commonly used features. 1 2 En 3 6 4 5 1 $ (Playback) button Enables playback mode 2 Zoom button W : For wide-angle photography T : For telephoto photography 3 a& (Macro) button Enables macro mode or super macro mode 4 d# (Flash mode) button For selecting the flash mode 5 cF (Exposure compensation) button For making fine changes to the exposure setting 6 bY (Self-timer) button Switches the self-timer mode on/off 12
d4271_basic_e.fm Page 12 Monday, July 4, 2005 10:33 PM Shooting mode buttons While in shooting mode, use these buttons for quick access to some of the more commonly used features. 1 2 En 3 6 4 5 1 $ (Playback) button Enables playback mode 2 Zoom button W : For wide-angle photography T : For telephoto photography 3 a& (Macro) button Enables macro mode or super macro mode 4 d# (Flash mode) button For selecting the flash mode 5 cF (Exposure compensation) button For making fine changes to the exposure setting 6 bY (Self-timer) button Switches the self-timer mode on/off 12

