
FE-120 Advanced Manual (English)
Page 1
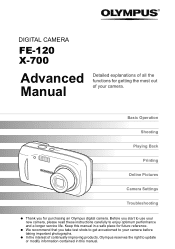
... test shots to get accustomed to your camera. DIGITAL CAMERA FE-120 X-700 Advanced Manual Detailed explanations of all the functions for getting the most out of continually improving products, Olympus reserves the right to enjoy optimum performance and a longer service life. Basic Operation Shooting Playing Back Printing Online Pictures Camera Settings Troubleshooting Thank you start to use...
... test shots to get accustomed to your camera. DIGITAL CAMERA FE-120 X-700 Advanced Manual Detailed explanations of all the functions for getting the most out of continually improving products, Olympus reserves the right to enjoy optimum performance and a longer service life. Basic Operation Shooting Playing Back Printing Online Pictures Camera Settings Troubleshooting Thank you start to use...

FE-120 Advanced Manual (English)
Page 2
...avoided. For details on notation and how to read the procedure pages, see "How to the camera's many functions after you to read it carefully before proceeding. Advanced Manual This manual introduces you have mastered the basics. Please read the procedure pages". (P. 21) 2 Note ...Important information on how to a malfunction or operational problems. Also warns of your camera. It gives you get used in this ...
...avoided. For details on notation and how to read the procedure pages, see "How to the camera's many functions after you to read it carefully before proceeding. Advanced Manual This manual introduces you have mastered the basics. Please read the procedure pages". (P. 21) 2 Note ...Important information on how to a malfunction or operational problems. Also warns of your camera. It gives you get used in this ...
FE-120 Advanced Manual (English)
Page 3
...before taking pictures. Settings P. 69 6 To print the pictures you have taken. To use . Explanations of techniques from basics to use OLYMPUS Master. To enjoy the pictures you an understanding of all the functions related to taking pictures Basic shooting functions Additional shooting functions P. 4 ... points for . Printing pictures P. 77 7 Connecting the camera to check it out. 3 Read this part before you start taking pictures. For when you want to make your camera here. Composition of the manual You'll find what you have taken. Appendix Miscellaneous ...
...before taking pictures. Settings P. 69 6 To print the pictures you have taken. To use . Explanations of techniques from basics to use OLYMPUS Master. To enjoy the pictures you an understanding of all the functions related to taking pictures Basic shooting functions Additional shooting functions P. 4 ... points for . Printing pictures P. 77 7 Connecting the camera to check it out. 3 Read this part before you start taking pictures. For when you want to make your camera here. Composition of the manual You'll find what you have taken. Appendix Miscellaneous ...

FE-120 Advanced Manual (English)
Page 4
Table of Contents How to use this manual 2 Composition of the manual 3 1 Basic operation 8 How to use the shooting button and playback button 9 How ...the menus 19 How to read the procedure pages 21 2 Tips before you start taking pictures 22 Holding the camera 23 If correct focus cannot be obtained 24 How to focus (focus lock 24 Subjects that are difficult to... by subject (SCENE SELECT 37 Zooming in on a distant subject 39 Using the digital zoom 40 Taking close-up pictures (macro/super macro) 41 Flash shooting 42 Adjusting picture brightness (exposure compensation 44 4
Table of Contents How to use this manual 2 Composition of the manual 3 1 Basic operation 8 How to use the shooting button and playback button 9 How ...the menus 19 How to read the procedure pages 21 2 Tips before you start taking pictures 22 Holding the camera 23 If correct focus cannot be obtained 24 How to focus (focus lock 24 Subjects that are difficult to... by subject (SCENE SELECT 37 Zooming in on a distant subject 39 Using the digital zoom 40 Taking close-up pictures (macro/super macro) 41 Flash shooting 42 Adjusting picture brightness (exposure compensation 44 4
FE-120 Advanced Manual (English)
Page 11
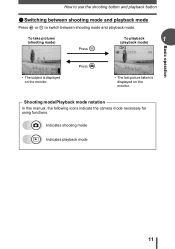
... mode) P Press $. Press #. '05.08.30 15:30 5 • The last picture taken is displayed on the monitor. Shooting mode/Playback mode notation In this manual, the following icons indicate the camera mode necessary for using functions.
... mode) P Press $. Press #. '05.08.30 15:30 5 • The last picture taken is displayed on the monitor. Shooting mode/Playback mode notation In this manual, the following icons indicate the camera mode necessary for using functions.

FE-120 Advanced Manual (English)
Page 12
... The mode dial is not indicated if the function can change the mode dial before taking pictures at night. Mode dial notation In this manual, the following icons indicate the mode dial position for using shooting mode functions. j Suitable for taking your subject in full auto. k ...Suitable for taking your subject in multiple modes. When the mode dial is set to the shooting conditions. How to use the mode dial This camera is capable of a landscape. / Suitable for taking moving subjects. See "Modes and shooting functions" (P. 130). 12 h Takes pictures in front...
... The mode dial is not indicated if the function can change the mode dial before taking pictures at night. Mode dial notation In this manual, the following icons indicate the mode dial position for using shooting mode functions. j Suitable for taking your subject in full auto. k ...Suitable for taking your subject in multiple modes. When the mode dial is set to the shooting conditions. How to use the mode dial This camera is capable of a landscape. / Suitable for taking moving subjects. See "Modes and shooting functions" (P. 130). 12 h Takes pictures in front...
FE-120 Advanced Manual (English)
Page 20
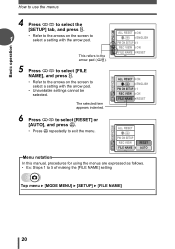
... FILE NAME ON ENGLISH 1 ON RESET ALL RESET PW ON SETUP REC VIEW FILE NAME RESET AUTO SETUP MEM PIC CAM Menu notation In this manual, procedures for using the menus are expressed as follows. • Ex: Steps 1 to exit the menu. Basic operation How to use the menus 4 Press ac...
... FILE NAME ON ENGLISH 1 ON RESET ALL RESET PW ON SETUP REC VIEW FILE NAME RESET AUTO SETUP MEM PIC CAM Menu notation In this manual, procedures for using the menus are expressed as follows. • Ex: Steps 1 to exit the menu. Basic operation How to use the menus 4 Press ac...
FE-120 Advanced Manual (English)
Page 21
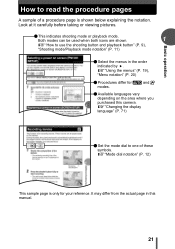
... icons are shown. 1 g"How to one of a procedure page is only for h and n modes. (Available languages vary depending on the area where you purchased this manual. 21 It may differ from the actual page in the order indicated by . Basic operation How to read the procedure pages A sample of these symbols... language" (P. 71) (Set the mode dial to use the shooting button and playback button" (P. 9), "Shooting mode/Playback mode notation" (P. 11) (Select the menus in this camera.
... icons are shown. 1 g"How to one of a procedure page is only for h and n modes. (Available languages vary depending on the area where you purchased this manual. 21 It may differ from the actual page in the order indicated by . Basic operation How to read the procedure pages A sample of these symbols... language" (P. 71) (Set the mode dial to use the shooting button and playback button" (P. 9), "Shooting mode/Playback mode notation" (P. 11) (Select the menus in this camera.
FE-120 Advanced Manual (English)
Page 29
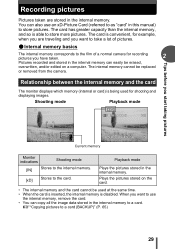
... you want to use the internal memory, remove the card. • You can also use an xD-Picture Card (referred to as "card" in this manual) to a card (BACKUP)" (P. 65) 29 The card is convenient, for example, when you are stored in the internal memory. Shooting mode Playback mode ... easily be erased, overwritten, and/or edited on the card. • The internal memory and the card cannot be replaced or removed from the camera. The internal memory cannot be used for recording pictures you want to take a lot of pictures. (Internal memory basics The internal memory corresponds to...
... you want to use the internal memory, remove the card. • You can also use an xD-Picture Card (referred to as "card" in this manual) to a card (BACKUP)" (P. 65) 29 The card is convenient, for example, when you are stored in the internal memory. Shooting mode Playback mode ... easily be erased, overwritten, and/or edited on the card. • The internal memory and the card cannot be replaced or removed from the camera. The internal memory cannot be used for recording pictures you want to take a lot of pictures. (Internal memory basics The internal memory corresponds to...

FE-120 Advanced Manual (English)
Page 33
... Manganese (zinc-carbon) batteries cannot be recharged. Note • Power consumption by Olympus before use the camera longer than with the camera, the following types of battery can take may cause the camera to turn off without displaying the battery level warning. 33 Charge the batteries with the... battery charger specified by the camera varies depending on in playback mode for your charger. For details, refer to the instruction manual for an extended period of time. • The shutter button is pressed halfway repeatedly...
... Manganese (zinc-carbon) batteries cannot be recharged. Note • Power consumption by Olympus before use the camera longer than with the camera, the following types of battery can take may cause the camera to turn off without displaying the battery level warning. 33 Charge the batteries with the... battery charger specified by the camera varies depending on in playback mode for your charger. For details, refer to the instruction manual for an extended period of time. • The shutter button is pressed halfway repeatedly...
FE-120 Advanced Manual (English)
Page 44
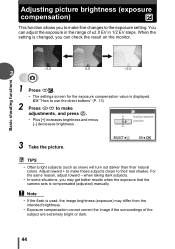
.... 3 Take the picture. Adjust toward - Note • If the flash is used, the image brightness (exposure) may get better results when the exposure that the camera sets is compensated (adjusted) manually. When the setting is displayed.
.... 3 Take the picture. Adjust toward - Note • If the flash is used, the image brightness (exposure) may get better results when the exposure that the camera sets is compensated (adjusted) manually. When the setting is displayed.
FE-120 Advanced Manual (English)
Page 78
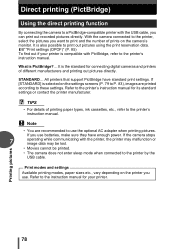
... 7 operating while communicating with the printer, the printer may malfunction or image data may be lost. • Movies cannot be printed. • The camera does not enter sleep mode when connected to the printer's instruction manual for connecting digital cameras and printers of printing paper types, ink cassettes, etc., refer to the printer's instruction...
... 7 operating while communicating with the printer, the printer may malfunction or image data may be lost. • Movies cannot be printed. • The camera does not enter sleep mode when connected to the printer's instruction manual for connecting digital cameras and printers of printing paper types, ink cassettes, etc., refer to the printer's instruction...
FE-120 Advanced Manual (English)
Page 79
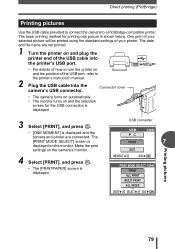
...and press Z. • [ONE MOMENT] is displayed on and the position of the USB port, refer to the printer's instruction manual. 2 Plug the USB cable into the camera's USB connector. The date and file name are connected. USB connector USB P C PRINT 7 SELECT EXIT GO OK PRINT MODE... picture will be printed using the standard settings of how to a PictBridge-compatible printer. Connector cover • The camera turns on automatically. • The monitor turns on the camera's monitor. 4 Select [PRINT], and press Z. • The [PRINTPAPER] screen is shown below. One print of...
...and press Z. • [ONE MOMENT] is displayed on and the position of the USB port, refer to the printer's instruction manual. 2 Plug the USB cable into the camera's USB connector. The date and file name are connected. USB connector USB P C PRINT 7 SELECT EXIT GO OK PRINT MODE... picture will be printed using the standard settings of how to a PictBridge-compatible printer. Connector cover • The camera turns on automatically. • The monitor turns on the camera's monitor. 4 Select [PRINT], and press Z. • The [PRINTPAPER] screen is shown below. One print of...
FE-120 Advanced Manual (English)
Page 84
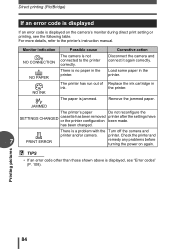
...is displayed, see the following table. The paper is a problem with the Turn off the camera and printer and/or camera. Corrective action Disconnect the camera and connect it again correctly. There is jammed. printer. Monitor indication NO CONNECTION NO PAPER NO... Remove the jammed paper. Check the printer and 7 PRINT ERROR remedy any problems before turning the power on the camera's monitor during direct print setting or printing, see "Error codes" (P. 108). The printer has run out of ... code is displayed If an error code is not connected to the printer's instruction manual.
...is displayed, see the following table. The paper is a problem with the Turn off the camera and printer and/or camera. Corrective action Disconnect the camera and connect it again correctly. There is jammed. printer. Monitor indication NO CONNECTION NO PAPER NO... Remove the jammed paper. Check the printer and 7 PRINT ERROR remedy any problems before turning the power on the camera's monitor during direct print setting or printing, see "Error codes" (P. 108). The printer has run out of ... code is displayed If an error code is not connected to the printer's instruction manual.
FE-120 Advanced Manual (English)
Page 85
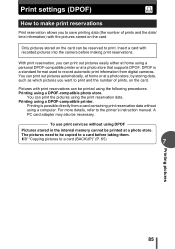
... prints and the date/ time information) with the pictures stored on the card. DPOF is possible directly from digital cameras. You can be copied to the printer's instruction manual. Pictures with recorded pictures into the camera before taking them. Only pictures stored on the card. For more details, refer to a card before making print...
... prints and the date/ time information) with the pictures stored on the card. DPOF is possible directly from digital cameras. You can be copied to the printer's instruction manual. Pictures with recorded pictures into the camera before taking them. Only pictures stored on the card. For more details, refer to a card before making print...
FE-120 Advanced Manual (English)
Page 92
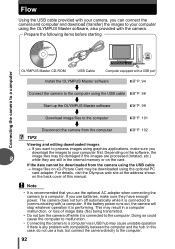
... on the back cover of image data (file) being transmitted. • Do not turn off while it is any problem with the camera. In this manual. For details, visit the Olympus web site at the address shown on the card. Doing so could cause the computer to malfunction. • Connecting the... camera to the computer. 92 If you use a hub, but connect the camera directly to a computer via a USB hub may be damaged if the ...
... on the back cover of image data (file) being transmitted. • Do not turn off while it is any problem with the camera. In this manual. For details, visit the Olympus web site at the address shown on the card. Doing so could cause the computer to malfunction. • Connecting the... camera to the computer. 92 If you use a hub, but connect the camera directly to a computer via a USB hub may be damaged if the ...

FE-120 Advanced Manual (English)
Page 93
... editing and managing image files, install the OLYMPUS Master software from the camera or other than the above, refer to a computer 8 Edit images with a digital camera on your images using pictures taken in panorama mode. Installing it on a computer. Connecting the camera to the "Help" guide and OLYMPUS Master reference manual. 93 What is application software for...
... editing and managing image files, install the OLYMPUS Master software from the camera or other than the above, refer to a computer 8 Edit images with a digital camera on your images using pictures taken in panorama mode. Installing it on a computer. Connecting the camera to the "Help" guide and OLYMPUS Master reference manual. 93 What is application software for...
FE-120 Advanced Manual (English)
Page 94
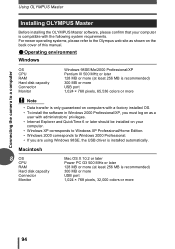
...camera to a computer Using OLYMPUS Master Installing OLYMPUS Master Before installing the OLYMPUS Master software, please confirm that your computer is compatible with administrators' privileges. • Internet Explorer and QuickTime 6 or later should be installed on your computer. • Windows XP corresponds to Windows XP Professional/Home Edition. • Windows 2000 corresponds to the Olympus... web site as shown on the back cover of this manual. (Operating environment Windows OS CPU RAM Hard disk capacity ...
...camera to a computer Using OLYMPUS Master Installing OLYMPUS Master Before installing the OLYMPUS Master software, please confirm that your computer is compatible with administrators' privileges. • Internet Explorer and QuickTime 6 or later should be installed on your computer. • Windows XP corresponds to Windows XP Professional/Home Edition. • Windows 2000 corresponds to the Olympus... web site as shown on the back cover of this manual. (Operating environment Windows OS CPU RAM Hard disk capacity ...

FE-120 Advanced Manual (English)
Page 96
...screen is not displayed, Adobe Reader is already installed on your region and click "Next". Go to read 8 the OLYMPUS Master instruction manual. Adobe Reader is required to Step 7. • The Adobe Reader installation screen is displayed. Refer to the sticker ... displayed. select your computer. 5 To install Adobe Reader, click "OK". • To cancel installation, click "Cancel". Connecting the camera to a computer Using OLYMPUS Master 3 Click "Next" and follow the onscreen instructions. • When the QuickTime licensing agreement is displayed, read the agreement and click...
...screen is not displayed, Adobe Reader is already installed on your region and click "Next". Go to read 8 the OLYMPUS Master instruction manual. Adobe Reader is required to Step 7. • The Adobe Reader installation screen is displayed. Refer to the sticker ... displayed. select your computer. 5 To install Adobe Reader, click "OK". • To cancel installation, click "Cancel". Connecting the camera to a computer Using OLYMPUS Master 3 Click "Next" and follow the onscreen instructions. • When the QuickTime licensing agreement is displayed, read the agreement and click...

FE-120 Advanced Manual (English)
Page 98
... on the computer. • Refer to your computer's instruction manual to locate the position of the USB port. 3 Plug the other end of the USB cable into the camera's USB Connector cover connector. • The camera turns on automatically. • The monitor turns on and the... The monitor is off. • The lens is displayed. When you connect the camera to your digital camera for the first time, the iPhoto application starts automatically, so close this application and start OLYMPUS Master. The camera is recognized as a "Removable Disk". • Macintosh The iPhoto program is the ...
... on the computer. • Refer to your computer's instruction manual to locate the position of the USB port. 3 Plug the other end of the USB cable into the camera's USB Connector cover connector. • The camera turns on automatically. • The monitor turns on and the... The monitor is off. • The lens is displayed. When you connect the camera to your digital camera for the first time, the iPhoto application starts automatically, so close this application and start OLYMPUS Master. The camera is recognized as a "Removable Disk". • Macintosh The iPhoto program is the ...


