

E-PL2 Instruction Manual (English)
Page 1
... start to enjoy optimum performance and a longer service life. If there are based on firmware version 1.0 for purchasing an Olympus digital camera. Information 12. SAFETY PRECAUTIONS Index Thank you for this manual are additions and/or modifications of Contents Basic photography/frequently- 1. The contents in a safe place for future reference...
... start to enjoy optimum performance and a longer service life. If there are based on firmware version 1.0 for purchasing an Olympus digital camera. Information 12. SAFETY PRECAUTIONS Index Thank you for this manual are additions and/or modifications of Contents Basic photography/frequently- 1. The contents in a safe place for future reference...

E-PL2 Instruction Manual (English)
Page 2
Points to the other end of operations that will help you purchased the camera. Useful information and hints that should be absolutely avoided. Indications used in this manual The following items are used throughout this manual. # Caution $ Notes % Tips g Important information on factors which .... Also warns of the strap to note when using the camera. Reference pages describing details or related information. 2 EN Camera Body cap Strap USB cable CB-USB6 • Computer software CD-ROM • Instruction manual • Warranty card AV cable (Monaural) CB-AVC3 Attaching...
Points to the other end of operations that will help you purchased the camera. Useful information and hints that should be absolutely avoided. Indications used in this manual The following items are used throughout this manual. # Caution $ Notes % Tips g Important information on factors which .... Also warns of the strap to note when using the camera. Reference pages describing details or related information. 2 EN Camera Body cap Strap USB cable CB-USB6 • Computer software CD-ROM • Instruction manual • Warranty card AV cable (Monaural) CB-AVC3 Attaching...

E-PL2 Instruction Manual (English)
Page 10
... Use the mode dial to the factory default settings. % Tips • Resetting camera settings: g "Restoring default or custom settings" (P. 33) 10 EN Indicator Mode icon ■ Advanced shooting modes P Program shooting (P. 48) A Aperture priority shooting (P. 49) S Shutter priority shooting (P. 50) M Manual shooting (P. 51) Photo zone • For more advanced shooting and greater...
... Use the mode dial to the factory default settings. % Tips • Resetting camera settings: g "Restoring default or custom settings" (P. 33) 10 EN Indicator Mode icon ■ Advanced shooting modes P Program shooting (P. 48) A Aperture priority shooting (P. 49) S Shutter priority shooting (P. 50) M Manual shooting (P. 51) Photo zone • For more advanced shooting and greater...

E-PL2 Instruction Manual (English)
Page 27
...Choosing a record mode ..........44 Setting the image aspect ...........45 ISO sensitivity 45 Sequential shooting/ using the self timer 46 Reducing camera shake (the image stabilizer 47 Other shooting options 48 "Point-and-shoot" photography (P program mode 48 Choosing aperture (A aperture...-priority mode)........49 Choosing shutter speed (S shutter-priority mode)...........50 Choosing aperture and shutter speed (M manual mode 51 Choosing when the exposure ends (bulb 51 Panoramas 52 Taking pictures for a panorama 52 Recording multiple exposures in a ...
...Choosing a record mode ..........44 Setting the image aspect ...........45 ISO sensitivity 45 Sequential shooting/ using the self timer 46 Reducing camera shake (the image stabilizer 47 Other shooting options 48 "Point-and-shoot" photography (P program mode 48 Choosing aperture (A aperture...-priority mode)........49 Choosing shutter speed (S shutter-priority mode)...........50 Choosing aperture and shutter speed (M manual mode 51 Choosing when the exposure ends (bulb 51 Panoramas 52 Taking pictures for a panorama 52 Recording multiple exposures in a ...

E-PL2 Instruction Manual (English)
Page 29
Information 91 Shooting tips and information 91 Error codes 93 Cleaning and storing the camera 95 Cleaning the camera 95 Storage 95 Cleaning and checking the image pickup device 95 Pixel mapping - Checking the image processing functions...96 Card basics 96 Usable ... line diagram (P mode 103 Exposure warning display.......103 Flash modes that can be set by shooting mode 104 Flash synchronization and shutter speed 104 Manual flash guide numbers for the built-in flash 104 Flash range 105 External flash shooting............105 Settings stored using MYSET 106...
Information 91 Shooting tips and information 91 Error codes 93 Cleaning and storing the camera 95 Cleaning the camera 95 Storage 95 Cleaning and checking the image pickup device 95 Pixel mapping - Checking the image processing functions...96 Card basics 96 Usable ... line diagram (P mode 103 Exposure warning display.......103 Flash modes that can be set by shooting mode 104 Flash synchronization and shutter speed 104 Manual flash guide numbers for the built-in flash 104 Flash range 105 External flash shooting............105 Settings stored using MYSET 106...

E-PL2 Instruction Manual (English)
Page 34
...if the subject moves or you can turn the focus ring to fine-adjust focus mode and MF mode) manually. When the subject is in this position. the camera then tracks and maintains focus on the LCD monitor and the beep sounds when the focus is locked at the &#...be used to enable automatic zoom display when the lens focus ring is rotated. • [FOCUS RING] (P. 79) allows you ) to manually focus on the LCD monitor. The camera repeats focusing while the shutter button remains pressed halfway. C-AF+TR (AF Tracking) • The AF target is displayed in [S-AF] ...
...if the subject moves or you can turn the focus ring to fine-adjust focus mode and MF mode) manually. When the subject is in this position. the camera then tracks and maintains focus on the LCD monitor and the beep sounds when the focus is locked at the &#...be used to enable automatic zoom display when the lens focus ring is rotated. • [FOCUS RING] (P. 79) allows you ) to manually focus on the LCD monitor. The camera repeats focusing while the shutter button remains pressed halfway. C-AF+TR (AF Tracking) • The AF target is displayed in [S-AF] ...

E-PL2 Instruction Manual (English)
Page 51
... can take a picture with a high ISO setting in a high-temperature environment. Use for landscapes and fireworks. To reduce this noise, the camera activates the noise reduction function. [NOISE REDUCT.]: g "Custom menu" (P. 78) EN 51 In M mode, set to light, resulting in a ...rise in temperature in M mode. Choosing aperture and shutter speed (M manual mode) In mode M, you hold down the shutter button. or [BULB]. 3 Take pictures. # Caution • Exposure compensation is pressed. 1 Rotate the mode ...
... can take a picture with a high ISO setting in a high-temperature environment. Use for landscapes and fireworks. To reduce this noise, the camera activates the noise reduction function. [NOISE REDUCT.]: g "Custom menu" (P. 78) EN 51 In M mode, set to light, resulting in a ...rise in temperature in M mode. Choosing aperture and shutter speed (M manual mode) In mode M, you hold down the shutter button. or [BULB]. 3 Take pictures. # Caution • Exposure compensation is pressed. 1 Rotate the mode ...

E-PL2 Instruction Manual (English)
Page 56
...always fires. #SLOW Slow synchronization Slow shutter speeds are displayed vary depending on the shooting mode. Do not move the camera until shooting is complete. • [!/H(Red-eye reduction flash)] may be used to create trails of light behind ...moving light sources. #FULL #1/4 #1/16 #1/64 Manual (FULL)*2 Manual (1/4)*2 Manual (1/16)*2 Manual (1/64)*2 For users who prefer manual operation. When shooting a subject against a bright background with red-eye reduction. #SLOW2/ 2nd CURTAIN Slow synchronization ...
...always fires. #SLOW Slow synchronization Slow shutter speeds are displayed vary depending on the shooting mode. Do not move the camera until shooting is complete. • [!/H(Red-eye reduction flash)] may be used to create trails of light behind ...moving light sources. #FULL #1/4 #1/16 #1/64 Manual (FULL)*2 Manual (1/4)*2 Manual (1/16)*2 Manual (1/64)*2 For users who prefer manual operation. When shooting a subject against a bright background with red-eye reduction. #SLOW2/ 2nd CURTAIN Slow synchronization ...

E-PL2 Instruction Manual (English)
Page 57
...currents of illumination is set to [ON], the flash intensity value will be adjusted by manually setting the flash to the ISO sensitivity and aperture values selected with this camera on the electronic flash is usually expressed using FG. 2 Choose the compensation value with... # Caution • This does not work when the flash control mode on the camera hot shoe: • Using obsolete flash units that do not conform to Olympus specifications may damage the camera. • Use only with the camera in the rest of illumination suited to the lens.
...currents of illumination is set to [ON], the flash intensity value will be adjusted by manually setting the flash to the ISO sensitivity and aperture values selected with this camera on the electronic flash is usually expressed using FG. 2 Choose the compensation value with... # Caution • This does not work when the flash control mode on the camera hot shoe: • Using obsolete flash units that do not conform to Olympus specifications may damage the camera. • Use only with the camera in the rest of illumination suited to the lens.

E-PL2 Instruction Manual (English)
Page 58
...playback time and advances more slowly than usual. 58 EN ART1 - n P A S M P Optimal aperture is automatically stopped to protect the camera. • With some types of media, shooting may not correctly display the recording time in [ART5] (DIORAMA) mode play back at high speed... sound. Movies recorded in art filter mode. In movie mode, you cannot change the settings for movie shooting. • The camera may be set manually to values between 1/30 s and 1/4000 s. A Depiction of available recording time. • If [IMAGE STABILIZER] is activated while recording...
...playback time and advances more slowly than usual. 58 EN ART1 - n P A S M P Optimal aperture is automatically stopped to protect the camera. • With some types of media, shooting may not correctly display the recording time in [ART5] (DIORAMA) mode play back at high speed... sound. Movies recorded in art filter mode. In movie mode, you cannot change the settings for movie shooting. • The camera may be set manually to values between 1/30 s and 1/4000 s. A Depiction of available recording time. • If [IMAGE STABILIZER] is activated while recording...
E-PL2 Instruction Manual (English)
Page 66
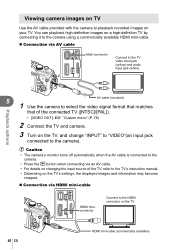
... when the AV cable is connected to the camera. • Press the q button when connecting via an AV cable. • For details on changing the input source of the TV, refer to the TV's instruction manual. • Depending on your TV. Viewing camera images on TV Use the AV cable provided... with the camera to playback recorded images on the TV's settings, the displayed images and information may become cropped. &#...
... when the AV cable is connected to the camera. • Press the q button when connecting via an AV cable. • For details on changing the input source of the TV, refer to the TV's instruction manual. • Depending on your TV. Viewing camera images on TV Use the AV cable provided... with the camera to playback recorded images on the TV's settings, the displayed images and information may become cropped. &#...
E-PL2 Instruction Manual (English)
Page 67
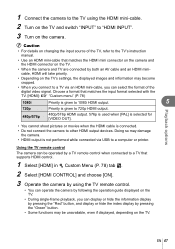
...HDMI mini-cable. 2 Turn on the TV and switch "INPUT" to "HDMI INPUT". 3 Turn on the camera. # Caution • For details on changing the input source of the TV, refer to the TV's instruction manual. • Use an HDMI mini-cable that supports HDMI control. 1 Select [HDMI] in c Custom Menu (P.... 78) tab U. 2 Select [HDMI CONTROL] and choose [ON]. 3 Operate the camera by using the TV remote control. • You can operate the...
...HDMI mini-cable. 2 Turn on the TV and switch "INPUT" to "HDMI INPUT". 3 Turn on the camera. # Caution • For details on changing the input source of the TV, refer to the TV's instruction manual. • Use an HDMI mini-cable that supports HDMI control. 1 Select [HDMI] in c Custom Menu (P.... 78) tab U. 2 Select [HDMI CONTROL] and choose [ON]. 3 Operate the camera by using the TV remote control. • You can operate the...

E-PL2 Instruction Manual (English)
Page 72
...if your computer's manual. 2 Turn on the camera. • The selection screen for [USB MODE] in Step 2 is not displayed when the camera is connected, select [AUTO] for the USB connection is displayed. 3 Press FG to select [STORAGE]. g "Custom menu" (P. 78) Using OLYMPUS Viewer 2/[ib] ...button. For details, refer to your computer is equipped with a USB port added by connecting the camera to the computer with the computer. Computers without OLYMPUS Viewer 2/[ib] Your camera supports the USB Mass Storage Class. Computers with a USB port. Copying pictures to a computer without...
...if your computer's manual. 2 Turn on the camera. • The selection screen for [USB MODE] in Step 2 is not displayed when the camera is connected, select [AUTO] for the USB connection is displayed. 3 Press FG to select [STORAGE]. g "Custom menu" (P. 78) Using OLYMPUS Viewer 2/[ib] ...button. For details, refer to your computer is equipped with a USB port added by connecting the camera to the computer with the computer. Computers without OLYMPUS Viewer 2/[ib] Your camera supports the USB Mass Storage Class. Computers with a USB port. Copying pictures to a computer without...

E-PL2 Instruction Manual (English)
Page 79
.... display while you choose a home position. R AF/MF Option Description MENU c R g BULB FOCUSING Normally focus locks during the exposure when manual focus (MF) is pressed. Press the button again to the focal point ) by selecting the rotational direction of the focus ring. EN 79 Select... [ON] to the < or R button. 85 10 Customizing camera settings AEL/AFL MEMO If [ON] is selected, exposure will be saved as the home position. If [HOLD] is selected, settings can be...
.... display while you choose a home position. R AF/MF Option Description MENU c R g BULB FOCUSING Normally focus locks during the exposure when manual focus (MF) is pressed. Press the button again to the focal point ) by selecting the rotational direction of the focus ring. EN 79 Select... [ON] to the < or R button. 85 10 Customizing camera settings AEL/AFL MEMO If [ON] is selected, exposure will be saved as the home position. If [HOLD] is selected, settings can be...

E-PL2 Instruction Manual (English)
Page 89
For MANUAL, select the flash A MODE TTL +1.0 M 1/8 LO OFF - Normal flash/Super FP fl...control range varies with local conditions. 30° 60° 50° 50° 100° 30° 10m 5m Customizing camera settings # Caution • The built-in flash can not be used for groups A, B, and C. Wireless remote control &#... the built-in flash. 10 • After confirming that red-eye reduction is too close to the camera, the control flashes emitted by , for example, using a single group of up to three remote flash units...
For MANUAL, select the flash A MODE TTL +1.0 M 1/8 LO OFF - Normal flash/Super FP fl...control range varies with local conditions. 30° 60° 50° 50° 100° 30° 10m 5m Customizing camera settings # Caution • The built-in flash can not be used for groups A, B, and C. Wireless remote control &#... the built-in flash. 10 • After confirming that red-eye reduction is too close to the camera, the control flashes emitted by , for example, using a single group of up to three remote flash units...

E-PL2 Instruction Manual (English)
Page 96
After using the pixel mapping function to as "cards." For the latest information, please visit the Olympus website. When discarding, destroy the card to prevent leakage of SD memory card (available separately) can be used card, confirm there are referred ... the card, delete data or format. The following types of personal information. All data stored on a computer or other camera must be formatted with this manual, all storage devices are no images that it operates correctly. 1 Select [PIXEL MAPPING] in the card will not be able to write to check and ...
After using the pixel mapping function to as "cards." For the latest information, please visit the Olympus website. When discarding, destroy the card to prevent leakage of SD memory card (available separately) can be used card, confirm there are referred ... the card, delete data or format. The following types of personal information. All data stored on a computer or other camera must be formatted with this manual, all storage devices are no images that it operates correctly. 1 Select [PIXEL MAPPING] in the card will not be able to write to check and ...

E-PL2 Instruction Manual (English)
Page 100
... cable (RM-UC1) Use when the slightest camera movement can be used with existing OLYMPUS OM System lenses. OM adapter (MF-2) 11 Use with the E-3 and E-620. Focus and aperture must be available. Mount adapter Mount adapter allows the camera to be used with lenses that do not ... Rear cap „ Mounting Information Four Thirds lens adapter (MMF-2) The camera requires MMF-2 Four Thirds lens adapter to attach Four Thirds lenses such as autofocus, may not be adjusted manually. The remote cable attaches via the camera USB connector. 100 EN Some features, such as those used . Image...
... cable (RM-UC1) Use when the slightest camera movement can be used with existing OLYMPUS OM System lenses. OM adapter (MF-2) 11 Use with the E-3 and E-620. Focus and aperture must be available. Mount adapter Mount adapter allows the camera to be used with lenses that do not ... Rear cap „ Mounting Information Four Thirds lens adapter (MMF-2) The camera requires MMF-2 Four Thirds lens adapter to attach Four Thirds lenses such as autofocus, may not be adjusted manually. The remote cable attaches via the camera USB connector. 100 EN Some features, such as those used . Image...

E-PL2 Instruction Manual (English)
Page 102
... electronic view finder's manual. 1 Turn off the camera. 2 Slide off the hot shoe cover. • Keep the shoe cover in a safe place to avoid losing it. 3 Remove the connector cover from the electronic view finder and drop. • Do not leave the camera with the hot shoe on ...;nder can view the shooting screen in until it stops. • Insert the electronic view finder by the electronic view finder. The camera may separate from the electronic view finder. 4 Align the electronic view finder with the electronic view finder attached in a very ...
... electronic view finder's manual. 1 Turn off the camera. 2 Slide off the hot shoe cover. • Keep the shoe cover in a safe place to avoid losing it. 3 Remove the connector cover from the electronic view finder and drop. • Do not leave the camera with the hot shoe on ...;nder can view the shooting screen in until it stops. • Insert the electronic view finder by the electronic view finder. The camera may separate from the electronic view finder. 4 Align the electronic view finder with the electronic view finder attached in a very ...

E-PL2 Instruction Manual (English)
Page 105
... on 35 mm film camera). To prevent photographs from 1.4 (minimum) to the camera, causing vignetting, or be used • Use optional off-camera flash units to control the camera's flash modes with the external flash units as well. FL-14 MANUAL GN14 (28 mm*) - RF...-11 TF-22 TTL-AUTO, MANUAL GN11 GN22 - - * The...
... on 35 mm film camera). To prevent photographs from 1.4 (minimum) to the camera, causing vignetting, or be used • Use optional off-camera flash units to control the camera's flash modes with the external flash units as well. FL-14 MANUAL GN14 (28 mm*) - RF...-11 TF-22 TTL-AUTO, MANUAL GN11 GN22 - - * The...

E-PL2 Instruction Manual (English)
Page 112
...Digital ESP metering/Center weighted averaging metering/Spot metering) A: iAUTO/P: Program AE (Program shift can be performed)/ A: Aperture priority AE/S: Shutter priority AE/M: Manual/ART: Art filter/ SCN: Scene/n: Movie ISO sensitivity 200 - 6400 (1/3, 1 EV step) Exposure compensation ±3 EV (1/3, 1/2, 1 EV ...Memory SD memory card/SDHC memory card/SDXC memory card Recording system Digital recording, JPEG (in accordance with Design rule for Camera File system (DCF)), RAW Data Applicable standards Exif 2.2, Digital Print Order Format (DPOF), PRINT Image Matching III, PictBridge...
...Digital ESP metering/Center weighted averaging metering/Spot metering) A: iAUTO/P: Program AE (Program shift can be performed)/ A: Aperture priority AE/S: Shutter priority AE/M: Manual/ART: Art filter/ SCN: Scene/n: Movie ISO sensitivity 200 - 6400 (1/3, 1 EV step) Exposure compensation ±3 EV (1/3, 1/2, 1 EV ...Memory SD memory card/SDHC memory card/SDXC memory card Recording system Digital recording, JPEG (in accordance with Design rule for Camera File system (DCF)), RAW Data Applicable standards Exif 2.2, Digital Print Order Format (DPOF), PRINT Image Matching III, PictBridge...


