
E-5 Instruction Manual (English)
Page 1
...and a longer service life. DIGITAL CAMERA INSTRUCTION MANUAL Basic guide P. 2 Review the camera part names, the basic steps for purchasing an Olympus digital camera. z The contents in a safe place for the camera, the contents will differ. Before you for shooting and playback, and ... modification of Contents P. 23 z Thank you start to firmware update for future reference. For the latest information, please visit the Olympus website. Table of functions due to use your camera before taking important photographs. Keep this manual were produced during the development stages...
...and a longer service life. DIGITAL CAMERA INSTRUCTION MANUAL Basic guide P. 2 Review the camera part names, the basic steps for purchasing an Olympus digital camera. z The contents in a safe place for the camera, the contents will differ. Before you for shooting and playback, and ... modification of Contents P. 23 z Thank you start to firmware update for future reference. For the latest information, please visit the Olympus website. Table of functions due to use your camera before taking important photographs. Keep this manual were produced during the development stages...

E-5 Instruction Manual (English)
Page 9
... other eyelet in the same way. Preparations for shooting 9 EN Camera Body cap Strap BLM-5 Lithium ion battery BCM-5 Lithium ion charger USB cable • OLYMPUS Setup CD-ROM • Instruction manual • Warranty card Attaching the strap AV cable (Monaural) 1 2 3 Thread the strap as indicated by the arrows...
... other eyelet in the same way. Preparations for shooting 9 EN Camera Body cap Strap BLM-5 Lithium ion battery BCM-5 Lithium ion charger USB cable • OLYMPUS Setup CD-ROM • Instruction manual • Warranty card Attaching the strap AV cable (Monaural) 1 2 3 Thread the strap as indicated by the arrows...
E-5 Instruction Manual (English)
Page 25
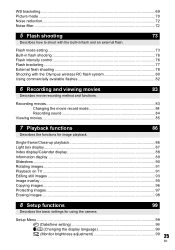
... Describes how to shoot with the built-in flash shooting 76 Flash intensity control 76 Flash bracketing ...77 External flash shooting 78 Shooting with the Olympus wireless RC flash system 80 Using commercially available flashes 82 6 Recording and viewing movies 83 Describes movie recording method and functions. Recording movies ...83 Changing...
... Describes how to shoot with the built-in flash shooting 76 Flash intensity control 76 Flash bracketing ...77 External flash shooting 78 Shooting with the Olympus wireless RC flash system 80 Using commercially available flashes 82 6 Recording and viewing movies 83 Describes movie recording method and functions. Recording movies ...83 Changing...

E-5 Instruction Manual (English)
Page 28
... reservation data 123 Direct printing (PictBridge 123 Connecting the camera to a printer 124 Easy printing 124 Custom printing 125 11 Using the OLYMPUS Viewer 2 / [ib] Describes how to this section for information on optional accessories, camera specifications, and other useful shooting information. ...Battery and charger 137 Using your camera images to a computer. 127 Windows...127 Macintosh 128 Import and store the image without OLYMPUS Viewer 2 or [ib 129 12 Shooting tips and maintenance Refer to this section for troubleshooting and camera maintenance information. 130 ...
... reservation data 123 Direct printing (PictBridge 123 Connecting the camera to a printer 124 Easy printing 124 Custom printing 125 11 Using the OLYMPUS Viewer 2 / [ib] Describes how to this section for information on optional accessories, camera specifications, and other useful shooting information. ...Battery and charger 137 Using your camera images to a computer. 127 Windows...127 Macintosh 128 Import and store the image without OLYMPUS Viewer 2 or [ib 129 12 Shooting tips and maintenance Refer to this section for troubleshooting and camera maintenance information. 130 ...

E-5 Instruction Manual (English)
Page 63
.... x Notes 3 • The image stabilizer cannot correct excessive camera shake or camera shake that you turn off the camera, the camera will vibrate. Consult your Olympus Authorized Service Center.
.... x Notes 3 • The image stabilizer cannot correct excessive camera shake or camera shake that you turn off the camera, the camera will vibrate. Consult your Olympus Authorized Service Center.

E-5 Instruction Manual (English)
Page 64
... camera or by using common software, and it will be selected for the X (Middle) print size For smallsized prints and use on the computer, use OLYMPUS Viewer 2 or [ib] software. However, the image will be displayed on a PC, website editing, etc.). Choose the record mode that is unprocessed data that has...
... camera or by using common software, and it will be selected for the X (Middle) print size For smallsized prints and use on the computer, use OLYMPUS Viewer 2 or [ib] software. However, the image will be displayed on a PC, website editing, etc.). Choose the record mode that is unprocessed data that has...

E-5 Instruction Manual (English)
Page 76
Built-in flash shooting If you shoot a subject using a lens that is wider than 14mm (equivalent to communicate with the Olympus wireless RC flash system" (P. 80) Flash intensity control The flash intensity can be adjusted from +3 to finish charging: j See "RLS PRIORITY S/RLS PRIORITY C" (gP. 108). x ...
Built-in flash shooting If you shoot a subject using a lens that is wider than 14mm (equivalent to communicate with the Olympus wireless RC flash system" (P. 80) Flash intensity control The flash intensity can be adjusted from +3 to finish charging: j See "RLS PRIORITY S/RLS PRIORITY C" (gP. 108). x ...
E-5 Instruction Manual (English)
Page 80
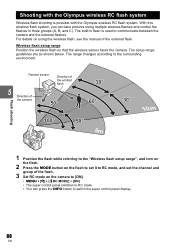
... the channel and group of the flash. 3 Set RC mode on using multiple wireless flashes and control the flashes in flash is possible with the Olympus wireless RC flash system Wireless flash shooting is used to communicate between the camera and the external flashes. The built-in three groups (A, B, and C). The... setup range Position the wireless flash so that the wireless sensor faces the camera. The setup range guidelines are as shown below. Shooting with the Olympus wireless RC flash system.
... the channel and group of the flash. 3 Set RC mode on using multiple wireless flashes and control the flashes in flash is possible with the Olympus wireless RC flash system Wireless flash shooting is used to communicate between the camera and the external flashes. The built-in three groups (A, B, and C). The... setup range Position the wireless flash so that the wireless sensor faces the camera. The setup range guidelines are as shown below. Shooting with the Olympus wireless RC flash system.

E-5 Instruction Manual (English)
Page 103
... POINTER When set to [ON], during shooting. PSET HOME You can set the range of the AF target for the mechanically-focus lenses such as Olympus SWD lenses. C-AF LOCK When set to [OFF], the AF target does not light when the subject is effective when shooting at a 9 location where something...
... POINTER When set to [ON], during shooting. PSET HOME You can set the range of the AF target for the mechanically-focus lenses such as Olympus SWD lenses. C-AF LOCK When set to [OFF], the AF target does not light when the subject is effective when shooting at a 9 location where something...
E-5 Instruction Manual (English)
Page 110
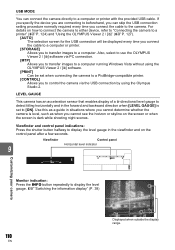
... to control the camera via PC connection. [MTP] Allows you to transfer images to a computer running Windows Vista without using the Olympus Studio 2. Viewfinder Control panel 9 Horizontal level indicator Customizing your camera Monitor indication: Press the INFO button repeatedly to a computer or ...dark while shooting night scenes. Viewfinder and control panel indications: Press the shutter button halfway to use the OLYMPUS Viewer 2 / [ib] software via the USB connection by using the OLYMPUS Viewer 2 / [ib] software. [PRINT] Can be displayed every time you connect the cable to a...
... to control the camera via PC connection. [MTP] Allows you to transfer images to a computer running Windows Vista without using the Olympus Studio 2. Viewfinder Control panel 9 Horizontal level indicator Customizing your camera Monitor indication: Press the INFO button repeatedly to a computer or ...dark while shooting night scenes. Viewfinder and control panel indications: Press the shutter button halfway to use the OLYMPUS Viewer 2 / [ib] software via the USB connection by using the OLYMPUS Viewer 2 / [ib] software. [PRINT] Can be displayed every time you connect the cable to a...

E-5 Instruction Manual (English)
Page 127
...be exhausted. Windows Vista/Windows 7 • An Autorun dialog will be displayed. x Notes • If the "Setup" dialog is displayed on your Olympus product. • Click the "Registration" button and follow the onscreen instructions. 11 127 EN x Notes • If nothing is not displayed, select... "My Computer" (Windows XP) or "Computer" (Windows Vista/Windows 7) from the start menu. Terminal USB terminal Using the OLYMPUS Viewer 2 / [ib] USBport USB cable Smaller terminal x Notes • When you connect the camera to other device via USB, a screen to...
...be exhausted. Windows Vista/Windows 7 • An Autorun dialog will be displayed. x Notes • If the "Setup" dialog is displayed on your Olympus product. • Click the "Registration" button and follow the onscreen instructions. 11 127 EN x Notes • If nothing is not displayed, select... "My Computer" (Windows XP) or "Computer" (Windows Vista/Windows 7) from the start menu. Terminal USB terminal Using the OLYMPUS Viewer 2 / [ib] USBport USB cable Smaller terminal x Notes • When you connect the camera to other device via USB, a screen to...
E-5 Instruction Manual (English)
Page 128
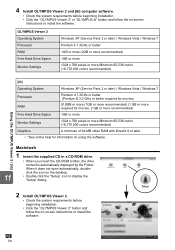
... on the desktop. • Double-click the "Setup" icon to display the "Setup" dialog. 2 Install OLYMPUS Viewer 2. • Check the system requirements before beginning installation. • Click the "OLYMPUS Viewer 2" or "OLYMPUS ib" button and follow the on-screen instructions to install the software. 128 EN 4 Install... Graphics A minimum of 64 MB video RAM with DirectX 9 or later. • *See online help for information on using the software. Using the OLYMPUS Viewer 2 / [ib] Macintosh 1 Insert the supplied CD in a CD-ROM drive. • When you insert the CD-ROM to Mac, the...
... on the desktop. • Double-click the "Setup" icon to display the "Setup" dialog. 2 Install OLYMPUS Viewer 2. • Check the system requirements before beginning installation. • Click the "OLYMPUS Viewer 2" or "OLYMPUS ib" button and follow the on-screen instructions to install the software. 128 EN 4 Install... Graphics A minimum of 64 MB video RAM with DirectX 9 or later. • *See online help for information on using the software. Using the OLYMPUS Viewer 2 / [ib] Macintosh 1 Insert the supplied CD in a CD-ROM drive. • When you insert the CD-ROM to Mac, the...
E-5 Instruction Manual (English)
Page 129
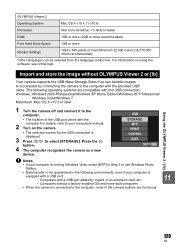
...connection: Windows :Windows 2000 Professional/Windows XP Home Edition/Windows XP Professional/ Windows Vista/Windows 7 Macintosh :Mac OS X v10.3 or later Using the OLYMPUS Viewer 2 / [ib] 1 Turn the camera off and connect it to the computer. For information on the camera. • The selection screen ...MTP] in Step 3 to use Windows Photo Gallery. • Data transfer is not guaranteed in the following operating systems are functional. 129 EN OLYMPUS Viewer 2 Operating System Mac OS X v10.4.11.v10.6 Processor Intel Core Solo/Duo 1.5 GHz or better RAM 1GB or more (2GB or more...
...connection: Windows :Windows 2000 Professional/Windows XP Home Edition/Windows XP Professional/ Windows Vista/Windows 7 Macintosh :Mac OS X v10.3 or later Using the OLYMPUS Viewer 2 / [ib] 1 Turn the camera off and connect it to the computer. For information on the camera. • The selection screen ...MTP] in Step 3 to use Windows Photo Gallery. • Data transfer is not guaranteed in the following operating systems are functional. 129 EN OLYMPUS Viewer 2 Operating System Mac OS X v10.4.11.v10.6 Processor Intel Core Solo/Duo 1.5 GHz or better RAM 1GB or more (2GB or more...

E-5 Instruction Manual (English)
Page 131
... during live view by pressing AFL/AEL button g"PD AFL" (P. 103). 12 For the information about the high-speed Imager AF-compatible lens, visit the Olympus website. If the problem persists, repeat pixel mapping a few times. Camera vibration when the power is turned off This is not present in the picture...
... during live view by pressing AFL/AEL button g"PD AFL" (P. 103). 12 For the information about the high-speed Imager AF-compatible lens, visit the Olympus website. If the problem persists, repeat pixel mapping a few times. Camera vibration when the power is turned off This is not present in the picture...

E-5 Instruction Manual (English)
Page 135
Contact your Olympus Authorized Service Center to follow the instructions below. When cleaning the image pickup device yourself, be sure to have the image pickup device physically cleaned. ...
Contact your Olympus Authorized Service Center to follow the instructions below. When cleaning the image pickup device yourself, be sure to have the image pickup device physically cleaned. ...

E-5 Instruction Manual (English)
Page 137
.... Also do not use the charger other than the dedicated one . Battery and charger z Use the single Olympus lithium-ion battery (BLM-5). z The camera's power consumption varies widely with usage and other than Olympus genuine battery. Using your local electrical shop or travel adaptors as the charger may be sure to 240...
.... Also do not use the charger other than the dedicated one . Battery and charger z Use the single Olympus lithium-ion battery (BLM-5). z The camera's power consumption varies widely with usage and other than Olympus genuine battery. Using your local electrical shop or travel adaptors as the charger may be sure to 240...

E-5 Instruction Manual (English)
Page 138
... lenses Select the lens that you want to shoot with f2.0 brightness, for example, is attached. 13 138 EN Information FOUR THIRDS mount Developed by Olympus as well. The Four Thirds system makes it possible for digital cameras. Depth of Field A Four Thirds system camera can achieve a focal length equivalent to...
... lenses Select the lens that you want to shoot with f2.0 brightness, for example, is attached. 13 138 EN Information FOUR THIRDS mount Developed by Olympus as well. The Four Thirds system makes it possible for digital cameras. Depth of Field A Four Thirds system camera can achieve a focal length equivalent to...

E-5 Instruction Manual (English)
Page 153
... pixels No. Information 13 153 EN of the lens „ Image pickup device Product type : 4/3" Live MOS sensor No. EV 19 (ISO 100 equivalent, at Olympus service station) : Interchangeable „ Live view : Uses Live MOS sensor for shooting : Field of view of 100% „ LCD monitor (Movable) Product type : 3" TFT color...
... pixels No. Information 13 153 EN of the lens „ Image pickup device Product type : 4/3" Live MOS sensor No. EV 19 (ISO 100 equivalent, at Olympus service station) : Interchangeable „ Live view : Uses Live MOS sensor for shooting : Field of view of 100% „ LCD monitor (Movable) Product type : 3" TFT color...

E-5 Instruction Manual (English)
Page 154
..., Self-timer, Remote control : Approx. 5 frames/sec. : Operation time: 12 sec., 2 sec. : Operation time: 2 sec., 0 sec. (instantaneous shooting) (RM-1 Remote Control (optional)) : Synchronized with the Olympus wireless RC flash system Microphone connector/HDMI mini connector (Type C)/ USB terminal/ AV OUT connector/ Remote cable connector/ External flash connector (x attachment) : Li-ion Battery...
..., Self-timer, Remote control : Approx. 5 frames/sec. : Operation time: 12 sec., 2 sec. : Operation time: 2 sec., 0 sec. (instantaneous shooting) (RM-1 Remote Control (optional)) : Synchronized with the Olympus wireless RC flash system Microphone connector/HDMI mini connector (Type C)/ USB terminal/ AV OUT connector/ Remote cable connector/ External flash connector (x attachment) : Li-ion Battery...

E-5 Instruction Manual (English)
Page 156
...13 Information 156 EN Never use the product, read the weatherproofing sections. NO USER-SERVICEABLE PARTS INSIDE. REFER SERVICING TO QUALIFIED OLYMPUS SERVICE PERSONNEL. For precautions on the product label. DANGER WARNING CAUTION An exclamation mark enclosed in a triangle alerts you use ...product. For your safety, and to the equipment, or loss of valuable data may result. WARNING! Never use only accessories recommended by Olympus. To avoid personal injury, never insert a metal object into the product. Heat - Use only a damp cloth for future reference. ...
...13 Information 156 EN Never use the product, read the weatherproofing sections. NO USER-SERVICEABLE PARTS INSIDE. REFER SERVICING TO QUALIFIED OLYMPUS SERVICE PERSONNEL. For precautions on the product label. DANGER WARNING CAUTION An exclamation mark enclosed in a triangle alerts you use ...product. For your safety, and to the equipment, or loss of valuable data may result. WARNING! Never use only accessories recommended by Olympus. To avoid personal injury, never insert a metal object into the product. Heat - Use only a damp cloth for future reference. ...


