
User Manual
Page 3
...to in Europe "CE" mark indicates that this product complies with Part 15 of Conformity Model Number : C-740 Ultra Zoom Trade Name : OLYMPUS Responsible Party : Olympus America Inc. J These instructions are intended for safety, health, environment and customer protection. En 3 Operation... customers in Canada This Class B digital apparatus meets all requirements of their respective owners. • The standards for Camera File System/DCF" standards stipulated by the Japan Electronics and Information Technology Industries Association (JEITA). Trademarks • IBM is...
...to in Europe "CE" mark indicates that this product complies with Part 15 of Conformity Model Number : C-740 Ultra Zoom Trade Name : OLYMPUS Responsible Party : Olympus America Inc. J These instructions are intended for safety, health, environment and customer protection. En 3 Operation... customers in Canada This Class B digital apparatus meets all requirements of their respective owners. • The standards for Camera File System/DCF" standards stipulated by the Japan Electronics and Information Technology Industries Association (JEITA). Trademarks • IBM is...

User Manual
Page 6
F8.0 4 Exposure compensation -2.0 - +2.0 Exposure differential -3.0 - +3.0 5 Battery check e, f 6 Green lamp 7 Flash stand-by Camera movement warning/Flash charge # (Lights) # (Blinks) 8 Macro mode & Super macro mode % Manual focus MF 9 Noise reduction O 10 Flash mode 11 Flash intensity control !, #, $, #SLOW1, HSLOW1, #...
F8.0 4 Exposure compensation -2.0 - +2.0 Exposure differential -3.0 - +3.0 5 Battery check e, f 6 Green lamp 7 Flash stand-by Camera movement warning/Flash charge # (Lights) # (Blinks) 8 Macro mode & Super macro mode % Manual focus MF 9 Noise reduction O 10 Flash mode 11 Flash intensity control !, #, $, #SLOW1, HSLOW1, #...

User Manual
Page 9
...) Remaining power level: high f Blinks (red) Remaining power level: low Ready new batteries. The memory gauge indication changes as follows when the camera is turned on or while the camera is storing the picture on the shooting status. Battery check If the remaining battery power is low, the battery check indication changes...: exhausted Replace with new batteries. En 9 Memory gauge The memory gauge lights up when you take the next shot. While the gauge is lit, the camera is in use.
...) Remaining power level: high f Blinks (red) Remaining power level: low Ready new batteries. The memory gauge indication changes as follows when the camera is turned on or while the camera is storing the picture on the shooting status. Battery check If the remaining battery power is low, the battery check indication changes...: exhausted Replace with new batteries. En 9 Memory gauge The memory gauge lights up when you take the next shot. While the gauge is lit, the camera is in use.

User Manual
Page 10
... it is not extended. 2 Slide the battery compartment lock from = to ). Battery compartment cover Battery compartment lock 10 En J LOADING THE BATTERIES 1 Make sure the camera is turned off. • The monitor is off. • The viewfinder is off. • The lens is fastened securely. Pull the strap through the hole...
... it is not extended. 2 Slide the battery compartment lock from = to ). Battery compartment cover Battery compartment lock 10 En J LOADING THE BATTERIES 1 Make sure the camera is turned off. • The monitor is off. • The viewfinder is off. • The lens is fastened securely. Pull the strap through the hole...

User Manual
Page 11
... cover, as it may be difficult to close properly by pressing the edge. • Make sure the cover is indicated on the bottom of the camera. • When using rechargeable AA (R6) batteries, charge them before use your finger to slide the cover. B A 4 Insert the batteries, making sure that they are...
... cover, as it may be difficult to close properly by pressing the edge. • Make sure the cover is indicated on the bottom of the camera. • When using rechargeable AA (R6) batteries, charge them before use your finger to slide the cover. B A 4 Insert the batteries, making sure that they are...
User Manual
Page 12
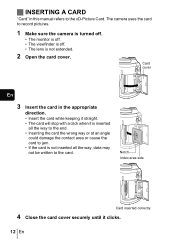
The camera uses the card to the card. Notch Index area side Card inserted correctly 4 Close the card cover securely until it is inserted all the way ... the card to jam. • If the card is not inserted all the way, data may not be written to record pictures. 1 Make sure the camera is turned off. • The monitor is off. • The viewfinder is off. • The lens is not extended. 2 Open the card cover. Card cover...
The camera uses the card to the card. Notch Index area side Card inserted correctly 4 Close the card cover securely until it is inserted all the way ... the card to jam. • If the card is not inserted all the way, data may not be written to record pictures. 1 Make sure the camera is turned off. • The monitor is off. • The viewfinder is off. • The lens is not extended. 2 Open the card cover. Card cover...

User Manual
Page 13
... finger quickly after pushing the card all the way in to unlock it, then let it return slowly. • The card is set to q, the camera turns on in may cause it to eject forcefully out of the slot. Removing the card 1 Push the card all the way in the playback...
... finger quickly after pushing the card all the way in to unlock it, then let it return slowly. • The card is set to q, the camera turns on in may cause it to eject forcefully out of the slot. Removing the card 1 Push the card all the way in the playback...

User Manual
Page 14
... soon as you operate the shutter button or zoom lever. J SELECTING A LANGUAGE W 1 Set the mode dial to P and press the power switch to turn the camera on the arrow pad to select MODE MENU. 4 Press ac to select the SETUP tab, then press d. 5 Press ac to select W, then press d. 6 Press ac... MODE MENU. 4 Press ac to select the SETUP tab, then press d. 5 Press ac to select X, then press d. • The green frame moves to turn the camera on. 2 Press e. • The top menu is displayed. J SETTING THE DATE AND TIME X 1 Set the mode dial to P and press the power switch to the...
... soon as you operate the shutter button or zoom lever. J SELECTING A LANGUAGE W 1 Set the mode dial to P and press the power switch to turn the camera on the arrow pad to select MODE MENU. 4 Press ac to select the SETUP tab, then press d. 5 Press ac to select W, then press d. 6 Press ac... MODE MENU. 4 Press ac to select the SETUP tab, then press d. 5 Press ac to select X, then press d. • The green frame moves to turn the camera on. 2 Press e. • The top menu is displayed. J SETTING THE DATE AND TIME X 1 Set the mode dial to P and press the power switch to the...

User Manual
Page 15
... the following date formats: Y- Consequently, 2 p.m. The clock starts when you press the button. 10 To turn the camera off, press the power switch. • The date and time settings will be canceled if the camera is displayed as 14:00. 9 Press e. is left without batteries for approximately 1 hour. Then press d. • Move...
... the following date formats: Y- Consequently, 2 p.m. The clock starts when you press the button. 10 To turn the camera off, press the power switch. • The date and time settings will be canceled if the camera is displayed as 14:00. 9 Press e. is left without batteries for approximately 1 hour. Then press d. • Move...

User Manual
Page 16
...from the menus. MENU FUNCTIONS J USING THE MENUS AND TABS When you turn on the monitor (or viewfinder). The top menu is displayed on the camera and press e, the top menu is displayed. The functions of the screen. • The functions registered in modes other than hnq. Press e ... to exit the menu and return to display the top menu. Press e to the setting screens. • Display operational buttons at the bottom of this camera are set the ISO, sharpness, etc. • Categorizes the settings into 4 tabs. • Press ac to select a tab and display the associated menu items...
...from the menus. MENU FUNCTIONS J USING THE MENUS AND TABS When you turn on the monitor (or viewfinder). The top menu is displayed on the camera and press e, the top menu is displayed. The functions of the screen. • The functions registered in modes other than hnq. Press e ... to exit the menu and return to display the top menu. Press e to the setting screens. • Display operational buttons at the bottom of this camera are set the ISO, sharpness, etc. • Categorizes the settings into 4 tabs. • Press ac to select a tab and display the associated menu items...

User Manual
Page 18
Mode menus The MODE MENU has 4 tabs. En Shooting mode SEt CARD PIC CAMERA CAMERA tab PICTURE tab CARD tab SETUP tab DRIVE ISO A/S/M SLOW SLOW1 CAMERA tab DRIVE ISO A/S/M Selects a shooting mode from A (Aperture priority shooting), S (Shutter priority shooting) and M (Manual shooting). 18 En Press ac to the "Reference Manual" on ...
Mode menus The MODE MENU has 4 tabs. En Shooting mode SEt CARD PIC CAMERA CAMERA tab PICTURE tab CARD tab SETUP tab DRIVE ISO A/S/M SLOW SLOW1 CAMERA tab DRIVE ISO A/S/M Selects a shooting mode from A (Aperture priority shooting), S (Shutter priority shooting) and M (Manual shooting). 18 En Press ac to the "Reference Manual" on ...

User Manual
Page 20
SETUP tab ALL RESET Selects whether to the camera's custom button. 8 Turns the beep sound used for button operations and warnings on and off the power. REC VIEW Selects whether to display pictures on -.... CARD tab CARD SETUP Formats a card. En SLEEP MY MODE SETUP Sets the sleep timer. CUSTOM BUTTON Assigns a frequently used function to keep the current camera settings when you turn off . 20 En PW ON/OFF SETUP Sets the picture displayed on the monitor when the power is turned on the...
SETUP tab ALL RESET Selects whether to the camera's custom button. 8 Turns the beep sound used for button operations and warnings on and off the power. REC VIEW Selects whether to display pictures on -.... CARD tab CARD SETUP Formats a card. En SLEEP MY MODE SETUP Sets the sleep timer. CUSTOM BUTTON Assigns a frequently used function to keep the current camera settings when you turn off . 20 En PW ON/OFF SETUP Sets the picture displayed on the monitor when the power is turned on the...

User Manual
Page 21
... file. Selects a language for on the region. TV video signal types differ depending on -screen display. Selects NTSC or PAL according to keep the current camera settings when you turn off . En 21 CARD tab CARD SETUP Erases all image data stored on and off . Registers a stored picture for button operations...
... file. Selects a language for on the region. TV video signal types differ depending on -screen display. Selects NTSC or PAL according to keep the current camera settings when you turn off . En 21 CARD tab CARD SETUP Erases all image data stored on and off . Registers a stored picture for button operations...
User Manual
Page 22
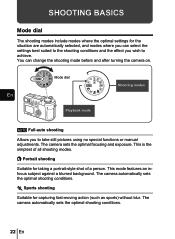
...take still pictures using no special functions or manual adjustments. This is the simplest of a person. The camera automatically sets the optimal shooting conditions. The camera automatically sets the optimal shooting conditions. 22 En SHOOTING BASICS Mode dial The shooting modes include modes where...the optimal settings for the situation are automatically selected, and modes where you can change the shooting mode before and after turning the camera on. i Portrait shooting Suitable for capturing fast-moving action (such as sports) without blur. This mode features an infocus subject ...
...take still pictures using no special functions or manual adjustments. This is the simplest of a person. The camera automatically sets the optimal shooting conditions. The camera automatically sets the optimal shooting conditions. 22 En SHOOTING BASICS Mode dial The shooting modes include modes where...the optimal settings for the situation are automatically selected, and modes where you can change the shooting mode before and after turning the camera on. i Portrait shooting Suitable for capturing fast-moving action (such as sports) without blur. This mode features an infocus subject ...

User Manual
Page 23
...Scene shooting Suitable for shooting pictures in the evening or at night in h mode, the lack of brightness will be changed. The camera sets a slower shutter speed than is taken with the background underexposed and without details. For example, if you En take pictures of.... o Self-Portrait shooting Enables you to take still pictures. k Landscape+Portrait shooting Suitable for taking pictures of shooting condition. The camera automatically sets the optimal shooting conditions. Other functions, such as the subject in the foreground in focus. In the Night Scene shooting ...
...Scene shooting Suitable for shooting pictures in the evening or at night in h mode, the lack of brightness will be changed. The camera sets a slower shutter speed than is taken with the background underexposed and without details. For example, if you En take pictures of.... o Self-Portrait shooting Enables you to take still pictures. k Landscape+Portrait shooting Suitable for taking pictures of shooting condition. The camera automatically sets the optimal shooting conditions. Other functions, such as the subject in the foreground in focus. In the Night Scene shooting ...
User Manual
Page 24
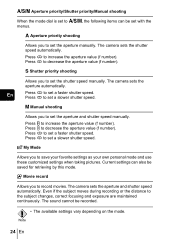
... to set a faster shutter speed. En Press a to set a slower shutter speed. Press c to increase the aperture value (f number). The camera sets the aperture and shutter speed automatically. Press d to set the shutter speed manually. Note 24 En Current settings can be set a faster shutter...own personal mode and use these customized settings when taking pictures. The sound cannot be saved for retrieving by this mode. The camera sets the shutter speed automatically. r My Mode Allows you to set a slower shutter speed. A Aperture priority shooting Allows you ...
... to set a faster shutter speed. En Press a to set a slower shutter speed. Press c to increase the aperture value (f number). The camera sets the aperture and shutter speed automatically. Press d to set the shutter speed manually. Note 24 En Current settings can be set a faster shutter...own personal mode and use these customized settings when taking pictures. The sound cannot be saved for retrieving by this mode. The camera sets the shutter speed automatically. r My Mode Allows you to set a slower shutter speed. A Aperture priority shooting Allows you ...

User Manual
Page 25
.... 4 Press the shutter button all you have to do is stored on the card. • The available settings vary depending on . 2 Decide the composition of camera movement. Both methods are displayed (except in M mode). • # blinks to h i j k l m o r p P and press the power switch. • The viewfinder ...target mark moves to the focused position. • The shutter speed and aperture value automatically set by the camera are easy as all the way (fully). • The camera takes the picture. • The card access lamp blinks while the picture is to press the shutter button....
.... 4 Press the shutter button all you have to do is stored on the card. • The available settings vary depending on . 2 Decide the composition of camera movement. Both methods are displayed (except in M mode). • # blinks to h i j k l m o r p P and press the power switch. • The viewfinder ...target mark moves to the focused position. • The shutter speed and aperture value automatically set by the camera are easy as all the way (fully). • The camera takes the picture. • The card access lamp blinks while the picture is to press the shutter button....

User Manual
Page 26
...When the subject cannot be focused on, you are not locked. F2.8 • When shooting a hard-to-focus subject or a fast-moving subject, point the camera at an object about the same distance away as explained below. 1 Position the AF target mark on the subject you want to n and press the... power switch. • The viewfinder turns on. • The available recording time on the card that you can focus the camera on another point at roughly the same distance (focus lock) and take the picture as the subject. 2 Press the shutter button halfway SQ11600 1200 until...
...When the subject cannot be focused on, you are not locked. F2.8 • When shooting a hard-to-focus subject or a fast-moving subject, point the camera at an object about the same distance away as explained below. 1 Position the AF target mark on the subject you want to n and press the... power switch. • The viewfinder turns on. • The available recording time on the card that you can focus the camera on another point at roughly the same distance (focus lock) and take the picture as the subject. 2 Press the shutter button halfway SQ11600 1200 until...
User Manual
Page 27
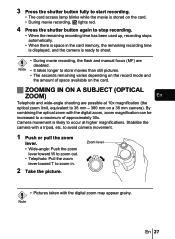
... the digital zoom may appear grainy. J ZOOMING IN ON A SUBJECT (OPTICAL ZOOM) En Telephoto and wide-angle shooting are disabled. Note En 27 to avoid camera movement. 1 Push or pull the zoom lever. • Wide-angle: Push the zoom lever toward W to zoom out. • Telephoto: Pull the zoom lever ...toward T to zoom in the card memory, the remaining recording time is displayed, and the camera is likely to occur at 10x magnification (the optical zoom limit, equivalent to 38 mm - 380 mm on the card. Note • It takes longer...
... the digital zoom may appear grainy. J ZOOMING IN ON A SUBJECT (OPTICAL ZOOM) En Telephoto and wide-angle shooting are disabled. Note En 27 to avoid camera movement. 1 Push or pull the zoom lever. • Wide-angle: Push the zoom lever toward W to zoom out. • Telephoto: Pull the zoom lever ...toward T to zoom in the card memory, the remaining recording time is displayed, and the camera is likely to occur at 10x magnification (the optical zoom limit, equivalent to 38 mm - 380 mm on the card. Note • It takes longer...

User Manual
Page 29
... minimizes red-eye. After blinking for about 10 seconds, then starts blinking. En En 29 1st curtain with yourself included in the photograph. 1 Mount the camera on a tripod or place it on a stable, flat surface. 2 Select Y by pressing Y. 3 Take the picture. • The self-timer lamp lights for about 2 seconds, the...
... minimizes red-eye. After blinking for about 10 seconds, then starts blinking. En En 29 1st curtain with yourself included in the photograph. 1 Mount the camera on a tripod or place it on a stable, flat surface. 2 Select Y by pressing Y. 3 Take the picture. • The self-timer lamp lights for about 2 seconds, the...


