C-4000 Zoom Quick Start Guide (993 KB)
Page 1
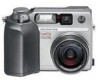
...4000 Zoom digital camera. OLYMPUS LENS AF ZOOM 6.5-19.5MM 1:2.8 C-4000 Zoom with lens cap Strap Lens cap retainer string Two CR-V3 lithium batteries CAMEDIA Master 4.0 CD-ROM USB cable 16MB SmartMedia card (beige color) with static-free case and labels The following items are named, and each other. Note the diagram on the camera...diagram, and slide the card into the springloaded slot as far as indicated in your Olympus C-4000 Zoom Digital Camera... First, make the camera easier to handle and prevent loss of the SmartMedia card to familiarize yourself with your ...
...4000 Zoom digital camera. OLYMPUS LENS AF ZOOM 6.5-19.5MM 1:2.8 C-4000 Zoom with lens cap Strap Lens cap retainer string Two CR-V3 lithium batteries CAMEDIA Master 4.0 CD-ROM USB cable 16MB SmartMedia card (beige color) with static-free case and labels The following items are named, and each other. Note the diagram on the camera...diagram, and slide the card into the springloaded slot as far as indicated in your Olympus C-4000 Zoom Digital Camera... First, make the camera easier to handle and prevent loss of the SmartMedia card to familiarize yourself with your ...
C-4000 Zoom Quick Start Guide (993 KB)
Page 2
...sure that the flash is suitable for installing the software, and enjoy your new digital photo processing capabilities! About the Olympus CAMEDIA Master 4.0 CD-ROM Your Olympus C-4000 Zoom Digital Camera comes bundled with every picture. TAKING PICTURES There are two ways to compose your ... confirms your picture has been taken. c.Zooming The C-4000 Zoom features a zoom lens, allowing you that the camera is normal operation for pictures you from the camera, view, organize, retouch, share, and print your camera in PDF format. Pull to Zoom in • Pull the lever toward...
...sure that the flash is suitable for installing the software, and enjoy your new digital photo processing capabilities! About the Olympus CAMEDIA Master 4.0 CD-ROM Your Olympus C-4000 Zoom Digital Camera comes bundled with every picture. TAKING PICTURES There are two ways to compose your ... confirms your picture has been taken. c.Zooming The C-4000 Zoom features a zoom lens, allowing you that the camera is normal operation for pictures you from the camera, view, organize, retouch, share, and print your camera in PDF format. Pull to Zoom in • Pull the lever toward...
C-4000 Zoom Basic Manual (1.1 MB)
Page 4
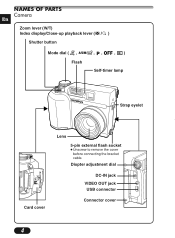
NAMES OF PARTS Camera En Zoom lever (W/T) Index display/Close-up playback lever ( / ) Shutter button Mode dial ( , Flash ,, ,) Self-timer lamp Strap eyelet Card cover Lens 5-pin external flash socket ● Unscrew to remove the cover before connecting the bracket cable. Diopter adjustment dial DC-IN jack VIDEO OUT jack USB connector Connector cover 4
NAMES OF PARTS Camera En Zoom lever (W/T) Index display/Close-up playback lever ( / ) Shutter button Mode dial ( , Flash ,, ,) Self-timer lamp Strap eyelet Card cover Lens 5-pin external flash socket ● Unscrew to remove the cover before connecting the bracket cable. Diopter adjustment dial DC-IN jack VIDEO OUT jack USB connector Connector cover 4
C-4000 Zoom Basic Manual (1.1 MB)
Page 13
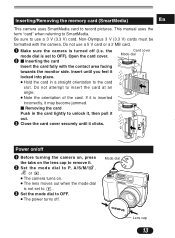
.... the mode dial is not set to remove it clicks. Insert until it . 2 Set the mode dial to P, A/S/M/ , or . ● The camera turns on the lens cap to OFF). If it locked into place. ● Hold the card in the card lightly to insert the card at an angle. ●...● The power turns off (i.e. Do not use a 3 V (3.3 V) card. Mode dial Lens cap 13 Do not attempt to unlock it, then pull it out. 3 Close the card cover securely until you feel it is turned off . Non-Olympus 3 V (3.3 V) cards must be formatted with the contact area facing towards the monitor side.
.... the mode dial is not set to remove it clicks. Insert until it . 2 Set the mode dial to P, A/S/M/ , or . ● The camera turns on the lens cap to OFF). If it locked into place. ● Hold the card in the card lightly to insert the card at an angle. ●...● The power turns off (i.e. Do not use a 3 V (3.3 V) card. Mode dial Lens cap 13 Do not attempt to unlock it, then pull it out. 3 Close the card cover securely until you feel it is turned off . Non-Olympus 3 V (3.3 V) cards must be formatted with the contact area facing towards the monitor side.
C-4000 Zoom Basic Manual (1.1 MB)
Page 24
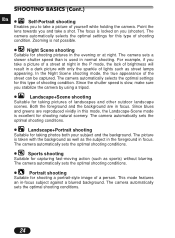
... will result in the evening or at night. The camera automatically sets the optimal shooting conditions. ● Portrait shooting Suitable for taking photos both your subject and the background. Point the lens towards you and take a picture of the street can be captured. Zooming is used in -focus subject against a blurred background. Since...
... will result in the evening or at night. The camera automatically sets the optimal shooting conditions. ● Portrait shooting Suitable for taking photos both your subject and the background. Point the lens towards you and take a picture of the street can be captured. Zooming is used in -focus subject against a blurred background. Since...
C-4000 Zoom Basic Manual (1.1 MB)
Page 27
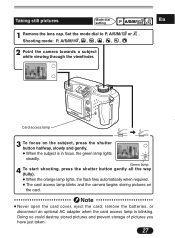
Shooting mode: P, A/S/M 2 Point the camera towards a subject while viewing through the viewfinder. Taking still pictures Mode dial setting En 1 Remove the lens cap. Set the mode dial to P, A/S/M/ or . Green lamp 4 To start shooting, press the shutter button gently all the way (fully). ...● When the orange lamp lights, the flash fires automatically when required. ● The card access lamp blinks and the camera begins storing pictures...
Shooting mode: P, A/S/M 2 Point the camera towards a subject while viewing through the viewfinder. Taking still pictures Mode dial setting En 1 Remove the lens cap. Set the mode dial to P, A/S/M/ or . Green lamp 4 To start shooting, press the shutter button gently all the way (fully). ...● When the orange lamp lights, the flash fires automatically when required. ● The card access lamp blinks and the camera begins storing pictures...
C-4000 Zoom Basic Manual (1.1 MB)
Page 28
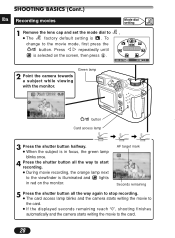
... recording. ● During movie recording, the orange lamp next to ● The factory default setting is . MODE MOVIE SELECT GO 2 Point the camera towards a subject while viewing with the monitor. To change to the card. 28 SHOOTING BASICS (Cont.) En Recording movies Mode dial setting 1 Remove the... lens cap and set the mode dial to the viewfinder is illuminated and lights in focus, the green lamp blinks once. 4 Press the shutter button...
... recording. ● During movie recording, the orange lamp next to ● The factory default setting is . MODE MOVIE SELECT GO 2 Point the camera towards a subject while viewing with the monitor. To change to the card. 28 SHOOTING BASICS (Cont.) En Recording movies Mode dial setting 1 Remove the... lens cap and set the mode dial to the viewfinder is illuminated and lights in focus, the green lamp blinks once. 4 Press the shutter button...
C-4000 Zoom Basic Manual (1.1 MB)
Page 44
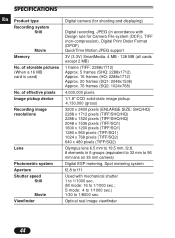
...) 1600 x 1200 pixels (TIFF/SQ1) 1280 x 960 pixels (TIFF/SQ1) 1024 x 768 pixels (TIFF/SQ2) 640 x 480 pixels (TIFF/SQ2) Lens Olympus lens 6.5 mm to 19.5 mm, f2.8, 8 elements in accordance with mechanical shutter 1 to 1/1000 sec. (M mode: 16 to 1/1000 sec.; Viewfinder Optical... frames (SQ2: 1024x768) No. SPECIFICATIONS En Product type Digital camera (for shooting and displaying) Recording system Still Movie Digital recording, JPEG (in 6 groups (equivalent to 32 mm to 96 mm lens on 35 mm camera) Photometric system Digital ESP metering, Spot metering system Aperture f2.8 to f11 ...
...) 1600 x 1200 pixels (TIFF/SQ1) 1280 x 960 pixels (TIFF/SQ1) 1024 x 768 pixels (TIFF/SQ2) 640 x 480 pixels (TIFF/SQ2) Lens Olympus lens 6.5 mm to 19.5 mm, f2.8, 8 elements in accordance with mechanical shutter 1 to 1/1000 sec. (M mode: 16 to 1/1000 sec.; Viewfinder Optical... frames (SQ2: 1024x768) No. SPECIFICATIONS En Product type Digital camera (for shooting and displaying) Recording system Still Movie Digital recording, JPEG (in 6 groups (equivalent to 32 mm to 96 mm lens on 35 mm camera) Photometric system Digital ESP metering, Spot metering system Aperture f2.8 to f11 ...
C-4000 Zoom Reference Manual (8.2 MB)
Page 11
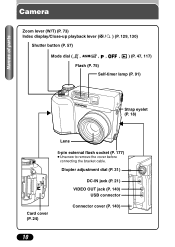
Diopter adjustment dial (P. 31) DC-IN jack (P. 21) VIDEO OUT jack (P. 140) USB connector Connector cover (P. 140) 10 Names of parts Camera Zoom lever (W/T) (P. 73) Index display/Close-up playback lever ( / ) (P. 129, 130) Shutter button (P. 57) Mode dial ( , ,, , ) (P. 47, 117) Flash (P. 75) Self-timer lamp (P. 91) Strap eyelet (P. 18) Card cover (P. 24) Lens 5-pin external flash socket (P. 177) ● Unscrew to remove the cover before connecting the bracket cable.
Diopter adjustment dial (P. 31) DC-IN jack (P. 21) VIDEO OUT jack (P. 140) USB connector Connector cover (P. 140) 10 Names of parts Camera Zoom lever (W/T) (P. 73) Index display/Close-up playback lever ( / ) (P. 129, 130) Shutter button (P. 57) Mode dial ( , ,, , ) (P. 47, 117) Flash (P. 75) Self-timer lamp (P. 91) Strap eyelet (P. 18) Card cover (P. 24) Lens 5-pin external flash socket (P. 177) ● Unscrew to remove the cover before connecting the bracket cable.
C-4000 Zoom Reference Manual (8.2 MB)
Page 19
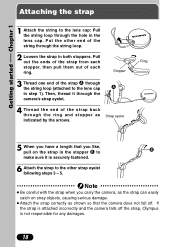
... strap in both stoppers. Then, thread it is not responsible for any damages. 18 Getting started Chapter 1 Attaching the strap 1 Attach the string to the lens cap A in step 1). Put the other strap eyelet following steps 3 - 5. Pull out the ends of the strap from each ring. If the strap... is attached incorrectly and the camera falls off . Strap eyelet 5 When you have a length that the camera does not fall off the strap, Olympus is securely fastened. 6 Attach the strap to the other end of each Ring stopper, then ...
... strap in both stoppers. Then, thread it is not responsible for any damages. 18 Getting started Chapter 1 Attaching the strap 1 Attach the string to the lens cap A in step 1). Put the other strap eyelet following steps 3 - 5. Pull out the ends of the strap from each ring. If the strap... is attached incorrectly and the camera falls off . Strap eyelet 5 When you have a length that the camera does not fall off the strap, Olympus is securely fastened. 6 Attach the strap to the other end of each Ring stopper, then ...
C-4000 Zoom Reference Manual (8.2 MB)
Page 26
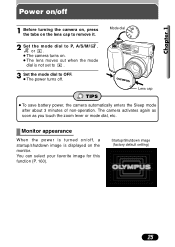
... Mode dial 2 Set the mode dial to P, A/S/M/ , or . ● The camera turns on. ● The lens moves out when the mode dial is not set to . . 3 Set the mode dial to remove it. The camera activates again as soon as you touch the zoom lever or mode dial, etc. You can select your favorite... image for this function (P. 160). Startup/Shutdown image (factory default setting) 25 Chapter 1 Power on/off 1 Before turning the camera on, press the tabs on the lens cap to OFF. ● The power ...
... Mode dial 2 Set the mode dial to P, A/S/M/ , or . ● The camera turns on. ● The lens moves out when the mode dial is not set to . . 3 Set the mode dial to remove it. The camera activates again as soon as you touch the zoom lever or mode dial, etc. You can select your favorite... image for this function (P. 160). Startup/Shutdown image (factory default setting) 25 Chapter 1 Power on/off 1 Before turning the camera on, press the tabs on the lens cap to OFF. ● The power ...
C-4000 Zoom Reference Manual (8.2 MB)
Page 28
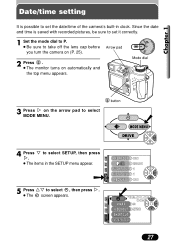
... arrow pad to select MODE MENU. Chapter 1 Date/time setting It is saved with recorded pictures, be sure to set the date/time of the camera's built-in the SETUP menu appear. 5 Press Ññ to select , then press í. ● The screen appears. Since the date and time is possible...
... arrow pad to select MODE MENU. Chapter 1 Date/time setting It is saved with recorded pictures, be sure to set the date/time of the camera's built-in the SETUP menu appear. 5 Press Ññ to select , then press í. ● The screen appears. Since the date and time is possible...
C-4000 Zoom Reference Manual (8.2 MB)
Page 30
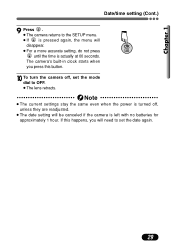
Chapter 1 Date/time setting (Cont.) 9 Press . ● The camera returns to OFF. ● The lens retracts. Note ● The current settings stay the same even when the power is turned off , set the date again. 29 The camera's built-in clock starts when you will need to set the mode dial to ...the SETUP menu. ● If is pressed again, the menu will be canceled if the camera is actually at 00 seconds. If this happens, you press this button. 10 To turn the camera off , unless they are readjusted. ● The date setting will disappear. ● For a more accurate ...
Chapter 1 Date/time setting (Cont.) 9 Press . ● The camera returns to OFF. ● The lens retracts. Note ● The current settings stay the same even when the power is turned off , set the date again. 29 The camera's built-in clock starts when you will need to set the mode dial to ...the SETUP menu. ● If is pressed again, the menu will be canceled if the camera is actually at 00 seconds. If this happens, you press this button. 10 To turn the camera off , unless they are readjusted. ● The date setting will disappear. ● For a more accurate ...
C-4000 Zoom Reference Manual (8.2 MB)
Page 31
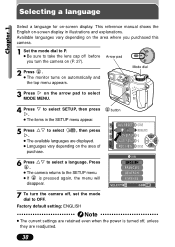
... ● The items in illustrations and explanations. ENGLISH FRANÇAIS DEUTSCH ESPAÑOL SELECT GO 7 To turn the camera on the area of purchase. Press . ● The camera returns to select í. , then press ● The available languages are retained even when the power is pressed again, ...turned off , set the mode dial to select a language. Arrow pad 2 Press . ● The monitor turns on the area where you purchased this camera. 1 Set the mode dial to P. ● Be sure to take the lens cap off before you turn the camera off , unless they are readjusted. 30
... ● The items in illustrations and explanations. ENGLISH FRANÇAIS DEUTSCH ESPAÑOL SELECT GO 7 To turn the camera on the area of purchase. Press . ● The camera returns to select í. , then press ● The available languages are retained even when the power is pressed again, ...turned off , set the mode dial to select a language. Arrow pad 2 Press . ● The monitor turns on the area where you purchased this camera. 1 Set the mode dial to P. ● Be sure to take the lens cap off before you turn the camera off , unless they are readjusted. 30
C-4000 Zoom Reference Manual (8.2 MB)
Page 32
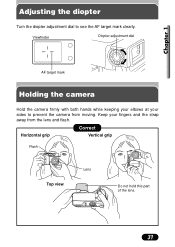
Chapter 1 Adjusting the diopter Turn the diopter adjustment dial to prevent the camera from the lens and flash. Keep your sides to see the AF target mark clearly. Correct Horizontal grip Vertical grip Flash Lens Top view Do not hold this part of the lens. 31 Viewfinder Diopter adjustment dial AF target mark Holding the camera Hold the camera firmly with both hands while keeping your elbows at your fingers and the strap away from moving.
Chapter 1 Adjusting the diopter Turn the diopter adjustment dial to prevent the camera from the lens and flash. Keep your sides to see the AF target mark clearly. Correct Horizontal grip Vertical grip Flash Lens Top view Do not hold this part of the lens. 31 Viewfinder Diopter adjustment dial AF target mark Holding the camera Hold the camera firmly with both hands while keeping your elbows at your fingers and the strap away from moving.
C-4000 Zoom Reference Manual (8.2 MB)
Page 33
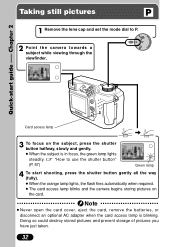
...way (fully). ● When the orange lamp lights, the flash fires automatically when required. ● The card access lamp blinks and the camera begins storing pictures on the subject, press the shutter button halfway, slowly and gently. ● When the subject is blinking. Card access ...to use the shutter button" (P. 57) Green lamp 4 To start guide Chapter 2 Taking still pictures 1 Remove the lens cap and set the mode dial to P. 2 Point the camera towards a subject while viewing through the viewfinder. Doing so could destroy stored pictures and prevent storage of pictures you have...
...way (fully). ● When the orange lamp lights, the flash fires automatically when required. ● The card access lamp blinks and the camera begins storing pictures on the subject, press the shutter button halfway, slowly and gently. ● When the subject is blinking. Card access ...to use the shutter button" (P. 57) Green lamp 4 To start guide Chapter 2 Taking still pictures 1 Remove the lens cap and set the mode dial to P. 2 Point the camera towards a subject while viewing through the viewfinder. Doing so could destroy stored pictures and prevent storage of pictures you have...
C-4000 Zoom Reference Manual (8.2 MB)
Page 34
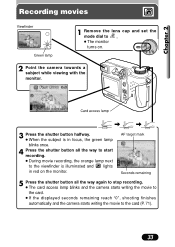
...shutter button all the way to start recording. ● During movie recording, the orange lamp next to the viewfinder is in red on . 2 Point the camera towards a subject while viewing with the monitor. HQ 320x240 Card access lamp 3 Press the shutter button halfway. ● When the subject is illuminated and ..., the green lamp blinks once. 4 Press the shutter button all the way again to stop recording. ● The card access lamp blinks and the camera starts writing the movie to the card. ● If the displayed seconds remaining reach "0", shooting finishes automatically and the...
...shutter button all the way to start recording. ● During movie recording, the orange lamp next to the viewfinder is in red on . 2 Point the camera towards a subject while viewing with the monitor. HQ 320x240 Card access lamp 3 Press the shutter button halfway. ● When the subject is illuminated and ..., the green lamp blinks once. 4 Press the shutter button all the way again to stop recording. ● The card access lamp blinks and the camera starts writing the movie to the card. ● If the displayed seconds remaining reach "0", shooting finishes automatically and the...

C-4000 Zoom Reference Manual (8.2 MB)
Page 48
Mode dial Shooting mode: P, A/S/M/ , ● Always remove the lens cap before turning Éí buttons on the camera since the lens automatically extends when the camera turns on. ● The monitor automatically turns on when the mode dial is set to A/S/M/ or . button button MODE MOVIE 3 Press Éí repeatedly until ...
Mode dial Shooting mode: P, A/S/M/ , ● Always remove the lens cap before turning Éí buttons on the camera since the lens automatically extends when the camera turns on. ● The monitor automatically turns on when the mode dial is set to A/S/M/ or . button button MODE MOVIE 3 Press Éí repeatedly until ...

C-4000 Zoom Reference Manual (8.2 MB)
Page 52
... settings for shooting pictures in the evening or at night in the P mode, the lack of brightness will result in normal shooting. Zooming is slow, make sure you take a picture of shooting condition. You cannot record movies with only the sparkle of shooting condition. Since... on you to record movies. In the Night Scene shooting mode, the true appearance of a street at night. The camera sets a slower shutter speed than is pressed halfway. Point the lens towards you to take a picture of the street can be captured. Chapter 4 Shooting mode setting -
... settings for shooting pictures in the evening or at night in the P mode, the lack of brightness will result in normal shooting. Zooming is slow, make sure you take a picture of shooting condition. You cannot record movies with only the sparkle of shooting condition. Since... on you to record movies. In the Night Scene shooting mode, the true appearance of a street at night. The camera sets a slower shutter speed than is pressed halfway. Point the lens towards you to take a picture of the street can be captured. Chapter 4 Shooting mode setting -
C-4000 Zoom Reference Manual (8.2 MB)
Page 71
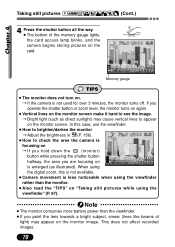
... using the viewfinder rather than the viewfinder. ● If you point the lens towards a bright subject, smear (lines like beams of the memory gauge lights, the card access lamp blinks, and the camera begins storing pictures on the card. Note ● The monitor consumes more ...monitor) button while pressing the shutter button halfway, the area you operate the shutter button or zoom lever, the monitor turns on again. ● Vertical lines on "Taking still pictures while using the digital zoom, this case, use the viewfinder. ● How to brighten/darken the monitor T Adjust the...
... using the viewfinder rather than the viewfinder. ● If you point the lens towards a bright subject, smear (lines like beams of the memory gauge lights, the card access lamp blinks, and the camera begins storing pictures on the card. Note ● The monitor consumes more ...monitor) button while pressing the shutter button halfway, the area you operate the shutter button or zoom lever, the monitor turns on again. ● Vertical lines on "Taking still pictures while using the digital zoom, this case, use the viewfinder. ● How to brighten/darken the monitor T Adjust the...


