
FE-4020 Instruction Manual (English)
Page 4
... be used in the function menu, and other settings such as shooting mode. "Menu Settings" (p. 27 to 36) POWER SAVE ON 1 2 3 EXIT MENU SET OK 5 Press the m button to the previous screen. Shooting Selected option Playback PROGRAM AUTO P 0.0 WB AUTO ISO AUTO 14M 4 To select the shooting mode Use HI to display the function menu. COMPRESSION NORMAL AF MODE FACE/iESP FINE ZOOM OFF 1 RCONFLICTING SETTIONFGFS 2 IMAGE STABILIZER ON 3 ICON GUIDE ON EXIT MENU SET OK 4 EN 1 2 3 EXIT MENU SET OK 1 2 3 BACK MENU OFF ON SET OK...
... be used in the function menu, and other settings such as shooting mode. "Menu Settings" (p. 27 to 36) POWER SAVE ON 1 2 3 EXIT MENU SET OK 5 Press the m button to the previous screen. Shooting Selected option Playback PROGRAM AUTO P 0.0 WB AUTO ISO AUTO 14M 4 To select the shooting mode Use HI to display the function menu. COMPRESSION NORMAL AF MODE FACE/iESP FINE ZOOM OFF 1 RCONFLICTING SETTIONFGFS 2 IMAGE STABILIZER ON 3 ICON GUIDE ON EXIT MENU SET OK 4 EN 1 2 3 EXIT MENU SET OK 1 2 3 BACK MENU OFF ON SET OK...

FE-4020 Instruction Manual (English)
Page 5
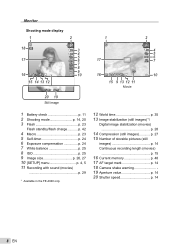
... sound to still images) p. 31 Menus for Shooting Functions PROGRAM AUTO 4 P 1 2 3 4 0.0 5 WB AUTO 6 ISO AUTO 7 14M 8 9 COMPRESSION NORMAL AF MODE FACE/iESP FINE ZOOM 1R OFF OFF 2 IMAGE STABILIZER ON 3 ICON GUIDE ON EXIT MENU SET OK 1 Shooting mode P (PROGRAM AUTO).......p. 14 M (iAUTO p. 20 N (DIS MODE)*1 p. 20 s (SCENE MODE) ......p. 20 P (MAGIC FILTER).....p. 21 ~ (PANORAMA p. 22 A (MOVIE p. 15 2 Flash p. 23 3 Macro p. 23 4 Self-timer p. 24 5 Exposure compensation....p. 24 6 White balance p. 25 7 ISO p. 25 8 Image size (Still images) ...p. 26 9 o (SETUP...
... sound to still images) p. 31 Menus for Shooting Functions PROGRAM AUTO 4 P 1 2 3 4 0.0 5 WB AUTO 6 ISO AUTO 7 14M 8 9 COMPRESSION NORMAL AF MODE FACE/iESP FINE ZOOM 1R OFF OFF 2 IMAGE STABILIZER ON 3 ICON GUIDE ON EXIT MENU SET OK 1 Shooting mode P (PROGRAM AUTO).......p. 14 M (iAUTO p. 20 N (DIS MODE)*1 p. 20 s (SCENE MODE) ......p. 20 P (MAGIC FILTER).....p. 21 ~ (PANORAMA p. 22 A (MOVIE p. 15 2 Flash p. 23 3 Macro p. 23 4 Self-timer p. 24 5 Exposure compensation....p. 24 6 White balance p. 25 7 ISO p. 25 8 Image size (Still images) ...p. 26 9 o (SETUP...
FE-4020 Instruction Manual (English)
Page 8
... 11 Movie 1 Battery check p. 11 2 Shooting mode p. 14, 20 3 Flash p. 23 Flash standby/flash charge p. 42 4 Macro p. 23 5 Self-timer p. 24 6 Exposure compensation p. 24 7 White balance p. 25 8 ISO p. 25 9 Image size p. 26, 27 10 [SETUP] menu p. 4, 5 11 Recording with sound (movies) p. 29 *1 Available in the FE-4040 only. 12 World time p. 35 13 Image stabilization (still images)*1/ Digital image stabilization (movies) p. 28 14 Compression (still images p. 27 15 Number of storable pictures (still images p. 14 Continuous recording length (movies) p. 15 16 Current memory...
... 11 Movie 1 Battery check p. 11 2 Shooting mode p. 14, 20 3 Flash p. 23 Flash standby/flash charge p. 42 4 Macro p. 23 5 Self-timer p. 24 6 Exposure compensation p. 24 7 White balance p. 25 8 ISO p. 25 9 Image size p. 26, 27 10 [SETUP] menu p. 4, 5 11 Recording with sound (movies) p. 29 *1 Available in the FE-4040 only. 12 World time p. 35 13 Image stabilization (still images)*1/ Digital image stabilization (movies) p. 28 14 Compression (still images p. 27 15 Number of storable pictures (still images p. 14 Continuous recording length (movies) p. 15 16 Current memory...
FE-4020 Instruction Manual (English)
Page 12
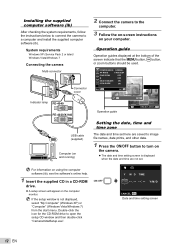
... zoom buttons should be used. For information on using the computer software (ib), see the software's online help. 1 Insert the supplied CD in a CD-ROM drive. ● A setup screen will appear on your computer. IMAGE SET OK Operation guide OK ERASE/CANCEL MENU Setting the date, time and time zone The date and time set here are not set. X Y M D TIME Y/M/D CANCEL MENU Date and time setting screen 12 EN If the setup window is displayed when the date and time are saved to image file names, date prints...
... zoom buttons should be used. For information on using the computer software (ib), see the software's online help. 1 Insert the supplied CD in a CD-ROM drive. ● A setup screen will appear on your computer. IMAGE SET OK Operation guide OK ERASE/CANCEL MENU Setting the date, time and time zone The date and time set here are not set. X Y M D TIME Y/M/D CANCEL MENU Date and time setting screen 12 EN If the setup window is displayed when the date and time are saved to image file names, date prints...

FE-4020 Instruction Manual (English)
Page 14
... flashes red. Monitor Horizontal grip P Vertical grip 0.0 WB AUTO ISO AUTO 14M 4 Number of storable still pictures (p. 49) Monitor (standby mode screen) If the [PROGRAM AUTO] indicator is locked (shutter speed and aperture value are activated while also allowing changes to a wide range of other shooting menu functions, such as needed. 1 Press the n button to turn off the camera. Press halfway 1/400 F2.6 Shutter speed Aperture value "Focusing" (p. 44) 14 EN Shooting, Viewing, and Erasing Shooting with your fi...
... flashes red. Monitor Horizontal grip P Vertical grip 0.0 WB AUTO ISO AUTO 14M 4 Number of storable still pictures (p. 49) Monitor (standby mode screen) If the [PROGRAM AUTO] indicator is locked (shutter speed and aperture value are activated while also allowing changes to a wide range of other shooting menu functions, such as needed. 1 Press the n button to turn off the camera. Press halfway 1/400 F2.6 Shutter speed Aperture value "Focusing" (p. 44) 14 EN Shooting, Viewing, and Erasing Shooting with your fi...

FE-4020 Instruction Manual (English)
Page 15
... to start recording. Sound will also be used. Press fully 1/400 F2.6 Image review screen To view images during shooting Pressing the q button enables playback of images. P 3 Press the shutter button halfway down to focus on the subject, and gently press the button all the way down to shake the camera. To record a movie with optical zoom, set [R] (movies) (p. 29) to [OFF]. 2 Use HI to set the shooting mode to display the function menu screen. 4 To take the picture, gently press the shutter button all...
... to start recording. Sound will also be used. Press fully 1/400 F2.6 Image review screen To view images during shooting Pressing the q button enables playback of images. P 3 Press the shutter button halfway down to focus on the subject, and gently press the button all the way down to shake the camera. To record a movie with optical zoom, set [R] (movies) (p. 29) to [OFF]. 2 Use HI to set the shooting mode to display the function menu screen. 4 To take the picture, gently press the shutter button all...
FE-4020 Instruction Manual (English)
Page 16
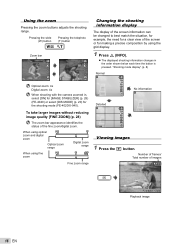
"Shooting mode display" (p. 8) Normal P Optical zoom: 4x Digital zoom: 4x When shooting with the camera zoomed in the order shown below each time the button is pressed. Pressing the wide (W) button Pressing the telephoto (T) button Zoom bar P P 0.0 0.0 WB WB AUTO AUTO ISO ISO AUTO AUTO 14M 14M 4 4 Changing the shooting information display The display of the screen information can be changed to best match the situation, for example, the need for a clear view of the screen or for making a precise composition...
"Shooting mode display" (p. 8) Normal P Optical zoom: 4x Digital zoom: 4x When shooting with the camera zoomed in the order shown below each time the button is pressed. Pressing the wide (W) button Pressing the telephoto (T) button Zoom bar P P 0.0 0.0 WB WB AUTO AUTO ISO ISO AUTO AUTO 14M 14M 4 4 Changing the shooting information display The display of the screen information can be changed to best match the situation, for example, the need for a clear view of the screen or for making a precise composition...

FE-4020 Instruction Manual (English)
Page 22
... MENU PANORAMA 0.0 WB AUTO ISO AUTO 14M 4 2 Use FGHI to form a panorama using the ib computer software. The focus, exposure (p. 24), zoom position (p. 16), and white balance (p. 25) are locked at the first frame. The flash (p. 23) is possible for the ib computer software. 22 EN Creating panoramic images [PANORAMA] Take pictures that they overlap with the image on the monitor. 4 Repeat Step 3 until the number of the display opposite the pan direction...
... MENU PANORAMA 0.0 WB AUTO ISO AUTO 14M 4 2 Use FGHI to form a panorama using the ib computer software. The focus, exposure (p. 24), zoom position (p. 16), and white balance (p. 25) are locked at the first frame. The flash (p. 23) is possible for the ib computer software. 22 EN Creating panoramic images [PANORAMA] Take pictures that they overlap with the image on the monitor. 4 Repeat Step 3 until the number of the display opposite the pan direction...
FE-4020 Instruction Manual (English)
Page 25
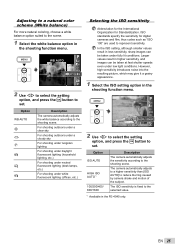
... fast shutter speeds even under fully lit conditions. Larger values result in less sensitivity, sharp images can be taken under low light conditions. P 0.0 ISO 200 WB AUTO ISO ISO ISO 100 200 400 14M 1/400 F2.6 2 Use HI to select the setting option, and press the H button to the scene. 1 Select the white balance option in the shooting function menu. Adjusting to a natural color scheme (White balance) For more natural coloring, choose a white balance...
... fast shutter speeds even under fully lit conditions. Larger values result in less sensitivity, sharp images can be taken under low light conditions. P 0.0 ISO 200 WB AUTO ISO ISO ISO 100 200 400 14M 1/400 F2.6 2 Use HI to select the setting option, and press the H button to the scene. 1 Select the white balance option in the shooting function menu. Adjusting to a natural color scheme (White balance) For more natural coloring, choose a white balance...
FE-4020 Instruction Manual (English)
Page 32
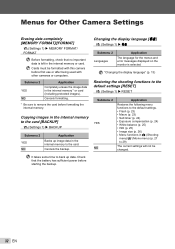
...internal memory or card. Copying images in the internal memory to the card [BACKUP] r (Settings 1) X BACKUP Submenu 2 YES NO Application Backs up image data in the internal memory to back up data. "Changing the display language" (p. 13) Restoring the shooting functions to the default settings [RESET] r (Settings 1) X RESET Submenu 2 YES NO Application Restores the following menu functions to the default settings. • Flash (p. 23) • Macro (p. 23) • Self-timer (p. 24) • Exposure compensation (p. 24) • White balance (p. 25) • ISO (p. 25) • Image size...
...internal memory or card. Copying images in the internal memory to the card [BACKUP] r (Settings 1) X BACKUP Submenu 2 YES NO Application Backs up image data in the internal memory to back up data. "Changing the display language" (p. 13) Restoring the shooting functions to the default settings [RESET] r (Settings 1) X RESET Submenu 2 YES NO Application Restores the following menu functions to the default settings. • Flash (p. 23) • Macro (p. 23) • Self-timer (p. 24) • Exposure compensation (p. 24) • White balance (p. 25) • ISO (p. 25) • Image size...

FE-4020 Instruction Manual (English)
Page 33
... USB ports installed using ib computer software with the camera connected to a computer. Choosing the opening screen display [PW ON SETUP] s (Settings 2) X PW ON SETUP Submenu 2 OFF ON Application No opening screen is displayed when the camera is turned on your computer while the camera and the computer are connected. Select when transferring images to P mode when the camera is turned on using the menus, see "Using the Menu" (p. 4). The shooting mode is set to a computer running Windows Vista or Windows 7 without using...
... USB ports installed using ib computer software with the camera connected to a computer. Choosing the opening screen display [PW ON SETUP] s (Settings 2) X PW ON SETUP Submenu 2 OFF ON Application No opening screen is displayed when the camera is turned on your computer while the camera and the computer are connected. Select when transferring images to P mode when the camera is turned on using the menus, see "Using the Menu" (p. 4). The shooting mode is set to a computer running Windows Vista or Windows 7 without using...

FE-4020 Instruction Manual (English)
Page 34
... the shutter sound. For best results, wait at factory shipping, and no adjustment is turned off during playback. To adjust the CCD and the image processing function Press the H button when [START] (Submenu 2) is played when images are displayed on the surrounding brightness. Setting the date and time [X] s (Settings 2) X X "Setting the date, time and time zone" (p. 12) To select the date display order 1 Press I after taking or viewing pictures before performing pixel mapping. Selects the operating sound and volume of...
... the shutter sound. For best results, wait at factory shipping, and no adjustment is turned off during playback. To adjust the CCD and the image processing function Press the H button when [START] (Submenu 2) is played when images are displayed on the surrounding brightness. Setting the date and time [X] s (Settings 2) X X "Setting the date, time and time zone" (p. 12) To select the date display order 1 Press I after taking or viewing pictures before performing pixel mapping. Selects the operating sound and volume of...
FE-4020 Instruction Manual (English)
Page 37
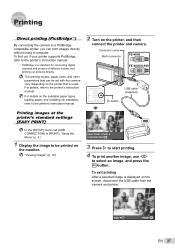
... H button. "Viewing images" (p. 16) EASY PRINT START CUSTOM PRINT OK 3 Press I button Printing images at the printer's standard settings [EASY PRINT] In the [SETUP] menu, set with the camera vary depending on the printer, and then connect the printer and camera. EXIT PRINT OK EN 37 To find out if your printer supports PictBridge, refer to the printer's instruction manual. *1 PictBridge is displayed on the screen, disconnect the USB cable from the camera and printer. For details, refer to be set [USB CONNECTION] to the printer's instruction manual. 2 Turn on...
... H button. "Viewing images" (p. 16) EASY PRINT START CUSTOM PRINT OK 3 Press I button Printing images at the printer's standard settings [EASY PRINT] In the [SETUP] menu, set with the camera vary depending on the printer, and then connect the printer and camera. EXIT PRINT OK EN 37 To find out if your printer supports PictBridge, refer to the printer's instruction manual. *1 PictBridge is displayed on the screen, disconnect the USB cable from the camera and printer. For details, refer to be set [USB CONNECTION] to the printer's instruction manual. 2 Turn on...
FE-4020 Instruction Manual (English)
Page 40
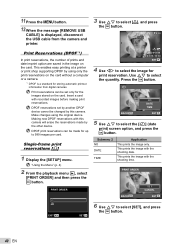
... the message [REMOVE USB CABLE] is a standard for storing automatic printout information from the camera and printer. Print Reservations (DPOF *1) In print reservations, the number of prints and date imprint option are saved in the image on the card without a computer or a camera. *1 DPOF is displayed, disconnect the USB cable from digital cameras. Insert a card with this camera will erase the reservations made for the images stored on the card. Making new DPOF reservations with recorded images before making print...
... the message [REMOVE USB CABLE] is a standard for storing automatic printout information from the camera and printer. Print Reservations (DPOF *1) In print reservations, the number of prints and date imprint option are saved in the image on the card without a computer or a camera. *1 DPOF is displayed, disconnect the USB cable from digital cameras. Insert a card with this camera will erase the reservations made for the images stored on the card. Making new DPOF reservations with recorded images before making print...

FE-4020 Instruction Manual (English)
Page 42
... time function "Date and time settings return to shoot. 42 EN "Vertical lines appear on the screen". ● This condition may activate the lens and make a noise even if no operation for a while. "Error message" (p. 43) Shutter button "No picture is taken when the shutter button is performed. Press the n button to turn the camera on dust in your pocket for 3 minutes when the camera is turned on the screen, and you are removed...
... time function "Date and time settings return to shoot. 42 EN "Vertical lines appear on the screen". ● This condition may activate the lens and make a noise even if no operation for a while. "Error message" (p. 43) Shutter button "No picture is taken when the shutter button is performed. Press the n button to turn the camera on dust in your pocket for 3 minutes when the camera is turned on the screen, and you are removed...

FE-4020 Instruction Manual (English)
Page 43
...selected image Use photo retouch software, etc. JAMMED SETTINGS CHANGED*3 PRINT ERROR Printer problem Remove the jammed paper. Do not operate the printer while making the print settings on the camera. *4 This camera may be used. THE IMAGE CANNOT BE EDITED Problem with selected image Use photo retouch software, etc. BATTERY EMPTY Battery problem Charge the battery. to select [MEMORY POWER OFF MEMORY FORMAT FORMAT], and press the H button. Next, use FG to select [YES], and SET OK press the H button.*2 MEMORY SETUP Internal memory problem Use FG to view the image on...
...selected image Use photo retouch software, etc. JAMMED SETTINGS CHANGED*3 PRINT ERROR Printer problem Remove the jammed paper. Do not operate the printer while making the print settings on the camera. *4 This camera may be used. THE IMAGE CANNOT BE EDITED Problem with selected image Use photo retouch software, etc. BATTERY EMPTY Battery problem Charge the battery. to select [MEMORY POWER OFF MEMORY FORMAT FORMAT], and press the H button. Next, use FG to select [YES], and SET OK press the H button.*2 MEMORY SETUP Internal memory problem Use FG to view the image on...
FE-4020 Instruction Manual (English)
Page 47
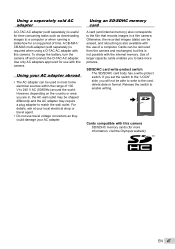
... adapter to the card, delete data or format. LOCK Cards compatible with this camera. Using a separately sold AC adapter A D-7AC AC adapter (sold separately) is required when using a D-7AC AC adapter with the internal memory. However, depending on the country or area you will not be removed from the camera and exchanged, but this is also available with the use with this camera. Otherwise, the recorded images (data) can be able to write to...
... adapter to the card, delete data or format. LOCK Cards compatible with this camera. Using a separately sold AC adapter A D-7AC AC adapter (sold separately) is required when using a D-7AC AC adapter with the internal memory. However, depending on the country or area you will not be removed from the camera and exchanged, but this is also available with the use with this camera. Otherwise, the recorded images (data) can be able to write to...

FE-4020 Instruction Manual (English)
Page 48
... image saving location The memory indicator shows whether the internal memory or card is being used during shooting and playback. Never open the battery/card compartment cover or unplug the USB cable. IMAGE], or [ALL ERASE] is performed, the data in red '10/02/26 12:30 Playback mode Even if [MEMORY FORMAT]/[FORMAT], [ERASE], [SEL. This can not only damage the image data but also render the internal memory or card unusable. Current memory indicator v: Internal memory is being used w: Card is being used Current memory P indicator Readout/recording...
... image saving location The memory indicator shows whether the internal memory or card is being used during shooting and playback. Never open the battery/card compartment cover or unplug the USB cable. IMAGE], or [ALL ERASE] is performed, the data in red '10/02/26 12:30 Playback mode Even if [MEMORY FORMAT]/[FORMAT], [ERASE], [SEL. This can not only damage the image data but also render the internal memory or card unusable. Current memory indicator v: Internal memory is being used w: Card is being used Current memory P indicator Readout/recording...
FE-4020 Instruction Manual (English)
Page 52
.... Warning Unauthorized photographing or use these written materials or this software may appear on the monitor. Battery Handling Precautions • This camera uses a lithium ion battery specified by erasing picture data. 52 EN otherwise the image may become vague, resulting in a playback mode failure or damage to the monitor. • A strip of the information contained therein. Olympus assumes no responsibility for...
.... Warning Unauthorized photographing or use these written materials or this software may appear on the monitor. Battery Handling Precautions • This camera uses a lithium ion battery specified by erasing picture data. 52 EN otherwise the image may become vague, resulting in a playback mode failure or damage to the monitor. • A strip of the information contained therein. Olympus assumes no responsibility for...

FE-4020 Instruction Manual (English)
Page 56
... of Olympus, which Olympus does not place and record serial numbers). 3 A detailed description of Olympus. WHERE TO SEND PRODUCT FOR SERVICE See "WORLDWIDE WARRANTY" for service. Representations and warranties made by an expressly authorized officer of the problem. 4 Sample prints, negatives, digital prints (or files on a Product to another image or data storage medium and/or remove any image or other data saved on disk...
... of Olympus, which Olympus does not place and record serial numbers). 3 A detailed description of Olympus. WHERE TO SEND PRODUCT FOR SERVICE See "WORLDWIDE WARRANTY" for service. Representations and warranties made by an expressly authorized officer of the problem. 4 Sample prints, negatives, digital prints (or files on a Product to another image or data storage medium and/or remove any image or other data saved on disk...


