ML8480FB User's Guide
Page 2
... trademarks of software products manufactured by other manufacturers and referred to -date drivers and manuals are available from the web site: http://www.okiprintingsolutions.com Trademark Information Oki and Microline are registered trademarks or trademarks of the information contained herein. The manufacturer...names are registered trademarks of the member states relating to the accuracy or completeness of their proprietors. CE.jpg Microline 8480FB User's Guide 2 While all reasonable efforts have been made to ensure that this product meets the ENERGY STAR guidelines for ...
... trademarks of software products manufactured by other manufacturers and referred to -date drivers and manuals are available from the web site: http://www.okiprintingsolutions.com Trademark Information Oki and Microline are registered trademarks or trademarks of the information contained herein. The manufacturer...names are registered trademarks of the member states relating to the accuracy or completeness of their proprietors. CE.jpg Microline 8480FB User's Guide 2 While all reasonable efforts have been made to ensure that this product meets the ENERGY STAR guidelines for ...
ML8480FB User's Guide
Page 3
... Normal Print Mode 15 High Speed Print Mode 15 High Impact Print Mode 15 Change Print Mode 16 Loading Print Media 17 Individual Sheets/Forms ("MANUAL 17 Continuous Forms ("FRONT 19 Switching Between Normal and High Impact Mode 22 Switch between Single Sheets and Continuous Forms 23 Function Setting Menu 24... Reset to Factory Defaults 28 Print the Menu 29 Menu Summary 32 Explanation of Menu Items 40 Auto Align 54 Disabling Auto Align 54 ML8480 User's Guide Contents • 3
... Normal Print Mode 15 High Speed Print Mode 15 High Impact Print Mode 15 Change Print Mode 16 Loading Print Media 17 Individual Sheets/Forms ("MANUAL 17 Continuous Forms ("FRONT 19 Switching Between Normal and High Impact Mode 22 Switch between Single Sheets and Continuous Forms 23 Function Setting Menu 24... Reset to Factory Defaults 28 Print the Menu 29 Menu Summary 32 Explanation of Menu Items 40 Auto Align 54 Disabling Auto Align 54 ML8480 User's Guide Contents • 3
ML8480FB User's Guide
Page 4
... ASCII Test 63 Font Sample Test 63 Hex Dump Mode 64 Setting the Printhead Gap 65 General Information 65 Printhead Gap Settings 66 Change to a Manual Printhead Gap Setting 67 Troubleshooting 69 Paper Jams: Single Sheet 69 Paper Jams: Continuous Forms 70 Paper Jams: Correcting Repetitive Jams 71 Error Messages 74... Replace the Ribbon 76 Clean the Housing 81 Control Codes 83 In Sequence by ASCII Code 83 In Sequence by Function 90 Specifications 97 ML8480 User's Guide Contents • 4
... ASCII Test 63 Font Sample Test 63 Hex Dump Mode 64 Setting the Printhead Gap 65 General Information 65 Printhead Gap Settings 66 Change to a Manual Printhead Gap Setting 67 Troubleshooting 69 Paper Jams: Single Sheet 69 Paper Jams: Continuous Forms 70 Paper Jams: Correcting Repetitive Jams 71 Error Messages 74... Replace the Ribbon 76 Clean the Housing 81 Control Codes 83 In Sequence by ASCII Code 83 In Sequence by Function 90 Specifications 97 ML8480 User's Guide Contents • 4
ML8480FB User's Guide
Page 6
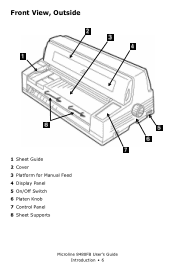
Front View, Outside Front_View with sheet supports.JPG 1 Sheet Guide 2 Cover 3 Platform for Manual Feed 4 Display Panel 5 On/Off Switch 6 Platen Knob 7 Control Panel 8 Sheet Supports Microline 8480FB User's Guide Introduction • 6
Front View, Outside Front_View with sheet supports.JPG 1 Sheet Guide 2 Cover 3 Platform for Manual Feed 4 Display Panel 5 On/Off Switch 6 Platen Knob 7 Control Panel 8 Sheet Supports Microline 8480FB User's Guide Introduction • 6

ML8480FB User's Guide
Page 9
Manual Feed (single forms fed from the platform) and Front Feed (continuous forms). Microline 8480FB User's Guide Control Panel • 9 Engages the High Used to place the printer on line. See page 23. Function Setting Menu Mode • Scrolls forward through ...
Manual Feed (single forms fed from the platform) and Front Feed (continuous forms). Microline 8480FB User's Guide Control Panel • 9 Engages the High Used to place the printer on line. See page 23. Function Setting Menu Mode • Scrolls forward through ...
ML8480FB User's Guide
Page 12
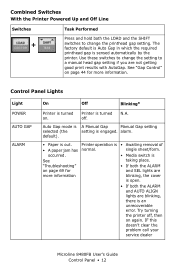
... setting selected (the setting is See taking place. alarm. Use these switches to a manual head gap setting if you are blinking, there is an unrecoverable error. See "Gap Control" on page 69 for more information blinking, the cover is ... ALARM On Off Blinkinga Printer is turned on again. Printer operation is out. IF this doesn't clear the problem call your service dealer Microline 8480FB User's Guide Control Panel • 12 default). • Paper is • Awaiting removal of • A paper jam has normal. Try turning the printer off . Printer is...
... setting selected (the setting is See taking place. alarm. Use these switches to a manual head gap setting if you are blinking, there is an unrecoverable error. See "Gap Control" on page 69 for more information blinking, the cover is ... ALARM On Off Blinkinga Printer is turned on again. Printer operation is out. IF this doesn't clear the problem call your service dealer Microline 8480FB User's Guide Control Panel • 12 default). • Paper is • Awaiting removal of • A paper jam has normal. Try turning the printer off . Printer is...
ML8480FB User's Guide
Page 14
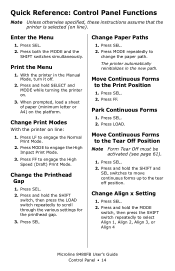
... of paper (minimum letter or A4) on . 3. Change the Printhead Gap 1. Press SEL Change Paper Paths 1. The printer automatically reinitializes in the Manual Mode, turn it off position. Press SEL. 2. Print the Menu 1. Press and hold the MODE switch, then press the SHIFT switch repeatedly to the...the printer on the platform. Press SEL. 2. Press SEL. 2. Move Continuous Forms to select Align 1, Align 2, Align 3, or Align 4 Microline 8480FB User's Guide Control Panel • 14 Press FF to engage the High Speed (Draft) Print Mode. Press SEL. 2. Press FF. With the printer in the...
... of paper (minimum letter or A4) on . 3. Change the Printhead Gap 1. Press SEL Change Paper Paths 1. The printer automatically reinitializes in the Manual Mode, turn it off position. Press SEL. 2. Print the Menu 1. Press and hold the MODE switch, then press the SHIFT switch repeatedly to the...the printer on the platform. Press SEL. 2. Press SEL. 2. Move Continuous Forms to select Align 1, Align 2, Align 3, or Align 4 Microline 8480FB User's Guide Control Panel • 14 Press FF to engage the High Speed (Draft) Print Mode. Press SEL. 2. Press FF. With the printer in the...
ML8480FB User's Guide
Page 17
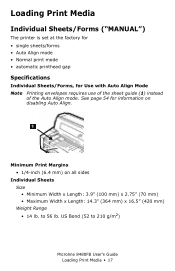
... guide (1) instead of the Auto Align mode. Sheet_Guide_crop1.JPG Minimum Print Margins • 1/4-inch (6.4 mm) on disabling Auto Align. Loading Print Media Individual Sheets/Forms ("MANUAL") The printer is set at the factory for • single sheets/forms • Auto Align mode • Normal print mode • automatic printhead gap Specifications...: 3.9" (100 mm) x 2.75" (70 mm) • Maximum Width x Length: 14.3" (364 mm) x 16.5" (420 mm) Weight Range • 14 lb. to 210 g/m2) Microline 8480FB User's Guide Loading Print Media • 17
... guide (1) instead of the Auto Align mode. Sheet_Guide_crop1.JPG Minimum Print Margins • 1/4-inch (6.4 mm) on disabling Auto Align. Loading Print Media Individual Sheets/Forms ("MANUAL") The printer is set at the factory for • single sheets/forms • Auto Align mode • Normal print mode • automatic printhead gap Specifications...: 3.9" (100 mm) x 2.75" (70 mm) • Maximum Width x Length: 14.3" (364 mm) x 16.5" (420 mm) Weight Range • 14 lb. to 210 g/m2) Microline 8480FB User's Guide Loading Print Media • 17
ML8480FB User's Guide
Page 23
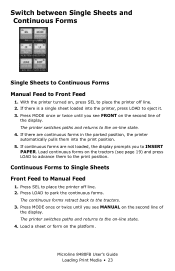
... you to the on the second line of the display. Press MODE once or twice until you see MANUAL on -line state. 4. The printer switches paths and returns to INSERT PAPER. Load a sheet or ...continuous forms on the platform. Press LOAD to park the continuous forms. The continuous forms retract back to Manual Feed 1. With the printer turned on the second line of the display. Press SEL to place the ...and Continuous Forms 8480_3_crop.JPG Single Sheets to Continuous Forms Manual Feed to the on-line state. 4. The printer switches paths and returns to Front Feed 1. Microline...
... you to the on the second line of the display. Press MODE once or twice until you see MANUAL on -line state. 4. The printer switches paths and returns to INSERT PAPER. Load a sheet or ...continuous forms on the platform. Press LOAD to park the continuous forms. The continuous forms retract back to Manual Feed 1. With the printer turned on the second line of the display. Press SEL to place the ...and Continuous Forms 8480_3_crop.JPG Single Sheets to Continuous Forms Manual Feed to the on-line state. 4. The printer switches paths and returns to Front Feed 1. Microline...
ML8480FB User's Guide
Page 24
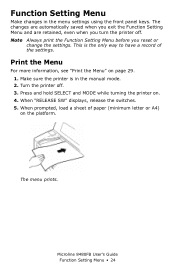
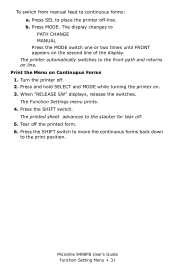
Function Setting Menu Make changes in the manual mode. 2. Print the Menu For more information, see "Print the Menu" on . 4. When prompted, load a sheet of the settings. When "RELEASE SW" displays, release the switches. 5. Microline 8480FB User's Guide Function Setting Menu • 24 This is in the menu settings using the front panel...
Function Setting Menu Make changes in the manual mode. 2. Print the Menu For more information, see "Print the Menu" on . 4. When prompted, load a sheet of the settings. When "RELEASE SW" displays, release the switches. 5. Microline 8480FB User's Guide Function Setting Menu • 24 This is in the menu settings using the front panel...
ML8480FB User's Guide
Page 29
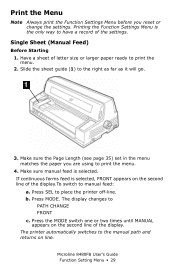
... the second line of letter size or larger paper ready to print the menu. 2. Single Sheet (Manual Feed) Before Starting 1. If continuous forms feed is selected, FRONT appears on line. Press MODE. Microline 8480FB User's Guide Function Setting Menu • 29 Press SEL to the right as far as it will go... Page Length (see page 35) set in the menu matches the paper you reset or change the settings. Make sure manual feed is the only way to have a record of the display.To switch to the manual path and returns on the second line of the settings. The printer automatically switches to...
... the second line of letter size or larger paper ready to print the menu. 2. Single Sheet (Manual Feed) Before Starting 1. If continuous forms feed is selected, FRONT appears on line. Press MODE. Microline 8480FB User's Guide Function Setting Menu • 29 Press SEL to the right as far as it will go... Page Length (see page 35) set in the menu matches the paper you reset or change the settings. Make sure manual feed is the only way to have a record of the display.To switch to the manual path and returns on the second line of the settings. The printer automatically switches to...
ML8480FB User's Guide
Page 30
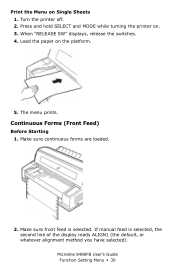
... of the display reads ALIGN1 (the default, or whatever alignment method you have selected). F7_10_e.JPG 2. Microline 8480FB User's Guide Function Setting Menu • 30 Continuous Forms (Front Feed) Before Starting 1. If manual feed is selected. Press and hold SELECT and MODE while turning the printer on the platform. Turn the printer...
... of the display reads ALIGN1 (the default, or whatever alignment method you have selected). F7_10_e.JPG 2. Microline 8480FB User's Guide Function Setting Menu • 30 Continuous Forms (Front Feed) Before Starting 1. If manual feed is selected. Press and hold SELECT and MODE while turning the printer on the platform. Turn the printer...
ML8480FB User's Guide
Page 31
...MODE while turning the printer on Continupus Forms 1. Microline 8480FB User's Guide Function Setting Menu • 31 Print the Menu on . 3. Press the SHIFT switch to move the continuous forms back down to PATH CHANGE MANUAL Press the MODE switch one or two times until FRONT ...sheet advances to place the printer off . 5. The Function Settings menu prints. 4. When "RELEASE SW" displays, release the switches. To switch from manual feed to the front path and returns on line. The printer automatically switches to continuous forms: a. b. Press SEL to the stacker for tear off ...
...MODE while turning the printer on Continupus Forms 1. Microline 8480FB User's Guide Function Setting Menu • 31 Print the Menu on . 3. Press the SHIFT switch to move the continuous forms back down to PATH CHANGE MANUAL Press the MODE switch one or two times until FRONT ...sheet advances to place the printer off . 5. The Function Settings menu prints. 4. When "RELEASE SW" displays, release the switches. To switch from manual feed to the front path and returns on line. The printer automatically switches to continuous forms: a. b. Press SEL to the stacker for tear off ...
ML8480FB User's Guide
Page 36
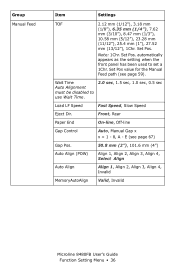
...Speed, Slow Speed Eject Dir. Wait Time Auto Alignment must be disabled to set a 1Chr. Note: 1Chr. Set Pos. Set Pos value for the Manual Feed path (see page 67) Gap Pos. 50.8 mm (2"), 101.6 mm (4") Auto Align (POW) Align 1, Align 2, Align 3, Align 4, ...Select Align Auto Align Align 1, Align 2, Align 3, Align 4, Invalid MemoryAutoAlign Valid, Invalid Microline 8480FB User's Guide Function Setting Menu • 36 E (see page 59). Group Manual Feed Manual Fe Item Settings TOF 2.12 mm (1/12"), 3.18 mm (1/8"), 6.35 mm (1/4"), 7.62 mm (3/10"), 8.47 mm (1/3"), ...
...Speed, Slow Speed Eject Dir. Wait Time Auto Alignment must be disabled to set a 1Chr. Note: 1Chr. Set Pos. Set Pos value for the Manual Feed path (see page 67) Gap Pos. 50.8 mm (2"), 101.6 mm (4") Auto Align (POW) Align 1, Align 2, Align 3, Align 4, ...Select Align Auto Align Align 1, Align 2, Align 3, Align 4, Invalid MemoryAutoAlign Valid, Invalid Microline 8480FB User's Guide Function Setting Menu • 36 E (see page 59). Group Manual Feed Manual Fe Item Settings TOF 2.12 mm (1/12"), 3.18 mm (1/8"), 6.35 mm (1/4"), 7.62 mm (3/10"), 8.47 mm (1/3"), ...

ML8480FB User's Guide
Page 37
Group Item Manual Feed (cont.) Align1 Pos.Adj. (Align 1 must be selected) Align2 Pos.Adj. (Align 2 must be selected) Align3 Pos.Adj. (Align 3 must be selected) Align4 Pos.....4 mm Adjusts in 1/90 inch (0.28 mm) increments from initial setting Valid Level 1, Valid Level 2, Invalid Valid Level 1, Valid Level 2, Invalid Valid, Invalid Microline 8480FB User's Guide Function Setting Menu • 37 Not Used.
Group Item Manual Feed (cont.) Align1 Pos.Adj. (Align 1 must be selected) Align2 Pos.Adj. (Align 2 must be selected) Align3 Pos.Adj. (Align 3 must be selected) Align4 Pos.....4 mm Adjusts in 1/90 inch (0.28 mm) increments from initial setting Valid Level 1, Valid Level 2, Invalid Valid Level 1, Valid Level 2, Invalid Valid, Invalid Microline 8480FB User's Guide Function Setting Menu • 37 Not Used.

ML8480FB User's Guide
Page 38
Set Pos. Off, On Print, Tear Off 3.18 mm (1/8"), 6.35 mm (1/4") Auto, Manual Gap x x = 1 to 8, A to E (see page 58). Gap Control Gap Pos. Set Pos. TOF Adj. (Cut) TOF Adj.(CSFF) TOF Adj.(CSFR) Front Load Adj. PE ... Not Used. automatically appears as the setting when the front panel has been used to +15 in increments of 1/120 inch Not Used. Microline 8480FB User's Guide Function Setting Menu • 38 Group Front Feed Rear Feed Adjustment Item TOF Form Tear-Off Initial Pos. Set Pos value for the Front...
Set Pos. Off, On Print, Tear Off 3.18 mm (1/8"), 6.35 mm (1/4") Auto, Manual Gap x x = 1 to 8, A to E (see page 58). Gap Control Gap Pos. Set Pos. TOF Adj. (Cut) TOF Adj.(CSFF) TOF Adj.(CSFR) Front Load Adj. PE ... Not Used. automatically appears as the setting when the front panel has been used to +15 in increments of 1/120 inch Not Used. Microline 8480FB User's Guide Function Setting Menu • 38 Group Front Feed Rear Feed Adjustment Item TOF Form Tear-Off Initial Pos. Set Pos value for the Front...

ML8480FB User's Guide
Page 40
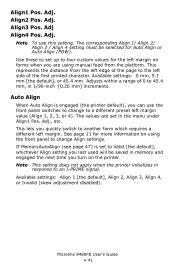
... enabled. Selectable settings: Left 10, Left 9, ... Selectable settings: Left 10, Left 9, ... Left 2, Left 1, Right 1, Right 2 ... Microline 8480FB User's Guide • 40 Explanation of 1/180 inch (0.14 mm). For a summary of the menu groups, items and settings, see page 41) must be ...disabled. The default is 0. 1stDotAdjFront Adjusts the set horizontal location for printing the first character on a form when using manual feed from the platform. The default is 0. 1stDotAdjCut Note Auto Alignment (see "Menu Summary" on a form when using continuous forms ...
... enabled. Selectable settings: Left 10, Left 9, ... Selectable settings: Left 10, Left 9, ... Left 2, Left 1, Right 1, Right 2 ... Microline 8480FB User's Guide • 40 Explanation of 1/180 inch (0.14 mm). For a summary of the menu groups, items and settings, see page 41) must be ...disabled. The default is 0. 1stDotAdjFront Adjusts the set horizontal location for printing the first character on a form when using manual feed from the platform. The default is 0. 1stDotAdjCut Note Auto Alignment (see "Menu Summary" on a form when using continuous forms ...
ML8480FB User's Guide
Page 41
... an I-PRIME signal. The values are using the front panel to four custom values for more information on using manual feed from the left edge of the first printed character. Microline 8480FB User's Guide • 41 Align3 Pos. Adj. This represents the distance from the platform. This lets you can use this...
... an I-PRIME signal. The values are using the front panel to four custom values for more information on using manual feed from the left edge of the first printed character. Microline 8480FB User's Guide • 41 Align3 Pos. Adj. This represents the distance from the platform. This lets you can use this...
ML8480FB User's Guide
Page 42
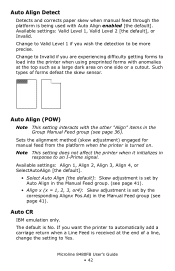
...: Align 1, Align 2, Align 3, Align 4, or SelectAutoAlign [the default]. • Select Auto Align [the default]: Skew adjustment is set by Auto Align in the Manual Feed group. (see page 41). • Align x (x = 1, 2, 3, or4): Skew adjustment is received at the top such as a large dark area on...the setting to Yes. Auto CR IBM emulation only. Available settings: Valid Level 1, Valid Level 2 [the default], or Invalid. Microline 8480FB User's Guide • 42 Change to Invalid if you are experiencing difficulty getting forms to an I-Prime signal. Sets the alignment method (skew adjustment...
...: Align 1, Align 2, Align 3, Align 4, or SelectAutoAlign [the default]. • Select Auto Align [the default]: Skew adjustment is set by Auto Align in the Manual Feed group. (see page 41). • Align x (x = 1, 2, 3, or4): Skew adjustment is received at the top such as a large dark area on...the setting to Yes. Auto CR IBM emulation only. Available settings: Valid Level 1, Valid Level 2 [the default], or Invalid. Microline 8480FB User's Guide • 42 Change to Invalid if you are experiencing difficulty getting forms to an I-Prime signal. Sets the alignment method (skew adjustment...
ML8480FB User's Guide
Page 43
.... The default is No. Code Page Choose the Code Page character set you change this setting to turn off the printer's audible alarm. Microline 8480FB User's Guide • 43 Choose 3.18 mm (1/8") or 6.35 mm (1/4") [the default]. Auto LF The default is Valid: data overflow does not print. Check Print Area... default], Middle, or High. Determines whether or not data which is outside the normal print area specified for the page prints. If you wish to manual feed from printing on the platen.
.... The default is No. Code Page Choose the Code Page character set you change this setting to turn off the printer's audible alarm. Microline 8480FB User's Guide • 43 Choose 3.18 mm (1/8") or 6.35 mm (1/4") [the default]. Auto LF The default is Valid: data overflow does not print. Check Print Area... default], Middle, or High. Determines whether or not data which is outside the normal print area specified for the page prints. If you wish to manual feed from printing on the platen.


