
OkiLAN 6020e? Pocket Print Server Userfs Guide
Page 7
.... - Consult our web site at www.okidata.com - Please consult your software user's manual for the latest network operating systems. (Customer service representatives are trained on all current Oki Data products They can describe your questions regarding: • Installation • Determination of printer issues that require service • Consumer relations • Interface information • Availability and installation of printer drivers and support for times and availability of Oki Data authorized Service Centers: - In...
.... - Consult our web site at www.okidata.com - Please consult your software user's manual for the latest network operating systems. (Customer service representatives are trained on all current Oki Data products They can describe your questions regarding: • Installation • Determination of printer issues that require service • Consumer relations • Interface information • Availability and installation of printer drivers and support for times and availability of Oki Data authorized Service Centers: - In...
OkiLAN 6020e? Pocket Print Server Userfs Guide
Page 15
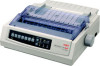
...; Power adapter with a bidirectional parallel port. Parallel connector OKI OkiLAN 6020e User's Guide I - Attach the OkiLAN 6020e to work with any Centronics or IEEE-1284 parallel interface printer that includes a resident emulation such as PCL versions 4 through 6, Adobe PostScriptâ, IBM ProPrinterâ or Epsonâ emulations. Turn off printer power. 2. Hardware Installation The OkiLAN 6020e Pocket Print Server enables Ethernet network users to connect to a printer with line cord · Installation User's Guide · Utilities CD · Product registration card Installing...
...; Power adapter with a bidirectional parallel port. Parallel connector OKI OkiLAN 6020e User's Guide I - Attach the OkiLAN 6020e to work with any Centronics or IEEE-1284 parallel interface printer that includes a resident emulation such as PCL versions 4 through 6, Adobe PostScriptâ, IBM ProPrinterâ or Epsonâ emulations. Turn off printer power. 2. Hardware Installation The OkiLAN 6020e Pocket Print Server enables Ethernet network users to connect to a printer with line cord · Installation User's Guide · Utilities CD · Product registration card Installing...
OkiLAN 6020e? Pocket Print Server Userfs Guide
Page 26
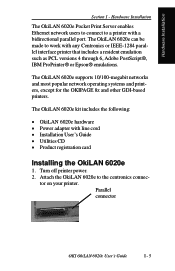
... 3 HP Web JetAdmin Support II-8 Overview II-8 Configuring the OkiLAN 6020e Using Web JetAdmin II-8 Installing a Windows NT Printer for the OkiLAN 6020e II-8 Obtaining Diagnostic Information from the OkiLAN 6020e II-9 Chapter 4 OkiLAN 6020e Web Configuration .....II-10 Overview II-10 Connecting to the OkiLAN 6020e II-10 Configuration II-12 Status II-15 Print Job Log II-15 Support II-15 Reset II-16 OkiLAN 6020e Server Discovery II-16 Troubleshooting II-17...
... 3 HP Web JetAdmin Support II-8 Overview II-8 Configuring the OkiLAN 6020e Using Web JetAdmin II-8 Installing a Windows NT Printer for the OkiLAN 6020e II-8 Obtaining Diagnostic Information from the OkiLAN 6020e II-9 Chapter 4 OkiLAN 6020e Web Configuration .....II-10 Overview II-10 Connecting to the OkiLAN 6020e II-10 Configuration II-12 Status II-15 Print Job Log II-15 Support II-15 Reset II-16 OkiLAN 6020e Server Discovery II-16 Troubleshooting II-17...
OkiLAN 6020e? Pocket Print Server Userfs Guide
Page 56
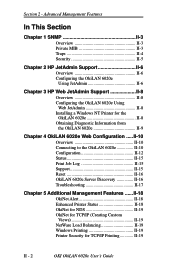
... is used to OFF. PostScript Switch Sequence Enter the character string to switch the printer to the PCL print language. Chapter 2 - For example, to PCL or PostScript mode. Section 3 - Note: If you are not switching languages or the printer can switch languages automatically, this option should be printed, troubleshooting abilities are limited. If your OkiLAN 6020e. III - 12 OKI OkiLAN 6020e User's Guide Configuration Page Language Select the appropriate printer...
... is used to OFF. PostScript Switch Sequence Enter the character string to switch the printer to the PCL print language. Chapter 2 - For example, to PCL or PostScript mode. Section 3 - Note: If you are not switching languages or the printer can switch languages automatically, this option should be printed, troubleshooting abilities are limited. If your OkiLAN 6020e. III - 12 OKI OkiLAN 6020e User's Guide Configuration Page Language Select the appropriate printer...
OkiLAN 6020e? Pocket Print Server Userfs Guide
Page 92
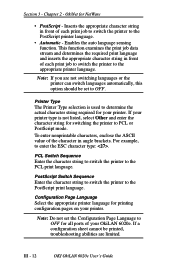
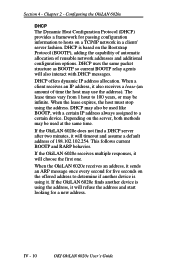
... configuration options. DHCP may use the address). If the OkiLAN 6020e finds another device is based on the offered address to a certain device. IV - 10 OKI OkiLAN 6020e User's Guide The lease times vary from 1 hour to hosts on the server, both methods may be used like BOOTP, with DHCP messages. DHCP is using the address. When the lease expires, the host must stop using...
... configuration options. DHCP may use the address). If the OkiLAN 6020e finds another device is based on the offered address to a certain device. IV - 10 OKI OkiLAN 6020e User's Guide The lease times vary from 1 hour to hosts on the server, both methods may be used like BOOTP, with DHCP messages. DHCP is using the address. When the lease expires, the host must stop using...
CUT-SHEET FEEDER Users Manual
Page 6
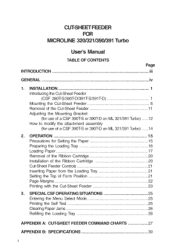
... Turbo User's Manual TABLE OF CONTENTS Page INTRODUCTION iii GENERAL iv 1. INSTALLATION 1 Introducing the Cut-Sheet Feeder (CSF 390T-S/390T-D/391 T-S/391 T-D 1 Mounting the Cut-Sheet Feeder 6 Removal of the Cut-Sheet Feeder 11 Adjusting the Mounting Bracket (for use of Form Position 21 Page Margins 22 Printing with the Cut-Sheet Feeder 23 3. SPECIAL CSF OPERATING SITUATIONS 25 Entering the Menu Select Mode 25 Printing the Self Test 25 Clearing Paper Jams 26 Refilling the Loading Tray 26 APPENDIX A: CUT-SHEET FEEDER COMMAND...
... Turbo User's Manual TABLE OF CONTENTS Page INTRODUCTION iii GENERAL iv 1. INSTALLATION 1 Introducing the Cut-Sheet Feeder (CSF 390T-S/390T-D/391 T-S/391 T-D 1 Mounting the Cut-Sheet Feeder 6 Removal of the Cut-Sheet Feeder 11 Adjusting the Mounting Bracket (for use of Form Position 21 Page Margins 22 Printing with the Cut-Sheet Feeder 23 3. SPECIAL CSF OPERATING SITUATIONS 25 Entering the Menu Select Mode 25 Printing the Self Test 25 Clearing Paper Jams 26 Refilling the Loading Tray 26 APPENDIX A: CUT-SHEET FEEDER COMMAND...
Printer Handbook
Page 6
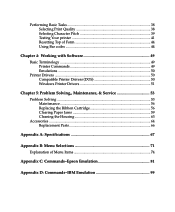
...38 Selecting Print Quality 38 Selecting Character Pitch 39 Testing Your printer 41 Resetting Top of Form 44 Using Bar codes 44 Chapter 4: Working with Software 49 Basic Terminology ...49 Printer Commands 49 Emulations ...50 Printer Drivers ...50 Compatible Printer Drivers (DOS 50 Windows Printer Drivers 51 Chapter 5: Problem Solving,, Maintenance, & Service 53 Problem Solving ...53 Maintenance ...56 Replacing the Ribbon Cartridge 56 Clearing Paper Jams 59 Cleaning the Housing 63 Accessories ...64 Replacement Parts 66 Appendix A: Specifications 67 Appendix B: Menu Selections 71...
...38 Selecting Print Quality 38 Selecting Character Pitch 39 Testing Your printer 41 Resetting Top of Form 44 Using Bar codes 44 Chapter 4: Working with Software 49 Basic Terminology ...49 Printer Commands 49 Emulations ...50 Printer Drivers ...50 Compatible Printer Drivers (DOS 50 Windows Printer Drivers 51 Chapter 5: Problem Solving,, Maintenance, & Service 53 Problem Solving ...53 Maintenance ...56 Replacing the Ribbon Cartridge 56 Clearing Paper Jams 59 Cleaning the Housing 63 Accessories ...64 Replacement Parts 66 Appendix A: Specifications 67 Appendix B: Menu Selections 71...
Printer Handbook
Page 30
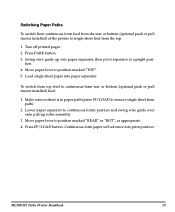
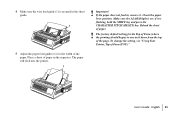
Tear off printed pages. 2. Make sure no sheet is in paper path (press FF/LOAD to remove single sheet from top feed to continuous-form tear or bottom (optional push or pull tractor installed) feed: 1. Load single sheet paper into print position. To switch from path). 2. Press FF/LOAD button. ML390/391 Turbo Printer Handbook 23 tion. 4. Continuous-form paper will advance into paper separator. Press PARK button. 3. Lower paper separator to continuous forms position and swing wire guide over onto pull-up into paper separator...
Tear off printed pages. 2. Make sure no sheet is in paper path (press FF/LOAD to remove single sheet from top feed to continuous-form tear or bottom (optional push or pull tractor installed) feed: 1. Load single sheet paper into print position. To switch from path). 2. Press FF/LOAD button. ML390/391 Turbo Printer Handbook 23 tion. 4. Continuous-form paper will advance into paper separator. Press PARK button. 3. Lower paper separator to continuous forms position and swing wire guide over onto pull-up into paper separator...
Printer Handbook
Page 41
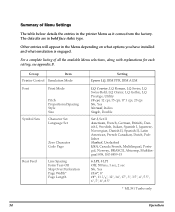
... all the available Menu selections, along with explanations for each setting, see appendix B. Group Item Printer Control Emulation Mode Font Print Mode Symbol Sets Pitch Proportional Spacing Style Size Character Set Language Set Zero Character Code Page Rear Feed Line Spacing Form Tear-Off Skip Over Perforation Page Width* Page Length Setting Epson LQ, IBM PPR, IBM AGM LQ Courier, LQ Roman, LQ Swiss, LQ Swiss Bold, LQ Orator, LQ Gothic, LQ Prestige, Utility 10 cpi, 12 cpi, 15 cpi, 17.1 cpi, 20 cpi No, Yes...
... all the available Menu selections, along with explanations for each setting, see appendix B. Group Item Printer Control Emulation Mode Font Print Mode Symbol Sets Pitch Proportional Spacing Style Size Character Set Language Set Zero Character Code Page Rear Feed Line Spacing Form Tear-Off Skip Over Perforation Page Width* Page Length Setting Epson LQ, IBM PPR, IBM AGM LQ Courier, LQ Roman, LQ Swiss, LQ Swiss Bold, LQ Orator, LQ Gothic, LQ Prestige, Utility 10 cpi, 12 cpi, 15 cpi, 17.1 cpi, 20 cpi No, Yes...
Printer Handbook
Page 81
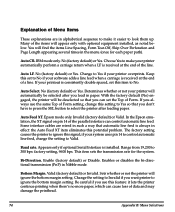
... Line Spacing, Form Tear-Off, Skip Over Perforation and Page Length appearing several times in the menu (once for the system. Keep this signal; Determines whether or not your printer will be selected after loading paper. With the factory default (No) engaged, the printer will automatically be deselected so that you load in paper. In the Epson emulation, the XT signal on pin 14 of the parallel interface can cause loss of data...
... Line Spacing, Form Tear-Off, Skip Over Perforation and Page Length appearing several times in the menu (once for the system. Keep this signal; Determines whether or not your printer will be selected after loading paper. With the factory default (No) engaged, the printer will automatically be deselected so that you load in paper. In the Epson emulation, the XT signal on pin 14 of the parallel interface can cause loss of data...

Printer Handbook
Page 83
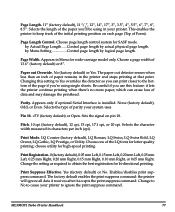
... SEL key while turning on the control panel. Bi-directional graphics printing can tear off , or you can control these features only through the printer's control panel which will permit you can select a time interval for the printer to dump the contents of continuous-forms paper. Low (factory default) or High. This will not be automatically overridden by adjusting the Print Registration setting in the respective foreign languages. Important! Form Tear-Off. Off (factory default...
... SEL key while turning on the control panel. Bi-directional graphics printing can tear off , or you can control these features only through the printer's control panel which will permit you can select a time interval for the printer to dump the contents of continuous-forms paper. Low (factory default) or High. This will not be automatically overridden by adjusting the Print Registration setting in the respective foreign languages. Important! Form Tear-Off. Off (factory default...
Printer Handbook
Page 84
... width of Form). Be careful if you 'll be using single sheets. Sets the signal on each page (Top of 13.6" (factory default) or 8". Print Suppress Effective. This enables the printer to obtain the best registration for bi-directional printing. No (factory default) or Yes. Selects the character width measured in Menu for high-speed printing. choose utility for wide-carriage model only. Print Mode. None (factory default), Odd, or Even. Enables/disables print suppress command. Appears in characters per inch (cpi...
... width of Form). Be careful if you 'll be using single sheets. Sets the signal on each page (Top of 13.6" (factory default) or 8". Print Suppress Effective. This enables the printer to obtain the best registration for bi-directional printing. No (factory default) or Yes. Selects the character width measured in Menu for high-speed printing. choose utility for wide-carriage model only. Print Mode. None (factory default), Odd, or Even. Enables/disables print suppress command. Appears in characters per inch (cpi...
Printer Handbook
Page 89
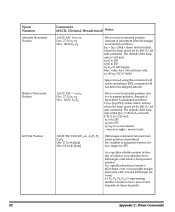
... character pitch) 82 Appendix C: Priner Commands Amount of parameter bytes to follow, range 0 to right; - Amount of movement from present position A2= specifies direction of the basic unit is set by ESC (U, set unit command. The default of relative movement: even= toward left ASCII: ESC DLE @ Pn A1 A2 P1 P2 P3 P4 Dec: 27 16 64 [data] Hex: 1B 10 40 [data] OKI...
... character pitch) 82 Appendix C: Priner Commands Amount of parameter bytes to follow, range 0 to right; - Amount of movement from present position A2= specifies direction of the basic unit is set by ESC (U, set unit command. The default of relative movement: even= toward left ASCII: ESC DLE @ Pn A1 A2 P1 P2 P3 P4 Dec: 27 16 64 [data] Hex: 1B 10 40 [data] OKI...
Printer Handbook
Page 120
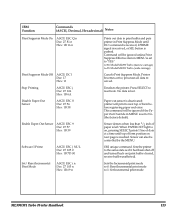
... form position on next page is deactivated: printer will be controlled by the MENU. Deselects the printer. This command will print to "YES." OKI unique command. No data is pushed. Sets the printer to reactivate. n=36: Model ML390 Turbo (narrow carriage) n=35: Model ML391 Turbo (wide carriage) Cancels Print Suppress Mode. Sensor can also be ignored if the Paper Out Override in MENU is set to No (the factory default). Paper-out sensor is reached. Sets the Incremental print mode n=0: Reset Incremental print mode n=1: Set...
... form position on next page is deactivated: printer will be controlled by the MENU. Deselects the printer. This command will print to "YES." OKI unique command. No data is pushed. Sets the printer to reactivate. n=36: Model ML390 Turbo (narrow carriage) n=35: Model ML391 Turbo (wide carriage) Cancels Print Suppress Mode. Sensor can also be ignored if the Paper Out Override in MENU is set to No (the factory default). Paper-out sensor is reached. Sets the Incremental print mode n=0: Reset Incremental print mode n=1: Set...
Users Guide
Page 33
... flashing, hold the SHIFT key and press the CHARACTER PITCH (RESET) key. To change the setting, see "Using Your Printer, Top of Form (TOF)." 5 Adjust the paper feed guides (1) for the Top of Form (where the printing should begin) is one inch down from the top of the paper. Check the paper lever position. 4 Make sure the wire feed guide (1) is secured in the separator. Important! The factory default setting for the width of the page. Place a sheet of paper...
... flashing, hold the SHIFT key and press the CHARACTER PITCH (RESET) key. To change the setting, see "Using Your Printer, Top of Form (TOF)." 5 Adjust the paper feed guides (1) for the Top of Form (where the printing should begin) is one inch down from the top of the paper. Check the paper lever position. 4 Make sure the wire feed guide (1) is secured in the separator. Important! The factory default setting for the width of the page. Place a sheet of paper...
Users Guide
Page 76
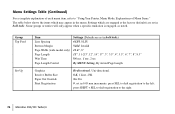
... only appear when a specific emulation is engaged, as noted. press SHIFT + SEL to shift registration to "Using Your Printer, Menu Mode, Explanations of each menu item, refer to the right. |76 Microline 390/391 Turbo/n The table below shows the items which are engaged at the factory (defaults) are set in bold italic) Line Spacing 6 LPI, 8 LPI Bottom Margin Valid, Invalid Page Width (wide model only) 13.6", 8" Page Length 11", 11-2/3", 12...
... only appear when a specific emulation is engaged, as noted. press SHIFT + SEL to shift registration to "Using Your Printer, Menu Mode, Explanations of each menu item, refer to the right. |76 Microline 390/391 Turbo/n The table below shows the items which are engaged at the factory (defaults) are set in bold italic) Line Spacing 6 LPI, 8 LPI Bottom Margin Valid, Invalid Page Width (wide model only) 13.6", 8" Page Length 11", 11-2/3", 12...
Users Guide
Page 90
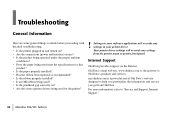
... Support." |90 Microline 390/391 Turbo/n my.okidata.com is the gateway to check before proceeding with detailed troubleshooting. • Is the printer plugged in and turned on? • Are the connections (power and interface) secure? • Is the product being operated under the proper ambient conditions? • Does the paper being used meet the specifications for this product? • Is the paper properly installed? • Has the ribbon...
... Support." |90 Microline 390/391 Turbo/n my.okidata.com is the gateway to check before proceeding with detailed troubleshooting. • Is the printer plugged in and turned on? • Are the connections (power and interface) secure? • Is the product being operated under the proper ambient conditions? • Does the paper being used meet the specifications for this product? • Is the paper properly installed? • Has the ribbon...
Users Guide
Page 121
... Data Printing large amounts 65 DC1 code 81 DC3 code 81 Depth of printer 101 | User's Guide: English 121 Service 105, 107 Service Center (Oki Data) 106 Canadian French 74, 79 Carbon Forms 58 Carbonless continuous forms 99, 100 Cardstock 99, 100 Expanded printhead gap 59 Centering 77, 79 Printhead Position 94 Centronics parallel interface 97 Character Pitch 80 Front Panel key 19 Indicator Lights 18 Key doesn't work 95 Selecting 65 Character Set 74, 79 Character Width 80 Characters...
... Data Printing large amounts 65 DC1 code 81 DC3 code 81 Depth of printer 101 | User's Guide: English 121 Service 105, 107 Service Center (Oki Data) 106 Canadian French 74, 79 Carbon Forms 58 Carbonless continuous forms 99, 100 Cardstock 99, 100 Expanded printhead gap 59 Centering 77, 79 Printhead Position 94 Centronics parallel interface 97 Character Pitch 80 Front Panel key 19 Indicator Lights 18 Key doesn't work 95 Selecting 65 Character Set 74, 79 Character Width 80 Characters...
Users Guide
Page 125
... Width 80 Bottom Feed 75 Rear Feed 75 Setting in the Printer Menu 76, 80 Top Feed 76 Paper 1" (25 mm) remains 80 Continuous Feed Alignment 31 Rear Feed 30 Cut Sheet 110 | User's Guide: English 125 Menu Mode 70 Changing Settings 73 Entering 71 Exiting 71 Front Panel keys 70 Group 70 Item 70 Explanations 79, 80, 81 Losing setting changes 73 MENU light 70 Moving through 10, 71 Printing the Menu Settings 72 Reset to factory defaults 72 Saving time 10 SEL...
... Width 80 Bottom Feed 75 Rear Feed 75 Setting in the Printer Menu 76, 80 Top Feed 76 Paper 1" (25 mm) remains 80 Continuous Feed Alignment 31 Rear Feed 30 Cut Sheet 110 | User's Guide: English 125 Menu Mode 70 Changing Settings 73 Entering 71 Exiting 71 Front Panel keys 70 Group 70 Item 70 Explanations 79, 80, 81 Losing setting changes 73 MENU light 70 Moving through 10, 71 Printing the Menu Settings 72 Reset to factory defaults 72 Saving time 10 SEL...
Users Guide
Page 129
... Oki Data 106 Set, Menu Mode 70 SHIFT Front Panel Key 19 Shipping Restraints 25 Saving the packing materials 25 SI 77, 81 Single Sheet Change from continuous forms 57 Change to continuous forms 57 Cut Sheet Feeder (Option) 110 Jams 89 Loading 32 Top Feed 17, 30 Size Double width and height 81 of printer 101 Skip Over Perforation 75 Software Embedded commands 93 Installation 37, 38 Matching drivers to emulations 93 Scalable Fonts 97 Software vs. Front Panel Light...
... Oki Data 106 Set, Menu Mode 70 SHIFT Front Panel Key 19 Shipping Restraints 25 Saving the packing materials 25 SI 77, 81 Single Sheet Change from continuous forms 57 Change to continuous forms 57 Cut Sheet Feeder (Option) 110 Jams 89 Loading 32 Top Feed 17, 30 Size Double width and height 81 of printer 101 Skip Over Perforation 75 Software Embedded commands 93 Installation 37, 38 Matching drivers to emulations 93 Scalable Fonts 97 Software vs. Front Panel Light...


