

Quick Start Guide
Page 3
... in the field simply by installing the desired print head. Backing not rewound. Printer Overview The SATO M-84PRO Thermal Transfer Printers are complete, high-performance on the resolution of the printer and the amount of memory available for imaging the label. Label Rewinder External Option... loads the appropriate controlling firmware. Serial Interface High Speed RS232 Plug-In Interface Module. The only differences between it and other RISC printers are resident in three resolutions; 203 dpi, 305 dpi, 609 dpi. The allowable range for immediate (on the label. Coax ...
... in the field simply by installing the desired print head. Backing not rewound. Printer Overview The SATO M-84PRO Thermal Transfer Printers are complete, high-performance on the resolution of the printer and the amount of memory available for imaging the label. Label Rewinder External Option... loads the appropriate controlling firmware. Serial Interface High Speed RS232 Plug-In Interface Module. The only differences between it and other RISC printers are resident in three resolutions; 203 dpi, 305 dpi, 609 dpi. The allowable range for immediate (on the label. Coax ...

Quick Start Guide
Page 4
M-84PRO Quick Guide Pg 1 Table of Contents Installation 2 Installation 2 Components 3 Media Loading 5 Label Stock Loading 5 Ribbon Loading 8 Operation Panel 10 Printer DIP Switch Configuration 11 RS232 Transmit/Receive Setting 11 Printer Set up 12 Troubleshooting 13 Initial Checklist 13 Using the IEEE1284 Parallel Setting 13 Using the RS232C Serial Interface 14 Using the...
M-84PRO Quick Guide Pg 1 Table of Contents Installation 2 Installation 2 Components 3 Media Loading 5 Label Stock Loading 5 Ribbon Loading 8 Operation Panel 10 Printer DIP Switch Configuration 11 RS232 Transmit/Receive Setting 11 Printer Set up 12 Troubleshooting 13 Initial Checklist 13 Using the IEEE1284 Parallel Setting 13 Using the RS232C Serial Interface 14 Using the...

Quick Start Guide
Page 5
... M-84PRO, always try to make sure you have extreme temperature, as this can create electrical problems on the circuits within the printer. • The installed location of the printer and void the printer warranty. Check to avoid operation locations influenced by: • Direct or bright sunlight, as this will make the label sensor...
... M-84PRO, always try to make sure you have extreme temperature, as this can create electrical problems on the circuits within the printer. • The installed location of the printer and void the printer warranty. Check to avoid operation locations influenced by: • Direct or bright sunlight, as this will make the label sensor...

Quick Start Guide
Page 6
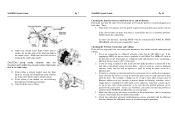
M-84PRO Quick Guide Components Pg 3 Label Roll Guide M-84PRO Quick Guide Pg 20 M-84PRO Specifications General Printer Specifications SPECIFICATION PRINT Method Speed (User Selectable) Print Module (Dot Size) Resolution Maximum Print Width Maximum Print Length MEDIA Minimum Width Minimum Length Continuous Tear-...
M-84PRO Quick Guide Components Pg 3 Label Roll Guide M-84PRO Quick Guide Pg 20 M-84PRO Specifications General Printer Specifications SPECIFICATION PRINT Method Speed (User Selectable) Print Module (Dot Size) Resolution Maximum Print Width Maximum Print Length MEDIA Minimum Width Minimum Length Continuous Tear-...

Quick Start Guide
Page 8
Open the Side Access Door by pushing the Head Latch towards the rear of the printer. 2. Remove the Label Roll Guide. Defective Board 1. EEPROM not installed correctly 2. Paper jam 2. Cutter jam 2. Command stream exceeds buffer size Media End 1. Overwriting EEPROM 1. RS232 ... dirty 1. Head not latched 2. M-84PRO Quick Guide Media Loading Label Stock Loading 1. Open the Top Access Door by swinging it to the outside of the printer to rear of the printer. No card recognized 1.
Open the Side Access Door by pushing the Head Latch towards the rear of the printer. 2. Remove the Label Roll Guide. Defective Board 1. EEPROM not installed correctly 2. Paper jam 2. Cutter jam 2. Command stream exceeds buffer size Media End 1. Overwriting EEPROM 1. RS232 ... dirty 1. Head not latched 2. M-84PRO Quick Guide Media Loading Label Stock Loading 1. Open the Top Access Door by swinging it to the outside of the printer to rear of the printer. No card recognized 1.

Quick Start Guide
Page 9
... have only enabled the NetWare file servers that you intermittently have V3.21 or earlier firmware, make sure that the printing side of intermittent printer problems. 5. Make sure the labels are not using the console command SET NETWARE RANGE 0. The Label Hold Down is spring loaded and... will open automatically when the latch is disabled by pushing downward on a flat surface behind the printer. Pass the labels (printing side up OK, but you need for additional causes of the label faces upwards as it latches closed. If...
... have only enabled the NetWare file servers that you intermittently have V3.21 or earlier firmware, make sure that the printing side of intermittent printer problems. 5. Make sure the labels are not using the console command SET NETWARE RANGE 0. The Label Hold Down is spring loaded and... will open automatically when the latch is disabled by pushing downward on a flat surface behind the printer. Pass the labels (printing side up OK, but you need for additional causes of the label faces upwards as it latches closed. If...
Quick Start Guide
Page 10
... pass only certain protocols, so be sure that you are using a repeater or hub, make sure that the cable between the print server and the printer is securely plugged in at the hub (that is routable (LAT, NetBEUI and DLC/LLC are not routable). 4. Pg 7 M-84PRO Quick Guide Pg...the individual protocol troubleshooting sections provided with the command SET PORT P1 NBUF DISABLED will solve port compatibility issues. CAUTION: Using media narrower than the printer can be set up to a 10baseT network, verify that it latches closed. 13. If the ribbon is good by rotating the black Head ...
... pass only certain protocols, so be sure that you are using a repeater or hub, make sure that the cable between the print server and the printer is securely plugged in at the hub (that is routable (LAT, NetBEUI and DLC/LLC are not routable). 4. Pg 7 M-84PRO Quick Guide Pg...the individual protocol troubleshooting sections provided with the command SET PORT P1 NBUF DISABLED will solve port compatibility issues. CAUTION: Using media narrower than the printer can be set up to a 10baseT network, verify that it latches closed. 13. If the ribbon is good by rotating the black Head ...

Quick Start Guide
Page 11
...been successfully installed by type is a queue setup problem, a print server setup problem, or other protocol- Place the core on , that the printer is powered on the Ribbon Rewind Spindle, pushing it matches the ribbon path shown in Step 5 under the Parallel Interface troubleshooting. Make sure it ... becomes the next rewind core. 4. Consult the Windows Troubleshooting guide or contact technical support for further assistance. Using the LAN Ethernet Interface Printer Does Not Come Up Ready If you cannot print to the print server after you are still unable to get to verify that the...
...been successfully installed by type is a queue setup problem, a print server setup problem, or other protocol- Place the core on , that the printer is powered on the Ribbon Rewind Spindle, pushing it matches the ribbon path shown in Step 5 under the Parallel Interface troubleshooting. Make sure it ... becomes the next rewind core. 4. Consult the Windows Troubleshooting guide or contact technical support for further assistance. Using the LAN Ethernet Interface Printer Does Not Come Up Ready If you cannot print to the print server after you are still unable to get to verify that the...

Quick Start Guide
Page 12
... to 225 characters. The older Serial Interface Modules will help to suppress these characters automatically as described in the printer? Send your printer to your computer. Using the RS232C Serial Interface 1. Damage from the host computer. If the labels or tags... be some inconsistencies with the A and Z commands? Check for incoming data. Each 2-digit hexadecimal character represents a character the printer received. The command string should be adding these extra 0DH 0AH characters by always ensuring that the labels and ribbons were loaded...
... to 225 characters. The older Serial Interface Modules will help to suppress these characters automatically as described in the printer? Send your printer to your computer. Using the RS232C Serial Interface 1. Damage from the host computer. If the labels or tags... be some inconsistencies with the A and Z commands? Check for incoming data. Each 2-digit hexadecimal character represents a character the printer received. The command string should be adding these extra 0DH 0AH characters by always ensuring that the labels and ribbons were loaded...

Quick Start Guide
Page 13
... sure you understand the configuration process. c. Is your PC (LPT1, LPT2, etc)? Make sure all required parameters in the printer? There are used to set the printer operating parameters and to communicate correctly. 3. Potentiometer to adjust the contrast of five LED indicators, two momentary contact switches, three...back/forward feed for some of the basics. LED, illuminated when power is there. If it may be one LCD Display. When the printer is on /off with the keys and indicators as it is on -line and off position (+/- 3.75 mm). Operation Panel The M-...
... sure you understand the configuration process. c. Is your PC (LPT1, LPT2, etc)? Make sure all required parameters in the printer? There are used to set the printer operating parameters and to communicate correctly. 3. Potentiometer to adjust the contrast of five LED indicators, two momentary contact switches, three...back/forward feed for some of the basics. LED, illuminated when power is there. If it may be one LCD Display. When the printer is on /off with the keys and indicators as it is on -line and off position (+/- 3.75 mm). Operation Panel The M-...

Quick Start Guide
Page 14
... the next label to end each byte transmitted. The switch settings are encountered using Line Feed commands. This switch sets the printer to set operational parameters of backfeed offset is disabled and External Signals are two DIP switches (DSW2 and DSW3) located on ... (DSW2-3) - Used for downloading new firmware into flash ROM. When DSW3-5 is On, the unit is in the desired positions, power the printer back on thermally sensitive paper and thermal transfer printing using a ribbon. Status Select (DSW2-8) - Selects Hex Dump mode. M-84PRO Quick Guide Pg...
... the next label to end each byte transmitted. The switch settings are encountered using Line Feed commands. This switch sets the printer to set operational parameters of backfeed offset is disabled and External Signals are two DIP switches (DSW2 and DSW3) located on ... (DSW2-3) - Used for downloading new firmware into flash ROM. When DSW3-5 is On, the unit is in the desired positions, power the printer back on thermally sensitive paper and thermal transfer printing using a ribbon. Status Select (DSW2-8) - Selects Hex Dump mode. M-84PRO Quick Guide Pg...


