
LE810DT UPS Setup Guide (English, Fran栩s, Espa?ol, Portugu鱩
Page 4
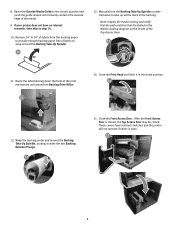
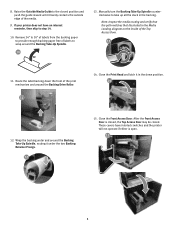
... so that the printing side of the Media Transport Assembly and move the sensor in ¼ inch increments (or finer) until it is not, the printer will refuse to the opened . 2 6. Note: Make sure the media is cleared. To properly adjust the sensor position, loosen the green Sensor Adjust Knob... gives access to the label path by rotating the green Head Latch counter clockwise. Push the media all the way to the inside of the printer to give the maximum media width. 4 7. Clear access is spring loaded and will be opened position. 3 4. The head is provided to the print ...
... so that the printing side of the Media Transport Assembly and move the sensor in ¼ inch increments (or finer) until it is not, the printer will refuse to the opened . 2 6. Note: Make sure the media is cleared. To properly adjust the sensor position, loosen the green Sensor Adjust Knob... gives access to the label path by rotating the green Head Latch counter clockwise. Push the media all the way to the inside of the printer to give the maximum media width. 4 7. Clear access is spring loaded and will be opened position. 3 4. The head is provided to the print ...
LE810DT UPS Setup Guide (English, Fran栩s, Espa?ol, Portugu鱩
Page 5
... paper free of the print mechanism and around the Backing Drive Roller. 11 14. Close the Front Access Door. If your printer does not have interlock switches and the printer will not operate if either is closed, the Top Access Door may be closed position and push the guide inward until it...
... paper free of the print mechanism and around the Backing Drive Roller. 11 14. Close the Front Access Door. If your printer does not have interlock switches and the printer will not operate if either is closed, the Top Access Door may be closed position and push the guide inward until it...

LE810DT UPS Setup Guide (English, Fran栩s, Espa?ol, Portugu鱩
Page 6
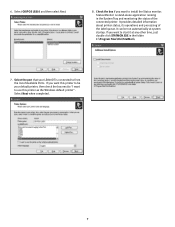
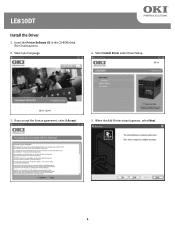
The CD will autorun. 2. If you accept the license agreement, select I Accept. 5. Insert the Printer Software CD in the CD-ROM drive. Select your language. 4. Select Install Driver under Driver Setup. 3. When the Add Printer wizard appears, select Next. 6 LE810DT Install the Driver 1.
The CD will autorun. 2. If you accept the license agreement, select I Accept. 5. Insert the Printer Software CD in the CD-ROM drive. Select your language. 4. Select Install Driver under Driver Setup. 3. When the Add Printer wizard appears, select Next. 6 LE810DT Install the Driver 1.
LE810DT UPS Setup Guide (English, Fran栩s, Espa?ol, Portugu鱩
Page 7
... of Available Ports. Select the port that your default printer, then check the box next to "I want to start it at system startup. It can be your LE810DT is stand-alone application running in the folder C:\Program Files\Oki\StatMon\ 7. If you want to install the Status ...monitor. Status Monitor is connected to use this printer to be run automatically at any other time, just double...
... of Available Ports. Select the port that your default printer, then check the box next to "I want to start it at system startup. It can be your LE810DT is stand-alone application running in the folder C:\Program Files\Oki\StatMon\ 7. If you want to install the Status ...monitor. Status Monitor is connected to use this printer to be run automatically at any other time, just double...
LE810DT Setup Guide
Page 4
...error is provided to the opened . 2 6. Pull the Media Supply Guide to print. 6 3. The proper position will refuse to the outside of the printer. This gives access to the print mechanism on the green Dispenser Latch and swinging the door forward and to the inside of the media roll...Guide 4 Adjust the media sensor to compensate for irregularities in ¼ inch increments (or finer) until it fits snugly against the outside of the printer to give the maximum media width. 4 7. After the error is routed through the Media Sensor Assembly, under the Print Head and out the ...
...error is provided to the opened . 2 6. Pull the Media Supply Guide to print. 6 3. The proper position will refuse to the outside of the printer. This gives access to the print mechanism on the green Dispenser Latch and swinging the door forward and to the inside of the media roll...Guide 4 Adjust the media sensor to compensate for irregularities in ¼ inch increments (or finer) until it fits snugly against the outside of the printer to give the maximum media width. 4 7. After the error is routed through the Media Sensor Assembly, under the Print Head and out the ...
LE810DT Setup Guide
Page 5
Raise the Outside Media Guide to the closed . If your printer does not have interlock switches and the printer will not operate if either is closed, the Top Access Door may be closed position and push the guide inward until it barely contacts the ...
Raise the Outside Media Guide to the closed . If your printer does not have interlock switches and the printer will not operate if either is closed, the Top Access Door may be closed position and push the guide inward until it barely contacts the ...
LE810DT Setup Guide
Page 6
Select Install Driver under Driver Setup. 3. The CD will autorun. 2. When the Add Printer wizard appears, select Next. 6 If you accept the license agreement, select I Accept. 5. Select your language. 4. LE810DT Install the Driver 1. Insert the Printer Software CD in the CD-ROM drive.
Select Install Driver under Driver Setup. 3. The CD will autorun. 2. When the Add Printer wizard appears, select Next. 6 If you accept the license agreement, select I Accept. 5. Select your language. 4. LE810DT Install the Driver 1. Insert the Printer Software CD in the CD-ROM drive.

LE810DT Setup Guide
Page 7
If you want to start it at system startup. If you want this printer as the Windows default printer". It can be your LE810DT is stand-alone application running in the folder C:\Program Files\Oki\StatMon\ 7. Select the port that your default printer, then check the box next to "I want to install the Status monitor. It...
If you want to start it at system startup. If you want this printer as the Windows default printer". It can be your LE810DT is stand-alone application running in the folder C:\Program Files\Oki\StatMon\ 7. Select the port that your default printer, then check the box next to "I want to install the Status monitor. It...

LE810DT User Guide (English)
Page 2
Note The appearance of your printer may differ somewhat from the web site: http://www.okiprintingsolutions.com Trademark Information Oki is a trademark of Oki Electric Industry Company Ltd. Mention of software products manufactured by the manufacturer . The most up -to -date drivers ... the information in it. Other product names and brand names are registered trademarks of Hewlett-Packard Company. All Rights Reserved Document Information LE810DT User's Guide P/N 59320201 Revision 1.2 April, 2010 Disclaimer Every effort has been made to ensure that changes in the United States ...
Note The appearance of your printer may differ somewhat from the web site: http://www.okiprintingsolutions.com Trademark Information Oki is a trademark of Oki Electric Industry Company Ltd. Mention of software products manufactured by the manufacturer . The most up -to -date drivers ... the information in it. Other product names and brand names are registered trademarks of Hewlett-Packard Company. All Rights Reserved Document Information LE810DT User's Guide P/N 59320201 Revision 1.2 April, 2010 Disclaimer Every effort has been made to ensure that changes in the United States ...

LE810DT User Guide (English)
Page 3
Contents Introduction 4 About This Manual 4 General Printer Description 5 Printer Components 6 Operator Panel 7 Installation 8 Parts Identification 8 Printer Installation 8 Site Location 8 Interface Connection 9... Mode Selection 32 Tear-off Mode 32 Continuous Mode 32 Dispense Mode 32 Printer Configuration 33 Basic Configuration Modes 33 Normal Mode 33 Advanced Mode 34 Counters ... Label 45 Maintenance 46 Cleaning the Printer 46 Removing Debris 46 Cleaning the Print Head and Platen . . . . 47 Cleaning the Printer Housing 48 Specifications 49 Physical Characteristics ...
Contents Introduction 4 About This Manual 4 General Printer Description 5 Printer Components 6 Operator Panel 7 Installation 8 Parts Identification 8 Printer Installation 8 Site Location 8 Interface Connection 9... Mode Selection 32 Tear-off Mode 32 Continuous Mode 32 Dispense Mode 32 Printer Configuration 33 Basic Configuration Modes 33 Normal Mode 33 Advanced Mode 34 Counters ... Label 45 Maintenance 46 Cleaning the Printer 46 Removing Debris 46 Cleaning the Print Head and Platen . . . . 47 Cleaning the Printer Housing 48 Specifications 49 Physical Characteristics ...

LE810DT User Guide (English)
Page 5
General Printer Description The LE810DT printer comes in several configurations which can differ by • Connection ports on the back of the printer • Default print mode • Internal path for print media Note The appearance of your printer may differ somewhat from the illustrations in this manual, depending on the model you purchased. LE810DT User's Guide 5 Introduction
General Printer Description The LE810DT printer comes in several configurations which can differ by • Connection ports on the back of the printer • Default print mode • Internal path for print media Note The appearance of your printer may differ somewhat from the illustrations in this manual, depending on the model you purchased. LE810DT User's Guide 5 Introduction
LE810DT User Guide (English)
Page 6
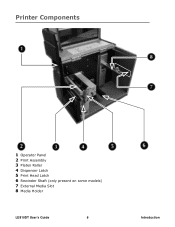
Printer Components 1 Operator Panel 2 Print Assembly 3 Platen Roller 4 Dispenser Latch 5 Print Head Latch 6 Rewinder Shaft (only present on some models) 7 External Media Slot 8 Media Holder LE810DT User's Guide 6 Introduction
Printer Components 1 Operator Panel 2 Print Assembly 3 Platen Roller 4 Dispenser Latch 5 Print Head Latch 6 Rewinder Shaft (only present on some models) 7 External Media Slot 8 Media Holder LE810DT User's Guide 6 Introduction

LE810DT User Guide (English)
Page 7
... offline state. - Operator Panel 1 LCD Display 2 Status LED - Press to select menu options. - Press top initiate other special functions as indicated later in this manual. LE810DT User's Guide 7 Introduction Press to advance the label media. - Press to scroll through menu options. - Illuminates green when online and turns off when offline. - Blinks...
... offline state. - Operator Panel 1 LCD Display 2 Status LED - Press to select menu options. - Press top initiate other special functions as indicated later in this manual. LE810DT User's Guide 7 Introduction Press to advance the label media. - Press to scroll through menu options. - Illuminates green when online and turns off when offline. - Blinks...
LE810DT User Guide (English)
Page 8
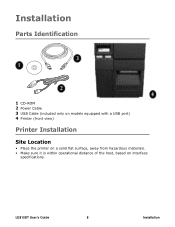
LE810DT User's Guide 8 Installation Installation Parts Identification 1 CD-ROM 2 Power Cable 3 USB Cable (included only on models equipped with a USB port) 4 Printer (front view) Printer Installation Site Location • Place the printer on a solid flat surface, away from hazardous materials. • Make sure it is within operational distance of the host, based on interface specifications.
LE810DT User's Guide 8 Installation Installation Parts Identification 1 CD-ROM 2 Power Cable 3 USB Cable (included only on models equipped with a USB port) 4 Printer (front view) Printer Installation Site Location • Place the printer on a solid flat surface, away from hazardous materials. • Make sure it is within operational distance of the host, based on interface specifications.
LE810DT User Guide (English)
Page 9
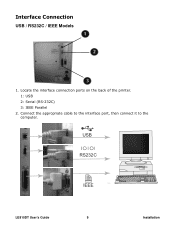
Interface Connection USB / RS232C / IEEE Models 1. USB RS232C IEEE LE810DT User's Guide 9 Installation Connect the appropriate cable to the interface port, then connect it to the computer. Locate the interface connection ports on the back of the printer. 1: USB 2: Serial (RS-232C) 3: IEEE Parallel 2.
Interface Connection USB / RS232C / IEEE Models 1. USB RS232C IEEE LE810DT User's Guide 9 Installation Connect the appropriate cable to the interface port, then connect it to the computer. Locate the interface connection ports on the back of the printer. 1: USB 2: Serial (RS-232C) 3: IEEE Parallel 2.
LE810DT User Guide (English)
Page 10
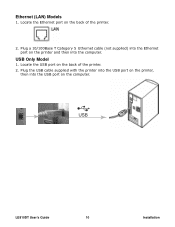
Plug a 10/100Base T Category 5 Ethernet cable (not supplied) into the Ethernet port on the back of the printer. 2. Locate the Ethernet port on the printer and then into the USB port on the back of the printer. 2. USB LE810DT User's Guide 10 Installation Plug the USB cable supplied with the printer into the USB port on the printer, then into the computer. Locate the USB port on the computer. Ethernet (LAN) Models 1. USB Only Model 1.
Plug a 10/100Base T Category 5 Ethernet cable (not supplied) into the Ethernet port on the back of the printer. 2. Locate the Ethernet port on the printer and then into the USB port on the back of the printer. 2. USB LE810DT User's Guide 10 Installation Plug the USB cable supplied with the printer into the USB port on the printer, then into the computer. Locate the USB port on the computer. Ethernet (LAN) Models 1. USB Only Model 1.
LE810DT User Guide (English)
Page 11
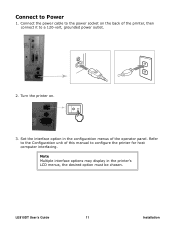
Refer to the Configuration unit of the printer, then connect it to a 120-volt, grounded power outlet. 2. Note Multiple interface options may display in the configuration menus of the operator panel. Connect the power cable to the power socket on . 3. Set the interface option in the printer's LCD menus, the desired option must be chosen. LE810DT User's Guide 11 Installation Turn the printer on the back of this manual to Power 1. Connect to configure the printer for host computer interfacing.
Refer to the Configuration unit of the printer, then connect it to a 120-volt, grounded power outlet. 2. Note Multiple interface options may display in the configuration menus of the operator panel. Connect the power cable to the power socket on . 3. Set the interface option in the printer's LCD menus, the desired option must be chosen. LE810DT User's Guide 11 Installation Turn the printer on the back of this manual to Power 1. Connect to configure the printer for host computer interfacing.

LE810DT User Guide (English)
Page 12
Using media that does not cover the print head will also wear a groove in the platen roller affecting print quality. To use fanfold media, you may need to , or just narrower than, the print head. LE810DT User's Guide 12 Installation The media edge will allow the platen roller to tread on the back of the printer as described under Loading Media, Fanfold Type. Both roll-type and fanfold media can be equal to remove the access plate on it and wear it out. Media Selection Caution The media width should be used with the printer.
Using media that does not cover the print head will also wear a groove in the platen roller affecting print quality. To use fanfold media, you may need to , or just narrower than, the print head. LE810DT User's Guide 12 Installation The media edge will allow the platen roller to tread on the back of the printer as described under Loading Media, Fanfold Type. Both roll-type and fanfold media can be equal to remove the access plate on it and wear it out. Media Selection Caution The media width should be used with the printer.

LE810DT User Guide (English)
Page 13
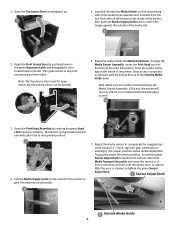
Lift up the Top Access Cover. LE810DT User's Guide 13 Loading Media Roll-Type, with Liner Fed to Rewinder Shaft With roll-type media loaded this way, the liner (1) automatically separates from the media and is removed. 1. The printer will not print another label until the printed label is pulled back into the printer and wrapped around the rewinder shaft (2). The self-adhesive label (3) without its liner moves out the front of the printer for pickup and direct application.
Lift up the Top Access Cover. LE810DT User's Guide 13 Loading Media Roll-Type, with Liner Fed to Rewinder Shaft With roll-type media loaded this way, the liner (1) automatically separates from the media and is removed. 1. The printer will not print another label until the printed label is pulled back into the printer and wrapped around the rewinder shaft (2). The self-adhesive label (3) without its liner moves out the front of the printer for pickup and direct application.

LE810DT User Guide (English)
Page 14
LE810DT User's Guide 14 2. Open the printer front door: push down on the green dispenser latch (1) to release the door, then swing it open (2). 3. Open the Print Head Assembly by rotating the Head Latch (1) counter clockwise.
LE810DT User's Guide 14 2. Open the printer front door: push down on the green dispenser latch (1) to release the door, then swing it open (2). 3. Open the Print Head Assembly by rotating the Head Latch (1) counter clockwise.


