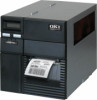

LE810DT UPS Safety and Regulatory Information (English, Fran栩s, Espa?ol, Portugu鱩
Page 1
... source matches the rating listed on the extension is less than those outlined in the documentation. LE810DT Safety and Regulatory Information 1 Informations de sécurité et de réglementation 3...Informações sobre segurança e normativas 7 Safety and Regulatory Information Safety Information Your OKI product has been carefully designed to shocks or other hazards. • Do not make any adjustments ...you are not sure, check with your dealer or with all warning and instruction labels on or near a heat source (such as a radiator or heat register). Make ...
... source matches the rating listed on the extension is less than those outlined in the documentation. LE810DT Safety and Regulatory Information 1 Informations de sécurité et de réglementation 3...Informações sobre segurança e normativas 7 Safety and Regulatory Information Safety Information Your OKI product has been carefully designed to shocks or other hazards. • Do not make any adjustments ...you are not sure, check with your dealer or with all warning and instruction labels on or near a heat source (such as a radiator or heat register). Make ...

LE810DT UPS Setup Guide (English, Fran栩s, Espa?ol, Portugu鱩
Page 4
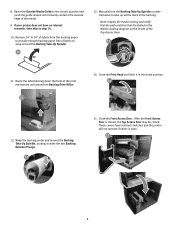
... as if there is routed through the Media Sensor Assembly, under the Media Hold-Down, through the Media Sensor Assembly. This gives access to the label path by swinging it unwinds from the roll. Clear access is cleared. Load the roll onto the Media Holder so that the printing side of...
... as if there is routed through the Media Sensor Assembly, under the Media Hold-Down, through the Media Sensor Assembly. This gives access to the label path by swinging it unwinds from the roll. Clear access is cleared. Load the roll onto the Media Holder so that the printing side of...
LE810DT UPS Setup Guide (English, Fran栩s, Espa?ol, Portugu鱩
Page 5
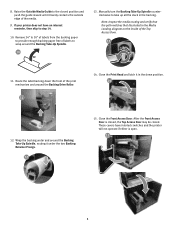
.... Raise the Outside Media Guide to provide enough backing paper free of the print mechanism and around the Backing Drive Roller. 11 14. Route the label backing down position. 14 12. Close the Print Head and latch it in the backing. Note: Inspect the media routing and verify that the path... Access Door is open. 15 b 5 Manually turn the Backing Take-Up Spindle counterclockwise to take up all the slack in the down the front of labels to step 14. 10.
.... Raise the Outside Media Guide to provide enough backing paper free of the print mechanism and around the Backing Drive Roller. 11 14. Route the label backing down position. 14 12. Close the Print Head and latch it in the backing. Note: Inspect the media routing and verify that the path... Access Door is open. 15 b 5 Manually turn the Backing Take-Up Spindle counterclockwise to take up all the slack in the down the front of labels to step 14. 10.
LE810DT UPS Setup Guide (English, Fran栩s, Espa?ol, Portugu鱩
Page 7
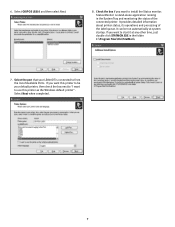
...7 It provides detailed information about printer status, its operations and processing of Available Ports. It can be your LE810DT is stand-alone application running in the folder C:\Program Files\Oki\StatMon\ 7. 6. Select the port that your default printer, then check the box next to from the list... of the label queue. Check the box if you want to start it at system startup. Status Monitor is connected...
...7 It provides detailed information about printer status, its operations and processing of Available Ports. It can be your LE810DT is stand-alone application running in the folder C:\Program Files\Oki\StatMon\ 7. 6. Select the port that your default printer, then check the box next to from the list... of the label queue. Check the box if you want to start it at system startup. Status Monitor is connected...
LE810DT Setup Guide
Page 4
... Print Head and out the front of the Outside Media Guide down on the green Dispenser Latch and swinging the door forward and to the label path by rotating the green Head Latch counter clockwise. After the error is provided to the left. To properly adjust the sensor position, loosen the...
... Print Head and out the front of the Outside Media Guide down on the green Dispenser Latch and swinging the door forward and to the label path by rotating the green Head Latch counter clockwise. After the error is provided to the left. To properly adjust the sensor position, loosen the...
LE810DT Setup Guide
Page 5
...-Up Spindle counterclockwise to take up all the slack in the down the front of labels to provide enough backing paper free of the print mechanism and around the Backing Take-... barely contacts the outside edge of the Top Access Door. 13 11. Remove 24" to 30" of labels from the backing paper to wrap around the Backing Take-Up Spindle. 10 13. Wrap the backing under ...closed position and push the guide inward until it under the two Backing Retainer Prongs. 12 15. Route the label backing down position. 14 12. These covers have an internal rewinder, then skip to the closed . Raise...
...-Up Spindle counterclockwise to take up all the slack in the down the front of labels to provide enough backing paper free of the print mechanism and around the Backing Take-... barely contacts the outside edge of the Top Access Door. 13 11. Remove 24" to 30" of labels from the backing paper to wrap around the Backing Take-Up Spindle. 10 13. Wrap the backing under ...closed position and push the guide inward until it under the two Backing Retainer Prongs. 12 15. Route the label backing down position. 14 12. These covers have an internal rewinder, then skip to the closed . Raise...

LE810DT Setup Guide
Page 7
... this printer to be run automatically at any other time, just double click STATMON.EXE in the System Tray and monitoring the status of the label queue. Select the port that your default printer, then check the box next to "I want to use this printer as the Windows default printer".... It can be your LE810DT is stand-alone application running in the folder C:\Program Files\Oki\StatMon\ 7. Select OKIPOS LE810 and then select Next. 8. Check the box if you want to start it at system ...
... this printer to be run automatically at any other time, just double click STATMON.EXE in the System Tray and monitoring the status of the label queue. Select the port that your default printer, then check the box next to "I want to use this printer as the Windows default printer".... It can be your LE810DT is stand-alone application running in the folder C:\Program Files\Oki\StatMon\ 7. Select OKIPOS LE810 and then select Next. 8. Check the box if you want to start it at system ...

LE810DT User Guide (English)
Page 3
... Mode 39 Advanced Mode 40 Counters Mode 41 Test Print Mode 42 Default Setting Mode 43 Hex Dump Mode 43 Troubleshooting 44 Test Label Printing 44 Sample Test Print Label 45 Maintenance 46 Cleaning the Printer 46 Removing Debris 46 Cleaning the Print Head and Platen . . . . 47 Cleaning the Printer Housing 48... 49 Environmental 49 Processing 49 Interfaces 50 Print Specifications 50 Sensing Specifications 50 Media 51 Commands 51 Character Font Capabilities 52 Bar Code Capabilities 53 LE810DT User's Guide 3
... Mode 39 Advanced Mode 40 Counters Mode 41 Test Print Mode 42 Default Setting Mode 43 Hex Dump Mode 43 Troubleshooting 44 Test Label Printing 44 Sample Test Print Label 45 Maintenance 46 Cleaning the Printer 46 Removing Debris 46 Cleaning the Print Head and Platen . . . . 47 Cleaning the Printer Housing 48... 49 Environmental 49 Processing 49 Interfaces 50 Print Specifications 50 Sensing Specifications 50 Media 51 Commands 51 Character Font Capabilities 52 Bar Code Capabilities 53 LE810DT User's Guide 3

LE810DT User Guide (English)
Page 7
LE810DT User's Guide 7 Introduction Press to scroll through menu options. - Press to select menu options. - Operator Panel 1 LCD Display 2 Status LED - Blinks green when receiving data or the buffer is near full. - Press to advance the label media. - Press to switch back and forth between online and offline state. - Illuminates green when online...
LE810DT User's Guide 7 Introduction Press to scroll through menu options. - Press to select menu options. - Operator Panel 1 LCD Display 2 Status LED - Blinks green when receiving data or the buffer is near full. - Press to advance the label media. - Press to switch back and forth between online and offline state. - Illuminates green when online...

LE810DT User Guide (English)
Page 13
Loading Media Roll-Type, with Liner Fed to Rewinder Shaft With roll-type media loaded this way, the liner (1) automatically separates from the media and is removed. 1. LE810DT User's Guide 13 The self-adhesive label (3) without its liner moves out the front of the printer for pickup and direct application. Lift up the Top Access Cover. The printer will not print another label until the printed label is pulled back into the printer and wrapped around the rewinder shaft (2).
Loading Media Roll-Type, with Liner Fed to Rewinder Shaft With roll-type media loaded this way, the liner (1) automatically separates from the media and is removed. 1. LE810DT User's Guide 13 The self-adhesive label (3) without its liner moves out the front of the printer for pickup and direct application. Lift up the Top Access Cover. The printer will not print another label until the printed label is pulled back into the printer and wrapped around the rewinder shaft (2).

LE810DT User Guide (English)
Page 15
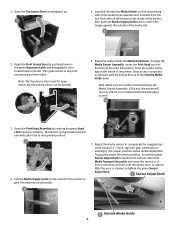
4. LE810DT User's Guide 15 Pull the green Media Supply Guide (1) out as far as it will go . Push the Media Support Guide back in until it and push the roll back against the media roll (2). 5. Locate the metal Outside Media Guide (1) under the print path and slide it toward you as far as it will go , then angle the label roll over it fits snugly against the printer housing.
4. LE810DT User's Guide 15 Pull the green Media Supply Guide (1) out as far as it will go . Push the Media Support Guide back in until it and push the roll back against the media roll (2). 5. Locate the metal Outside Media Guide (1) under the print path and slide it toward you as far as it will go , then angle the label roll over it fits snugly against the printer housing.

LE810DT User Guide (English)
Page 18
When you are exposed, then remove the labels from that section. LE810DT User's Guide 18 10.Pull the media roll out until the liner is wrapped around it several times. Notice the two prongs (3) on the front ...
When you are exposed, then remove the labels from that section. LE810DT User's Guide 18 10.Pull the media roll out until the liner is wrapped around it several times. Notice the two prongs (3) on the front ...

LE810DT User Guide (English)
Page 22
LE810DT User's Guide 22 Pull the green Media Supply Guide (1) out as far as it will go . Push the Media Support Guide back in until it and push the roll back against the media roll (2). 5. Locate the metal Outside Media Guide (1) under the print path and slide it toward you as far as it will go , then angle the label roll over it fits snugly against the printer housing. 4.
LE810DT User's Guide 22 Pull the green Media Supply Guide (1) out as far as it will go . Push the Media Support Guide back in until it and push the roll back against the media roll (2). 5. Locate the metal Outside Media Guide (1) under the print path and slide it toward you as far as it will go , then angle the label roll over it fits snugly against the printer housing. 4.

LE810DT User Guide (English)
Page 28
Place the stack of fanfold media behind the printer and feed the first label in through the opening. LE810DT User's Guide 28 MEDIA MEDIA MEDIA MEDIA MEDIA MEDIA MEDIA 4. Locate the metal Outside Media Guide (1) under the print path and slide it toward you as far as it will go. 3.
Place the stack of fanfold media behind the printer and feed the first label in through the opening. LE810DT User's Guide 28 MEDIA MEDIA MEDIA MEDIA MEDIA MEDIA MEDIA 4. Locate the metal Outside Media Guide (1) under the print path and slide it toward you as far as it will go. 3.

LE810DT User Guide (English)
Page 32
...; Tear-off , Continuous, and Dispense. Tear-off Mode • For printing labels one to four additional labels have been printed (quantity depends upon label size). LE810DT User's Guide 32 Dispense Mode • For printing labels one at a time. • The liner remains with the label as it exits the printer. • The media remains in position...
...; Tear-off , Continuous, and Dispense. Tear-off Mode • For printing labels one to four additional labels have been printed (quantity depends upon label size). LE810DT User's Guide 32 Dispense Mode • For printing labels one at a time. • The liner remains with the label as it exits the printer. • The media remains in position...
LE810DT User Guide (English)
Page 33
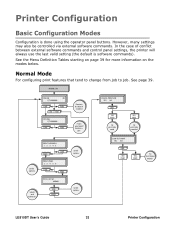
... on the modes below. POWER: ON ONLINE [Z] QTY: 000000 LINE FEED LINE + FEED OFFLINE QTY: 000000 LINE FEED Reprints last label if enabled. Feeds one label if DSW3-3 is software commands). Normal Mode For configuring print features that tend to change from job to job. See page 39. ... All print jobs saved YES FEED All print jobs canceled USER TEST PRINT YES NO LINE NO FEED YES FEED TO TEST PRINT MENU LE810DT User's Guide 33 Printer Configuration In the case of conflict between external software commands and control panel settings, the printer will always use...
... on the modes below. POWER: ON ONLINE [Z] QTY: 000000 LINE FEED LINE + FEED OFFLINE QTY: 000000 LINE FEED Reprints last label if enabled. Feeds one label if DSW3-3 is software commands). Normal Mode For configuring print features that tend to change from job to job. See page 39. ... All print jobs saved YES FEED All print jobs canceled USER TEST PRINT YES NO LINE NO FEED YES FEED TO TEST PRINT MENU LE810DT User's Guide 33 Printer Configuration In the case of conflict between external software commands and control panel settings, the printer will always use...

LE810DT User Guide (English)
Page 36
Test labels are designed to identify failures in configuration, adjustments problems, and mechanical defects. FEED + POWER Scrolls options TEST PRINT MODE CONFIGURATION BARCODE HEADCHECK FACTORY LINE Configuration ... PRINT CONTINUE YES NO LINE YES FEED NO FEED USER TEST PRINT YES NO LINE NO FEED YES FEED ONLINE MODE [Z] QTY: XXXXXX Scrolls options LE810DT User's Guide 36 Printer Configuration Test Print Mode For printing a test...
Test labels are designed to identify failures in configuration, adjustments problems, and mechanical defects. FEED + POWER Scrolls options TEST PRINT MODE CONFIGURATION BARCODE HEADCHECK FACTORY LINE Configuration ... PRINT CONTINUE YES NO LINE YES FEED NO FEED USER TEST PRINT YES NO LINE NO FEED YES FEED ONLINE MODE [Z] QTY: XXXXXX Scrolls options LE810DT User's Guide 36 Printer Configuration Test Print Mode For printing a test...

LE810DT User Guide (English)
Page 39
.... Once the position has been set, it can be printed. Print data that comes out of the printer first) of a label and the leading edge of labels to be changed to be printed. Select YES to enter User Test Print menu while select NO will be fine adjusted using the... the specific sequence of events required by pressing the LINE key. The ONLINE status is displayed on the top line and the label quantity status is selected, the printer will be printed. If the NO option is on the bottom. LE810DT User's Guide 39 Printer Configuration The message will go offline.
.... Once the position has been set, it can be printed. Print data that comes out of the printer first) of a label and the leading edge of labels to be changed to be printed. Select YES to enter User Test Print menu while select NO will be fine adjusted using the... the specific sequence of events required by pressing the LINE key. The ONLINE status is displayed on the top line and the label quantity status is selected, the printer will be printed. If the NO option is on the bottom. LE810DT User's Guide 39 Printer Configuration The message will go offline.

LE810DT User Guide (English)
Page 40
... screen will not be manually placed online before it is an optional feature that allows the date and time to the host. LE810DT User's Guide 40 Printer Configuration Print offset refers to the vertical and horizontal shifting of the entire print area relative to the ...ONLINE YES NO PRINT OFFSET V: +XXXX H: +XXX Allows the darkness (print density) selection of the Advanced Mode. The calendar is to the label and the print start position. Positive and negative vertical adjustment is not installed. including graphics and 2D barcodes. The movement is incremental by the month...
... screen will not be manually placed online before it is an optional feature that allows the date and time to the host. LE810DT User's Guide 40 Printer Configuration Print offset refers to the vertical and horizontal shifting of the entire print area relative to the ...ONLINE YES NO PRINT OFFSET V: +XXXX H: +XXX Allows the darkness (print density) selection of the Advanced Mode. The calendar is to the label and the print start position. Positive and negative vertical adjustment is not installed. including graphics and 2D barcodes. The movement is incremental by the month...

LE810DT User Guide (English)
Page 42
... or HEAD CHECK was chosen in the previous menu. For factory test prints, this screen appears instead of the previous screen for a test label to be printed. A confirmation screen to stop printing and press again to resume printing. If YES is 1cm. Displays the printer's operational ... Select YES to enter User Test Print menu while select NO will be printed. If NO is on how to terminate print activity. LE810DT User's Guide 42 Printer Configuration Ready for print job. Is a directional screen prompting action on the bottom. Test Print Mode Display Description...
... or HEAD CHECK was chosen in the previous menu. For factory test prints, this screen appears instead of the previous screen for a test label to be printed. A confirmation screen to stop printing and press again to resume printing. If YES is 1cm. Displays the printer's operational ... Select YES to enter User Test Print menu while select NO will be printed. If NO is on how to terminate print activity. LE810DT User's Guide 42 Printer Configuration Ready for print job. Is a directional screen prompting action on the bottom. Test Print Mode Display Description...


